Good morning everyone! It's Friday and that means it is barbecue time here on the blog! Today, we are going to look at a few different things including how to make delicious and tender ribs on the smoker or grill, a really great all-purpose rub, and barbecue sauce. If you are new to smoking meat, you might want to start with my post on cooking meat for some foundational tips.
The Rub
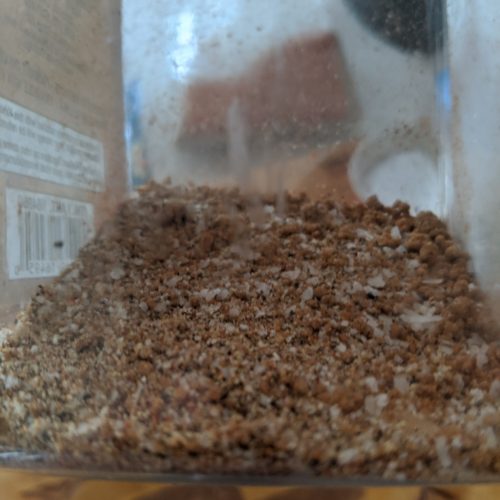
The first step in making delicious ribs is to make a delicious rub. Simply put, the rub is the seasoning on the meat. We could just go with salt and pepper, which I often do, but today we are going to use a few more ingredients to add in a little extra flavour.
For the rub, I used equal parts of salt and brown sugar. To that, I added black pepper, garlic and onion powder, cayenne, cumin and paprika. This all got mixed together then I put it in an empty spice bottle that could be used as a shaker. Using a shaker rather than just sprinkling the seasoning on by hand will create a much more even coating on the meat. This isn't strictly necessary, but it does help a lot.


Recipe
Rib Rub
Ingredients
- 1 tablespoon kosher salt
- 2 teaspoon black pepper
- 1 tablespoon brown sugar
- 1 teaspoon garlic powder
- 1 teaspoon onion powder
- ¼ teaspoon cayenne
- ¼ teaspoon cumin
- ½ teaspoon paprika
Instructions
- Mix all ingredients and put in a shaker.
The Sauce
After the rub was made and ready to go I made a quick barbecue sauce. The sauce I'm using for the ribs may not be what you would expect to use for ribs. Typically, where I'm from, we put thick, really sweet barbecue sauce on ribs, or most things actually. Today's sauce, however, is only slightly sweet, leaning more on the acidic side. It is also much thinner than you may expect.
The consistency of the sauce is actually really important for the method we are going to look at for making the ribs. If you use a store-bought sauce you are going to want to thin it out with a bit of water to the point that it is more a heavy cream consistency than a ketchup consistency.
For the sauce, I used equal parts ketchup, cider vinegar, and maple syrup. This mixture was then flavoured with garlic and onion powder, cayenne, a few drops of fish sauce (or Worcestershire Sauce), salt and pepper. The final ingredient in the sauce is a little water to thin it out. I mixed all the ingredients together then put the sauce in a squeeze bottle.


Recipe

All Purpose Barbecue Sauce for Ribs
Ingredients
- ½ cup ketchup
- ½ cup cider vinegar
- ½ cup Maple syrup
- ¼ teaspoon garlic powder
- ¼ teaspoon onion powder
- ¼ teaspoon cayenne
- ½ teaspoon black pepper
- ½ teaspoon salt
- 2-3 drops fish sauce
- ½ cup water
Instructions
- Mix all the ingredients and put in a squeeze bottle.
The Franklin Method
For the ribs, I followed what is known as the Franklin Method. This method comes from Franklin Barbecue in Austin Texas. The owner and chef there is named Aaron Franklin and is considered by most to be the best pitmaster in the world. Franklin Barbecue is considered the best barbecue in the world. So, if you are going to use a method for making ribs, his method is probably the one you want to use.
I should say that everything Aaron cooks is cooked over an indirect wood fire. This gives the food a smoky flavour but also prevents flare-ups and burns. Having said that, this technique can easily be adapted to a gas or charcoal grill, or a smoker. I used a charcoal smoker to make my ribs.
Making the ribs with the Franklin Method
To make the ribs I first laid them flat on my cutting board, used the tip of my knife against the end rib bone to lift the membrane, then used a paper towel to pull it off. This membrane doesn't break down during cooking so I always prefer to take it off. It should only take a second or two to do. Once the membrane was removed from the ribs I went back and removed any excess fat with my knife. You don't really have to do this, I just wanted a clean looking rib.
I should say that I am using back ribs rather than side ribs. You can read about the difference in this post I did all about ribs.


Applying the rub
Once the ribs were cleaned I used my shaker to apply the rub in an even layer. One thing that Aaron recommends and that I have noticed works well, is to keep the shaker moving the whole time you are applying the rub. This prevents the heavier ingredients, namely the salt, from settling to the bottom of the shaker.
I applied the rub on the underside of the ribs, patted it on, flipped the ribs and applied the rub to the other side. Even though it's called a rub you really don't "rub" it. I just kind of pat it down to make sure it stays on the meat. Once the rub was applied, I cut my ribs in half so they would fit on my smoker. You can skip this step if the ribs will fit on your smoker or grill. At this point, I set everything aside and went to get my smoker going.


Readying the smoker
To get the smoker ready, I lit some lump charcoal in a chimney starter and let it burn until all the coals were ashed over. While the coals were burning down, I filled up the water pan at the bottom of the smoker. Even if you are using a gas grill to cook your ribs, I suggest using a water pan. It will help prevent the ribs from drying out. Just get a metal bowl or pot with a metal handle and put it on the back of your grill out of the way.
Once the coals were ready, I added about 1 cup of hickory wood chips that had been soaking in water for 30 minutes. I let the initial steam burn off for a few minutes until I could smell the hickory smoke. At this point, I assembled my smoker, put the ribs on it, and got to cooking.
For the ribs, my goal was a consistent temperature of around 275-300 degrees Fahrenheit. Any hotter than that and the ribs will cook too fast and risk drying out. Any lower and the ribs will take much longer to cook than they need to. My goal for the cooking time was about three hours. For the first hour and forty-five minutes, I didn't do anything to the ribs. The only things I was concerned about were the fire and smoke and maintaining the temperature.


After the initial cook
After the first hour and forty-five minutes, I generously sauced the ribs then let them cook for another fifteen minutes. Once that had happened, the ribs had been cooking for two solid hours and it was time to wrap them. I laid out some foil, gave it a good squirt of the sauce, put the ribs meaty side down, and added another splash of sauce. At this point, I wrapped the ribs tightly and put them back on the grill meaty side up. The ribs cooked for another hour to finish.
This wrapping does a few things:
- It helps to speed up the cooking process by holding in the heat.
- It helps to prevent moisture loss at a critical point in the cooking process.
- It helps to add flavour by steaming the meat in the sauce.
We talked earlier in this post about the consistency of the sauce. This is where that is very important. If the sauce is very thick, like a typical barbecue sauce, it will just kind of burn at this step. We need that extra moisture to prevent that and to help finish cooking the ribs.


Finishing the ribs
Once the full three hour cook time had gone by I gave the ribs a little poke with my finger to see how tender they were. They felt done to me because the meat had some give to it. Now, contrary to popular belief you do not want the rib meat to be falling off the bone. We aren't trying to make pulled pork. The meat should easily come away from the bone, but it should never fall off.
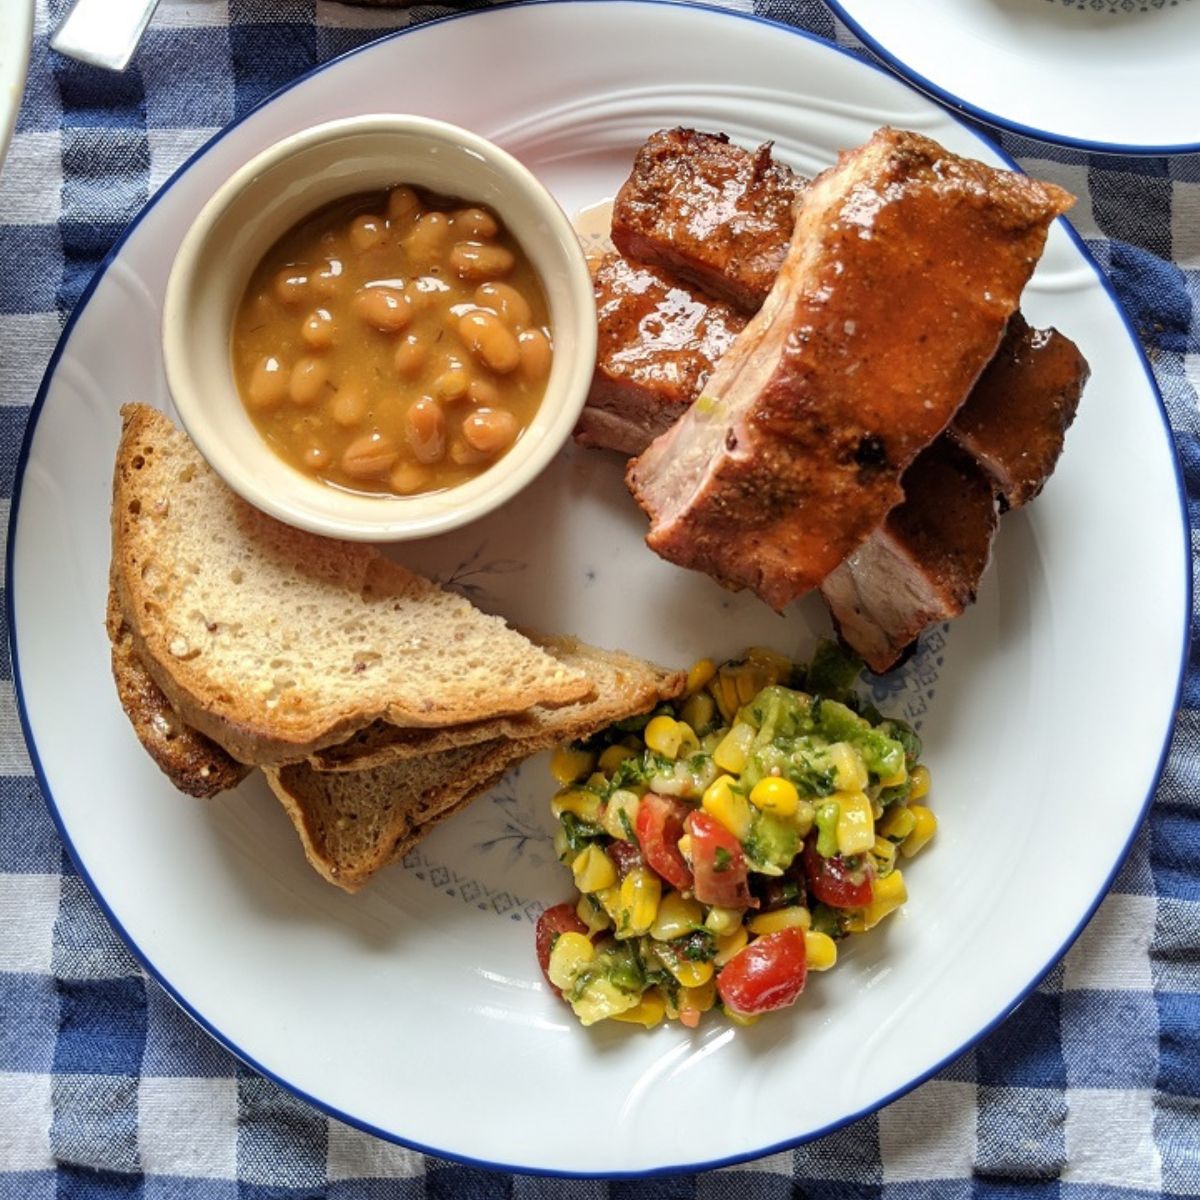
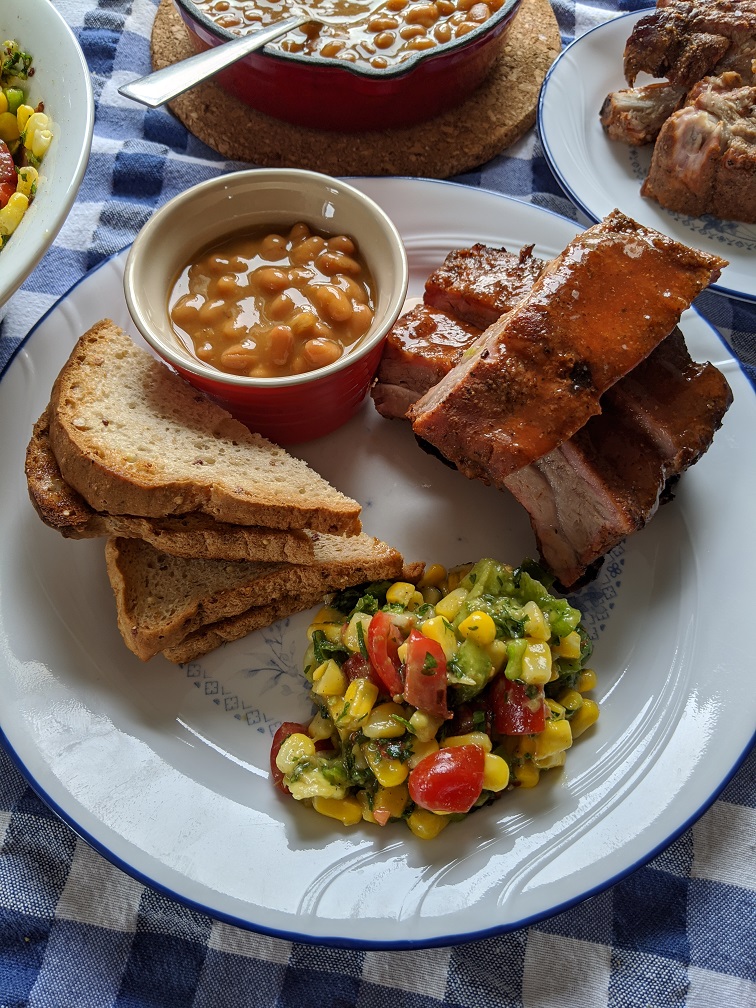
I served the ribs with the remaining sauce on the side, some baked beans, which I will talk about in a second, some toast (mostly for the beans) and an avocado and corn salad. If you are wondering, yes, it tasted as good as it looked.


Adapting to a gas grill
If you are going to follow this technique on a gas grill you really don't have to change anything. What I would recommend is either cooking the ribs on the warming rack or only turning on half the barbecue and cooking the ribs on the other half so that they never come in direct contact with the flames. A lot of fat and juices are going to render out of the ribs, and the last thing you are going to want is to have a flare-up and burn them after putting in all this time. The key principle here is indirect heat -- the same idea I talk about in my post on preheating your pan and understanding how heat works in cooking.
The beans
Years ago, I was flipping through this Weber Barbecue Cook Book I have (I am 90% sure it was that book), and there was a recipe for barbecued baked beans. I got excited until I saw that the recipe said to open a can of baked beans, pour them into a pot, and heat them on the grill. Now, I don't know about you, but to me, that seemed like a ridiculous thing to have in a cookbook, especially the one about grilling put out by a grill company.
As I was making the ribs, I got a craving for some beans, but I didn't have time to make them from scratch. That's when this random "recipe" I had seen years ago popped into my mind. I thought I would try it if for no other reason than to validate my disappointment. I opened a can of Heinz baked beans, poured them into a little skillet and heated them on the smoker for about forty-five minutes. To my surprise, the beans actually took on a lot of the smoke flavour and were way better than they normally are. Of course, they weren't as good as homemade barbecue baked beans (which we will make), but they were still pretty good. Despite this, I still think it was stupid to have a recipe for it in a cookbook.


Final thoughts
The Franklin Method is by far my favourite way to make ribs -- they come out tender, juicy, and incredibly flavourful every single time. I honestly cannot recommend this approach enough, and I really hope you give it a try.

Leave a Reply