Bacon-Wrapped Pork Tenderloin. What more do I need to say? Make it for dinner tonight, your next special occasion, or dinner party. It is guaranteed to please. You can find the recipe directly below but keep reading for a more detailed explanation.
Jump to:
Pork tenderloin is one of the leanest and most tender cuts of pork you can buy. On its own, it can sometimes dry out during cooking because of its low fat content. That is exactly why wrapping it in bacon is such a brilliant move. The bacon bastes the tenderloin as it cooks, keeping the meat incredibly juicy while adding a layer of smoky, crispy flavour that takes this dish from simple to spectacular.

A Quick Note About the Pork Tenderloin
Usually, when making something like this bacon-wrapped pork tenderloin, I would use a whole tenderloin. However, when I went to the grocery store to buy a pork tenderloin, they were all cut into pieces. That is the only reason why this recipe calls for half a pork tenderloin. You can double up the bacon and easily do this with a whole tenderloin. You may need to add five minutes to the cooking time, but otherwise, nothing else needs to change.
When shopping for pork tenderloin, look for one that is evenly shaped and uniformly thick. Some tenderloins taper quite a bit at one end, which means that thinner end will cook faster and can dry out. If yours does taper significantly, you can tuck the thin end underneath to create a more uniform thickness.
Bacon-Wrapping The Pork Tenderloin
To wrap the tenderloin, start by placing a 12-inch length of plastic wrap flat on your cutting board. Place five slices of good-quality bacon in an overlapping pattern in the middle of the plastic. The overlap is important because it ensures the bacon forms a continuous layer around the pork with no gaps.
Put the pork tenderloin at the end of the bacon strips. Use the plastic wrap to lift the bacon while you roll the tenderloin forward. Tuck the bacon around the tenderloin and roll forward to finish the wrap. Close the plastic wrap around the bacon-wrapped pork tenderloin. Grab the ends of the plastic wrap and roll the wrapped tenderloin along on the cutting board to twist the edges tightly. Let the tenderloin sit in the plastic for ten minutes or up to two days in the fridge.
The resting time in the plastic wrap helps the bacon adhere to the pork, which means it is less likely to unravel during cooking. If you are preparing for a dinner party, this make-ahead quality is incredibly handy.


How to Cook the Bacon-Wrapped Pork Tenderloin
Searing
Heat a large skillet on medium-high heat. Add two teaspoons of cooking oil. Remove the plastic wrap from the pork tenderloin. Put the tenderloin in the hot pan with the seam of the bacon down. This is important because searing the seam first helps seal it closed so the bacon stays wrapped tightly around the pork.
Cook for a minute or two or until the bacon is browned. Flip the tenderloin and brown on the top. Then, brown on both sides. It is very important that your pan is hot when the tenderloin goes in, otherwise the bacon will stick to the pan and pull away from the pork.


Roasting
Put the tenderloin in a small roasting pan or casserole dish and brush with your favourite barbecue sauce or follow my guide to homemade barbecue sauce here. Put the roasting pan in the oven at 375 degrees for 12 minutes. Flip the tenderloin, brush with some more barbecue sauce, and cook for another 8 to 10 minutes or until the tenderloin is firm to the touch or a thermometer inserted into the thickest part of it reaches 150 degrees.
Take the pork out of the oven and let it rest for 5 minutes before you cut into it. Resting is essential because it allows the juices to redistribute throughout the meat. If you cut into it right away, all those lovely juices will run out onto your cutting board instead of staying in the pork where they belong.


Serving The Pork Tenderloin
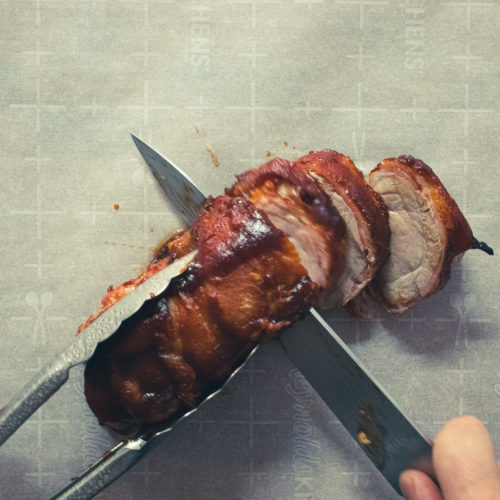
Once the pork has rested, slice it into pinky-finger width pieces. For a more elegant presentation, cut it on a slight bias. This creates wider, more attractive slices that show off the beautiful bacon exterior and the juicy pink centre of the pork.
Serve the pork with roasted or mashed potatoes and vegetables. This pairs beautifully with roasted carrots or steakhouse creamed spinach for a truly special meal. A simple green salad rounds things out nicely if you want something lighter on the side.


Tips for the Perfect Bacon Wrap
Here are a few tips to make sure your bacon-wrapped pork tenderloin turns out perfectly:
- Use good quality bacon. Thick-cut bacon works best because it holds together better during wrapping and searing. Thin bacon can tear and fall apart.
- Do not skip the plastic wrap step. Wrapping the bacon-covered tenderloin in plastic and letting it rest compresses everything together, making the bacon stick to the pork.
- Make sure your pan is hot. A cold or lukewarm pan will cause the bacon to stick and tear. You want a good sizzle the moment the pork hits the pan.
- Use a meat thermometer. Pork tenderloin can go from perfectly cooked to dry very quickly. Pull it at 150 degrees and let carryover cooking bring it to the final temperature during the rest.
- Let it rest. Five minutes of resting makes a huge difference in the juiciness of the final result.
Bacon-wrapped pork tenderloin is the kind of dish that looks and tastes far more impressive than the effort it takes to make. The crispy, smoky bacon keeps the pork beautifully juicy, and the barbecue glaze ties everything together. Whether you are hosting a dinner party or simply want to elevate a weeknight meal, this one never fails to deliver. If you enjoy working with pork, have a look at my guide to pork chops for even more ideas.
The fact that you can wrap it a day or two ahead makes it especially brilliant for entertaining. It is one of those recipes that earns a regular spot in your rotation once you have made it the first time.
Recipe
Perfect Bacon-Wrapped Pork Tenderloin
Ingredients
- ½ pork tenderloin
- 5 strips good quality bacon
- ½ cup barbecue sauce
- 2 teaspoon vegetable oil
Instructions
- Lay a 12-inch piece of plastic wrap on your cutting board.
- Place the bacon on the plastic wrap, overlapping the pieces.
- Place the pork tenderloin on the bacon and wrap using plastic wrap to lift the bacon. Grap the end of the wrap and twist to tighten. Let sit for 10 minutes or put in the fridge for up to 2 days.
- Heat your oven to 375°f.
- Put a pan on the stove on medium-high heat. Once the pan is hot add the vegetable oil. Take the pork out of the plastic wrap and place in the hot pan with the ends of the bacon down. Cook for 2 to 3 minutes or until the bacon is browned. Then repeat on all sides.
- Take the bacon out of the pan, and put it in a small roasting pan. Brush with half of the barbecue sauce and put in the oven for 12 minutes.
- Take the pork out of the oven, flip, and brush with the remaining sauce. Return the pork to the oven for another 8 to 10 minutes or until it is cooked.
- Let the pork rest for 5 minutes, then thinly slice on a slight bias and serve.


Leave a Reply