“You can always judge the quality of a cook or a restaurant by roast chicken. “
Julia Child
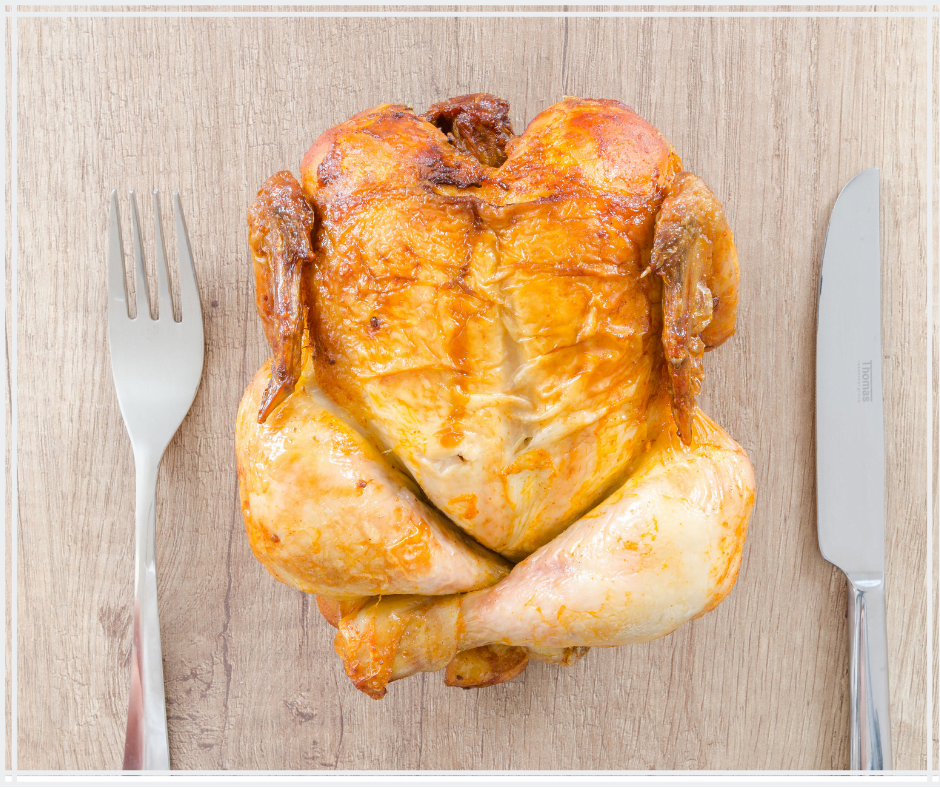
There are few things in this world better than a perfectly roasted chicken. The crispy browned skin, the tender, juicy meat. What’s not to love? The thing is, I fear these days, few people have ever actually had a perfectly roasted chicken.
It isn’t nearly as common as it used to be to cook a chicken whole. More often than not, when we buy chicken we buy it in pieces. Not only is the chicken in pieces, we only buy the pieces we want. Breast, legs, thighs, and wings. There isn’t anything inherently wrong with this except for what we’re missing.
There is something magical and special about a really good roast chicken. The way the skin crisps up. The way the fat renders and evenly flavours the meat. The way the bones help to flavour the meat and keep it juicy. It really is amazing.
If you haven’t figured it out yet, today we are talking about roast chicken. More specifically, we are talking about
Everything I know about Roast Chicken
Okay, first of all, there are many, many ways to roast a chicken. One way is generally not more right than another. But for today, we are focusing on a very basic, French style roast chicken based on Julia Child’s own recipe. We are aiming for very specific results which are crispy brown skin, and juicy meat.
Ingredients
Often when people go to roast a chicken they open up their spice cupboard and seemingly start grabbing things at random. The chicken get’s coated with paprika, garlic powder, oregano, chili flakes, or whatever else is in the line of sight when the cupboard door opens on the spices. In all honesty, I was guilty of this for a long time.
A really good roast chicken needs only four ingredients:
a chicken
salt
pepper
butter
It seems too simple. Almost ridiculous. But it isn’t. You can add one onion into that ingredients list which can be put in the chickens body cavity for flavour but it really isn’t needed.
Secrets
One of the most important things, or the big secret, to getting the brown crispy skin on a chicken, is dryness. The skin has to be dry. Traditionally, chickens and other poultry would be tied up and left to dry for a few days.
Drying the chicken does a few things. First of all it removes moisture from the skin. If that moisture isn’t removed prior to cooking, it will come out during cooking. It is very difficult to develop browning on a wet surface. The second thing drying does is to intensify the flavour of the skin and the chicken.
How To Dry A Chicken
Ideally, when you buy a chicken, it should be taken out of the package and set on a rack over a pan which will collect any drippings. This is put in the bottom of your fridge uncovered for a couple of days and rotated every twelve hours or so.
This seems like a lot of work and like the opposite of everything you have ever been told. We have a tendency to wrap or cover everything that goes into the fridge. The reason we do that is to protect from contamination by other food products and to prevent food from drying out.
When we are drying a chicken we aren’t really that concerned with other food products contaminating it, and we put it on the bottom of the fridge so it won’t contaminate other foods. We aren’t worried about it drying out because that is actually the result we are aiming for.
Can’t I use a paper towel to dry it?
Using a paper towel to dry off a chicken is only going to pull moisture off the surface. It’s definitely better than nothing but it’s not going to give you the same result as air drying the chicken. You won’t get the same quality roast chicken.
Cooking the chicken
The chicken is dry and now it’s time to cook it.
The first thing you want to do is season the inside of the chicken with salt and pepper. Next melt some butter, about 1/4 cup. Once the butter is melted you want to brush the dried chicken with it on all sides. Then season the surface of the chicken well with salt. Put the chicken breast side down on a rack set over a roasting pan and put it in a 400°f oven.
Rotating
Every 15 minutes or so you want to rotate the chicken by a quarter turn. So, it started breast side down, after 15 minutes rotate it so the wing and leg on one side is down. After another 15 minutes that chicken will be rotated again, this time breasts will be facing up. You get the idea.
Basting
Every second time rotate it, so every time the breasts are facing up, or facing down, you want to baste the chicken with a bit more melted butter.
Cooking time and finished temperature.
Depending on the size of the chicken it is going to take between an hour to an hour and a half to cook it. Just keep rotating it every 15 minutes until it is done cooking. It’s done when the legs and wings easily move in their sockets or when a thermometer placed in the thickest part of the breast reads 170°F.
Remove the chicken from the oven, and keeping it on the rack it was cooked on let it rest for at least 10-15 minutes.
Serving the chicken
While the chicken is resting a gravy can be made with the drippings that have accumulated in the bottom of the pan.
For my money a roast chicken is best served with mashed or roasted potatoes and a few vegetables.
Conclusion
I’m not delusional. I know that no one is going to cook a chicken like this all the time. It’s a lot of work. It isn’t a complex process but it takes time. This type of chicken is really meant for special occasions or when you have people coming over for dinner.
If you’ve never had a chicken like this, I highly, highly suggest that you try it at least once. You won’t believe that a simple roast chicken can taste so good.
If you do make this for guests, document the process with pictures because it will be so good that they won’t believe that you made. Seriously!
Leafy greens are an important part of the diet. They are low in fat and calories but high in minerals, nutrients, and vitamins. Swiss Chard falls into this category.
When young, the leaves of the chard can be used raw in salads. Older chard plants can be sauteed, braised, roasted, or cooked in soups. Usually, the leaves are separated from the stem as the leaves cook quicker. The stems will be cooked first and then the leaves will be added near the end of the cooking process.
Chard is part of the beet family. That doesn’t really matter, but I didn’t know that and thought it was interesting.
Flavour
Raw chard can have a slightly but not unpleasant bitter flavour. When cooked, the bitterness is taken away and you are left with a subtle green vegetable flavour. Imagine the flavour of cooked spinach but not as strong.
Because the flavour of chard is so mild when cooked, it is easily complimented. Acids like lemon juice or vinegar added at the end of the cooking process enhance the natural flavour of the chard.
Cooking
Sauteing
One of my favourite ways to eat chard (chard, and Swiss Chard is the same thing) is to pull the leaves away from the stems. Cut off and discard the very end of the stem and dice the rest. Cut the leaves into 1-2 inch pieces.
Heat a frying pan over medium high heat. Add 1 tbsp of butter and 1 tbsp of olive oil. Once the butter starts to bubble add the stems and sauté for two minutes. Add the leaves and sauté for another minute or two. Season with salt and pepper and finish with a small squeeze of lemon juice.
Braising
To braise the chard, start the same way as when sauteing it. Remove the leaves from the stems, discard the ends, dice the stems, and cut the leaves.
Heat a pan over medium high heat. Sauté the stems with a bit of garlic. Add 1/2 cup of chicken stock, white wine or water. Bring to a boil and then reduce the heat to low. Simmer for ten minutes.
Add the chopped leaves and simmer for another five to ten minutes. Season with salt and pepper, add a 1/4 cup of cream, turn the heat up, bring back to a boil and cook for five minutes. Finish with a tbsp of butter.
Roasting
To roast, start the chard the same way as with the other two processes. This time, drop the chopped stems in boiling water for thirty to forty seconds. Drain, and pat dry.
Toss the leaves and blanched stems with olive oil, salt and pepper. Spread out an a sheet pan and bake in a 400°f oven for fifteen to twenty minutes or until the leaves are crisp.
Soup
To add the chard to soup prep it the same way as with the other processes. This time add the chopped stems in with the onions. Add the leaves about five minutes before the soup is finished.
What to serve the chard with?
Chard goes well with chicken, pork, fish, or beef. It can be prepared in any of the above ways and served as a side dish. It also works well mixed in with cooked rice.
You don’t know what your missing!
Chard is one of those things that until you try it you don’t know what your missing. It has such a delicate flavour and works well with everything. Not to mention that it is really good for you. Oh, and it’s cheap!
Next time you’re in the grocery store grab a bunch. Take it home, cook it up, and serve it as a side dish with whatever you’re having for dinner. You won’t be disappointed.
This week in the third and final part of “Everything I Know About Chinese Food” I will be talking about won tons, soup, and vegetable dishes. If you haven’t checked out part one and part two I suggest you do so before jumping into this on.
Okay, let’s get into it…
Won Tons
What is a won ton?
A won ton is a type of Chinese dumpling. It can be fried, steamed, or served in soup. It can be filled with anything from vegetables to pork, beef, or seafood.
Generally the term “won ton” in North America refers to one of three things. Either it’s a deep fired stuffed won ton, a deep fried won ton skin with nothing in it served with sweet and sour sauce, or as a soup dumpling.
Despite the fact that we only really consider those three items as won tons, a pot sticker, and even dim sum are both essentially won tons. Just a different variety.
What is a won ton made of?
Won tons are composed of a skin and a stuffing. The skin is the same wrapper used for egg rolls. The only difference is that won ton wrappers are smaller than egg roll wrappers. They can usually be found in the produce aisle right beside the egg roll wrappers.
As I said, the stuffing of a won ton can be a lot of things. One of my personal favourites is ground pork mixed with shredded cabbage, Chinese Five Spice, ginger, and garlic.
How to make won tons.
To make won tons, get a pack of won ton skins. Lay a few out flat and brush the edges with beaten egg. Place a teaspoon or two of the mixture in the center of the wrappers. Fold each wrapper into a triangle, pinching the edges to seal and making sure to get as much air out as possible.
Hold the won ton so that the fold in the center of the wrapper is facing you and the tip of the triangle is facing away. Put a little egg wash on the two bottom tips of the won ton and fold them into the center creating the classic won ton look. Set the won tons on a sheet pan dusted with corn starch until they are all formed.
Deep fry the won tons in batches in 350°F oil until they are crisp and cooked through, about 4-5 minutes. Alternatively, put the won tons in soup and simmer for 15 minutes.
Serve the deep fried won tons with your favourite Chinese dipping sauce.
Vegetables
Although there is a massive variety of Chinese vegetable dishes, most of us only really know vegetable stir-fry like the one pictured above. A quick glance at a Chinese food menu will show you that there aren’t a lot of specifically vegetarian options in North American Chinese restaurants. Most are just dishes with the meat omitted.
Since this is about North American Chinese food, let’s talk about the ubiquitous vegetable stir-fry.
Vegetable stir fry ingredients.
The ingredients in a vegetable stir-fry don’t really change that much, if ever. You have baby corn, carrot, broccoli, snow peas, sometimes pepper, and mushrooms. This is often flavoured with garlic, onion, sometimes ginger, and always soy sauce.
These dishes aren’t complicated. Often it is just the vegetables cooked on super high heat and finished with a bit of soy sauce. So what makes them so good?
The secret to the flavour.
Part of the flavour in a vegetable stir-fry comes from the cooking technique itself. The super high heat of the wok brings different flavours out of the vegetables than you would get just by steaming. If you don’t believe me, stir-fry some broccoli on really high heat, making sure to get a bit of colour on it. It’s taste a lot different than steamed broccoli.
The second part of the flavour is a combination of all the individual vegetable flavours combining.
The third part of the flavour is soy sauce. It adds that bit of salt to enhance the flavour, and the umami or meaty flavour that vegetable dishes often lack.
Sometimes you will get a vegetable stir-fry that has a bit of a sauce. I usually make this by combining 2 tsp of cornstarch with 1/4 cup of chicken or vegetable stock, and 1 tbsp soy sauce. I mix this all up really well and then pour it over the vegetables in the last minute or two of cooking. Delicious!
Soup
Types of Chinese Soup
There are a few different soups you may encounter at Chinese restaurants. Won ton soup as we already mentioned, contains won tons simmered in a rich chicken broth.
You may also encounter hot and sour soup which is flavoured with chilies and vinegar. Beyond that, hot and sour soup can have a million different ingredients.
Finally, you may come across egg drop soup. This is really just beaten eggs mixed into hot chicken broth and served with condiments like sesame oil, sambal chili sauce, and hoisin sauce.
At home when I make Chinese soups I generally just wing it. I use stock as the base, flavour it with soy sauce, hoisin sauce, some chili, ginger, and garlic. I add vegetables like cabbage, green onion, carrot, onion, celery, bean sprouts. Really, I just put whatever vegetables I have lying around. Same with meat. If I have a bit of pork, beef, or chicken, that’s going in as well.
Conclusion
Even though our Chinese food isn’t “authentic” Chinese food, doesn’t mean that it’s not delicious, or that we shouldn’t love it. I say we embrace it whole heartily, but with the understanding that true Chinese food, is a completely different beats that deserves attention.
I sincerely hope that you have enjoyed this deep dive into all things North American Chinese Food. I really enjoyed writing it.
If you have any questions, please don’t hesitate to leave a comment and I will get back to you as soon as I can.
Hoisin Sauce
As a little bonus, I thought I should explain what Hoisin Sauce is to those of you that don’t know. Here is what Wikipedia has to say about it…
“Hoisin sauce is a thick, fragrant sauce commonly used in Chinese cuisine as a glaze for meat, an addition to stir fries, or as dipping sauce. It is darkly coloured in appearance and sweet and salty in taste. Although regional variants exist, hoisin sauce usually includes soy beans, fennel seeds, red chillies, and garlic. Vinegar, Chinese five spice and sugar are also commonly added.”
Last Friday in part one of this post I talked about cooking with a wok, fried rice, basic Chinese food sauces, and a bunch more. If you haven’t read that yet, I suggest you go and check it out before jumping into this post. You can read it here.
Today we are going to talk about egg rolls, and noodles. Let’s get into it.
Noodles
There are a lot of varieties of noodles in China. Like a lot. They come in different shapes and sizes and made with different ingredients. Wheat noodles are “mien” (or “mein) “as in “lo mien”. While fěn refers to noodles made of rice flour, or pretty much anything else. As the main focus of this post is North American Chinese food we are going to talk about wheat noodles.
There are way more Chinese noodle dishes than I could possibly talk about in this post. What I’m going to do instead is talk about one of the classic Chinese Restaurant noodle dishes, lo mien.
Lo mien is really simply soft wheat noodles stir fried with vegetables and a light sauce. Within those parameters there are a lot of possibilities. So let’s break it down.
The Noodles
The most important part of a noodle dish is obviously the noodles. But it can be daunting when trying to find the right noodles for the job. There are so many choices. I prefer Red Rooster Brand noodles which are an “instant” noodles you can get a pack for under $2 and they will feed 6-8 people easily.
When looking for a noodle you want something with a nice chew and that isn’t going to fall apart when boiled and stir fried. That’s really the most important part.
The Vegetables
The vegetables in lo mien can vary, however there some staples. Onions, some kind of cabbage or bok choy, bean sprouts, carrots, and often bell peppers. Other vegetables like mushrooms, broccoli, snow peas, green onions, and celery can be added as well. Of course, you can add whatever you want.
The secret here is that you want all of the vegetables sliced very thinly. You want everything to cook as quickly as possible so that means small pieces.
Sauce
The sauce for lo mien is generally pretty simple. Often it is just a bit of soy sauce. Sometime it contains Chinese Five Spice (you can find a recipe for it here), hoisin sauce, or even oyster sauce. It may also contain small amounts of chicken, beef, or mushroom stock. Often sesame oil is used in the cooking process which also adds to the flavour of the dish.
More flavourful lo mien dishes start with a base of ginger and garlic, possibly fresh chili , which is stir fried with the onion before the other ingredients are added. This along with the ingredients I just mentioned would help to build and flavour of the sauce.
Most lo mien dishes don’t really have a sauce. They are mostly dry which is actually how I prefer my lo mien. However, saucy noodles can be really good as long as the sauce is good.
Generally, when I’m making saucy noodles I put all of the sauce ingredients together separately to make sure it all tastes good before I add it to the noodles. This prevents you having to add more and more of each ingredient into the stir fry while trying to get the sauce right.
Putting it together
The first step is to have all of your ingredients ready to go. Have your noodles cooked and rinsed under cold water. Get all of your vegetables sliced and ready to go. Have your sauce made and set aside.
Now, heat the wok. Get it really hot. Add your onion and ginger and garlic if you are using it. Stir it and cook only until the onion starts to soften. If your wok is as hot as it should be this will only take a minute or two.
Now add carrot, peppers, and any other firm vegetable. Cook for a few minutes making sure the wok gains it’s heat back before adding the cabbage and or bean sprouts. Stir fry until they start to soften, now add the cooked noodles.
Stir fry the noodles until they are hot, and combined with the other ingredients. Add the sauce, stir fry for another minute or two, and serve.
Egg Rolls
As we all know, there are many different types of egg rolls. We are going to stay away from the type that contains the unrecognizable grey paste and focus on the type that is loaded with vegetables.
Skins
Egg roll wrappers are essentially a type of fresh pasta made mostly of wheat flour and eggs. They are the same as won ton skins but larger. They can usually be found in the produce aisle by the bean sprouts and other Asian vegetables.
Egg roll wrappers differ from spring roll wrappers which are more like a crepe than pasta. Spring roll wrappers are generally found in the freezer section of the grocery store.
There are many different brands that make egg roll wrappers. However, you are likely limited to what is available in your area. Whatever you can get is fine.
Egg roll wrappers can be sealed with either a bit of water or beaten egg brushed around the edges of the dough.
Vegetables
The vegetables in an egg roll are stir fried, drained and cooled before being rolled in the wrapper. The egg roll won’t cook long enough to cook the vegetables from raw. The vegetables are drained because any excess liquid will cause the egg rolls to get soggy and possibly fall apart.
The vegetables in an egg roll are pretty much the same vegetables used in lo mien and most other Chinese food dishes. The standard vegetables are cabbage, onion, carrot, bean sprouts, and sometimes peppers.
As with lo mien the seasoning can be basic or more complex. Often the vegetables are stir fried with just a bit of soy sauce. However, other ingredients can be added like hoisin sauce, and Chinese Five Spice. Of course, garlic and ginger can be cooked in the mix as well.
All of these ingredients are stir fired together and then put in a strainer over a bowl to drain a bit and cool.
Making Egg Rolls
Actually assembling egg rolls is a pretty straight forward process. Lay out an egg roll wrapper. Brush the edges with water or beaten egg. Put some filling the the center of the egg roll wrapper. Roll the egg roll. Flatten the ends, fold them over on themselves, and pinch together. Repeat this process until you have made all of your egg rolls.
Cooking
Heat 1-2 litres of canola or vegetable oil to 350°F in a deep fryer, wok, or deep pot. Cook the egg rolls a few at a time for about five minutes, flipping them half way through. Remove the egg rolls from the oil and drain on a wire rack.
You can cook off all of your egg rolls, let them cool completely and then freeze them. When you want to eat them again just take them out of the freeze and bake them at 400°f from frozen for about 30-40 minutes flipping half way thorough.
It goes without saying that you need to serve those bad boys with some delicious plum sauce.
Conclusion
Again, I find myself writing way too much. So, I am going to end it here and I am going to finish this up next week when I will talk about won tons, soup, and vegetable dishes.
“Season to taste” is a phrase that is often seen at the end of a recipe. I usually write it at the end of all my recipes. However, I have come to realize that not everyone knows how to do this. So, today we are going to talk about how to taste your food and how to season it based on how it tastes.
Seasoning is one of the keys to unlocking the next level of cooking. It is by far the most important part of making food taste good. Master this and you will make better food than you thought possible.
What is seasoning?
The term seasoning is a broad term that generally covers herbs and spices that are added to food to affect the flavour. However, at the end of a recipe, “season to taste” is generally referring to salt and pepper. But, it is also a way for the recipe writer to acknowledge that my 1 tbsp of dried oregano may be different than yours, and that we should taste and adjust as needed.
Differences in ingredients
Ingredients are not all created equal. You can line up 20 chicken legs and they will all be slightly different. Some may have more fat. Some might be dryer. Some might be older. Some may have been fed corn while others were fed grain. All of this will affect the ingredients taste, how they interact with other ingredients, and how they cook.
Let’s go back to oregano for a second. If I have 1 tbsp of home grown, hung dried oregano, it is going to taste a lot different than commercially produced, heat dried oregano. The heat from drying destroys some of the subtle notes in the flavour so the home dried and the factory dried won’t taste the same. 1 tbsp of one doesn’t equal 1 tbsp of the other.
Not all salt and pepper are the same either. Salt especially, has many different varieties which all taste different. They also all dissolve differently in food. So, a recipe may call for 1/2 tsp of salt, but is that table salt, kosher salt, sea salt. All of these salts are very different in a lot of ways.
Over coming the differences
This is the point that I’m trying to make; following a recipe is all well and good and it can yield good food. However, being able to taste and adjust as needed will allow you to make great food. Why? Because ingredients are different. A good cook knows how to listen to their palate and adjust as required.
Taste
Being able to taste is only part of the equation. The other part is deciphering what that information means and how to adjust for it. In other words, when I taste a spaghetti sauce, how do I know it needs more oregano instead of more basil? Well, this is where things get a bit complicated.
What it really comes down to is experience. As you cook more, and taste more you kind of build up a flavour library in your mind. You are able to access this library to pick out individual flavours, to notice what’s missing, and to know what’s needed to fill that gap.
What’s really cool, is whether you know it or not, you already have a flavour library in your mind. You have tasted loads of food. You know if something tastes good or bad. You know when adjustments need to be made. You just have to trust that information and actively try to grow and cultivate it.
Fake it till you make it
It is possible to kind of fake your way through this and it’s by using your sense of smell. If I were to taste some spaghetti sauce and I think maybe it could use more oregano here’s what I would do, if I didn’t know what to do.
Taste some sauce. Smell some oregano. Taste the sauce again. On that second taste does it seem like that smell of oregano made the sauce taste better? Did it seem like maybe that oregano was missing or was it over powering?
Once you’re kind of convinced that you need to add a bit more oregano, add only a tiny amount. 1 tsp or less should do it. Stir it in, wait a minute or two and then taste again.
It’s important to remember that one extra tsp of oregano isn’t going to ruin your sauce. But one missing tsp of oregano will be noticed.
Beyond the pretense
In all honesty a large part of this comes down to personal preference. Maybe you like more or less oregano than I do. That’s fine. The real process with all of this is to taste and adjust until it tastes good to you.
Again, it really comes down to experience. The more you cook, the better a cook you will be. The more you taste, the better a taster you will be. You can’t expect to be a great cook if you only cook once a month. You wouldn’t expect to be a great baseball player if you only played once a month, right?
Salty, Acidic, Sweet and Pepper
Salt
Here is the thing about salt, you shouldn’t taste it. Salt should be working behind the scenes to enhance the flavours of everything else. So, if you are tasting for salt, whether a dish needs it or not, don’t try to taste salt.
You want to taste for impact. That’s a weird sentence, I know that but bear with me. The question you need to ask yourself is “How impactful is the flavour in this dish?”. Why? Because the salt is ideally going to elevate all of the flavours around it and push them into a harmonious group. That is the power of salt.
I always equate it to playing guitar. If played a slightly out of tune guitar it might sound okay. It will never sound great. But, if I tune that guitar if can sound amazing. That is what salt is. It is tuning the guitar.
Acid
If salt is like tuning a guitar, acid is like putting new strings on it. If you don’t know, new strings make a guitar sound bright. There is an almost overpowering brilliance to the sound of new strings. That is the power of acid.
Acid can be a lot of things. There are the obvious ingredients like citrus juice, and vinegar. But tomato is an acidic ingredient as well.
A small amount of acid can go a long way. Too much, can be overpowering. Add acid when a dish seems flat. Meaning, when you taste it your tongue doesn’t get excited. You don’t salivate more than usual.
Sweet
You know something needs a bit of something sweet if it is too acidic or too spicy. The sweetness can balance that out. Sugar, honey, molasses, maple syrup, or even caramelized onions, or roasted vegetables can add sweetness to a dish.
Pepper
Pepper is like the most ubiquitous ingredient in western cooking. We put it in everything. Why? Well, it just adds a little tiny bit of warmth to a dish which is good for the palate and for digestion.
Add just enough to feel a slight warming on the tongue but not enough that you can easily pick out the pepper flavour.
Conclusion
This all seems like a very complicated way to say adjust until the food tastes good. That’s it. Just taste it and adjust until you think it’s good. But, always ask yourself “Could this be better?” If the answer is yes, keep going.
To say that there is a big difference between what we think of as Chinese food and what is actually Chinese food is an understatement. First of all China is a massive place with a variety of climates and regions. The over 1.3 billion people who live there don’t survive on egg rolls, General Tso’s chicken, and sweet and sour pork.
Despite the fact that Chinese food isn’t really Chinese food, it’s still delicious, it’s still tradition here if not there. And although you likely wouldn’t find a single dish from a North American Chinese restaurant anywhere in China, it doesn’t mean that it’s not good and that we shouldn’t embrace it.
The Chinese food that I grew up eating is likely almost identical to the Chinese food you grew up eating. Vegetables stir-fried with soy sauce. Fried rice with onion, peas, egg and pork or chicken. Chicken balls drenched in that thick red sweet and sour sauce. And egg rolls, oh the egg rolls with the ever popular plum sauce. Sound familiar?
Today, I am going to tell you…
Everything I know about North American Chinese Food
As I have said before, my very first job was in a Chinese Restaurant. Because of that, Chinese food holds a special place in my heart. It was also a favourite of my mothers. I remember here throwing together these massive, homemade Chinese Food Feasts.
Alright, enough chit chat, let’s get too it.
Sauces
One of the main aspects of North American Chinese food (hereby refereed to simply as Chinese Food) is the sauces. From sweet and sour sauce, to orange chicken sauce, to General Tso’s, they are all pretty much the same.
Most Chinese food sauces have four different components. They have the base which imparts the main flavour of the sauce. They have sugar. They have vinegar. And they have a thickener which is always corn starch. There are other ingredients present in the sauces but these make up the main components.
The Base –
The base of a Chinese Food sauce could be a lot of things. In the case of Orange Chicken sauce the base is orange juice. For sweet and sour sauce, the base is actually the vinegar and the sugar. For General Tso’s the base of the sauce is more difficult to pinpoint because it doesn’t have one main forward note; it has many. Soy sauce, ginger, garlic, chili, all of these make up the base.
So why am I telling you this? Well, because if you know the base of the sauce, and you know it has vinegar and sugar in it, and you know it’s thickened with corn starch, you might be able to make it. At least a rough approximation of it.
Vinegar and Sugar
Once you’ve identified the base of the sauce the next question is how sweet is the sauce and how acidic is it? That will tell you how much sugar and vinegar will be needed. For most of these sauces it’s a lot of sugar and a bit of vinegar. The exception is sweet and sour which has a lot of both.
Actually, let’s talk about sweet and sour sauce for a minute. I make a version which is really just equal parts sugar, vinegar, water, and maraschino cherry juice. To this I add a slurry of corn starch and water and cook it until it’s thick. Pretty easy right?
Orange Chicken sauce is pretty similar. 3 parts orange juice, 2 parts sugar, 1 part vinegar, to that I add a bit of soy sauce, ginger and garlic, and then thicken it with a corn starch slurry. You can get more complex with the sauces and add a pile of ingredients but you don’t have to. This will get you pretty close.
Batter
A lot of meat in Chinese food is battered, especially the three dishes we have been talking about so far. The batter is generally made of corn starch, egg, and water. Pretty straight forward.
The meat is simply cut into bite sized pieces, dipped in the batter and then deep fried on 350°f until it’s crispy. Generally, big batches of this would be done in advanced and then be refried to order. You can do this at home too.
Once the meat is cooked and the batter is crisp it is drained of any excess oil and then tossed with the sauce. Sometimes vegetable or whole dried chilies will be added as well depending on the dish.
Fried Rice
One of my favourite Chinese dishes is also the simplest. Fried rice. Really all it is is day old rice stir-fried with onion, sometimes carrot, often peas, soy sauce and an egg. To this bits of pork or chicken may be added as well.
The key to it is getting just the right amount of soy sauce and getting the egg cooked throughout the rice. Other than that it’s pretty straight forward.
Using a Wok
Okay, the next thing we are going to talk about here is using a wok. A wok is the main cooking vessel used in Chinese Cooking. Becoming acquainted with it with help you master homemade Chinese food.
The idea behind a wok and stir-frying is that high heat is used and food is cooked quickly. At home, it is often difficult to reach the temperatures needed to keep the wok hot enough to cook as quickly as they do in Chinese restaurants. But that’s okay.
When using a wok at home the key is heat management. You want to start with the wok very hot. Smoking hot. Everything you add to the wok is going cause the temperature of it to go down. So, every time you add something, you have to wait for the temperature to return to what it was before you add anything else.
At home, if you try and rush through cooking with a wok you will end with a bunch of liquid pooled in the bottom. This is because the wok wasn’t hot enough to evaporate the liquid coming out of the food. So, this liquid pooled in the bottom of the wok, cooled it down even more so that more liquid came out of the food. And, instead of stir-frying the vegetables to a tender crispness, you just boiled them.
Every time you add something to the wok, wait at least two minutes for the heat to recover before adding anything else.
Conclusion
While writing this I realized that I have way too much to say about Chinese food than can be said in one post. Because of that, I am going to stop here and pick it back up next Friday.
So, next Friday, in part 2 we will talk about egg rolls, noodles, vegetable dishes and more.
With their sweet, rich flavour and soft, pillow like texture, scallops are amazing. That is, if you don’t over cook them. If you do, they end up as tasteless little pieces of rubber that are about as enjoyable to eat as a bike tire.
Now, because I like you guys, I’m going share some tips on how to cook these little sea marshmallows to make them exceptionally delicious. These are tips that I have picked up cooking thousands, literally thousands, of these little s.o.b.’s.
Without further ado, here are my…
5 Tips To Cooking Perfect Scallops
Okay, I lied…we need to talk about buying scallops before we talk about cooking them. So let’s do that first.
Buying Scallops
There are two main types of scallops; bay scallops, and sea scallops. Bay scallops are the tiny little ones that you often find in chowder. Sea scallops are the big ones that we are going to focus on today.
Sea scallops are bought and sold as number ratings which would be represented as either two numbers with a forward slash between them like 20/30. Or, they will be sold as U10 or U15 or something like that.
These scallop numbers probably seem a little confusing right now. But don’t worry, once you know what they mean it makes buying the scallops you want really easy.
20/30
All 20/30 means, (and it doesn’t have to be those numbers it could be 10/20 or 30/40, etc.) is that there are 20 to 30 scallops in a pound. So, 20/30 scallops are fairly small. They aren’t as small as bay scallops, but they aren’t very big. So, 30/40 means there are 30 to 40 scallops in a pound. Get it?
U10
“U” numbers when buying scallops are similar to the slash (/) numbers. The only real difference is that instead of giving of range of 20 to 30 or 30 to 40, the “U” number tell you the maximum amount of scallops that are going to be in a pound.
U10 scallops, means that there are 10 or under scallops in a pound. The “U” obviously standing for under. So, U10 scallops are bigger than U15 scallops or 20/30 scallops. I guess the easiest way to look at it is, the bigger the numbers the smaller the scallops.
This is number system is also how shrimp are sold.
Alright, now that we have gone on this side quest to talk about how to buy scallops, let’s get to cooking them.
Scallop Tip 1
This may see pretty obvious to a lot of you, but to some it might be new information.
Scallops have joiner muscles that attach the scallop to the shell. For whatever reason, they are always left on the scallops. Take them off before cooking. They are very chewy and not enjoyable to eat at all.
You can see in the picture below how the person who cooked these scallops left it on. Tisk Tisk.
Scallop Tip 2
The key to delicious scallops is getting that nice sear on the surface. That sear is a type of caramelization which enhances the natural sweetness of the scallop.
As you may remember from the steak post dry surfaces sear better than wet surfaces. So, dry the surface of the scallops well with a paper towel before searing.
I should say to that scallops are like little sponges. If they are left in water they will absorb it and hold it until they are cooked. If you buy frozen scallops, defrost them on a rack or in a colander so the excess liquid drains off.
Scallop Tip 3
As we now know, the key to a delicious scallop is the sear, and dry surfaces are important to getting that nice sear. The key however, to that beautiful sear is a very hot pan.
When cooking scallops a very hot pan is necessary. You want the pan to be pretty much smoking before the scallops go in.
If your pan isn’t hot enough when the scallops go in a few things are going to happen.
First of all any liquid coming out of the scallops isn’t going to evaporate. It is going to pool in the pan, cool it down further and then you are going to end up with boiled scallops, which nobody wants.
The second thing that is going to happen if your pan isn’t hot enough is that you aren’t going to get that oh-so important sear. Which is an important contrasting flavour to the scallops.
So, make sure your pan is very, very hot before you put your scallops in it.
Also, make sure you don’t crowed the pan. Too many scallops will cool the pan down as well and then you will have the same problem as you would if you didn’t heat your pan up enough. Only cover a maximum of 75% of the surface of the pan with scallops.
Scallop Tip 4
Okay, you have your U10 scallops. The surface of them is dry, you seasoned them with a little salt and pepper, and your pan is nice and hot. You add a touch of oil to the pan…just a touch, and then you dump the scallops in, stir them around and delicious! WRONG!!
It’s really important that you gently place the scallops in the pan, flat-side down. This is how you get that nice sear.
Once the scallops are in the pan, don’t touch them! This is really important. If your fiddling with them and tossing them around they aren’t going to be able to sear.
So, you put your scallops in the hot pan one at a time. You haven’t covered more than 75% of the surface of the pan, so it is still hot. Now what? Now you wait.
Watch the scallops. What you will notice is that around the base of the scallops will start to go brown. You want this to become a deep, rich brown colour. Once that happens, use a set of tongs or a spoon and flip the scallops one at a time starting with the first scallop that went in the pan.
This initial sear on the first side should take 2-3 minutes, no more. Once the scallops are flipped over you are only going to cook them for another 2-3 minutes.
You know the scallops are done when they have a nice deep brown sear on both ends and they are firm but not rubbery when gently squeezed. Again, this should only take 4-6 minutes depending on the size of the scallops.
Once they are cooked, remove them from the pan in the order they went in, and pat them dry on a paper towel.
Perfectly cooked scallops should be seared on both sides and warm in the middle but ever so slightly translucent in the very center. That is a perfect scallop.
Scallop Tip 5
Scallops are sweet and rich. Because of this, pairing them with something that will cut through that is always a good idea. That is one of the reasons bacon and scallops go so well together. The saltiness of the bacon, balances the sweetness of the scallops.
Two classic combinations that go really well with scallops are pea and prosciutto, and corn and bacon.
Also, pairing scallops with anything sweet and acidic works very well. Things like balsamic reduction or aged balsamic vinegar. Or equal parts vinegar and sugar cooked together until thick and drizzled over the scallops is delicious too.
Conclusion
Now that you know how to cook a scallop like a pro, experiment with different pairings. Come up with your own recipes or stick with the classics like garlic butter or bacon wrapped.
Either way, just enjoy them. They are delicious little ocean treats that we are fortunate enough to have in abundance. And now…I’m craving them.
It’s over guys. We did it. We made it through the holidays alive. Our wallets might be lighter and our belts might be bit tighter, but we did. Now, it is a new year with new goals, dreams, and resolutions.
It is very possible that you made a new years resolution this year. If you did, there a 45% chance that your resolution is to loose weight. Unfortunately, there is an 80% chance that your New Years Resolution will fail.
One of the reasons why New Years Resolutions fail, especially weight loss resolutions, is that they come as kind of a shock to the system. You start eating completely different than you’re used to. The food your making tastes like nothing because it is “Health Food”. The food you eat is boring.
Well, as usual I have your back. Today, we are going to talk about how you can have your cake and eat it too…okay not literally. We are actually going to talk about how you can eat healthy food without sacrificing flavour, variety, and enjoyment.
Without further ado, let’s kick off 2019 the right way and learn…
How To Make Healthy Food Taste Good
Before we get too deep into this, let me first say this. It has been my experience, and I have heard stories of this from other people as well, that simply reducing the portion sizes of what you are already eating can and will lead to weight loss.
Okay, now let’s talk about how to make healthy food taste good.
What is healthy food?
Healthy foods are whole foods. Like vegetables, fruits, a moderate amount of grains, fish and meat.
Unhealthy foods are anything containing large quantities of refined sugar, saturated fats, and salt. The key there is large quantities.
I should say, though it should be obvious that I am not a nutritionist. I am a Chef. I know how to make things taste good and I have a pretty good idea of foods that aren’t great for you.
Naturally Healthy Foods
When we think of healthy food we automatically think that it has to be bland. That might be because large multinational food conglomerates specializing in high sugar, high fat, and high salt processed foods pay billions of dollars in advertising annually to make us think that. Or, it could be because the processed “food” we eat from those conglomerates is so high in sugar, fat, and salt that it makes real food taste bland. Either way, my money is on it being those big companies fault.
Okay, so I went on a bit of a rant there but the facts remain the same. We associated healthy food with bland tasteless food. It really doesn’t have to be that way.
There are countries all around the world who’s cuisines have healthy dishes that taste amazing. Of course, they have their guilty pleasures too but look at Thai food, Indian Food, a lot of Japanese food, Mexican food, Brazilian, real Italian food. The list can go on and on.
You see, the problem isn’t with good food. The problem is really with processed food. So, how do we convince our palate that is used to the high fat, sugar, and salt, that food low in those tastes good?
Flavour
The key to good food of any kind is balance of flavour. That balance of flavour is what needs to be in mind when making healthy food. What I’m talking about is balance of acid, spices, beneficial fats, and sweet ingredients. Let’s break these down.
Acid
Acid can be vinegar, citrus, tomatoes, pineapple, etc. Too much acid can easily over power a dish. But, the right amount of acid can take a mediocre dish and make it really delicious.
Imagine for a moment that you are making a burrito bowl. You have some brown rice topped with chicken, vegetables, cilantro, whatever. If you put a big squeeze of lime over that it is going to make it exponentially better.
Acid wakes up the palate. It adds brightness to foods and cuts through richness. It can be used as simply as a squeeze of fresh lime, or it could be the addition of some tomato paste to a braised dish. Either way, using acid to make things taste good is a tried and true method.
What acids to use and how much really comes down to what you are making and personal preference. But, keep in mind that a little goes a long way. A squeeze of lemon or a few drops of vinegar can be enough to brighten up a whole pot of soup.
Like anything, taste, add, taste, add, taste add. You can only ever know how much acid you need to add by tasting and adding. It is not an exact science. It is subjective. And you have to learn how to taste your food. It is the only way that you make truly delicious food.
Spices
Spice may include chilies but that isn’t completely what I’m talking about here. I mean herbs and spices. Learning to properly use spices can help you make anything taste good.
Imagining a curry for example, it has been my experience that you almost always want to twice as much spices as you think you need too. I’m not talking about curry powder. Though it can be used as an ingredient.
When I say spices I mean cumin, coriander, cardamom, cloves, cinnamon, turmeric. Beyond curry I’m talking about cilantro root, cilantro, thyme, rosemary, parsley, basil, the list can go on forever.
There are two main keys to using dry spices. The first is to use as much as you think you need to and then probably double it. So, if you think you should use 1 tbsp of cumin, use 2 tbsp.
The second key to using dry spices is to wake them up by sauteing them in oil. Let’s say that you are sauteing some ginger, garlic, and onion in a bit of oil. Once the onion is softened, add your spices and cook, stirring for a few minutes before adding any liquid. This will open the spices and intensify their flavours.
When it comes to herbs, add dry herbs early in the cooking process and fresh herbs later in the cooking process.
No matter what you are making, fresh herbs, and dried spices can help make it taste really, really good. Be bold and experiment with amounts. You will be surprised how much you can use and how great they can taste.
Sweet
Often when we think of sweet ingredients we automatically think unhealthy. But that doesn’t always have to be the case. Sweetness can come from things other than sugar.
Tomatoes are naturally sweet. Tomato paste, when cooked or over a moderate heat similar to how I described cooking dry spices, can add a deep intense sweetness to a dish.
Fresh tomatoes can add both acid and sweetness to salads, burrito or grain bowls. Fresh bell peppers, and other fresh vegetables can also add a nice pop of sweetness.
Depending on how they are cooked onions can be very sweet. Especially when caramelized or roasted.
Any vegetable takes on a delicious sweetness when roasted. Simply cut the vegetable into appropriate sizes, toss with olive oil, and a bit of salt and pepper and roast in a 425°F oven for 30 – 35 minutes.
Don’t be afraid to use fruit like peaches, pineapples, and apples, to add sweetness either in a salsa, salad, used on their own or added to dishes.
Fats
All too often we hear about fat being bad for you. It’s not fat that is bad for you. You need fat. It is “bad fats” like the ones found in potato chips that you are being warned about.
But using olive oil, to make a salad dressing or to cook with isn’t going to hurt you. Eating meat with a bit of fat on it is good for your joints. Avocado is fatty but also good for you. Salmon is one of the most fatty fishes but again, it is very good for you.
Fats add richness to dishes and let’s be honest are just delicious. Turning your back completely on them isn’t going to do you any good. Moderation, and quality are the keys to fats.
Conclusion
Here’s the deal. If you want to really take off some weight and be healthier eat less of everything but especially carbs. Don’t cut them out completely, just reduce how many carbs you eat. Exercise regularly and eat in a balanced way.
It really isn’t that complicated. I’m not saying it’s not hard. God knows I could afford to take off a few pounds myself. So yes, it might be difficult, but it is not complicated.
Side note
Just as a bit of an aside here I wanted to say that I hope you all had a great holiday. I certainty did, except for a minor eye injury and a visit to the er on Christmas eve (a story for another time).
I am super excited to back in the swing of things and excited for the new year.
Thank you for helping to make my 2018 a great year. I’m really looking forward to what we will do together in 2019.
Every year around Christmas all these blogs put up all these posts about Christmas dinner. This blog is no different in that regard. It is kind mandatory in a way.
Last year I did the obligatory Christmas post and talked about organization and things like that. This year I am going to do something a little different.
This year, instead of just giving you some tips, or telling you what you should do, I’m going to tell you what I would do. Essentially, I am going to walk you through how I go about preparing Christmas dinner and maybe that will give you a few ideas of your own.
The Turkey
Without question the star of Christmas dinner is the turkey. Mess it up and the whole dinner is a disappointment. It’s a lot of pressure. Here is what I do to my turkey to make sure it is delicious.
The Rub
Turkey is a lean bird. When cooked, lean quickly becomes dry. One way to mitigate dryness is to add fat.
I make a rub with butter, bacon and herbs. Essentially, I take a block of room temperature butter and put it in a mixer with a 1/2 lb of minced bacon, 2 tbsp of thyme, and 2 tbsp of summery savoury. Using the paddle attachment, I beat this mixture together until it is completely mixed and homogeneous.
Before I put the butter mixture on the turkey I pat the surface dry with paper towel. Once the surface is dry I carefully lift of the skin on the breast. I stuff one third of the butter mixture under the skin and spread it evenly. The rest of the butter mixture gets rubbed all over the turkey.
Stuffing
Prior to roasting the turkey I put 1-2 onions, 1-2 carrots, 1-2 celery stalks, and some fresh herbs in the body cavity. I don’t pack this tightly. The vegetable and the herbs flavour the bird from the inside out.
Cooking
Now the turkey goes in the oven on 325°F until it reaches a temperature of 170°F. Depending on the size of the turkey this could take 4-8 hours.
Once the turkey is cooked I let it rest, out of the oven for at least 45 minutes. This is the key to a very juicy turkey.
The Gravy
Easily the second most important aspect of Christmas Dinner is the gravy. Part of the reason why it is considered so important is because the turkey is often so dry it can’t be swallowed without the lubricating qualities of the gravy.
The gravy should be creamy, rich and flavourful. It should not be thin or watery, or too fatty.
Where to begin?
I always start my turkey gravy with chicken stock. It can be either homemade or store bought. Generally, I will use the chicken stock as the base and then add some of the drippings from the turkey to bolster the flavours.
The thickener.
I always thicken my gravy with a roux rather than a slurry. What’s the difference? A roux is made with flour and fat. A slurry is made with water and flour. The roux gives the gravy a better flavour and texture.
After I collect the drippings from the cooked turkey I let them sit so the fat will rise to the top. I skim this off and use a portion of it to make my roux. The remaining liquid from the drippings gets passed through a sieve and added to my chicken stock.
Concentrated Flavour
Before I thicken my stock and drippings with the roux, I reduce the liquid. Essentially, I mean I boil it for a while. Usually, I will reduce it by half its volume. I do this because it intensifies the flavour. Now, I add the roux and make my gravy.
The key to using a roux is that it has to be cooked out. That simply means that you cook it so it doesn’t taste like raw flour. There should be sign that there is flour in your gravy other than the texture which again should smooth and creamy. Stir the gravy while it’s cooking to prevent sticking and burning.
Once the gravy is thickened and the flour is cooked out, I season the gravy to taste with salt and pepper. Then I pass it through the sieve again. Now, if it needs any fresh herbs or anything else I add them in and the gravy is done. Severe it right away or cover and let sit for up to 20 minutes before it need to be reheated.
Gluten-Free Just Like Me
Just a quick note. If you can’t have gluten like me, use all purpose gluten-free flour. It works the same way.
Mashed Potatoes
Mashed potatoes are another favourite on the Christmas dinner table. I really like them very smooth and very creamy with a lot of butter, cream, salt, and pepper.
Over Cooked Potatoes
One problem people often have with mashed potatoes is that they over cook the potatoes. This may seem impossible but it’s true. The potatoes are like little sponges especially when they are cooked. So, if they sit in the water for too long they will absorb it and become water logged. This leads to watery, gross potatoes.
Cook the potatoes only until they start to crumble. Drain them right away and let them steam in the strainer for 3-4 minutes.
Steam Dry
While the potatoes are steaming in the colander I put my butter and cream (I use whipping cream in potatoes and Christmas) in the potato pot and cook it until the butter is fully melted and the cream is hot. I add the potatoes back in and mash them with the hot butter and cream. I season the potatoes with salt and pepper, and then I pass them through a sieve.
This sieve business with the potatoes is admittedly a lot of work. It can be done much easier with a food mill. But no matter how you do it, you cannot beat the texture the potatoes once they have been passed through the sieve.
Sieve them
Once the potatoes are passed through the sieve I put them back in the pot, cover them and put them on the stove but off the burner. They can sit here for up to half an hour and keep their temperature.
If the potatoes go cold, I simply add a bit more cream and heat the potatoes back up on a burner while stirring them.
I know some people like to add sour cream, cream cheese, chives, and all kinds of other thing to their potatoes at Christmas but I like to keep it simple. There are enough flavours in the dinner that I prefer to keep everything relatively simple.
Carrot and Turnip
I usually have mashed carrot and turnip with my Christmas Dinner as well. I simply peel and dice equal amounts of carrot and turnip and then boil them until they are soft and then drain them.
I add butter, brown sugar, salt, pepper, and a touch of nutmeg and mash it all together. This too can sit on the stove covered for a while.
Brussels Sprouts
I know a lot of people steam their brussels sprouts but I prefer mine roasted.
Once the turkey comes out of the oven I jack the temperature up to 400°F. I cut the sprouts in half, toss with olive oil, salt and pepper and roast until they are tender. This takes about a half hour.
I serve them just like that.
Sweet Potato
I also prefer my sweet potato roasted as opposed to boiled. Very simply, I cut the sweet potato in half lengthwise, put it cut side up on a sheet pan, drizzle it with olive oil, salt, pepper, and brown sugar and roast it on 400°F for 35-45 minutes.
Dressing
I have never really been that big a fan of dressing. (stuffing that wasn’t ever in the bird). Despite that, I always have to make it because other people like it.
I just take a bunch of torn up bread and mix it with minced sautéed onion, sage, summery savoury, salt, pepper, and a pile of melted butter. I also generally add some of the drippings form the turkey.
I cover this with tinfoil and back it for about 30 minutes. Then I uncover it and bake for another 10-15 minutes.
Cranberry Sauce
This thanksgiving I made cranberry sauce out of dried cranberries and it came out really delicious. I think that is how I will make it from now on.
I sautéed a finely diced onion in a bit of butter and then added in 1 cup of dried cranberries. To this I added 2 tbsp of cider vinegar, 1/4 cup of sugar, the juice from 1/2 an orange, the zest from 1/2 an orange, a few sprigs of thyme and 1 cup of water.
I brought all of this to a boil, reduced the heat and simmered it until the cranberries were soft and the sauce was the consistency I wanted. I seasoned it with salt and pepper and it was good to go.
Conclusion
I hope that this gives you some ideas for your own Christmas Dinner.
What do you do that is your unique twist on Christmas Dinner? Tell me in the comments.
Also, I should say that this is my last post of they year. I am taking a few weeks off and will be back in full force on January 7th 2019.
I hope that you all have a fantastic holiday. I will see you in the new year and as always, thank you for reading.
If you’re reading this, you probably already have an affinity for bacon. Who could blame you? The fatty, salty, porky flavour of bacon is the perfect combination. But what do you really know about the stuff? More importantly, what don’t you know about bacon that you should?
This week, in the continuing series about getting to know your ingredients we are talking about bacon. What exactly is it? The different ways it’s made. Different ways to cook it for different outcomes. And how to buy it.
Without further ado, sit down, relax, grab a napkin to wipe away the drool because today we are getting to know…
Bacon
What is Bacon Anyway?
Depending on where you are in the world the word bacon can mean a few different things. For our purposes here today we are talking about belly or side bacon.
Bacon as we generally refer to it in North America is cured and smoked pork belly. In other parts of the world they have smoked and non-smoked bacon, and bacon can come from different parts of the pig.
We do have different types of bacon as well such as back bacon which comes from the loin. However, we have different names for different bacon. In some places it’s all just bacon.
The cure
There are two types of cures that are used to make bacon. Wet and dry. We are going to take a look at both of these processes but first let’s talk about what a cure is.
A cure is essentially a salty brine or mixture which draws moisture out of the pork belly. This is a very old form of food preservation. Lowering the moisture content and increasing the salt content makes a very inhospitable environment for microbes. Today sodium nitrite is often added to the bacon cure to help it retain it’s colour.
Wet Cure
A wet cure is exactly what it sounds like. Rather than a salt rub the pork bellies are put in a salt brine. Alternatively the bellies may be injected with the brine rather than being soaked. A brine is a salt water solution.
This wet cure draws moisture out of the belly while replacing it with the salt water solution. This method is the way most commercially produced bacon is made.
I personally feel as though wet cured bacon is inferior to dry cured bacon. If you have ever bought bacon that was very wet and soggy you understand what I mean.
Dry Cure
Just like with the wet cure the purpose is to extract moisture from the belly. Where a wet cure replaces the drawn out liquid with the salt water solution, dry curing doesn’t replace the extracted liquid.
The result of a dry cure is a firm, dry texture to the pork belly. This is the traditional way of making bacon. And the technique that I prefer to use when making bacon or to buy when purchasing bacon.
Often with a dry cure there will also be sugar added to the salt which adds a bit more depth of flavour to the final product.
Once the bacon is in the cure, wet or dry, it needs to sit for a period of time to allow the cure to do it’s job. This can be as little as a day or two or as long as a month.
Smoke
We all love that smoky flavour of bacon. However, not all bacon is actually smoked the way you would think it is.
Often with commercially produced, wet cured bacon, liquid smoke is used rather than actual smoke. This can be added to the brine and/or the bacon can be given a bath in it. This liquid smoke also adds colour to the meat.
Better quality bacon, and even a lot of commercially produced bacon, is actually smoked with wood smoke. If tasted side by side it is very easy to tell the difference between bacon with real smoke, vs. bacon with liquid smoke.
Liquid smoke is often used for the same reason that a wet cure is used. It is much cheaper than a dry cure and real smoke. However the result is sub-par at best.
Types of smoke
Bacon can be smoked with a variety of woods and even corn cobs. Often maple wood, apple wood, and hickory will be used. Each wood provides a different flavour and smoke profile to the bacon. Honestly though, they all taste good.
Buying Bacon
When buying bacon look for a firm dry texture. This signifies high quality and more traditional techniques.
Wet, soft bacon is low quality. It costs less for a reason. However, when you cook this bacon a lot of moisture comes out and is lost. The dry, firm bacon has much less loss in the form of liquid and fat.
The shitty bacon may seem cheaper. However, when you calculate all the loss that occurs when it’s cooked the price is actually similar to the better quality stuff. Remember, bacon is sold by weight. So, if you are losing 25% of the bacon’s weight when you’re cooking it, compared to maybe a 10% loss, you are actually paying 15% more than you think you are. Make sense?
The final point is that dry cured, naturally smoked bacon just tastes 1000 times better than wet cured artificially smoked bacon.
Cooking Bacon
Often when people cook bacon they get a pan really hot, add the bacon, and cook it on high heat. I’m going to tell you right now that this is a terrible way to cook bacon.
There are a few methods that can be used to produce a really tasty finished product.
The first, and my personal favourite way to cook bacon is to start it in a cold pan. Lay the bacon down flat in the pan off the heat. Put the pan on medium low heat and cook the bacon slowly. Flip the bacon after 5- 10 minutes. This slowly renders the fat out of the bacon and leaves you with the crispiest bacon you have ever had.
The second way I like to cook bacon is in the oven at 350°F pressed between two cookie sheets. This does the same thing as the first method with the added bonus of perfectly flat bacon.
Another method that I have been hearing a lot about but personally have not tried is to start the bacon in a bit of water. To do this, put the bacon in a pan, cover with a tiny bit of water and cook. Let the water evaporate and finish cooking the bacon in the pan until crisp.
This final method I wouldn’t use with good quality bacon. However, for a wet cured bacon it could actually help make it crispy.
Conclusion
You may have just read through this whole thing and thought it doesn’t matter. Bacon is bacon. Well, I challenge you to try the difference side by side. Get a wet cured artificially smoked bacon and a dry cured naturally smoked bacon and test them. The moment the bacon goes in the pan you will see the difference.
Don’t let yourself be fooled into thinking that all bacon is created equal. And definitely don’t be fooled into thinking that cheaper bacon is actually cheaper.
We use cookies on our website to give you the most relevant experience by remembering your preferences and repeat visits. By clicking “Accept”, you consent to the use of ALL the cookies.
This website uses cookies to improve your experience while you navigate through the website. Out of these, the cookies that are categorized as necessary are stored on your browser as they are essential for the working of basic functionalities of the website. We also use third-party cookies that help us analyze and understand how you use this website. These cookies will be stored in your browser only with your consent. You also have the option to opt-out of these cookies. But opting out of some of these cookies may affect your browsing experience.
Necessary cookies are absolutely essential for the website to function properly. This category only includes cookies that ensures basic functionalities and security features of the website. These cookies do not store any personal information.
Any cookies that may not be particularly necessary for the website to function and is used specifically to collect user personal data via analytics, ads, other embedded contents are termed as non-necessary cookies. It is mandatory to procure user consent prior to running these cookies on your website.