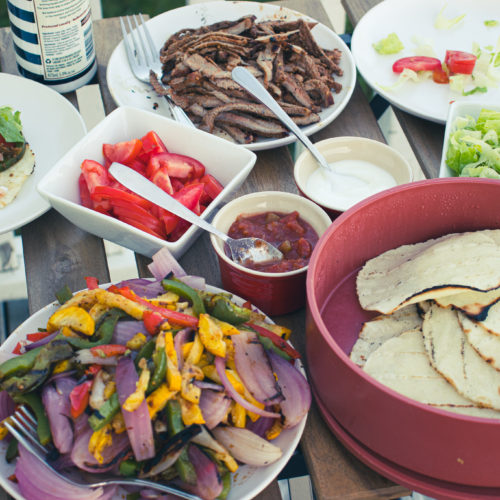
In the early part of my career, I worked in a few pubs. For whatever reason, all of these pubs served a version of steak fajitas. The steak was tossed with bell peppers, red onion, and cajun seasoning then cooked in a pan or on a flat-top. To accompany the fajita mix would be tomatoes, lettuce, salsa, sour cream, cheese, and guacamole (for an extra charge). More often than not, the meat and vegetables would be brought to the table in a hot skillet, so it was sizzling when it came out of the kitchen. We always splashed water on the skillet to make the sizzle more impressive for the customer.
Jump to:
The steak fajita recipe I will share with you today doesn't stray far from the version I made so many times in those early years. However, I did my best to elevate it. To make it something even more than it already was. I hope you enjoy it.

What Are Fajitas?
At their core, fajitas are like a DIY taco, though they are about as Mexican as I am. They originate in Texas (I know, it used to be part of Mexico, but that was long before fajitas existed). Rather than being Mexican, fajitas are part of a strange but delicious sub-sect of food known as Tex-Mex. Of course, none of this really matters because steak fajitas are delicious and make a perfect family meal.
If you enjoy Tex-Mex flavours, you might also want to try my steak tacos or my guide to making homemade salsa. Both pair wonderfully with this kind of cooking.
Steak Fajita Marinade
The first step to making my version of Steak Fajitas is to marinate the steak. To do that, we need to make a marinade. You can find all the measurements above, so I won't list them here. But, the ingredients for the marinade are oregano, paprika, cayenne, ancho chili powder (optional), cumin, garlic, onion, pickled jalapeno, kosher salt, olive oil, and red wine vinegar. Put all the ingredients in a mixing bowl and mix it up.
The pickled jalapeno is the secret weapon here. It adds a tangy heat that you don't get from fresh jalapenos or dried chili flakes. The vinegar brine also helps tenderize the meat ever so slightly.


The Steak
The steak I used was fast fry sirloin tip. These are just very thin sirloin tip steaks. You can use any thin cut of steak. You could also take a thicker steak and pound it out with a meat mallet if you'd like. That's just more work, though. I'll leave it up to you.
Either way, put the meat in the marinade, mix it up to ensure all the meat is coated, then cover the meat with plastic wrap, making sure to push the wrap down to the surface of the meat rather than just covering the bowl. This will help prevent the meat from discolouring. Put the bowl in the fridge for a minimum of two hours and a maximum of twenty-four hours.


Fajita Vegetables
The traditional fajita vegetables are bell peppers and red onion. When I pulled the peppers out of the fridge, I noticed this beautiful yellow zucchini and thought it would make a great addition to the vegetable mixture. I was right. You can leave it out if you'd prefer.
Prepare the Vegetables
To prepare the peppers, stand them straight up on your cutting board and cut the lobes away from the core. Then, discard the seed pod. Cut the ends off the zucchini, then cut it into long thin slices. Toss the peppers and zucchini with olive oil and the mandatory fajita spice, Cajun seasoning. Cut the red onion in half down through the root and stem. That's all you have to do to the onion right now. And yes, before you ask, leave the peel on.


Homemade Corn Tortillas
Okay, you can totally skip this step and just buy tortillas. You don't have to make them yourself, but they are way better when you do. Having said that, it is a lot of work. Your choice.
If you do want to make them, here is how you do it. Go to the store and buy a bag of masa. I like PAN yellow or white masa. Masa is corn that has been treated with an alkaline solution, rinsed, cooked, ground, and dried. Treating the corn with an alkaline solution makes the corn's nutrients more accessible to your body and makes the corn easier to digest. It is a process that the ancient Mayans and Aztecs perfected over 2000 years ago.
Once you get your masa home, just follow the instructions on the bag. This particular brand suggests 2 cups of masa flour to 2 ½ cups of water along with a teaspoon of salt. I halved the recipe. To make the dough, mix the water and salt, then stir in the corn flour. Mix it and knead it until it forms a soft dough. Divide the dough into 1 tablespoon-sized pieces and roll them into balls. Using a tortilla press and two sheets of waxed paper, press the dough balls to flatten them into tortillas. Leave them wrapped in plastic or waxed paper until you are ready to cook them.


Get Grilling!
Grilled Red Onion
All your prep is done. Now, it's time to cook. Get your grill nice and hot, then put your red onion on the cut side down. On my grill, the front is the hottest part, and the back is cooler. So, I put the onion on the back and grilled it for about 20 minutes. Then, I flipped it, brought it to the front and cooked it for another 10 minutes.


Grilling the Tortillas
While the onion is grilling, cook up the tortillas. Grill them on the hottest part of your grill. They should take about 90 seconds per side. Once grilled, put the tortillas in a tortilla warmer, or wrap them in a clean kitchen towel or foil.


Grilled Peppers and Zucchini
Once the tortillas come off the grill, you can put the peppers and zucchini on. Cook them for about 8 to 10 minutes per side over moderate heat. You want them still to have a small bit of crunch to them but not be raw.


Grilling The Steak
Finally, you can grill the steak. Take it out of the marinade and grill it on the hottest part of your grill for about 3 minutes per side. Because the steaks are thin, they cook very quickly. Keep a close eye on them so they don't overcook and become tough.


Cut It Up!
Now that all your ingredients are cooked, it's time to cut them up! Let the vegetables cool for 5 to 10 minutes or just until you can handle them comfortably. Thinly slice the peppers and zucchini, then put them in a medium mixing bowl. Cut the ends off the onion and remove the skin. Cut the onion into slices the same width as the peppers and zucchini. Add the onion to the other vegetables and mix. Put in a serving dish and serve.
Let the steak rest for 5 minutes, then thinly slice it across the grain. Slicing against the grain is essential for tenderness, especially with a lean cut like sirloin tip. Put the meat on a serving platter and serve.


Serving The Grilled Steak Fajitas
Serve the fajitas as a family-style meal, meaning everyone serves themselves. Along with the fajitas, put some salsa, sour cream, sliced lettuce, tomatoes, and avocado on the table. Enjoy!


More Than Just a Meal
There is something special about sitting down to a nice meal with your family and having everyone reaching around the table and food being passed back and forth. It takes attention. You can't have a cell phone in your hand if you have to pass the peppers or the meat. This kind of meal gives a family time to talk and enjoy each other's company. Couldn't we all use a little more of that?
These grilled steak fajitas are one of my favourite summer meals because they bring people together around the table in a way that few other dishes can. The whole process, from firing up the grill to passing the tortillas, feels like a celebration. So, what are you waiting for? Fire up the grill and get cooking!
Recipe
Grilled Steak Fajitas
Ingredients
Steak Marinade
- 1 teaspoon dried oregano
- 1 teaspoon paprika
- ⅛ teaspoon cayenne
- ½ teaspoon ancho chilli powder
- ¼ teaspoon ground cumin
- 1 tablespoon minced garlic
- ¼ cup thinly sliced onion
- 4 rings pickled jalapenos
- ¼ teaspoon kosher salt
- 2 tablespoon olive oil
- 1 tablespoon red wine vinegar
- 1 lb sirloin tip ¼-inch thick steaks
Tortillas
- 1 ¼ cup water
- 1 cup PAN massa
- /2 teaspoon kosher salt
Vegetables
- 1 green bell pepper
- 1 red bell pepper
- 1 yellow zucchini
- 1 red onion
- 2 teaspoon cajun seasoning
- 2 tablespoon olive oil
Garnish
- ½ cup grated cheddar cheese
- 1 cup shredded lettuce
- 1 cup diced tomato
- ½ cup salsa
- ½ cup sour cream
Instructions
Steak
- Combine all the marinade ingredients in a medium glass or plastic bowl.
- Add the meat, cover tightly with plastic wrap and put it in the fridge for at least 2 hours or up to 24 hours.
- Remove the steak from the marinade and grill on high heat for about 3 minutes per side.
- Allow the meat to rest for 5 minutes, then thinly slice it against the grain and serve.
Tortillas
- Pour the water into a large mixing bowl and stir in the salt.
- Slowly mix in the masa and knead until the mixture forms a firm dough.
- Divide the dough into tablespoon-sized pieces and roll into balls.
- Press the dough balls between two sheets of waxed paper on a tortilla press or use a heavy pot.
- Grill the tortillas on high heat for about 90 seconds per side.
- Keep the cooked tortillas in a tortilla warmer, or wrap them in a clean kitchen towel until you are ready to serve them. If the tortillas cool down too much, reheat them for 20 seconds in the microwave.
Vegetables
- Cut the red onion in half through the root and stem.
- Grill the onion, cut-side down for about 20 minutes on moderate heat. Flip the onion and cook on high heat for another 10 minutes.
- Remove the onion from the grill and allow it to cool for 5 to 10 minutes.
- Cut the ends off the onion and remove the peel.
- Thinly slice the onion and put it in a medium mixing bowl to be tossed with the other grilled vegetables.
- Cut the sides off of the red and green bell peppers discarding the seed pods.
- Cut the ends off the zucchini and discard. Slice the zucchini into long thin slices.
- Put the peppers and zucchini in a large mixing bowl, drizzle with the olive oil, then season with the cajun seasoning.
- Grill the peppers and zucchini on medium-high heat for about 6 minutes per side.
- Remove the vegetbles from the grill and allow them to cool just long enough that you can handle them. Thinly slice the vegetables, mix with the sliced onions and serve.
Serving
- Serve the steak, vegetables, and tortillas with grated cheddar cheese, thinly sliced lettuce, diced tomatoes, salsa and sour cream. Avocados or guacamole and fresh lime are also great additions.


Leave a Reply