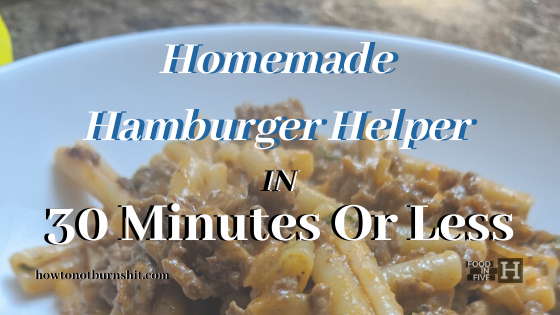
Happy Monday Everyone! For today’s 30 Minutes Or Less we are going to take a look at my twist on a store-bought classic and make Homemade “Hamburger Helper”. What’s more, is that we are going to make it in just about the same amount of time it would take to make it from a box. I may be biased but I think this homemade version is even going to taste better than the original.
Before we jump into this there is something I want to quickly talk about. When I was a kid there were points when my family was really struggling to make ends meet. Like millions of Canadians, we had to turn to the local food bank for help. One thing that was consistently among the items we would receive from the food bank was hamburger helper and these would be the only times we would ever have it. So when I taste the flavour of hamburger helper like in this recipe, it takes me back to that time. What I remember most about that time is not shame, it’s not a feeling of sadness, it is a feeling of gratefulness. If it wasn’t for our local food bank and the donations that people in the community made to it I would have gone hungry on more nights than I can remember or probably even know.
Almost 12% of Nova Scotian Households face food insecurity issues. I can tell you from personal experience that this time of year is especially difficult when you don’t have enough to eat. So if you can, if you have any extra you can spare, please donate to your local food bank. This time of year and all year round. Who you end up helping could a friend, a neighbour, a family member, or even a young me.
Alright, here we go…
5:35 pm – Getting Started
I got going on this Homemade “Hamburger Helper” at 5:35 pm. To get started I put a large skillet on the stove over medium-high heat, I put a pot of salted water on for the pasta, and I diced an onion.
5:38 pm – Parsley
Once the onion was chopped up and pushed aside I chopped up about 2-3 tbsp of fresh parsley. And that concludes our knife work for the day.
5:39 pm – Hot pan
At 5:39 the pan was nice and hot so I added in the beef. I’m using a nonstick pan so I didn’t add any oil into it because enough will come out of the beef and that with the non-stick is enough. However, if you are using stainless steel or castiron you will likely need to add a teaspoon or two of canola or another neutral oil. So, I added the beef in, stirred it around a bit and seasoned it with salt and pepper.
5:44 pm – Boiling Water
By 5:44 I was still browning the beef but my pasta water was boiling. The pasta I used is obviously gluten-free and takes about 12 minutes to cook. I figured that the timing would work out just about perfect so I put the pasta in the water. If your pasta takes a little less time to cook you may want to wait for a few minutes before adding it into the water.
5:46 pm – Onions In
Once the beef was browned I added in the onion and cooked that for about 2 minutes.
5:48 pm – Herbs and Spices
After the onion came the herbs and spices. I used 1 tsp of garlic powder (I would have used 2-3 cloves of fresh garlic but realized way too late that I was completely out), 1 tbsp dried oregano, 1/2 tsp paprika, and 1/4 tsp red chilli flakes. I cooked the species with the beef and onion for about 3 minutes.
5:51 pm – Sauce It
Next up, I added in 1 cup of puréed (or crushed) tomatoes, and 1/2 cup of whipping cream (35%) and stirred it well to combine.
5:54 pm – More Herbs and Spices
At this point, I gave the mixture a taste and wasn’t too happy with it. So, I doubled up on the spices adding in the same amount again of garlic powder, paprika, and dried chilli flakes.
5:56 pm – Drain the pasta
My sauce was looking a little too thick so I scooped out about 1/4 cup of the pasta water and added that in. I also drained the pasta and added it to the sauce. I mixed all of this up making sure all the pasta was coated in the sauce.
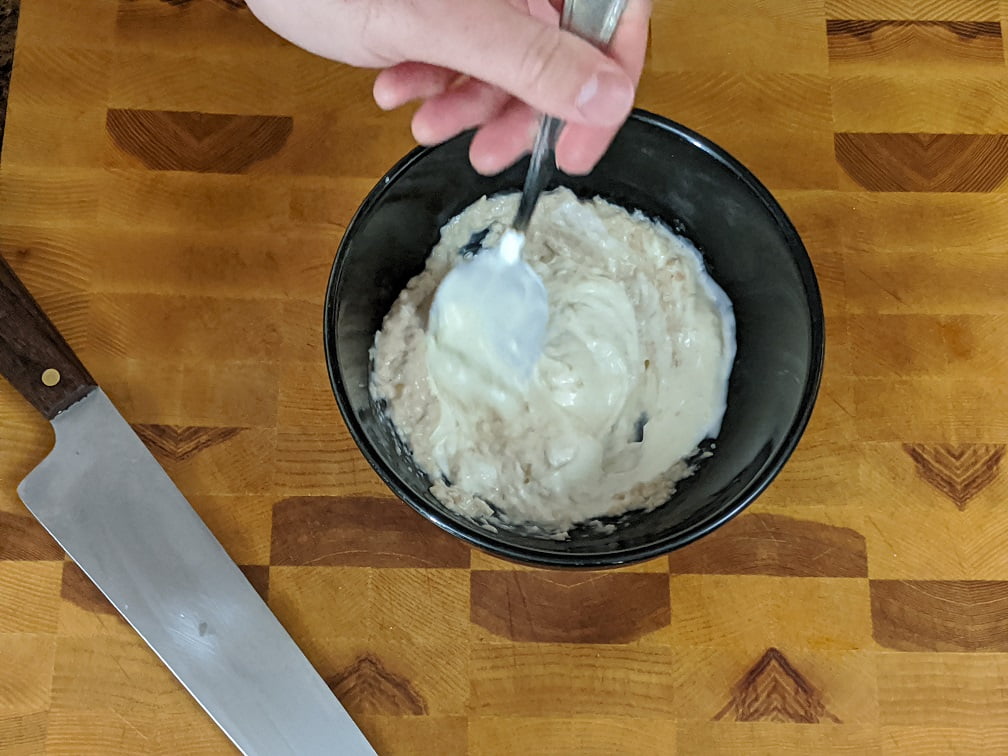
5:58 pm – Homemade
Finally, at 5:58 pm I shut the heat off of the burner and added 2 tbsp sour cream, 2-3 tbsp grated cheddar, 2 tbsp parsley to the pan. I gave the pasta one final taste, adjusted the seasoning with salt and pepper and just like that with 7 minutes to spare, Homemade “Hamburger Helper” was done and good to go.
Conclusion
What’s not to love about this? It’s creamy, gooey, quick, cheap, and delicious. I highly recommend you give this a shot.
You may have noticed that there are not a lot of vegetables with this dish, good eye. I suggest serving it with a saladwhich you have plenty of time to make and will still come in under the 30-minute mark.
I hope you enjoyed this post and remember to like and share it. Thanks, and please donate to your local food bank, no donation is too small.
Homemade Hamburger Helper
A quick and delicious homemade "hamburger helper" style meal.
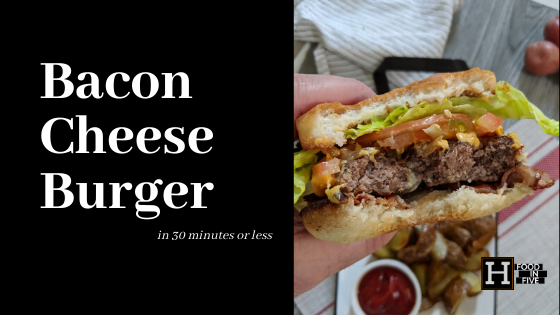
Okay, everybody, it’s Monday, you know what that means! It is 30 Minutes or Less time. Today we are going to make a bacon cheeseburger with horseradish mayo and roasted potatoes in under 30 minutes. And, I’m going to show you how to do it too. You don’t need to be a professional chef, just a hungry person who is short on time and hungry for something delicious.
This is how to make…
2:25 pm – Pre-heat
I actually made this bacon cheeseburger for a late lunch as I had things to do in the evening, so I started at 2:25 pm. The first thing I did, and you should to was to heat up the oven to 400°f, get a skillet or oven-safe pan heating up on the stove over medium heat, and heat up a griddle to 375°F.
A note about the griddle.
If you don’t have a griddle it isn’t the end of the world. These burgers can be cooked in a pan or on the BBQ. Generally, I don’t use special equipment for these posts but I just got my griddle and I know a lot of people do have them. If you’re curious this is a link to the one I’ve got. I’ve used it a handful of times and it works well so far.
2:26 pm – Potatoes
With everything heating up it was time to get down to business. First up, potatoes. I used baby red potatoes for this as they hold up really well in the oven. You can use any kind of potato you want, but I do recommend a yellow-fleshed variety for various reasons.
All I did with the potatoes was cut them into quarters, toss them in the pan with a little oil and salt and pepper and let them cook. I tossed them every few minutes while I went about other things.
We will come back to these later.
2:29 pm – Onion
It took me a few minutes to get the potatoes cut and in the pan, then I went to work on an onion. I cut the ends off, cut the onion in half and peeled it. Then I thinly sliced it along the grain of the onion. Once the onions were cut, I put them on the griddle with a touch of oil.
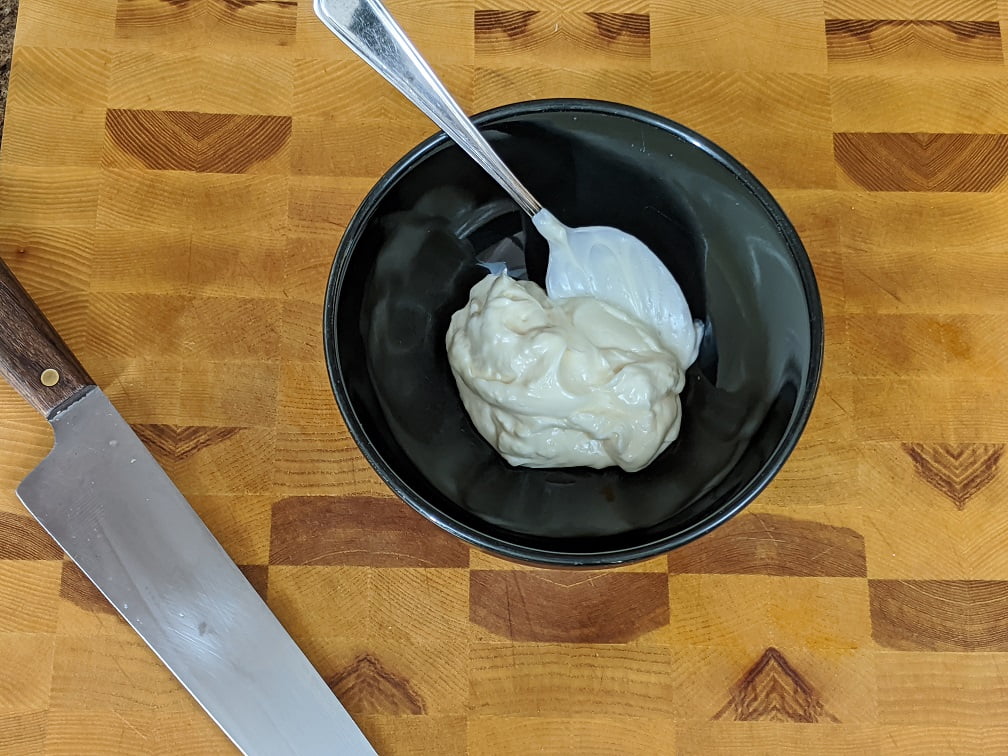
2:31 pm – Horseradish Mayo
It was now 2:31 and this seemed like the perfect opportunity for me to mix up a batch of horseradish mayo. What’s in it? Prepared horseradish and mayonnaise. That’s it. Let’s call it 1/2 cup of mayo and 1/4 cup horseradish. I mixed it up and set it aside.
2:33 pm – Potatoes in the oven
I had been tossing or stirring the potatoes every minute or two up until this point. But not they were browning and the oven was hot. In the oven, they went. I also gave the onions a stir and cut four strips of bacon in half and put them on the griddle.
2:35 – Prep the vegetables
Another small job I got out of the way was prepping the vegetables. I sliced a tomato and tore apart some iceberg lettuce. Nothing too exciting.
When it comes to burgers and sandwiches in general thinly sliced tomatoes are always the way to go. I slice them as thin as I can. I find the sandwich or burger is less likely to slide apart with thin tomatoes.
2:37 pm – Burger
Okay, with the veg out of the way I gave the onions another toss, flipped the bacon and got to work on the burger. I didn’t do anything crazy here. I took one pound of medium ground beef and combined it with 1 tsp garlic powder, 1 tsp onion powder, 1 tsp salt (with the bacon this was a bit much. In the full recipe I cut this back to 1/2 tsp), and 1/2 tsp of black pepper. That’s it. I mixed this up and made four evenly sized balls.
2:39 pm – Bacon
The onions were starting to look pretty good and the bacon was cooked. I tossed the onions, and took the bacon off the griddle and set it on some paper towel to absorb the excess grease.
2:41 pm – Bacon Off Burgers On
With the bacon off the griddle and the onions pushed to the side, there was now room for the burgers. I flattened the beef balls until they were about 1/4 inch thick and put them on the griddle. I seasoned the burger lightly with salt and pepper and let them cook.
Notice that I didn’t take a lot of time to make sure the burgers were perfectly round. That is an unnecessary step that eats time. Just flatten the ball and put it on the griddle, no one is going to care.
2:45 pm – Flip burgers
About four minutes after the burgers went on the griddle I flipped them. I then sliced the buns and put them on the griddle too. I didn’t butter the buns because there was enough grease on the griddle from the bacon and the burgers.
A note about the buns.
I am obviously using gluten-free buns here. The best ones I have found so far are made by kinnikinnick. You can check out their website here. The only place I’ve been able to find them around here is Sobeys.
2:48 pm – Onions on burgers
At this point, the burgers were cooked so I topped them with the onions and one Kraft single each. The buns were also ready so I took them off the griddle.
Why am I using Kraft Singles?
You may be wondering why I used Kraft Singles on my burger, surely there must be a better cheese I could have used. Nope. In all honesty, I think for a bacon cheeseburger, there isn’t much better than a Kraft Single. I used them because I like them on cheeseburgers.
2:51 pm – Dress Buns
While the “cheese” was melting I dressed my buns. Horseradish mayo on the top and bottom bun. Bacon on the bottom bun. Lettuce and tomato on the top.
2:52 pm – Cheeseburger Done
With the cheese melted the burgers were done. On to the buns they went.
2:53 pm – Potatoes Done
At 2:53 the potatoes came out of the oven. Crispy on the outside and soft on the inside. Delicious!
2:54 pm – Dinner is ready
And just like that, dinner was done.
Conclusion
All too often we try to over complicate things that are best when left simple. This cheeseburger has only a few ingredients but was absolutely delicious. Keep it simple.
There is also this misconception that homemade burgers takes a long time to make. Seasoning the meat, forming the patties, it seems like it should take a long time. But, clearly, that doesn’t have to be the case. The next time you get a craving for a burger make this instead of going out. You will be so happy that you did.
Bacon Cheeseburger
This recipe makes a delicious burger with onion, bacon, cheese, and horseradish mayo. What could be better?
The other day I posted a picture of some chili I made at Atlantic SuperStore. They asked me if I would help them to feed people who still didn’t have power and I was happy to do it. Since then a lot of people asked me for that chili recipe, but the truth is I didn’t use one. So, rather than write a recipe that isn’t going to be exactly the same as what I made anyway, I’m going to tell you my 5 secrets to great chili. That way, you won’t need a recipe either.
So, let’s get right to it,
My 5 Secrets To Great Chili
Number 5 – Lot’s of Vegetables in Chili
There are plenty of people out there that think that chili should just be meat, and sauce, sometimes not even beans. But I completely disagree. Chili can and should be a full meal in a bowl. So, I like to start with a base of carrots, onion, and celery, also known in French cooking as Mire Poix. I pretty much always add red and green peppers to my chili as well. If you are adding bell peppers into your chili, add them only in the last quarter of the cooking time. If added too early they can become bitter.
Other vegetables that can be added to chili include zucchini, mushrooms, eggplant, corn, or cauliflower. I’m sure there are plenty of other vegetables that would be great in chili.
The point is to just load that chili pot up with vegetables to balance out the meal. You will feel fuller, and probably not as bloated or heavy as you otherwise may.
Number 4 – Beans and Legumes
I think most of us probably add kidney beans into our chili. It is very common. But I like to take this one step further. I always like to add in a second bean or legume. This could be pinto beans, lentils, chickpeas, anything like that. I do this for two reasons. Beans and legumes are loaded with protein and fiber which is really good for you. And they are way cheaper than meat. Adding extra beans or legumes is a great way to bump up the protein without adding the cost of additional meat.
If I am making a vegetarian chili I may even go with three different kinds of beans and legumes just to make sure I am hitting those protein requirements.
Number 3 – Chili Spices
We all put spices in our chili. I think cumin, coriander, and oregano are really common. If you use chili powder, not ground chilies, but chili powder which is a blend of spices then you are pretty much using cumin, coriander, and oregano. In addition to those spices, I like to add a bit cinnamon to my chili as well. It doesn’t take much, maybe 1/4 – 1/2 tsp in a pot, but it adds a really nice flavour.
There is something else I want to mention about spices. The flavour of spices actually comes from flavour compounds held in the essentially oils in the spices. These flavour compounds are heat soluble and volatile. What does that mean? It means that in order to get the most flavour out of our spices we need to do two things. The first thing is to sauté the spices. The high heat will cause the spices to release their flavour. This only takes about 1-2 minutes. Once your onions, garlic, and vegetables have been sautéed, and right before you add any liquid or wet ingredients to your pot add your spices, and stir for 1-2 minutes. Once the smell of the spices really starts to hit you add liquid to cool them and slow the release of those essential oils.
The second thing we have to do is probably counter to everything you know about cooking chili. Generally, when people talk about cooking chili they brag about leaving the pot on the stove simmering for 12, 14, 18 hours! The assumption being that the longer the chili is cooked the better it will be. This is actually 100% false and the reason goes back to those essential oils coming out of the spices. As I said, those oils are heat soluble and volatile. So, the longer you cook them the more they degrade and the less flavour you get. You really don’t want to cook chili for any more than two hours.
I should say too that if you are cooking your chili, give it a taste and notice that it could use a bit more of a certain spice it is okay to just add it into the chili as its simmering. It’s just that those late addition spices aren’t going to have the same depth of flavour as those early addition spices.
Number 2 – Heat
Whether you like spicy food or not I think we all can agree that chili needs to have a bit of heat to it. Chilies are what chili takes its name from. It doesn’t have to be a lot, but there needs to be some. At least a bit of warming on the tongue. To achieve this heat people often will add cayenne pepper. This is okay but I much prefer fresh chilies. For a little spice 1 jalapeno, you can even remove the seeds if you want to really downgrade the heat. For hotter chili, a few jalapenos and a couple of habaneros or scotch bonnets will really throw things into overdrive.
To use the chilis just chop them up (it might be best to wear a glove when doing this) and sauté them with the onion, garlic, and other vegetables.
It is important to remember that not all chilies are created equal. One jalapeno may be way hotter than another one. A good way to tell how hot a pepper is going to be is to cut into it and give it a smell. Does it smell slightly metallic? Does it sting your sinuses a little? If so, you know it’s going to be a hot one. It might be best to remove the seeds before use. For those of you that don’t know why I keep saying remove the seeds, its because much of the heat in a chili comes from the seeds and the white ribs inside the pepper.
Numer 1 – The secret ingredients
My two secret ingredients to making an amazing chili are coffee and chocolate. Yup, you read that right. These two ingredients add depth to the flavour of the chili that is unbelievable. And, you don’t need much.
To a pot of chili, I will generally add between a 1/2 – 1 ounce of semi-sweet bakers chocolate. I just drop it right into the pot about halfway through cooking. For the coffee, I will use either 1 shot of espresso or 1/2 a cup of strong brewed coffee.
I know it seems odd but you won’t believe how amazing this will make your chili.
Bonus Tips
When making vegetarian chili start with a base of 1 chopped portobello mushroom and 4-6 cremini or brown mushrooms. Cook these on a moderate heat with a bit of oil and salt. The mushrooms will release their liquid which should then be cooked until almost fully evaporated. This will create a base for the flavour of the chili that will replace that missing meatiness.
When adding tomato paste to chili sauté it with the vegetables for 3-4 minutes before adding in any liquid. This will take away the harsh metallic flavour of the tomato paste and make it sweeter. The sweetness from the tomato paste will balance the acidity of the tomatoes meaning you won’t need to add any sugar or much less sugar than you otherwise may have to.
Conclusion
Chili is a delicious, full meal in a bowl that is just as great in the middle of summer as it is in the dead of winter. Use these secrets and let me know what you think in the comments or on social media.
Thanks for reading and remember to subscribe to the blog so you never miss a post.
Last night I made spaghetti and meat sauce with garlic bread and Caesar salad. I did it in under 30 minutes however, it was very difficult. And, in all honesty, it wasn’t the best pasta sauce I have ever made (as my wife was quick to point out). It was good, but it could have been better.
For the tomato portion of the sauce, I used one can of crushed tomatoes and one can of diced tomatoes. The diced tomatoes were pretty watery. Because of the limited time, I wasn’t able to cook off enough of the tomato liquid. I would suggest using two cans of crushed tomatoes rather than diced ones.
Putting the garlic bread together was pretty easy and took very little time. The Caesar salad, on the other hand, did kind of get in the way. Within the half-hour cook time, I not only made the sauce from scratch, cooked the pasta, made garlic butter and garlic bread, but I also made everything for the salad from scratch. It’s not impossible, obviously, but again, it was difficult. I would suggest having the salad mostly ready to go. You can do this the day before, just don’t dress it.
Finally, while the bacon and the beef were cooking I stirred them every chance I got. It was too frequent and probably unnecessary to give exact times.
Okay, with all that in mind, let’s take a look at how I made…
Spaghetti & Meat Sauce in 30 Minutes or Less
7:10 pm – Getting Started
The first thing I did was get the heat on for everything. I turned on the pot for the sauce, the pan for the bacon bits, the oven for the garlic bread 425°F, and I filled a large pot with hot water, turned it on high and put a lid on it for the pasta.
This all sounds like a lot but it only took about one minute.
7:11 pm – Nice to meat you!
With all the heat on it was time to get cooking. I diced about a 1/2 lb of bacon and put it in a slightly warm cast iron pan on medium low heat.
Once the bacon was in the pan I added about 1 tbsp of canola oil to my saucepot and added 1 lb of medium ground beef.
This all took about 3-4 minutes during which I also washed my knife and cutting board.
7:15 pm – A roll of the dice.
With the meat cooking, it was time to get going on the vegetables. I diced an onion, a red pepper, four cloves of garlic, and a couple of cremini mushrooms.
I separated the garlic into three and put 1/3 in a small ramekin which I used later to make garlic butter. I put 1/3 in a bowl for Caesar dressing. And, I left 1/3 on the cutting board for the sauce.
7:21 pm – What’s the beef?
By 7:21 all the vegetables were cut and I added them to the now browned beef.
I cooked all of this together for about three minutes and then added 1 tsp chili flakes, 2 tbsp, dried oregano, and salt & pepper.
7:25 pm – The can-can
At 7:25 it was time to open up the cans of tomato purée and diced tomatoes. I added them into the pot. (Again if you want to do this in 30 minutes I would suggest using two cans to tomato purée and leaving out the diced tomatoes.)
I brought the sauce to a boil and then reduced the heat to let it simmer.
7:28 pm – Pasta in the pool
I used gluten-free pasta which takes about two minutes longer to cook than regular pasta. I added mine to the boiling water at 7:28 but, if you are using regular dried pasta probably wait another minute or two. Though, in all honesty, it doesn’t really matter that much as long as you drain it before it overcooks.
Right around this time, I drained the bacon which by now was nice and crispy. I cooked it on medium-low heat to draw the fat out. This is an old French technique that yields the crispiest bacon ever.
7:29 – Butter that bread
It was time to get going on the garlic bread. I took that little ramekin of garlic that I set aside earlier added about 1 1/2 tbsp of butter to it. I mixed this up really well. I then sliced a gluten-free baguette (you can use non-gluten-free) down the middle lengthwise, spread the garlic butter on the and popped it in the oven right on the rack.
7:30 pm – Dress it up.
It took me about a minute to assemble the garlic bread and get it in the oven. The next step was to make the Caesar salad dressing.
Generally, Caesar salad is made with raw egg yolk. As my wife is pregnant and definitely cannot have raw egg yolk I made mine with mayonnaise as the base.
I took the bowl with the final 1/3 of garlic in it and added about 1/4 cup mayo to it. To this, I added 1 tbsp red wine vinegar, a few drops of fish sauce (you can use Worcestershire sauce), the juice of 1/4 of a lemon, 2 tbsp grated parmesan, and a bit of salt and pepper.
I mixed all of this together and the dressing was done.
7:33 pm – The old cut n’ wash
With the dressing made and set aside I got straight to cutting the romain lettuce.
I used 1 romain heart for this as it was just my wife and I eating, but two should feed a family of four.
I pulled off any brown leaves, sliced the head lengthwise through the middle, but not through the root. I rolled the lettuce 1/4 turn and the sliced again. Essentially I was making a plus sign ( +) cut down the center of the romaine head while keeping the root attached to hold the head together. I then cut across the head making bite-sized pieces of lettuce. These went into the salad spinner, got rinsed with cold water, drained, and spun.
If this all sounds confusing then just watch the quick video below to see what I’m talking about.
7:35 pm – Putting it all together.
At this point, I was still waiting on my pasta to cook (I stirred it every couple of minutes to prevent clumping) but, everything was ready for my salad. I already had the Romain in a big metal bowl and so I added my dressing, bacon bits, and a bunch of parmesan right in on top of it.
I left the salad in the bowl and went about finishing everything else.
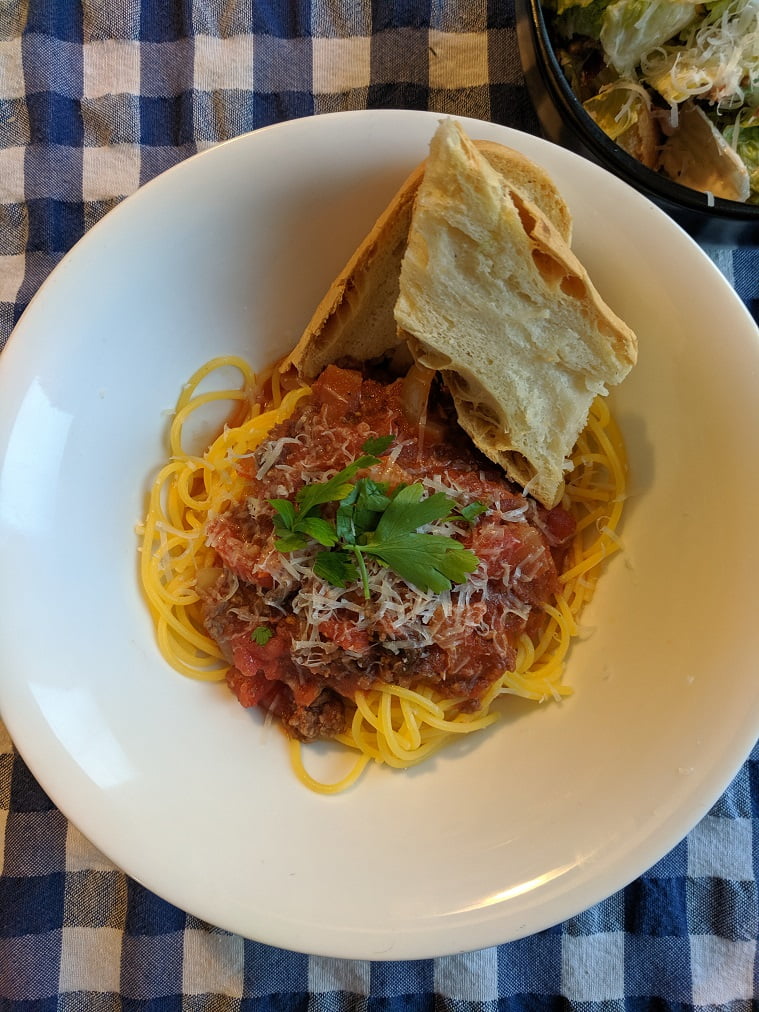
7:37 pm – Spaghetti and Meat Sauce
Okay, at 7:37 the spaghetti was cooked so I drained it. After it was very well-drained I put some in a big bowl. I tasted the sauce and adjusted the seasoning with salt and pepper. Once the sauce was seasoned I took a big ladle full and poured it over my pasta. I topped the pasta with pepper and parmesan cheese.
Once the pasta was plated I took the garlic bread out of the oven. I sliced the two halves into three pieces. I put two pieces with my pasta, saved two pieces for my wife, and the other two I cut into croutons and tossed with the salad to finish.
I tossed the salad quickly and served it into bowls with a slice of lemon. Just like that dinner was done. The time was 7:39 pm.
Conclusion –
Once more I want to say that this would be better using two cans of tomato purée rather than one purée and one dice. Other than that this spaghetti and meat sauce was delicious. The salad was spot on and the garlic bread was delicious.
I hope that you enjoyed this post. The full, printable recipe is right below and remember to subscribe to the blog to never miss a post.
Spaghetti and Meat Sauce with Caesar Salad and Garlic Bread
This is a delicious meal that I was able to make in under 30 minutes.
The May long weekend is here! For many of us that means the official start to summer. Weekends at the cottage, drinks on the deck, and of course barbecues. In honour of the long weekend we are going to talk in depth about one of those barbecue staples; homemade hamburgers.
There are as many styles of homemade hamburgers as there are people making them. Everyone has their secrets and preferences. There are little things that we all do differently or add to our meat to make our burgers stand out.
Everyone thinks their homemade hamburgers are the best, myself included. However, what I know is that you don’t know until you know. You know? What I mean is that maybe there is something that you could be doing differently, a new idea you just never thought of that would completely change your homemade hamburger game forever.
With that in mind, today I’m going to tell you…
Everything I know about Homemade Hamburgers
In my experience there are two main approaches that people take to making burgers. One, and unfortunately the more common of the two approaches is to throw everything but the kitchen sink into the mix. The second approach is more stripped down and minimalist. I fall into the second camp. Let’s take a look at them separately for a second.
Just to clarify, we aren’t going to talk about toppings, or even buns today. Just the homemade hamburger patty itself. Otherwise, this post will be way to long and a little unruly.
Kitchen Sink Burgers –
These are by far the most common type of homemade hamburger. People put everything in there. Chopped garlic and onion. Some kind of filler like bread crumbs, oat meal, or even crushed up tortilla chips. Usually there is an egg in the mix somewhere. I’ve seen people mix in Montreal steak spice, barbecue sauce, even celery salt. You name it, I’ve pretty much seen it go into a burger.
The problem I have with these types of burgers is that they don’t taste anything like a hamburger. The flavour get’s completely muddied and lost among all these different ingredients that don’t really need to be in the mix.
Minimalist Burgers –
When I make homemade hamburgers I typically add a little garlic and onion powder, and I add either salt and pepper or a little seasoning salt like old bay. That’s it. No binders. No fillers.
On the outside of the burger, right before I start to cook it, I season it with the same ingredients I seasoned the meat with. This way there is no confusion of flavours.
Rather than covering up and muddying the taste of the beef, these few ingredients act to compliment and enhance the flavour. So, the burger tastes like beef.
Type of Meat –
When I make homemade hamburgers, I prefer a medium ground beef, to a lean ground beef. The reason why is threefold and very simple.
Reason 1. The fat adds flavour.
Reason 2. The burger holds together better.
Reason 3. The burger will be juicier.
That’s it. What else do I need to say?
If you are sitting there thinking, “But Ben, it’s so fatty!” then you have bigger problems. These are burgers we are talking about. And, most of that fat is going to be cooked out anyway. If you want a juicy, flavourful burger, the secret isn’t to add a pile of ingredients. The secret is to leave the fat in.
Grinding your own meat –
If you are set up for grinding your own meat, fantastic! Myself, and I think most chefs, prefer a mixture of chuck and brisket for burgers. Chuck is very lean and brisket is pretty fatty. The combination of the two make for a perfect ground beef for burgers. But, what exactly is beef chuck, and brisket?
Brisket –
Brisket, as I’m sure most of us are familiar with comes from the bottom front of the cow, right above the front shoulder. It is fatty and tough, but very flavourful. This makes it perfect for grinding, smoking, and braising.
Chuck –
Chuck sits right above the brisket and behind the head/neck of the cow. It also is a very tough cut of meat. It is very lean and also flavourful. Most typically you would find this as a pot roast.
Other meats –
It isn’t uncommon for a little pork either raw or in the form of bacon to be added to ground beef to add flavour or fat. This would be especially necessary if you were only using ground chuck, or venison. Because it is so lean, the pork (or brisket) is needed to prevent the meat from becoming really dry and crumbly. Without the fat it would be like eating sand unless the burgers were cooked no more than medium.
Cooking burgers to temperature –
This actually brings up another good point. Cooking homemade hamburgers to temperature. Essentially, is it safe to eat hamburger rare, medium rare, or medium? The answer is yes and no.
It is very strongly suggested that you fully cook ground meat from the grocery store, or even from your butcher. Obviously we prefer to think that everyone handling our raw meat is maintaining the highest food safety standards possible, but it isn’t always the case.
The problem with ground meat is that by grinding it you are creating all of this surface area for bacteria to live and grow. By contrast, a whole steak only has the top, bottom, and sides for bacteria to populate. When the steak is cooked, even if it is rare, these surfaces are getting hot enough to kill that bacteria. But, because there is so much surface area with ground meat, it is impossible to kill all the potential bacteria unless the burger is cooked through.
Having said all of this, if you grind the meat yourself right before you make your hamburgers, and you make sure all the equipment is clean and sanitized, then yeah knock yourself out. Eat your burger rare. Why not?
For those of you that do have instant read thermometers, and you all should, burgers should be cooked to an internal temperature of 165°F.
The perfect size for the perfect burger –
When it comes to hamburgers I would rather have two thin patties than one giant patty. I know that a lot of people like a big juicy patty and that’s fine but not me. Let me explain.
There are a lot of reasons why I prefer thin patties to thick ones. One of the really big reasons is cook time. If I make a hamburger patty that is 1/4 inch thick it is going to cook in 4-5 minutes rather than 10-15 minutes for a really thick patty. This means it is less likely to burn on the outside while it’s cooking. Also, by stacking two thin patties I get four grilled surfaces rather than the two that you get with one thick patty. That equals more flavour. There is also an extra surface for cheese.
With thin patties there is also the option to have small single patty burgers for guests who may not be as hungry. What this means is that your meat goes further without having to add any fillers.
Cooking homemade hamburgers –
I think that we can all agree that the best way to cook a homemade hamburger is on the grill. If you make thick burgers, use a moderate heat. For thin burgers, you can use a high heat. Don’t press them and try to only flip them once.
If you don’t have a grill, I prefer to cook them in a hot cast iron pan. I don’t add oil to it as there will be enough coming out of the burger itself.
That’s really about it.
Conclusion –
Pretty much everybody loves burgers, except Barb and vegetarians (I’ll eventually do a veggie burger post). How you make your burgers is up to you. You are the one eating them after all. All I suggest is taking a step back, thinking about your burgers as they are now, and asking yourself if they could be better. If they can be, I hope that this helped. If they are as good as they can possibly be, I would love to hear about them. Talk to me in the comments.
Have a great long weekend everyone and thank you for reading!
It’s almost officially summer and we all know what that means. It’s burger time! Burgers are obviously classic summertime fare, and one of those unique foods that pretty much everyone has their own secret recipe for. Now, despite the fact that everyone thinks they make the best burgers, they don’t. Yes, some of you out there can make a really good burger but all too often people fall into the same burger traps. Avoid the common burger mistakes and become a burger pro with my 7 tips for making your burgers better.
Number 1. The Meat.
Choosing the right meat is the key to burger success. I would like to tell you to get some beef chuck and brisket and grind it yourself making a perfect 50/50 blend. Undoubtedly, that will make an incredible burger. But, you’re not going to do that and generally neither am I. So what should you use? Buy good quality lean ground beef. Fat is good in a burger but too much fat leads to a lot more shrinkage and flare-ups on the grill that’s why lean ground beef is better.
Number 2. Seasoning The Burger.
People are often given bad advice when it comes to what they should put in their burgers. There are a lot of “experts” out there that recommend adding all kinds of things to your burger meat before cooking it. Things like bread crumbs, onion, garlic, Worcestershire Sauce, steak spice and all kinds of other weird things. To be completely honest I was brought up on burgers like this but have since gained a new perspective. Let the burger taste like beef. All I put in and all I recommend putting in your burger meat is a little salt and pepper.
Having said that, I generally do season the outside of my burger with a mixture of garlic powder, onion powder, and Old Bay Seasoning. I use this blend on steaks as well. This way you still get a lot of flavour from your burger but it also still tastes like beef.
Number 3. Making Your Patties.
I am of the school thought that thinner is better. I make my patties as thin as I can by flattening them first in my hand than on a flat surface covered in parchment paper or plastic wrap. I use enough meat so that once they are fully flattened they are about one and a half times the diameter of the bun. I do this because the burger cooks quicker. They end up cooking into the perfect thickness and diameter for the burn. They cook more evenly. And they’re easier to eat.
If you do like a really thick burger there is a way to mitigate some of the shrinkage. After your patty is formed, stick your thumb in the centre making a thumb-sized hole pretty much all the way through the centre of the patty. This will not only help prevent the patty from shrinking too much, it will also help it cook more evenly.
Number 4. Cooking Your Burgers.
How you cook your burger depends on how thick you’ve made it. If you followed my advice and made your patty thin, you want to cook your burger on a medium-high to high heat. For thick burgers, you want to cook on a medium heat. The reason being that if you cook a thick burger on high heat it will burn on the outside long before it ever cooks through.
If you are cooking your burger in a pan, let’s say cast iron, get the pan nice and hot and don’t add any oil. Enough fat will come out of the burger that you don’t need to add any extra.
If you are cooking on a barbecue, heat your grill up for at least twenty minutes before you start cooking. Also, make sure your grill is really clean. As long as the grill is hot and clean, you shouldn’t need to oil it. If you have cleaned your grill and heated it up and your burger is sticking it’s likely because you are trying to flip it too soon. Give it a minute and let it release from the grill naturally.
Don’t push your burger down. All you’re doing is squeezing the juice out of it and making your burger dry. The only time this is acceptable is at the very end of cooking. If you give the centre of the patty a little push with your tongs or spatula and the juices run clear the burger is done, if they are still red cook it some more.
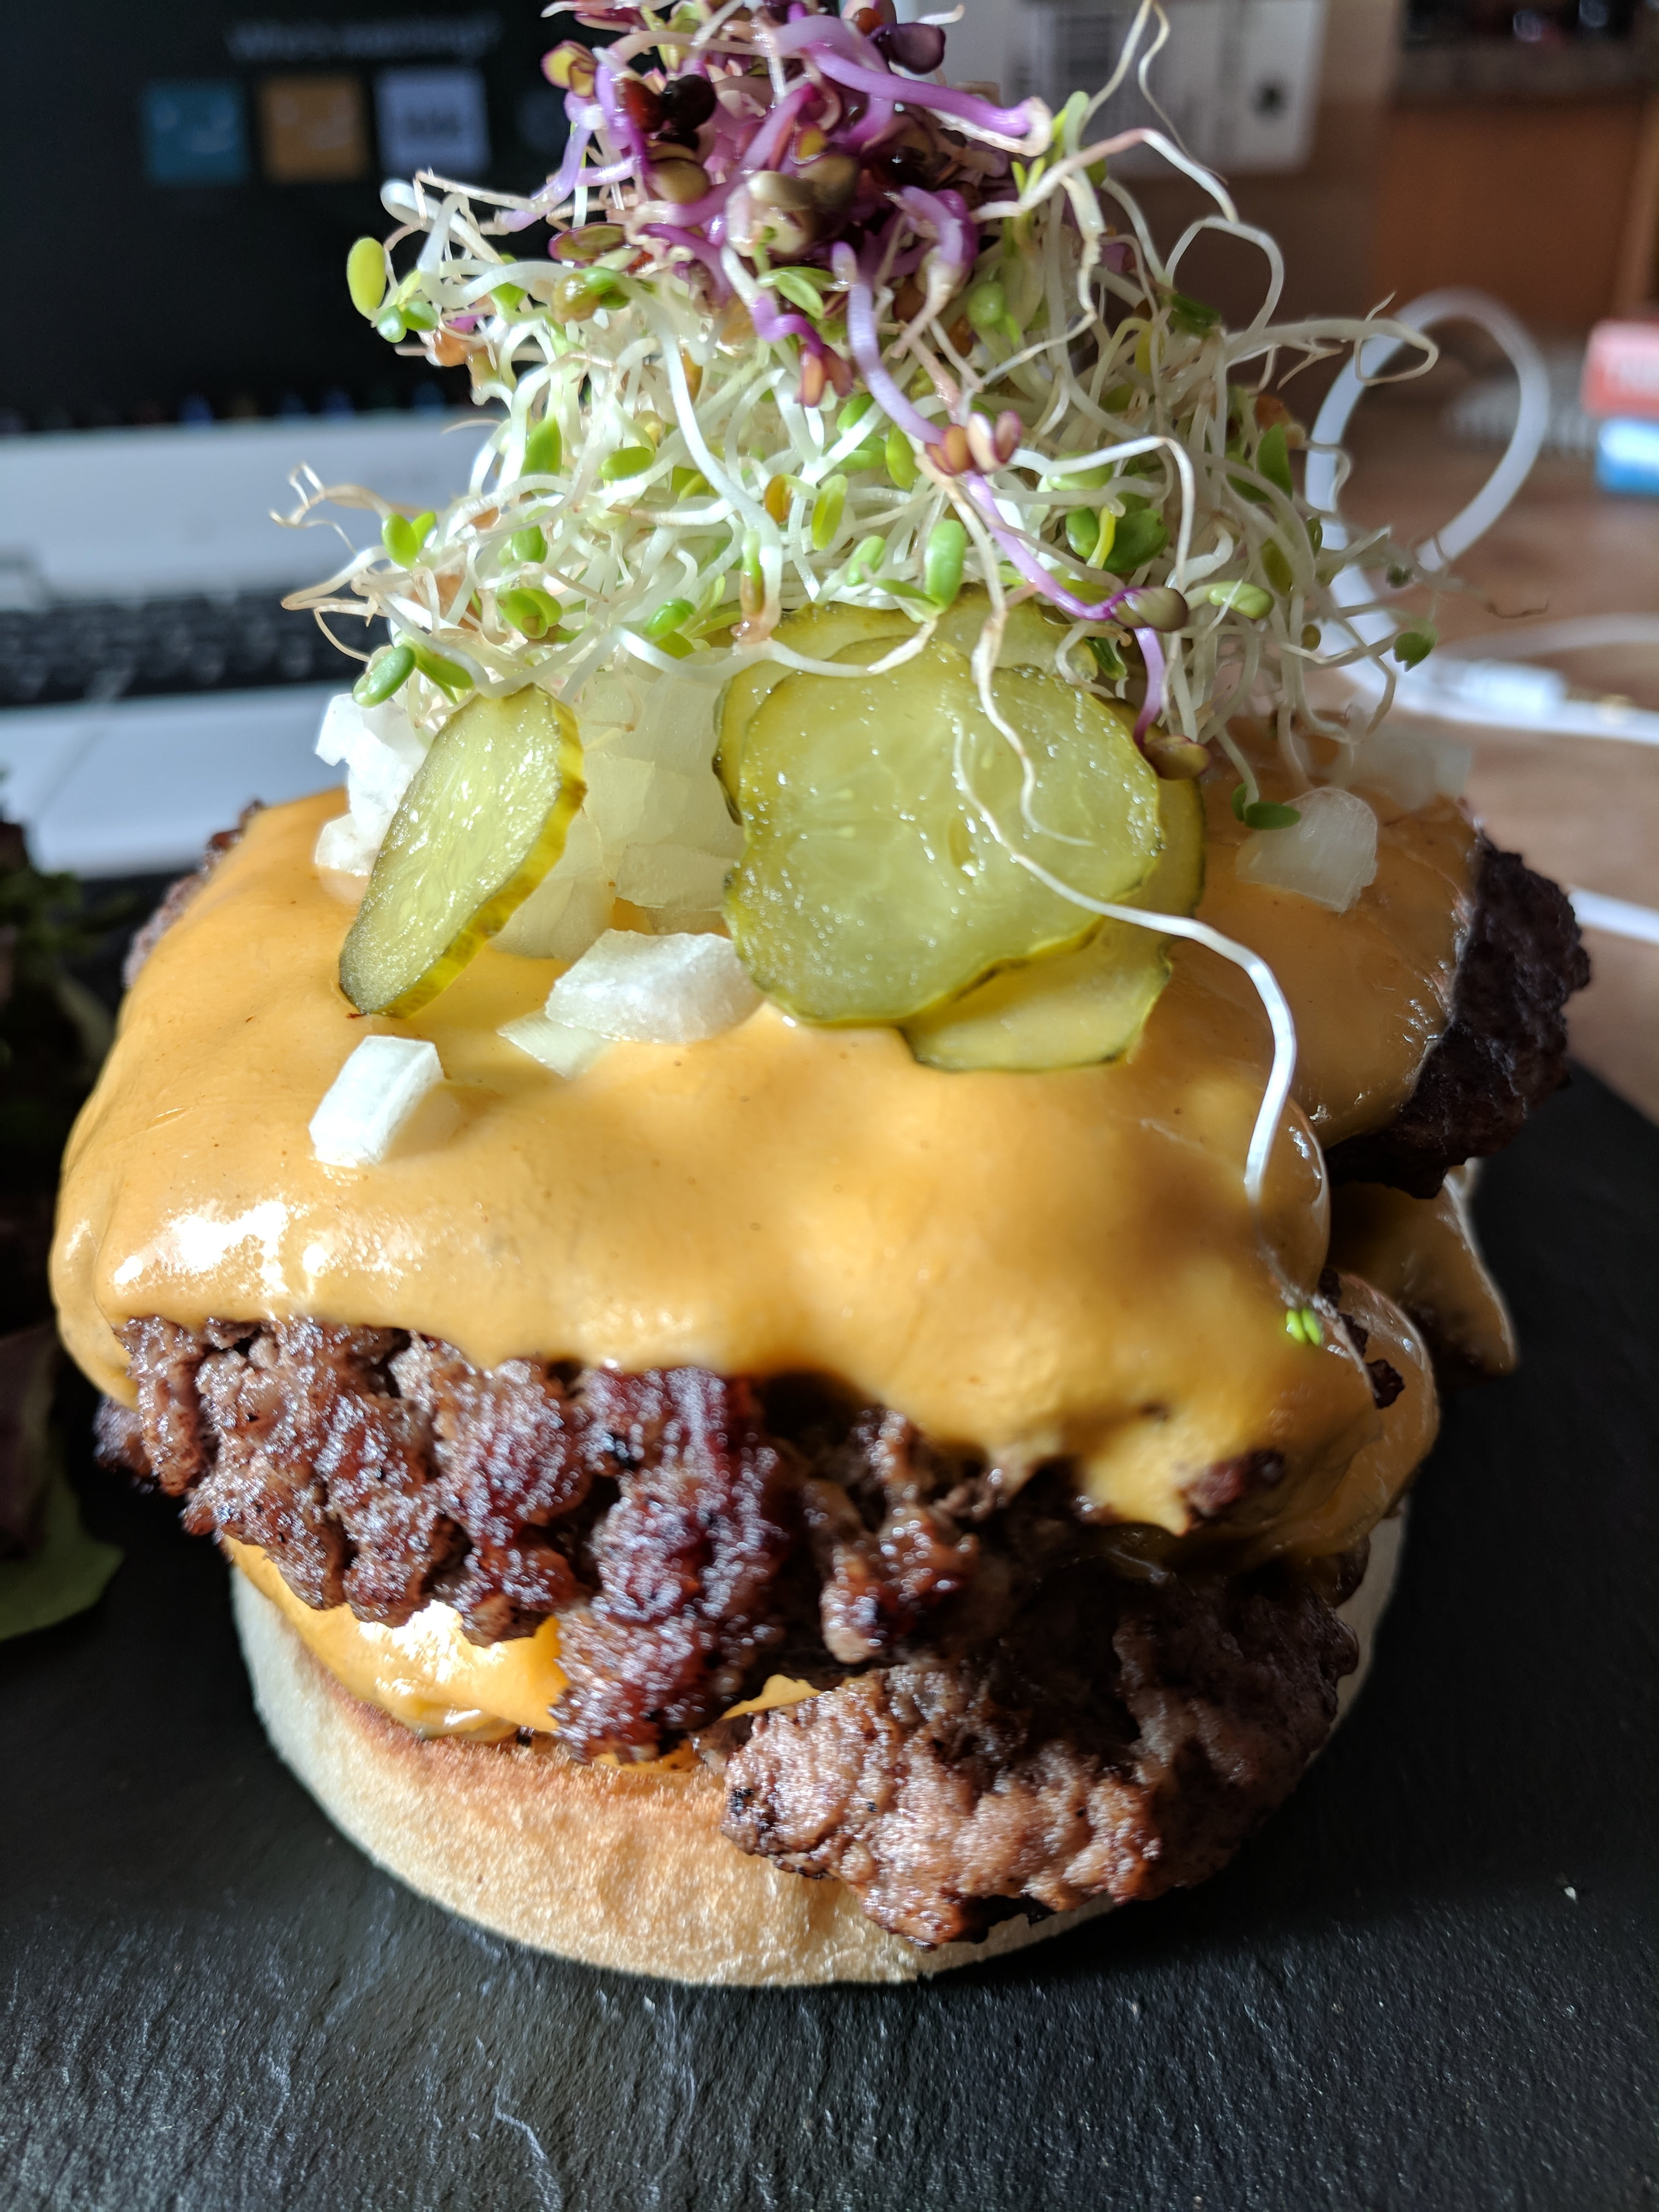
Number 5. Say Cheese.
The cheese that you use is fully up to you. I do have to say that for a long time I snubbed processed cheese slices but have recently fallen back in love with them on burgers. They add something that nothing else can. I think it’s probably just nostalgia but either way, it’s delicious.
Now, what type of cheese you use is your call completely, but when you add the cheese is really important. If you add it too early it will be melted and gone before your burger is fully cooked. If you add it too late, your burger will be overcooked and dry before the cheese melts. This isn’t really that big a problem with processed cheese slices as they melt if you blow on them.
Add the cheese once you flip your burger for the last time. You know it’s the last time because you checked the doneness of your burger by gently pushing down the centre of the patty and the juices are almost clear but not perfectly. This gives you the perfect amount of time to melt your cheese and finish cooking your burger. Flip the burger before adding the cheese as this gives the cheese the hottest possible surface of the patty and helps to speed up the melting process.
Number 6. Choosing the right bun.
When it comes to the bun there are really only two things that you need to worry about. The first being the size of the bun in relation to your burger. If you made your patty nice and thin and one and a half times the diameter of the bun this shouldn’t be that much of an issue. But keep it in mind. There are few things more annoying when eating a burger than having too much or too little bun.
The second thing you need to think about when choosing your bun is its structure. If the bun is too soft it will absorb fat from the burger and go mushy. If it’s too firm, it may fall when you try to eat it. You want a bun somewhere in the middle. Now, some of these issues can be dealt with by toasting the bun, but you want to be careful with this as well. A light toasting is delicious and helps to protect the structural integrity of the bun by creating a bit of a protective barrier between the surface of the burger and the inside of the bun. However, a bun that is over toasted and crispy falls apart and takes away from the enjoyment of eating the burger.
Number 7. Condiments.
What you put on your burger is your own business. I’m not going to tell you how to live your life. However, I will say don’t put too much stuff on your burger. There is a trend these days to pile unnecessary shit on a burger just for the sake of doing it. But ask yourself if it’s actually enjoyable to eat that or does it just look cool? The other thing is, the more stuff you put on your burger the harder it’s going to be to eat and the messier it is going to be. Just think it through.
If you are going more of a classic route with lettuce, tomato, and pickles cut them as thin as possible. This is especially true of the tomatoes and pickles. The are few things worse than biting into a burger and having its contents shoot out the backend because the tomatoes created a slick surface. By cutting the tomatoes as thin as you can you hopefully prevent this. Same going for pickles.
We use cookies on our website to give you the most relevant experience by remembering your preferences and repeat visits. By clicking “Accept”, you consent to the use of ALL the cookies.
This website uses cookies to improve your experience while you navigate through the website. Out of these, the cookies that are categorized as necessary are stored on your browser as they are essential for the working of basic functionalities of the website. We also use third-party cookies that help us analyze and understand how you use this website. These cookies will be stored in your browser only with your consent. You also have the option to opt-out of these cookies. But opting out of some of these cookies may affect your browsing experience.
Necessary cookies are absolutely essential for the website to function properly. This category only includes cookies that ensures basic functionalities and security features of the website. These cookies do not store any personal information.
Any cookies that may not be particularly necessary for the website to function and is used specifically to collect user personal data via analytics, ads, other embedded contents are termed as non-necessary cookies. It is mandatory to procure user consent prior to running these cookies on your website.