What’s better than a delicious meal? How about a delicious meal that you can make in under an hour? Sound good to me. Well, that’s exactly what these Sweet and Sour Meatballs are. They make a quick and delicious meal that you can make and eat any day of the week. And, you can make them from scratch with ingredients you probably already have on hand. Let’s get cooking!
Making The Meatballs
These meatballs are pretty straightforward. Put some ground beef in a mixing bowl, add some minced or grated ginger and garlic (you can use ginger and garlic powder if you want. Use 1 tsp of each per pound of meat.) Add a bit of salt and pepper to the meat and one egg to help bind it all together. If you want to stretch the meat a little further, you can also add half a cup of fine dry breadcrumbs. Once all the ingredients are in the bowl, mix well.
Forming The Meatballs
I find that forming these meatballs, or any meatball for that matter, is best down in two stages. Stage one is portioning out the meat. In this case, use a tablespoon to divide the meat into portions. The second stage is to roll the meat portions into balls. The easiest way to roll the balls is to have a bowl of cold water handy (no pun intended). Wet your hands and roll the meat into balls. Re-wet your hands after every two or three balls. Wetting your hands will prevent the meat from sticking to your hands and forming a thick layer of fat on your hands. It will also help give the balls a smooth appearance. Keep in mind your hands don’t have to be dripping wet. Just a little wet is fine.
Cook the Meatballs
Once the meatballs are formed, place them on a parchment-lined sheet pan and roast them in the oven at 400°f for 15 minutes. While the meatballs are cooking, you can make the sweet and sour sauce.
How To Make Sweet and Sour Sauce
There are a few different ways to make a sweet and sour sauce. I wanted to keep this recipe simple and use ingredients you probably have on hand, so I used ketchup as the base. If you’d like to see another way to make a sweet and sour sauce, take a look at this Sweet and Sour Chicken Ball Recipe.
Sweet and Sour Sauce Ingredients
You will need one green bell pepper and half a red onion for this recipe. Cut both into bite-sized pieces. I like to cut the green pepper into odd shapes because I think it adds to the dish’s appearance. You don’t have to take the time to do that if you don’t want to. Cut the pepper however you’d like. The other sauce ingredients are ketchup, white vinegar, sugar, and water. You can find the measurements in the recipe at the top of this post. Finally, you will need a bit of cooking oil. I like to use peanut oil, but you can use grapeseed, avocado, or canola oil if you’d like.
Making the Sweet and Sour Sauce
To make the sweet and sour sauce, heat a wok or large skillet on high heat. Add in the cooking oil, bell pepper, and onion. Stir-fry the pepper and onion until they start to brown, about two to three minutes. Then, add the ketchup and stir-fry for another minute. Next, add the sugar, vinegar, and water. Bring to a boil, then add in the cooked meatballs. Turn the heat down to medium-low and simmer for about three to five minutes or until the sauce is thick.
Sweet and Sour Meatballs
Just like that, your Sweet and Sour Meatballs are ready to go. Serve them with rice or noodles for a full meal. These meatballs also make a great hors d’oeuvre. Just stick them with some toothpicks, and you’re good to go. And these can be made ahead, kept in the fridge for up to four days and reheated. You just can’t go wrong.
The Wrap-Up
I love anything Sweet and Sour from my Sweet and Sour Chicken Balls, to my Sweet and Sour Chicken Legs, and of course, these Sweet and Sour Meatballs. With sweet and sour, you just can’t go wrong. So, what are you waiting for? Get cooking!
That does it for today but thank you for coming. I hope you enjoyed the post. And, if you haven’t already, remember to sign up to my newsletter at the bottom of the page to get exclusive recipes, cooking tips, behind-the-scenes stories etc., in your inbox once a month. The first edition of my new newsletter comes out next Monday. Don’t miss out! Have a great week and a fantastic weekend! I’ll see you right back here next Thursday.
Sweet and Sour Meatballs
Sweet and Sour Meatballs are a delicious and easy thing to make with a pound of ground beef. This simple recipe uses things you probably already have on hand to make a delicious sweet and sour sauce that you'll want to put on everything. Serve with rice to make a full meal. These meatballs also make a great appetizer for any party.
With rising grocery prices, I think we could all use a few quick, low-cost, delicious meal options. Well, I have one for you today. This is my ground beef and green bean stir-fry. You can put the whole thing together in less than 30 minutes, it costs less than ten bucks, it tastes amazing, and you can feed a bunch of people with a pound of ground beef and a bag of frozen green beans. Does that sound too good to be true? It’s not. Let me show you. As always, you can find the recipe directly below but keep reading for more details.
Making Stir-Fry Sauce
You can’t have a stir-fry without a delicious stir-fry sauce. Okay, you can but it’s much better with a sauce. The sauce for this ground beef and green bean stir-fry is about as straightforward as they come. Get a small bowl and put in it two teaspoons of cornstarch, one tablespoon of brown sugar, a quarter cup of beef stock (chicken stock or water will work too), two tablespoons of soy sauce, and two teaspoons of rice vinegar (white wine vinegar will work). Mix all the ingredients and set them aside until you’re ready to use them.
Prepping The Ingredients
Any stir-fry will benefit from a bit of onion. For this ground beef and green bean stir-fry, I use green onions, but you can use any other type of onion you want. If you use white, yellow, or red onions, use about a quarter of a cup of sliced onions. If using green onions, separate the whites and the greens as I did in the picture below. Cut the whites into finger-width pieces, and thinly slice the greens. The greens and the whites of the onion cook differently so we don’t want to add them to the stir-fry at the same time. The whites will go in first and cook with the other ingredients. The greens will be added near the end of cooking to add a fresh flavour to the dish. Along with the green onion, you need two cloves of thinly sliced garlic, two teaspoons to a tablespoon of minced or grated ginger. If you add a little more or less it isn’t going to change too much. Finally, you will need half a teaspoon of crushed red pepper flakes and two teaspoons of Chinese 5 Spice.
Ingredient Substitutions
If you don’t have fresh ginger and garlic, you can use one teaspoon each of garlic and ginger powder. Add the powders to the sauce. You can buy Chinese 5 Spice at most grocery stores now in the spice aisle. You can also make it using my recipe here. If you don’t have Chinese 5 Spice, you can use Garam Masala or Yellow curry powder with a pinch of cinnamon and clove.
Making The Ground Beef and Green Bean Stir-Fry
The key to a good stir-fry is a very hot wok (or pan if you don’t have a wok). The wok has to be hot so that the moisture that comes off the ingredients while cooking hits the pan’s surface and evaporates. If the wok isn’t hot enough, all that moisture will hit the pan’s surface, turn from a gas to a liquid, and pool, further cooling down your wok. This leads to a mushy boiled dinner rather than a crisp and fresh-tasting stir-fry. You can read more about the stir-fry technique here. In the meantime, put your wok on the burner, crank it up to high, and let it sit for a minute or two to get really hot. Next, add a teaspoon or two of cooking oil (I like peanut oil for stir-frying). Swirl the oil around the wok and add in the ground beef.
Browning the ground beef
There is a common mistake that people make with ground beef. When a recipe says to “brown the ground beef” they see that and think it means to “grey the ground beef“. Browning is a form of caramelization. Think about the surface of a burger cooked in a pan or a seared steak. That deep mahogany brown is what you want. This takes a little time but it is well worth the wait as the flavour will be deeper and richer. So, put the beef in the pan, break it up a little bit, then leave it alone for a few minutes. Let the bottom of the beef turn that deep brown before you stir it. Then, stir it and leave it alone for another few minutes. Once most of the meat is browned and it is all cooked, drain the excess fat and put the wok back on the burner.
Adding The Other Ingredients To The Stir-Fry
The ground beef is brown, you’ve drained the excess oil, and the pan is back on the burner. Make sure the pan is very hot again, then add the frozen green beans, garlic, ginger, Chinese 5 Spice, and crushed red pepper flakes. Now stir-fry for about three to four minutes or until the green beans are no longer frozen. This may take a little longer depending on how hot your wok was when you added everything in. Also, if you notice that your wok is cooling down, push the green beans to the sides and let it heat up. Once the green beans are no longer frozen, stir the sauce, then pour it into the wok. Stir-fry until the sauce is thick and the green beans are tender. Take the wok off the heat and stir in the tops of the green onions. Taste a green bean and a bit of the meat. Add a bit of salt and pepper as needed.
How To Serve The Ground Beef and Green Bean Stir-Fry
Serve the ground beef and green bean stir-fry with some rice, and you’ve got a delicious meal that took less than thirty minutes to make. It’s enough to feed four to six people, and it is delicious. Even if only one or two of you are eating this, I suggest making the whole batch. It makes excellent leftovers. I also like to serve it with a zig-zag of sriracha hot sauce over the top. This adds a little more heat and a little more acidity. The stir-fry doesn’t need it, but it does bump up the flavour that extra notch. Oh, and for a little more flair, you can sprinkle some white and black sesame seeds or the top for garnish. I would have, but I didn’t have any.
The Wrap-Up
I’ve made this twice now, and I’ve eaten way more than I should have both times. It’s a little sweet, a little spicy, and completely delicious. It is very much the kind of thing that you don’t want to stop once you start eating it. And, it’s a great meal for four to six people for less than ten dollars. You can’t beat that.
That does it for today but thank you for coming. I hope you enjoyed the post. And, if you haven’t already, remember to sign up to my newsletter at the bottom of the page to get exclusive recipes, cooking tips, behind-the-scenes stories etc., in your inbox once a month. Have a great week and a fantastic weekend! I’ll see you right back here next Thursday.
Ground Beef and Green Bean Stir-Fry
Do you have a pound of ground beef and don't know what to do with it? While, grab some green beans out of the freezer and throw this ground beef and green bean stir-fry together for a quick, cheap and delicious dinner.
4eagreen onions, whites and green separated and diced
tspsalt and pepper to taste
Instructions
In a small bowl whisk together the cornstarch, brown sugar, beef stock, soy sauce, and rice vinegar. Set aside.
Heat a wok over high heat.
Add the peanut oil to the wok and swirl it around. Add the ground beef and cook until browned. Drain off excess oil.
Add the green beans, garlic, ginger, crushed red pepper flakes, Chinese 5 Spice, and the whites of the green onions to the wok. Stir-fry for 3 to 4 minutes or until the beans are tender.
Stir the cornstarch mixture and pour it into the wok. Cook until thick.
Taste and season with salt and pepper as needed.
Garnish with the green parts of the green onions and serve with rice.
For a little more kick stir in a few teaspoons of sriracha.
Imagine everything you love about a cheeseburger but in a casserole. Guess what; you don’t have to imagine it becasue it’s a real thing. And now, you can have whenever you’d like. And yes, it is as good as you think it would be. But don’t take my word for it. Make this cheeseburger casserole for dinner and see for yourself. Alright, let’s get cooking.
Ingredients
The ingredients for the Cheeseburger Casserole are 2 pounds of lean ground beef, 1 onion, 2 to 3 cloves of garlic, 2 tablespoons tomato paste, 3 to 4 dill pickles, 2 tablespoons yellow mustard, 1 1/2 cups beef stock, 1 1/2 cups heavy cream, 1 teaspoon kosher salt, 1/2 teaspoon black pepper, 1 teaspoon sugar, 340 g box dried penne pasta, 1 cup grated cheddar cheese, 1/2 cup of bread crumbs, and 1/2 cup ketchup.
Prepping The Ingredients
Start by thinly slicing the onion, garlic, and pickles. In total, you want 1 cup of sliced onions, 1 tablespoon of sliced garlic, and 1/2 cup of sliced pickles. If you added a few extra pickles to the mix, it wouldn’t be a bad thing. Bring a large pot of water to a boil and cook the pasta for 1 minute less than the package instructions indicate. Drain the pasta and rinse under cold water for a minute. Set the pasta aside until you are ready to add it to the cheeseburger casserole.
Cooking The Cheeseburger Casserole
Heat a large oven-safe skillet over medium-high heat. Add in 2 teaspoons of canola oil along with the beef and cook until the beef is browned. This should take between 5 and 10 minutes. Add the onion and cook for 3 more minutes, then add the pickles and garlic and cook for another 2 minutes. Mix in the tomato paste and mustard, cook for 2 minutes, then add in the beef stock. Bring to a boil and cook for 3 minutes.
Finishing The Cheeseburger Casserole
To finish the cheeseburger casserole, add the cream, bring it back to a boil, then add the sugar, pepper, and mix in half the cheddar cheese. Taste the mixture and add the salt as needed. Depending on the beef stock you use, you may need to add more or less salt than the recipe says. Add the pasta to the sauce (Don’t mind that I used different pasta shapes. I had a few boxes with a little bit left in them), and mix well. Combine the remaining half cup of grated cheese with the breadcrumbs and sprinkle over the casserole. Cover the pan with a lid or foil and bake for 15 minutes at 350°F, then take the lid off and bake for another 10 minutes.
The Finished Cheeseburger Casserole
This might sound crazy, but top the casserole with ketchup and serve. It is a “cheeseburger” casserole, after all—the ketchup kind of ties the whole thing together.
Cheeseburger Casserole
Everything you love about a cheeseburger, but in a casserole.
Bring a large pot of water to a boil and cook the pasta for 1 minute less than the package instructions indicate. Drain the pasta, rinse under cold water, drain again, and set aside until you are ready to add it to the sauce.
Heat a large oven-safe skillet over medium-high heat. Add in 2 teaspoons of canola oil along with the beef and cook until the beef is browned. This should take between 5 and 10 minutes.
Add the onion and cook for 3 more minutes, then add the pickles and garlic and cook for another 2 minutes. Mix in the tomato paste and mustard, cook for 2 minutes, then add in the beef stock. Bring to a boil and cook for 3 minutes.
Add the cream, bring it back to a boil, then add the sugar, pepper, and mix in half the cheddar cheese.
Taste the mixture and add the salt as needed. Depending on the beef stock you use, you may need to add more or less salt than the recipe says.
Add the cooked pasta to the sauce and mix well.
Combine the remaining half cup of grated cheese with the breadcrumbs and sprinkle over the casserole.
Cover the pan with a lid or foil and bake for 15 minutes at 350°F, then take the lid off and bake for another 10 minutes.
Take the casserole out of the oven, let it rest for 5 minutes, top with the ketchup and serve.
I know that some of you read this recipe and thought everything sounded great until I mentioned putting dill pickles in it. But the dill pickles are key. That little bit of acidity breaks up the richness of the dish. Getting that pop of dill pickle in every bite, to me, is what really makes this cheeseburger casserole special. But again, don’t take my word for it. Try it for yourself.
Remember to share this post on Facebook or Pinterest if you enjoyed it. Thank you for reading, and have a great day! Remember, there are new Chef’s Notes posts every Monday, Wednesday, and Friday, and you can subscribe below, so you never miss one.
Sometimes in life, you get a craving that won’t go away until you satisfy it. It nags at you constantly like a siren’s songs calling you to the rocks. You know you shouldn’t. You know it’s bad for you. But you can’t help yourself. You awaken with a shot in a foggy dream-like haze. You’re in a well-used kitchen, dirty pots and pans surround you. The smell of cooked onion and ground beef fills your sinuses. You feel a weight in your right hand. Your eyes glance down as your hand lifts a burger to your mouth. You see it happening in slow motion. You feel yourself take that first bite, fighting the urges. “No!” You say quietly to yourself. “I’m a good boy.” but you can’t stop yourself. Before you know it, you are left with nothing but grease-covered hands and a dumb satisfied look on your face. Was it a dream? Was it a nightmare? No. It was a Philly Cheesesteak Burger. Craving satisfied. Let’s get to it.
The Burger Patties
All joking aside, this Philly Cheesesteak Burger is wicked good. The patties are a combination of cooked onion, ground beef, garlic, salt and pepper. They are cooked in a pan, topped with fried mushrooms and onions, and provolone cheese. The burger is finished with a little mayonnaise and barbecue sauce, and a delicious bun. Yes, it is as good as it sounds. The first step in making these burgers is to cook some onions.
Onions
Dice one onion. You want about a cup of onion in total. Heat a small frying pan over medium-high heat and add a teaspoon or two of oil (canola or olive). Add a quarter teaspoon of Kosher salt to the onions and cook until they soften and start to brown. Add two tablespoons of beef stock to the pan and cook until it has completely evaporated. Take the onions out of the pan, spread them out onto a plate and put them in the fridge to cool for ten to fifteen minutes.
Mixing The Meat
Use one pound (454 g) of lean ground beef. Not extra lean. The burgers will be way to dry. Add the cooked and cooled onions, half a teaspoon of Kosher salt, a quarter teaspoon of black pepper, and a teaspoon of minced garlic. Mix well.
Forming The Patties
Line your cutting board with plastic wrap. Divide the meat into four evenly sized portions. Take one portion and flatten it into a patty. Place the flattened meat on your plastic-covered cutting board and continue to flatten it until it is one centimetre thick. Cup your hands around the patty to make it circular. Repeat with the rest of the meat. If the meat is sticking to your hands, wet your hands with cold water before shaping the next burger. Put the burgers and plastic wrap on a plate and put it in the fridge for ten minutes to firm up a little bit. You can leave the burgers in the fridge, covered for up to two days before cooking them.
Mushrooms and Onions
While the burgers are in the fridge, slice two cups of cremini mushrooms and two cups of onion. Heat a frying pan on medium-high, then add in a tablespoon of oil. Put the mushrooms and onions in the pan and cook for three to four minutes or until the onions start to soften. Add half a cup of beef stock and cook until it is fully evaporated.
Cooking The Burgers
Heat a large frying pan over medium-high heat. Add in a teaspoon or two of oil, then the burgers. I only cooked two burgers because there were only two of us. The other two burgers were left in the fridge for later enjoyment. Cook the burgers for four to five minutes per side, or until the juices run clear when the burger is pressed in the middle.
Finishing The Philly Cheesesteak Burger
Top the burgers with onions and mushrooms and provolone cheese. Pour two to three tablespoons of beef stock or water into the bottom of the pan and cover with a tight-fitting lid for a minute or until the cheese is melted. Toast the burger buns, then spread a teaspoon of mayonnaise on the bottom and a teaspoon of barbecue sauce on the top. Put the burgers on the buns and enjoy.
Alternative Recipe
It is common for a Philly Cheesesteak to have Cheese Whiz on it. Truth be told, that’s what I was craving, but I don’t typically have Cheese Whiz in the house becasue if I do, I eat the whole bottle. I know it’s gross, I get. But, it’s one of those things. If you want something really special, get rid of the provolone, and add a few tablespoons of Cheese Whiz to the mushrooms and onions once they’re cooked. Spoon the mushroom, onion, and Cheese Whiz mixture over the burger, and enjoy. If you are going to go the Cheese Whiz route, you can get rid of the mayo and barbecue sauce or keep them. That’s up to you.
The Philly Cheesesteak Burger
A delicious Philly Cheesesteak-inspired burger that you will love. The burger has sautéed onions in it and is topped with sautéed mushrooms, more onions, and provolone cheese. It's finished with mayo and barbecue sauce.
Heat a small frying pan over medium-high heat. Add in 1 tsp of canola oil and diced onions. Cook for 3 to 4 minutes or until the onions soften and start to brown. Add the beef stock and cook until it is completely evaporated. Spread the onions out onto a plate and put in the fridge to cool for 10 minutes.
In a medium mixing bowl, combine the ground beef with the cooked and cooled onions, garlic, salt, and pepper and mix well. Divide the meat into four and form into 1 cm thick patties. Put the patties in the fridge for 10 minutes to set.
Heat a large skillet over medium-high heat. Season the burgers with salt and pepper. Add in 1 tsp of canola oil to the hot pan along with the burgers. Cook the burger for 4 to 5 minutes per side or until the juices run clear when the middle of the burger is pressed.
Finishing the Burger
Heat a medium frying pan over medium-high heat. Add in 1 tsp canola oil, the sliced mushrroms and onions. Cook for 3 to 4 minutes then add in the beef stock and cook until it has evaporated.
Put the mushrooms and onions on the burgers, top each with a slice of provolone cheese. Put 2 to 3 tablespoons of water or beef stock in the bottom of the hot burger pan, cover and steam for 1 minute or until the cheese is melted.
Toast 4 buns spread the mayo on the bottom bun and the barbecue sauce on the top bun. Put the burgers on the buns and enjoy.
I think we’ve all had cravings that just won’t go away. Thankfully, this burger satisfied a craving that I’ve been having for weeks. If you like Philly Cheese Steaks, I think you will really like this burger. In fact, if you like burgers at all, you are really going to like this burger. I certainly did. What is a food craving you get that won’t go away until it has been satisfied?
I can finally announce that I have written a cookbook. It’s called the 5-Ingredient Cookbook for men (of course, it is for everyone). It officially goes on sale on March 16th, but you can preorder it now from Amazon in Canada here, and Amazon in the US here.
Thank you for reading this post. Please share it on Facebook, Pinterest, or Twitter to help Chef’s Notes grow. Subscribe to Chef’s Notes below, and you will never miss a post again.
Let’s face it, everyone has tips and secrets to making the best burger. The thing is, a lot of those tips and secrets are garbage. I recently saw a post that suggested you use the leanest meat you can buy, and load it up with vegetables and oats. Does that sound like a good idea to you? If it does send me a message and I’ll give you the link to the site. If you think that sounds terrible like I do, stay here. I am going to give you a very short list, only three things, that will actually make your burgers better. Don’t believe me? Keep reading.
The Beef
First things first, let’s talk about the meat. One thing I’m not going to tell you to do is to grind your own meat. Do you know why? Because you aren’t going to do it. I don’t even do it. Will grinding your own beef make a better burger? If you get the ratio of fat and meat right, then yes, it can. Can you make a delicious burger with store-bought meat? Of course, you can. Anyone who tells you different is full of it.
For hamburgers, you want to buy medium ground beef. The ‘medium” refers to the ratio of meat to fat, not the size of the grind. Medium ground beef has no more than 23% fat, leaving 77% meat. Typically, 80/20 is the perfect ratio, but 77/23 is pretty close. You might be tempted to go with leaner beef, but don’t do it. Leaner meat will lead to a dry burger unless you are very careful. Keep in mind that a lot of the fat will melt out of the burger while cooking.
Seasoning the Meat and Other Additives.
I’ve seen a lot of people put a lot of things in their burgers. Don’t. Keep it simple. Your meat does not need a binder. It does not need filler. It needs very little. I’m not going to tell you exactly what you should put in your burger mix. I think that is up to you. But, here is what I put in mine; salt, pepper, onion powder, garlic powder, and sometimes Old Bay Seasoning. That’s it.
You may be looking at what I put in my burger mix and thinking to yourself that those burgers must taste bland. “That Ben guy is so uncreative. He can’t even think of interesting things to put in his burgers.” Wrong. If I’ve learned anything in my career, it is this: Making things unnecessarily complicated is a recipe for disaster. I’m making a recipe for burgers, not a disaster. The burgers have loads of flavour, and they make the perfect base for whatever toppings I want to add. What more does a hamburger patty have to be?
Forming and Cooking Hamburgers
I have made thousands of hamburgers in my life, literally. It’s to the point that I can eyeball a 6 oz handful of meat with a very high level of accuracy. I assume you can’t do that. Why would you be able to? But there is a simple enough way to form evenly sized patties. Figure out how many burgers you want. It’s best if it is an even number. Flatten and square off your meat mound as best you can. Divide the mound-o-meat in half. Do that again. Do that again. Do it again until you have the number you want. Roll all of those divisions of meat into balls, then form them into patties. Who cares if they are 6 oz, 5 oz, or 4 oz as long as they are all the same size and you have enough.
Making Hamburger Patties
I do not like thick hamburger patties. I would rather have two thin patties stacked on top of each other than one big one. The reason is simple. A lot of the burger flavour comes from the browning on its surface. Two patties, no matter the width, have double the surface area of one patty. So, two thin patties equal more flavour. Plus, you can melt cheese on both. And, two patties make for better pictures, if that’s your thing.
To make it a little more clear, I very rarely make a burger patty more than a 1/4 inch thick. Oh, and season the outside of the burger with the same stuff as the inside.
BS Check
I’ve seen a lot of people lately saying not to put salt in your burger meat because it will affect the texture. I’m positive that salt will alter the texture of a raw burger patty that sits in the fridge for even a few hours. But, it isn’t going to make that big of a difference. The benefit of flavour that comes from seasoning the meat with salt far outweighs any possible negative effect on texture. I call BS.
Cooking the burgers
I don’t care if my burgers get cooked on a grill, in a skillet or on a griddle. All three options will make a good burger. I care that the burger tastes good, and I care that the burger is cooked all the way through. Anyone that tells you to eat a burger anything less than well done is putting your life at risk. The only time it is okay to eat a hamburger less than well done is when you have ground the meat yourself (see the science fact below for more information). For cooking, the barbecue has a slight advantage over a skillet or griddle. On the grill, the fat melting out of the meat drops away instead of pooling around the patty. Other than that, it doesn’t matter. It is going to taste good no matter what.
Science Fact
You can eat a steak rare. Why shouldn’t you eat a burger rare? Surface area. A steak has a top, a bottom, and sides. Bacteria can live and grow on all of these surfaces. But, when the steak is cooked, the high heat that hits those surfaces is enough to kill the bacteria. If you take that same steak and throw it through a meat grinder, you will create thousands of little steaks. Each small piece of ground meat has a surface area for bacteria to grow. If the grinding equipment had bacteria on it, or if someone didn’t wash their hands before grinding your meat, that has now been transferred to the meat. The more time that passes from grinding to cooking, the more bacteria will grow. When you form that meat into a burger, the majority of that bacteria gets tucked nicely inside protected from direct heat. The only way to kill the inside bacteria is to cook the hamburger to an internal temperature of 165°F. That’s well done.
Bonus Tip
.Whatever you put on your burger, cut it as thin as possible. Tomatoes, cut them thin. Onion, cut it thin. Pickles, cut them thin. The thinner the toppings, the easier your burger is going to be to eat and the more structurally sound it is going to be.
Conclusion
If you love your hamburgers and think that there is no room for improvement, don’t listen to me. If that is the case, I’d love to hear about what makes your burger so great in the comments. If you think that you’re burgers could be better, follow these three tips and you will find an improvement.
What are your top hamburger tips? Tell me in the comments section below.
Did you know that Chef’s Notes has over 300 posts on all things food and cooking? Think of all the great tips and recipes you’ve missed! If you want to stop missing out, subscribe to Chef’s Notes at the top right of this page. You’ll get notified of new posts right in your inbox. And, if you liked this post, remember to share it on Facebook and/or Pinterest or wherever else you see fit. Just click the icon to the right or the left. It’s that simple.
Hello everyone and good morning. Today in the second last post of my free basic cooking course we are going to focus on ground beef. Specifically, we are going to look at a handful of uncomplicated and delicious meals that can be made with ground beef. These are meals that in my opinion, everyone should know how to make some version of. We are going to look at how to make meatloaf, shepherd’s pie, chili, and more. Let’s get to it.
This is…
Basic Things Everyone Should Be Able To Cook pt. 3 – Kitchen Clueless Basic Cooking Course
Hamburgers
I honestly believe that there are few things better in this world than a delicious hamburger. Luckily, making a truly delicious burger is much easier than it seems like it should be. I say this because generally, the big mistake that people make when making hamburgers is that they try to overcomplicate it. There is a tendency to add a pile of ingredients into the burger mix. All these ingredients often overpower the taste of the beef itself. What’s more, is that more often than not, all these flavours just get muddled together and end up tasting like a confusing mess. For this reason, for me, a simple burger is a good burger.
In all of my time cooking professionally the most important lesson I’ve learned, and this was a hard lesson to learn, is when to stop adding ingredients. Cooking is not about adding and adding until something tastes good. It’s about adding as few ingredients as you can to highlight the main ingredients. When I’m creating a recipe I will often list every ingredient that I think should go in it, then I started taking things away that aren’t adding anything to the final dish. Compliment the main ingredient, don’t overpower it. If you take one lesson from this whole series, this should be it. Recite it every time you cook, “Compliment, don’t overpower.” Every time you pick up a knife in the kitchen “Compliment, don’t overpower.” Every time you open your spice cupboard, “Compliment, don’t overpower.” This and this alone will take your cooking further than anything else.
Looking at the recipe below you will notice that the burger mix only has four ingredients in it; salt, pepper, onion powder, and garlic powder. That’s all. I know people who put ten or more ingredients in their burgers. Why? In cases like this, the ground beef is more a vessel for all the other flavours rather than being the start of the show. This to me, defeats the whole purpose of the burger.
Forming the burger
While there are some people out there that prefer a really thick burger, my feet are firmly planted in the opposite camp. I like thin burgers, then if you want more meat you can just add a second patty. The reason for this is pretty simple. The sear on a burger, the browning from the cooking process, adds loads of flavour to the meat and the final burger. When you have one thick patty you only have this sear on two sides. However, when using thinner patties, and doubling them up, you get the same amount of meat but double the seared surface meaning more flavour.
The other bonus to thin burgers is that they cook much quicker than thick burgers. This means that the risk of burning the outside of the burger is greatly reduced and the burger will shrink less, and dry out less. All this leads to a more flavorful and juicy burger.
Cooking the burger
In the recipe below I suggest cooking the burgers on an electric griddle. However, you can cook them in a skillet, or on a grill as well. This to me is actually the least important part of making burgers. Just make sure that whatever you are using to cook the burgers is nice and hot, and that you get a nice sear on the meat.
Bacon Cheeseburger
This recipe makes a delicious burger with onion, bacon, cheese, and horseradish mayo. What could be better?
When I was a kid meatloaf was a weekly staple on our dinner table. I hated it. My mom was a great cook, and I loved most of her food, but I could not stand her meatloaf. To be fair, it wasn’t just hers. For whatever reason, I hated all meatloaf. Someone could have served me the best meatloaf in the world and I still would have turned my nose up at it.
This hatred of meatloaf lasted until I was in my mid 20’s and was tasked with making staff meal in the restaurant I was working in at the time. I was given a pile of ground beef and told to make something. I have no idea why I chose to make meatloaf, but I did, and it was delicious. It was the only meatloaf I’d ever had that I liked up until that point. Now, I wouldn’t say that I developed a love for meatloaf after that, but I did develop more of an appreciation for it.
If you find yourself with a few pounds of ground beef and you are unsure of what to do with it, meatloaf is a great option…for those of us that like meatloaf at least.
One big problem I’ve always had with meatloaf is that they will have big chunks of onion and garlic that didn’t fully cook. This makes the meatloaf especially unenjoyable to eat. The obvious solution then is to pre-cook the onions and garlic and that is what I do in the recipe below. This is what I do in the recipe below. The added bonus is that the cooked onions and garlic add a mild sweetness to the mix adding more balance to the overall flavour of the meatloaf.
It will come as no surprise, that like my burgers (and just about everything else I cook) I prefer a more simplistic approach to my meatloaf. Not everything in the spice cupboard has to go into everything you cook. Add only what is needed and if you are going to add herbs use fresh ones whenever possible.
My Best Meatloaf Recipe
A really great meatloaf recipe with one or two ingredients that you'll want to keep our little secret. It also happens to be gluten-free
Heat a medium skillet over medium heat. Add in the olive oil, and onion. Cook for 2-3 minutes then add in the garlic and cook for an additional 2 minutes. Remove from the heat and let cool to room temperature.
Combine the remaining meatloaf ingredients in a large mixing bowl. Add the cooled onions and garlic and mix well. Knead the meatloaf mixture for 5-6 minutes until the meat becomes tacky and sticky. Push the meat into a loaf pan. Set aside.
Glaze
Combine the glaze ingredients and mix well. Pour the glaze over the meatloaf. Put the glazed meatloaf in the oven on 350°F. Bake for about 1 hour or until the internal temperature reaches 165°F.
Gravy
Heat a small skillet over medium heat. Add the butter and heat until it starts to foam. Add in the mushrooms, and onions and cook for 4-5 minutes. Add in the garlic and thyme and cook for another 2 minutes. Sprinkle the flour into the pan and stir for about 1 minute. Stir in the beef stock, and cook until thick. Season to taste with salt and pepper. Serve over the the meatloaf.
Who doesn’t love a good pot of Chili? The keyword there being good. In truth Chili is a bit like pizza, even bad pizza is still pizza. I think what I’m trying to say is that it is difficult to mess up Chili, it is a very forgiving dish. The recipe below is not a basis Chili recipe by any means. However, it is not at all difficult to make. What you notice right away when looking at the below recipe is that there are a lot of ingredients. Yes, it’s true. My simplistic view of cooking goes right out the window when it comes to Chili and for good reason, Chili benefits from complexity. Of course, there is nothing that says that you can’t make a delicious simply Chili, I just didn’t do that here.
The real benefit to the recipe below is more in the technique. Pay attention to when I added the spices and vegetables. They are timed so that the maximum amount of flavour is in the Chili at the time of eating. As a bit of an aside, don’t listen to people who say that Chili needs to be simmered for hours and hours, they are wrong. Doing this will destroy the flavour. The essential oils in the spices, which is where the flavour comes from are volatile and heat soluble. Cooking them for long periods literally cooks the flavour out of them.
The Best Ever Chili
In my opinion, this is the Best Chili you will ever have.
I just posted about these on Monday so I’m not going to say too much about them here. I suggest checking out the full post at the link below if you haven’t already done so.
Keyword: Chicken Pasta, Meatballs, Spaghetti and Meatballs
Servings: 23meatballs
Ingredients
1.2 kgMedium Ground Beef
1cupMinced Onion
2tbspMinced Garlic
1tbspChopped Parsley
1tbspChopped Rosemary
1tbspDried Oregano
1/2tspCrushed Red Pepper Flakes
1/2cupFreshly Grated Parmesan
1 1/2tspKosher Salt1 tsp if using table salt
3/4 tspBlack Pepper
3/4cupBread CrumbsGluten-Free
1lgEgg
1/3batchBasic Tomato Sauce
2cupBeef Stock
1/4cupOlive Oil
Instructions
Combine all the ingredients except the olive oil, tomato sauce and beef stock in a large bowl and mix until the meat is tacky, about 5 minutes.
Add the olive oil to a roasting pan.
Form the meat into 23-24 even size balls and place in the oiled roasting pan.
Bake the meatballs in a 400°f oven uncovered for 35 minutes flipping them halfway through.
Remove the meatballs from the oven and drain off all the excess fat.
Add the beef stock and tomato sauce to the roasting pan, cover with foil and bake in a 325°f oven for 35-45 minutes. Remove the foil and bake for another 10-20 minutes.
Toss the meatballs with tomato sauce and pasta and serve.
One of my absolute favourite things to do with ground beef is to make Shepherd’s Pie. (It is technically Cottage Pie becasue it is made with beef rather than lamb but where I come from we call it Shepherd’s Pie). Not only is this one of my all time favourite foods form when I was a child, but it is also one of the first things I ever learend to cook. And it is so stragight forward that I’m not even going to give you a recipe. I will hoever give you a quick walk through.
Shepherd’s Pie is made by sauteéing ground beef with onions, and sometimes garlic. Once these are cooked other vegetables like diced carrots, peas, corn, and green beans are added to the mix. Then one large can of creamed corn and some salt and pepper. Some people prefer to use gravy, but in my family, it was always creamed corn. This mix is topped with mashed potatoes and baked on 350°f until the potatoes are golden brown. Amazing!
Conclusion
This concludes the Basic Things Everyone Should Be Able To Cook position of my free basic cooking course. If you missed the first two parts of this section you can check out the first two parts of this section here and here. Next week we will be wrapping up the cooking course with a final post to tie everything together and review all the things that we have covered. I’ll see you then!
I hope that you have enjoyed this post. If you have please remember to like and share it. And of course, remember to subscribe to the blog so you never miss a post again.
Spaghetti and Meatballs is the most Italian food (other than pizza) that most of us can think of. Strangely enough, most Italians would never combine the two. If they do, the two items would be served separately rather than as one dish. However, in North America Spaghetti and Meatballs is a classic. It also happens to be one of my wife’s all-time favourite dishes, so we had it last night for her Mother’s Day dinner. Today, I’m going to show you exactly how I made it.
This…
How To Make Spaghetti and Meatballs Like a Pro
The Sauce
It should go without saying that you are never going to make a great bowl of Spaghetti and Meatballs without first making a great sauce. What is really important to note here is that great does not mean complicated and it absolutely does not mean a lot of ingredients. Case in point, the sauce we are going to look at today has only eight ingredients. That’s all. Let’s take a look at it.
Making the Sauce
To start the sauce I first diced 2 medium onions which came out to be about 1 cup. While I was dicing the onion I heated a large pot over medium-high heat and added in about 3 tbsp of olive oil. I added the onions into the pot and cooked them for about 10-15 minutes or until they started to caramelize. It is important to stir the onions every few minutes so they don’t burn.
While the onions were cooking I used the time to prep my other ingredients. First, I chopped up 3 cloves of garlic which was about 2 tbsp in total. Once the onions were caramelized I added the garlic in and cooked it for about 2 minutes.
While the garlic cooked with the onions I opened a can of whole Italian tomatoes, poured them into the bowl, then crushed them with my hands. You can use a hand blender if you’d prefer, I just like to get my hands dirty. Then, I dumped the tomatoes into the garlic and onions. Depending on how much liquid there is in your tomatoes you may need to add a bit of water to the sauce.
For the last few steps of the sauce, I chopped up about 1-2 tbsp of rosemary and added it to the pot. Finally, I seasoned the sauce to taste with salt, pepper, and sugar then let it simmer for 20 minutes and set it aside until I was ready to use it.
Basic Tomato Sauce
This is a really great all-purpose tomato sauce. Here I use it with Spaghetti and Meatballs, but it works just as well on a meatball or sausage and pepper sandwich, chicken parmesan or just about anything you can imagine.
1 796 mlCan Of Whole Italian Tomatoesdumped into a bowl and hand crushed
1cupDiced Onion
2tbspMinced Garlic
1-2tbspFresh Chopped Rosemaryor basil
3tbspOlive Oil
Salt, Pepper, and Sugar to taste
Instructions
Heat a large pot over medium heat then add in the olive oil and onions.
Cook the onions for 10-15 minutes or until they are lightly caramelized then add in the garlic and cook for 2 more minutes.
Add in the tomatoes, and a 1/4 to 1/2 cup of water if needed then add in the rosemary and seasoning.
Bring the pot to a boil, turn the heat down to low and simmer for 20 minutes. Taste and adjust the seasoning with salt, pepper, and sugar as needed. Remove from the heat and set aside until ready to use.
With the sauce out of the way, let’s now take a look at the meatballs.
First of all, I should say that for a very, very long time I hated meatballs. (I feel like this is becoming a theme on the blog). I found them to be dry, chewy and tasteless, it didn’t matter who made them, I hated them. Then, I started working at an Italian restaurant and discovered how good a meatball could actually be. A good meatball is tender, juicy and full of flavour. Easy to say, but how do you accomplish it?
The meat
The first step to making a delicious meatball is using the right meat. There has to be fat in the meat, meaning you should not use lean ground beef to make a meatball. This lack of fat will lead to all the common issues people encounter when making meatballs like dryness and chewiness. Having said that, I also wouldn’t suggest using full-fat ground beef. I generally suggest a nice medium ground. Not only does it have more flavour than lean ground beef, but it is also considerably cheaper. If you want to really step up your game substitute a quarter of the ground beef for ground pork. I didn’t do that in this recipe but it does make a really great meatball.
The flavourings
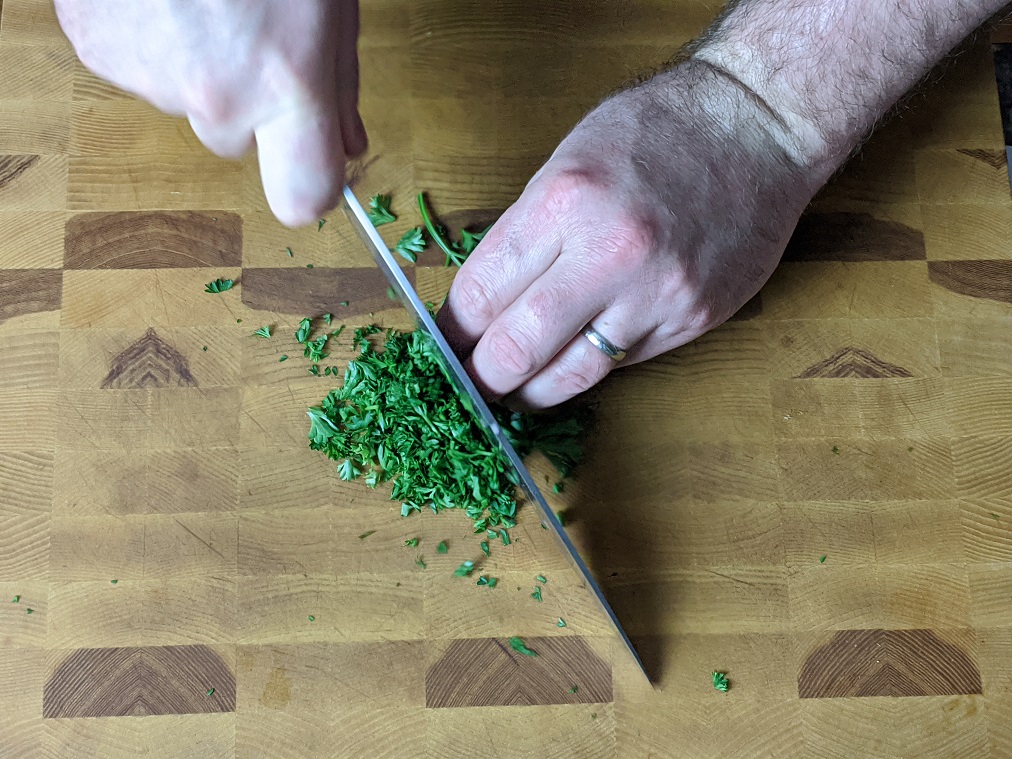
The next step to making a great meatball are the flavourings. I find that meatballs are like burgers. People add way too many ingredients and the flavour becomes jumbled. Like with most things I cook, I prefer a more minimalist approach. I also much prefer fresh herbs to dried herbs if you have them.
For these meatballs I used about 1 cup of very finely minced onion, about 2 tbsp of minced garlic, 1 tbsp each chopped parsley, rosemary and dried oregano (the one exception to the fresh herb comment), 1/2 tsp crushed red pepper flakes, and 1/2 cup fresh grated parmesan. Of course, I also added salt and pepper which was about 1 1/2 tsp kosher salt (less if you are using table salt) and about 1/2 – 3/4 tsp fresh cracked black pepper.
The binders
The last things to add to the meatball mix are binders. For this, I used about 1/2 – 3-/4 of a cup of bread crumbs (gluten-free of course) and 1 lg egg. That’s it.
Now that all the ingredients for the meatballs were in the bowl and ready to go it was time to mix. For this, I used my two favourite tools in the kitchen, my hands. I mixed not only until the ingredients were fully incorporated but until the meat got a little tacky. This has a specific culinary name that you really don’t need to know. All you do need to know is that by mixing the meat until it is tacky, you are creating a mix that is going to give you smooth tender meatballs. This took 4-5 minutes.
Forming/Cooking the Meatballs
With the meat all mixed I poured about 1/4 cup of olive oil into a roasting pan and preheated my oven to 400°f, then I started making the meatballs.
The size that you chose to make your meatballs really comes down to personal preference. I like kind of medium size while some people like really big ones and some people prefer very small ones. Make them however you’d like, just make them all the same size. Once all of the balls have been formed and placed in the roasting pan, put the whole thing in the heated oven for about 35 minutes or until they are nice and brown. You can flip them halfway through cooking if you’d like.
After that initial cook, I removed the meatballs from the oven and drained off as much of the fat as I could from the roasting pan. Next, I added about 2 cups of beef stock (you could also use red wine) to the roasting pan along with about 1/3 of the tomato sauce. I tossed the meatballs around to coat them, turned the oven temperature down to 325°f, covered the roasting pan with foil and put it back in the oven for another 35 minutes. After the 35 minutes, I removed the foil cover from the meatballs and put them back in for another 20 minutes.
Finishing the dish
While the meatballs were finishing in the oven I brought a large pot of water to a boil and cooked my pasta. I also heated the remained of my sauce back up. Once the meat balls were finished, I added 8 of them (4 each for my wife and me) to the hot sauce, add in the pasta and tossed. At this point, I also add in about 2 tbsp of garlic butter. This may seem odd, but it adds so much flavour it is incredible. This is optional however I highly recommend it. Also, finishing tomato sauces with a bit of butter (plain or garlic) is always the way to go. Try it for yourself. I then plated the Spaghetti and Meatballs and finished it with freshly grated parmesan, fresh chopped parsley, and a bit of fresh cracked pepper.
Keyword: Chicken Pasta, Meatballs, Spaghetti and Meatballs
Servings: 23meatballs
Ingredients
1.2 kgMedium Ground Beef
1cupMinced Onion
2tbspMinced Garlic
1tbspChopped Parsley
1tbspChopped Rosemary
1tbspDried Oregano
1/2tspCrushed Red Pepper Flakes
1/2cupFreshly Grated Parmesan
1 1/2tspKosher Salt1 tsp if using table salt
3/4 tspBlack Pepper
3/4cupBread CrumbsGluten-Free
1lgEgg
1/3batchBasic Tomato Sauce
2cupBeef Stock
1/4cupOlive Oil
Instructions
Combine all the ingredients except the olive oil, tomato sauce and beef stock in a large bowl and mix until the meat is tacky, about 5 minutes.
Add the olive oil to a roasting pan.
Form the meat into 23-24 even size balls and place in the oiled roasting pan.
Bake the meatballs in a 400°f oven uncovered for 35 minutes flipping them halfway through.
Remove the meatballs from the oven and drain off all the excess fat.
Add the beef stock and tomato sauce to the roasting pan, cover with foil and bake in a 325°f oven for 35-45 minutes. Remove the foil and bake for another 10-20 minutes.
Toss the meatballs with tomato sauce and pasta and serve.
I highly recommend that you try this meatball recipe. I’m willing to be that it will be one of the best meatballs that you’ve ever had. If you do try them I’d love to hear about it. Also, if you have a meatball secret that I havn’t mentioned I would love to hear that too.
Thank you as always for reading and remember to subscribe to the blog so you never miss a post. And…if you really liked this post please remember to share it! Have a great Monday everyone, talk to you soon.
When I was a kid meatloaf was a weekly staple on our dinner table. I hated it. My mom was a great cook, and I loved most of her food, but I could not stand her meatloaf. To be fair, it wasn’t just hers. For whatever reason, I hated all meatloaf. Someone could have served me the best meatloaf in the world and I still would have turned my nose up at it.
This hatred of meatloaf lasted until I was in my mid 20’s and was tasked with making staff meal in the restaurant I was working in at the time. I was given a pile of ground beef and told to make something. I have no idea why I chose to make meatloaf, but I did, and it was delicious. It was the only meatloaf I’d ever had that I liked up until that point. Now, I wouldn’t say that I developed a love for meatloaf after that, but I did develop more of an appreciation for it.
I’m still not crazy about meatloaf, but once or twice a year I get a craving for it and put one together. Rarely do I make the same meatloaf twice. Sometimes I wrap it in bacon, sometimes I make it really dense, sometimes it’s a little looser. On occasion I will make a really sweet topping, sometimes I will make it more savoury. The meatloaf I’m sharing with you today is not one that I’ve ever made before. I created the recipe specifically, for this post and with the idea that I was going to make the best meatloaf I could. Did I accomplish that? I think so but judge for yourself.
This is…
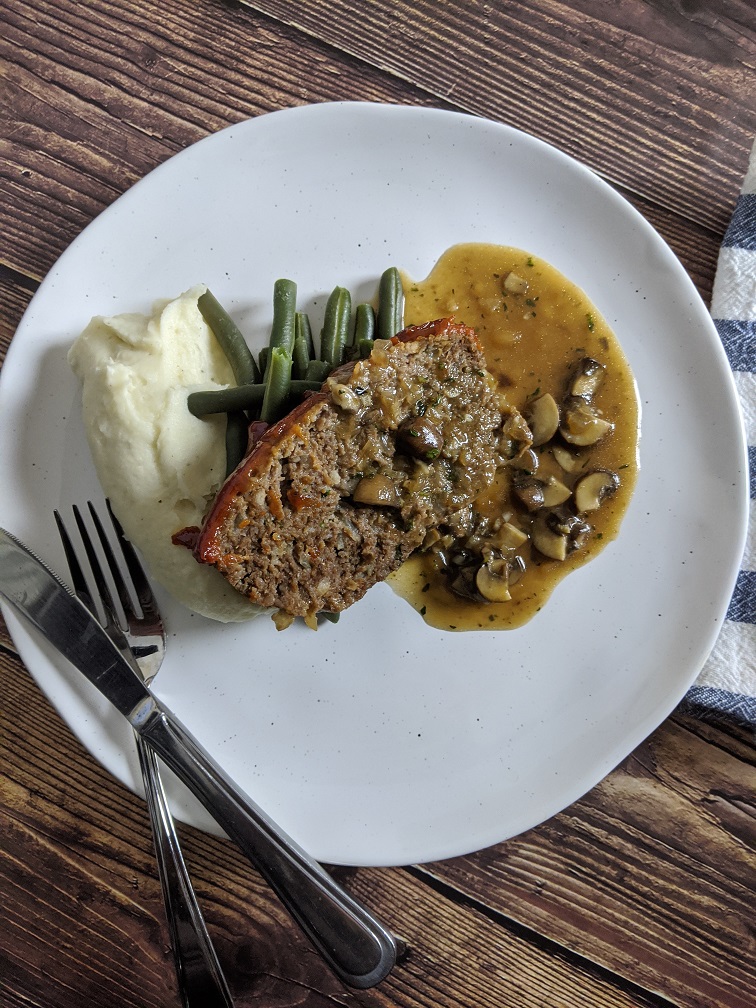
MEATLOAF WITH MUSHROOM GRAVY
Getting Started
One big problem I’ve always had with meatloaf and some burgers too is that they will have big chunks of onion and garlic that didn’t fully cook. This makes the meatloaf especially unenjoyable to eat. The obvious solution then is to pre-cook the onions and garlic. That is exactly what I did.
To start my meatloaf I finely diced 1 baseball-sized onion and 2 cloves of garlic (measurements in the recipe below). I heated a frying pan over medium heat, added a little bit of olive oil and cooked the onions until they started to soften. Then, I added in the garlic and cooked for another 2 minutes. I set this aside to cool and got to work on the rest of my mix.
Meatloaf Mix
For the meatloaf mix, I started with 2 lbs of medium ground beef (medium referring to the amount of fat rather than the size of the grind). To the meat, I added 1/2 cup breadcrumbs (I used gluten-free), 1 egg, 1 tsp kosher salt, 1/4 tsp black pepper, 1/4 tsp crushed red pepper flakes, 1/2 cup loosely packed chopped parsley, 1 tbsp mustard, 1/4 tsp onion powder, 1/4 tsp garlic powder, and 1 tbsp fresh chopped mint (secret ingredient). Finally, I added in the cooled onions and garlic.
With all the ingredients added into the meat, I mixed until everything was fully distributed. Once the meat was mixed I kneaded it, just like a loaf of bread, for about 5 minutes or until the mixture was sticky. Then I pushed it into a loaf pan and set it aside.
Glaze
I think there is a law that says that you can’t have meatloaf without some kind of ketchup-based glaze on it, so I made one. Generally, these glazes have either brown sugar or molasses in them. I decided to switch it up and use Coca-Cola instead. It worked really well. The only problem I had with it was that as I put it in the oven I realized I should have added some whiskey to the glaze. If I had the forethought to do that, this would have been a Jack and Coke glaze. Next time.
For the glaze, I combined 1/2 cup of ketchup, 3 tbsp of coke, 1 tbsp mustard, 1 tsp soy sauce (gluten-free tamari) and a bit of salt and pepper. I mixed this up, poured it over the meatloaf and popped the whole thing in a 350°F oven for a little over an hour. The important part is that a thermometer inserted into the middle of the meatloaf reads 165°F.
Mushroom Gravy
Meatloaf without gravy is like a burger without a bun. Pointless and no meatloaf at all. To make my gravy I heated up about 2 tbsp of butter in a small frying pan and sautéed about 6 sliced cremini mushrooms and 1/4 cup of minced onion. After 3-4 minutes of cooking, I added in 2 tsp of minced garlic and 1 tsp fresh chopped thyme. I cooked the garlic for about 2 minutes then sprinkled about 1 tbsp of flour (gluten-free) over the pan and mixed it in. Once the flour was mixed in and had cooked for about 2 minutes I added in 1 cup of beef stock, and a little salt and pepper. I brought the gravy to a boil, reduced the heat to low and simmered until it was gravy consistency.
Once the gravy was ready I set it aside until the meatloaf was cooked. When it came time to serve, I added a few tbsp of water to the gravy and put the pan back on the burner until the gravy was hot and the proper consistency.
Finish The Meatloaf
To finish the meatloaf, I cut it into slices and plated it with mashed potatoes, green beans, and a bit of the gravy. And yes, it was as good as it looks.
Conclusion
As I said, I’ve never been that big a fan of meatloaf, but I was a fan of this one. One thing I think that you’ll be surprised by is how much flavour that tiny bit of mint in the meat mixture adds to the meatloaf. It really changes it from a good meatloaf to a great one. Another thing that was really great about this was that the meatloaf was really juicy and tender. It is definitely worth making.
Really quickly, I wanted to explain why there was no post on Wednesday this week. You know how every once in a while you have one of those days when everything seems to be working against you? Well, that was Tuesday for me. My wife and I were both sick with the flu, then we had to leave our apartment for the night because it filled up with exhaust fumes from the furnace in the basement. We ended up having to stay in a hotel for the night. Needless to say, I didn’t get any work done. Luckily, we are both feeling better and the exhaust smell has been dealt with.
I apologize to anyone who was looking forward to Wednesday’s post. It will be out on Tuesday this week and then on Wednesday, I will move on to the next section of my free basic cooking course. Thank you for understanding.
Have a great weekend everyone. I’ll see you Monday for How to Make A Turkey Burger in 30 Minutes or Less.
My Best Meatloaf Recipe
A really great meatloaf recipe with one or two ingredients that you'll want to keep our little secret. It also happens to be gluten-free
Heat a medium skillet over medium heat. Add in the olive oil, and onion. Cook for 2-3 minutes then add in the garlic and cook for an additional 2 minutes. Remove from the heat and let cool to room temperature.
Combine the remaining meatloaf ingredients in a large mixing bowl. Add the cooled onions and garlic and mix well. Knead the meatloaf mixture for 5-6 minutes until the meat becomes tacky and sticky. Push the meat into a loaf pan. Set aside.
Glaze
Combine the glaze ingredients and mix well. Pour the glaze over the meatloaf. Put the glazed meatloaf in the oven on 350°F. Bake for about 1 hour or until the internal temperature reaches 165°F.
Gravy
Heat a small skillet over medium heat. Add the butter and heat until it starts to foam. Add in the mushrooms, and onions and cook for 4-5 minutes. Add in the garlic and thyme and cook for another 2 minutes. Sprinkle the flour into the pan and stir for about 1 minute. Stir in the beef stock, and cook until thick. Season to taste with salt and pepper. Serve over the the meatloaf.
Good morning friends! It is, of course, Monday, I am back from my vacation, and that can only mean one thing, 30 Minutes Or Less! I hope that you are all as excited as I am. Today, we are going to be taking a look at something that most of us probably haven’t had in a very long time, Sloppy Joes. Bonus points to anyone who can get through this post without hearing Adam Sandler in their head singing “Lunch Lady Land”.
When I decided I was going to make Sloppy Joes for today’s 30 Minutes Or Less, I took a few minutes and thought about what a Sloppy Joe is. What I realized is that every Sloppy Joe I’ve ever had was made with leftover spaghetti sauce, rather than some specific Sloppy Joe mixture. After a quick Google search I realized that to the rest of the world, or at least the Goolecentric part of it, a Sloppy Joe isn’t actually what I thought it was at all.
I did some research and came to the very surprising conclusion that I’d never had an actual Sloppy Joe before. It was obviously time to change that. I compiled my research, broke it down, took some pieces away, added a few of my own and what I was left with was the recipe I’m about to share with you. An entirely new-to-me Sloppy Joe recipe.
Most of the recipes I found had a base of ketchup and mustard. I couldn’t bring myself to pour a bunch of ketchup into my pan so I used tomato purée and added a little sugar and cider vinegar to kind of replicate the ketchup flavour. I also added fresh garlic when most of the recipes called for garlic powder. And, I used mustard powder when most recipes called for prepared mustard. Other than that I didn’t change too much. I wasn’t trying to reinvent the wheel, just make a delicious Sloppy Joe.
And with that, this is how to make…
Sloppy Joes in 30 Minutes Or Less
12:20 pm – Getting Started
First things first I put a large frying pan on the stove over medium-high heat. While that was heating up I diced one medium-sized onion by cutting the top off, then cut it down through the middle. I peeled the onion and then made a few horizontal slices about 3/4 of the way through the onion. I then made a few verticle slices all the while keeping the root of the onion intact so it didn’t fall apart. After that, I cut across the slices, and like magic, perfectly diced onions.
By the time the onion was cut the pan was hot and ready. I add about 1 tbsp of olive oil along with 2 lbs lean ground beef and my diced onions. I stirred the beef to break it up and to make sure everything was cooking evenly. Finally, I seasoned the beef and onions generously with salt and pepper then move on to my next task.
12:25 pm – Peppers & Garlic
With the beef and onions cooking away I diced up about a 1/2 cup of green bell pepper which was about 1/2 the pepper. Then I peeled and sliced 2 cloves of garlic.
By the time I was done with my slicing and dicing the onions were translucent and the beef was cooked through. It was time to add in the bell pepper and garlic. I cooked everything together stirring fro a few minutes.
12:31 – Seasonings
After a couple of minutes of cooking the bell peppers and onions, it was time to add in my seasonings. First up was 2 tbsp of brown sugar, 2 tsp ground mustard, 2 tsp cider vinegar, 1 tbsp soy sauce, and 1/2 tsp crushed red pepper flakes. I stirred the seasonings into the meat mixture and cooked it all together for about 2-3 minutes before moving on.
12:34 pm – Sauce
The last two ingredients to go into the Sloppy Joe mixture were 1 cup of tomato purée and 1 cup of beef stock. Once these were added in I turned the heat up slightly on the pan and brought it to a boil. Then, I reduced the heat to medium and let it simmer away.
12:37 pm – Salad
While the mixture was simmering on the stove I got to work making a quick salad. I first sliced up a chunk of cucumber, then a radish, and a carrot. I put of mesclun mix in two small bowls and topped it with the cut vegetables and couple cherry tomatoes.
12:45 – Buns
The salad was done, the Sloppy Joe mixture was almost done, all that was left was to toast the buns. I cut them in half and popped them in the toaster. My toaster has a “bagel setting” which only turns on one side of the element. I usually use this to taste the buns 90% of the way and then finish them on the regular setting. It works really well for me and my toaster.
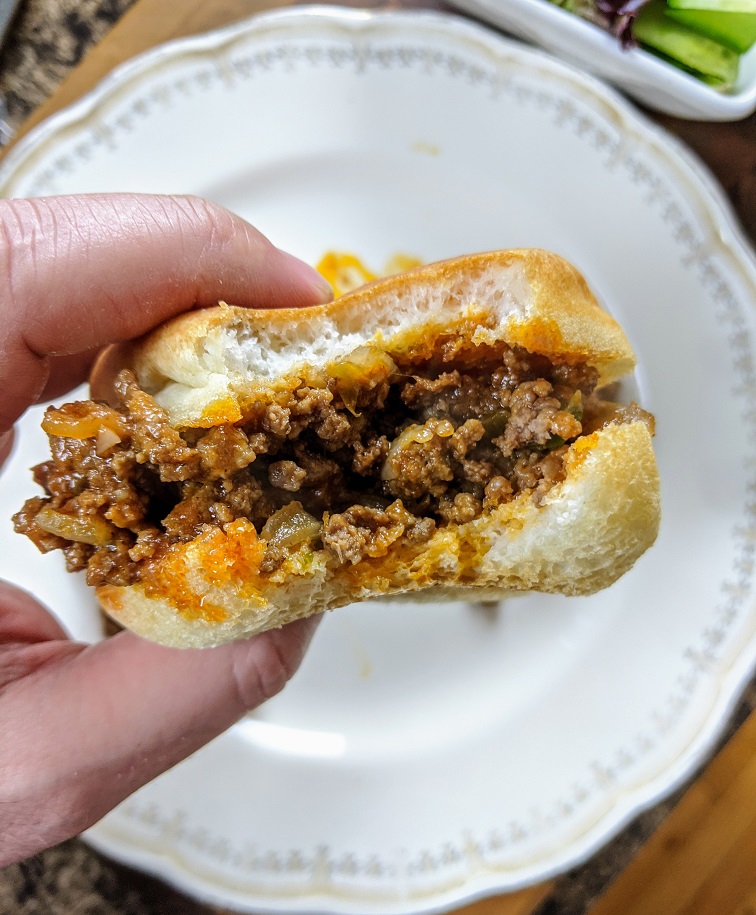
12:47 pm – Sloppy Joe
The Sloppy Joe mixture was done when there was very little moisture left in it. Essentially, when I scraped the bottom of the pan with a spoon, a clean line stayed. You can see this in the pictures below. That’s how you know the mixture is thick enough.
I big scoop of the filling on my bun dressed my salad and dinner was ready.
Conclusion
These Sloppy Joes were really tasty, and I would be more than happy to eat them again. However, what I realized is that what I actually wanted, was the spaghetti sauce style Sloppy Joes I had always had before. So, as good as this were, there was some sense of disappointment that went along with them for me. But all that means is that I will have to make so spaghetti sauce and redo this for lunch someday in the near future.
Oh, and one other thing. I actually put hot sauce on my Sloppy Joe as I was eating it. I felt like it needed a bit of a kick and I was right. If you are all right with a bit of heat, put some hot sauce on this, you’ll be happy you did.
And that does it for today. Thank you as always for reading and remember to tune into Dinner with Ben tonight and every Monday night at 6 pm on my Facebook page. Tonight we are making Chicken Fried Steak! See you then.
Heat a large frying pan over medium-high heat. Addin the ground beef and onions and cook until the onions are soft and the beef is cooked through (5-8 minutes). Season generously with salt and pepper.
Add the green pepper and garlic to the beef and onions and cook for another 2-3 minutes.
Next up, add in all the seasonings cook for 2 minutes then add in the tomato purée and beef stock. Bring to a boil, reduce the heat to a simmer and cook until thick.
The mixture is done when a spoon dragged across the bottom of the pan leaves a clean line. Taste and adjust the seasoning as needed.
Who doesn’t love a good pot of Chili? Especially, in the dead of winter. Is there anything better to warm you up? I don’t think so. With winter storms hitting us from all directions and the weekend only a few short hours away I thought I would share with you the recipe for The Best Chili Ever.
What makes this Chili Recipe so special? Well, besides a couple of surprise ingredients, it really comes down to the timing of when the ingredients are added and the spices and quantities of spices used. To be fair, this isn’t your run of the mill Chili. This has a lot more flavour which comes in part from the cinnamon and cumin in the recipe. So, this will likely be different than most Chili you are used to. But, I think that is what makes it so good. It isn’t at all like every other Chili.
I’m going to break the recipe down 30 Minutes or Less Style then give you a full printable recipe at the end. If you just want the recipe you can grab that at the bottom of the page. Okay, let’s take a look at how to make…
THE BEST CHILI EVER
Getting Started – Mise en place
The first step is to get all the ingredients together. In cooking, we call this Mise en Place. For me, this included measuring out all of my spices ahead of time. That way I wasn’t fumbling around later trying to find all my spices in the disaster that is my spice cupboard.
The spices I used are:
1 tsp cinnamon
1 tbsp dried oregano
1 tsp smoked paprika
2 tsp cumin
1/4 tsp chilli flakes
1 tsp salt
1/4 tsp pepper
Browing the Beef
The next step is to start cooking the beef. I heated up a large pot. In this case, it was an enamelled castiron dutch oven. You can use whatever type of pot you want. I added about 1 tbsp of canola oil. You can use olive oil, grape seed oil, or just about any other type of oil for this. I added the beef (about 2 lbs) to the hot pot and oil and cooked it until it was fully browned. This took about 8-10 minutes.
Onions, and garlic, and celery, oh my!
While the beef was browning I diced one onion, minced 3 garlic cloves, diced the bottom half of a bunch of green onions and diced 1 celery stalk and 1 jalapeno. I added the onions and the garlic to the pot first cooking them for about 5 minutes. Then I added in the green onion bottoms, and the celery and cooked for about 4 minutes. Finally, I added in the jalapeno and cooked for another 4 minutes before moving on to the my next batch of ingredients.
Spices
With all the onions and celery and everything starting to soften, it was time to add in the spices. As I said earlier, I had the spices all measured out, so I poured them all in in one shot. I cooked the spices, stirring, for about 2 minutes.
Tomato Purée
Next came the tomato purée. If you don’t have tomato purée or can’t find it, crushed tomatoes will do. The jar I used was 660ml (or 24 fl oz). I poured the contents of the bottle into my pot, then rinsed the bottle out with about a 1/2 cup of water and poured that in too. Waste not want not, right?
Beans
In some parts of the world, Chili doesn’t have beans in it. I do not live in one of those parts of the world. I don’t think I have ever had Chili without beans in it. And so if you think it is crazy that I am adding kidney beans into my Chili, understand that I think it’s crazy that you don’t.
I drained and rinsed a 540ml (19 fl oz) can of red kidney beans, then added them to my pot. At this point, I stirred everything together and brought it up to a boil. Then, I put the lid on the pot, reduced the heat to low and left it to simmer for 30 minutes, stirring once halfway through so the Chili didn’t stick to the bottom of the pot.
Peppers
While the Chili was simmering away I got my final few ingredients ready to go. First up, I took the seeds out and diced 1 red bell pepper, and 1 green bell pepper. Then, I brewed a 1/4 cup of very strong coffee and grabbed 2 oz of semi-sweet bakers chocolate out of my baking cupboard.
You may be wondering why I haven’t added the bell peppers into the Chili yet. Well, if the peppers get cooked too long they will turn bitter and throw off the flavour of the Chili. As you will see I add them in at the last 20 minutes of cooking. This is enough time to cook the peppers through, but not enough time to make them bitter.
You may also be wondering what the coffee and chocolate are for. They are not a snack for while I’m waiting. They are both going into the Chili. The coffee and chocolate add a lot of depth to the flavour of the Chili. I know it may seem odd, but when you try it, you will be blown away.
Finishing the Best Ever Chili
After the initial 30 minute simmer of the Chili, I gave it a stir and a taste and added a bit more salt. Then, I added in the peppers, coffee, and chocolate, stirred it all together, put the lid back on the pot and simmered it for another 20 minutes. After that, I tasted it and added a bit more seasoning as was needed. Then, I put the lid back on the pot and let the Chili sit off the heat for another 20 minutes.
Corn pancake.
While the Chili was resting I made some kind of sweet corn pancake to go along with it. Essentially, I wanted cornbread but didn’t have all the ingredients so I made this instead. I have used this brand for a long time to make tacos, but this was the first time I used this mixture. It as really good and I would recommend it with the Chili 100%.
Conclusion
Like I said in the intro, in my opinion, this is the Best Chili Ever. It is spicy but not too much so. It’s earthy but doesn’t taste like dirt. It has loads of flavour, as well as a few surprise ingredients that you can keep as our little secret. The next time you get a craving for Chili, give this recipe a shot. I promise that you will be happy you did.
You may have noticed that this Chili hasn’t been cooked for hours and hours and hours as some people believe is necessary. The truth is that cooking Chili for that long is actually destroying the flavour of it, rather than improving it. Think about it this way; when we taste something, let’s say a carrot. We aren’t actually tasting the “carrot”. We are tasting a mixture of flavour compounds that make up the taste of a carrot. These flavour compounds are what give everything flavour. The flavour compounds are largely made up of essential oils which when heated quickly start to lose their potency. The longer you cook these compounds the less flavour they are going to have. Because the flavours aren’t as potent when they are cooked for long periods of time, they don’t stand out. What you are left with is a bland pot of Chili that only has one muddled flavour. This is opposed to a pot of Chili with a combination of well balanced vibrant flavours.
I know that what I just said is going to piss some people off. They will say they’ve been cooking Chili their whole lives for hours and hours and it’s the best and whatever else. To those people, I have one question. Have you tried not cooking the shit out of your Chili? Maybe, just maybe you’ll like it better. I’m willing to bet you will.
As always, thank you for reading. And please remember to like and share the post. Have a great weekend everyone!
The Best Ever Chili
In my opinion, this is the Best Chili you will ever have.
We use cookies on our website to give you the most relevant experience by remembering your preferences and repeat visits. By clicking “Accept”, you consent to the use of ALL the cookies.
This website uses cookies to improve your experience while you navigate through the website. Out of these, the cookies that are categorized as necessary are stored on your browser as they are essential for the working of basic functionalities of the website. We also use third-party cookies that help us analyze and understand how you use this website. These cookies will be stored in your browser only with your consent. You also have the option to opt-out of these cookies. But opting out of some of these cookies may affect your browsing experience.
Necessary cookies are absolutely essential for the website to function properly. This category only includes cookies that ensures basic functionalities and security features of the website. These cookies do not store any personal information.
Any cookies that may not be particularly necessary for the website to function and is used specifically to collect user personal data via analytics, ads, other embedded contents are termed as non-necessary cookies. It is mandatory to procure user consent prior to running these cookies on your website.