Diving into the world of tacos, there’s one variation that stands out for its bold flavours and irresistible crunch: the crispy pork belly taco recipe. This dish is a game-changer for anyone looking to elevate their taco night. It marries the deep, savoury notes of crispy pork belly with the vibrant zing of pickled red onions and fresh cilantro, all tucked into a soft tortilla embrace. It’s not just a meal; it’s a sensory journey that balances richness with freshness, creating a taste profile that’s hard to forget.
The Star Ingredient: Crispy Pork Belly
Pork belly, with its perfect ratio of meat to fat, is the heart of this recipe. Seasoning it with a mix of sea salt, black pepper, and smoked paprika not only enhances its flavour but also sets the stage for that ultimate crispy finish we’re all after. The secret lies in slow-roasting it first to tender perfection, then giving it a high-heat blast to crisp up the skin. This process might test your patience, but the result is succulent pork with a crackling exterior that’s totally worth the wait.
The Fresh Twist: Pickled Red Onions
What really brings these tacos to life is the pickled red onions. Their sharpness and slight sweetness cut through the richness of the pork belly, adding a layer of complexity to each bite. Making them is simple. Combine apple cider vinegar, sugar, salt, and warm water. Letting the onions sit in this pickling solution, whether for an hour or overnight, transforms them into a tangy condiment that you’ll want to add to everything.
Assembly: The Final Touch
With the pork belly perfectly roasted and the onions pickled, assembling the tacos is where the fun really begins. Lay down a warm tortilla, add a generous helping of pork belly cubes, and top them with vibrant onions and fresh cilantro leaves. A squeeze of lime juice over the top brings a bright pop of acidity that ties everything together beautifully.
Why It Works
This crispy pork belly taco recipe isn’t just about combining ingredients; it’s about creating a balance. The richness of the pork is offset by the acidity of the pickled onions, while the cilantro adds a burst of freshness that elevates the entire dish. The contrast of textures—from the crunch of the pork skin to the softness of the tortilla—makes every bite a delight.
In summary, crispy pork belly tacos are more than just a meal; they’re an experience. They bring together the best of what tacos have to offer: bold flavours, contrasting textures, and the joy of customization. Whether it’s a casual dinner or a special occasion, these tacos promise to be a hit, proving that with the right ingredients and a bit of patience, taco night can be nothing short of extraordinary.
Pork Taco Recipe
Pork Belly Tacos
These tacos combine the rich, savory flavor of crispy pork belly with the fresh punch of pickled red onions and cilantro, all nestled in a soft tortilla. It's a fusion of textures and tastes that'll give your taste buds a real fiesta.
Start by pickling the onions: In a jar, combine apple cider vinegar, sugar, salt, and warm water. Stir until the sugar and salt are dissolved. Add the red onions, ensuring they are fully submerged. Let sit for at least 1 hour or refrigerate overnight for best results.
Preheat the oven to 250°F (120°C). Season the pork belly on all sides with salt, pepper, and smoked paprika. Place on a wire rack over a baking sheet and cook for 2-3 hours until tender.
Increase oven temperature to 400°F (205°C) and roast the pork belly for an additional 20-30 minutes until the skin is crispy.
Remove the pork belly from the oven and let it rest for 10 minutes before cutting into bite-sized cubes.
To assemble the tacos, place a few pieces of crispy pork belly on each warmed tortilla.
Top with pickled red onions, fresh cilantro leaves, and a squeeze of lime juice.
Serve immediately with extra lime wedges on the side.
Bacon-Wrapped Pork Tenderloin. What more do I need to say? Make it for dinner tonight, your next special occasion, or dinner party. It is guaranteed to please. You can find the recipe directly below but keep reading for a more detailed explanation.
A quick note about the pork tenderloin.
Usually, when making something like this bacon-wrapped pork tenderloin, I would use a whole tenderloin. However, when I went to the grocery store to buy a pork tenderloin, they were all cut into pieces. That’s the only reason why this recipe calls for half a pork tenderloin. You can double up the bacon and easily do this with a whole tenderloin. You may need to add five minutes to the cooking time, but otherwise, nothing else needs to change.
Bacon-Wrapping The Pork Tenderloin
To wrap the tenderloin, start by placing a 12-inch length of plastic wrap flat on your cutting board. Place five slices of good-quality bacon in an overlapping pattern in the middle of the plastic. Put the pork tenderloin at the end of the bacon strips. Use the plastic wrap to lift the bacon while you roll the tenderloin forward—Tuck the bacon around the tenderloin and roll forward to finish the wrap. Close the plastic wrap around the bacon-wrapped pork tenderloin. Grap the ends of the plastic wrap and roll the wrapped tenderloin along on the cutting board to twist the edges tightly. Let the tenderloin sit in the plastic for ten minutes or up to two days in the fridge.
How to cook the bacon-wrapped pork tenderloin.
Searing
Heat a large skillet on medium-high heat. Add two teaspoons of cooking oil. Remove the plastic wrap from the pork tenderloin. Put the tenderloin in the hot pan with the seam of the bacon down. Cook for a minute or two or until the bacon is browned. Flip the tenderloin and brown on the top. Then, brown on both sides. It is very important that your pan is hot when the tenderloin goes in otherwise the bacon will stick.
Roasting
Put the tenderloin in a small roasting pan or casserole dish and brush with your favourite barbecue sauce or follow my guide to homemade barbecue sauce here. Put the roasting pan in the oven at 375°f for 12 minutes. Flip the tenderloin, brush with some more barbecue sauce, and cook for another 8 to 10 minutes or until the tenderloin is firm to the touch or a thermometer inserted into the thickest part of it reaches 150°F. Take the pork out of the oven and let it rest for 5 minutes before you cut into it.
Serving The Pork Tenderloin
Once the pork has rested, slice it into pinky-finger width pieces. For appearances purposes, cut it on a slight bias. Serve the pork with roasted or mashed potatoes and vegetables.
The Wrap-Up
Bacon-Wrapped Pork Tenderloin is the kind of dish that seems very impressive, but as you’ve seen, it is pretty simple. However, that simplicity doesn’t take away from the appeal or the delicious flavour. If you have people over for dinner or want to make something special, bacon-wrapped pork tenderloin is the perfect option. You can also wrap it a day ahead which is great to cut down on prep time when hosting a dinner party.
[jetpack_subscription_form subscribe_placeholder=”Email Address” show_subscribers_total=”false” button_on_newline=”false” custom_font_size=”16px” custom_border_radius=”0″ custom_border_weight=”1″ custom_padding=”15″ custom_spacing=”10″ submit_button_classes=”” email_field_classes=”” show_only_email_and_button=”true” success_message=”Success! An email was just sent to confirm your subscription. Please find the email now and click ‘Confirm Follow’ to start subscribing.”]
Perfect Bacon-Wrapped Pork Tenderloin
Pork tenderloin wrapped in cripsy bacon and coated in barbecue sauce. Doesn't that sound good? Make it for dinner or your next dinner party. Either way, everyone will be happy.
Lay a 12-inch piece of plastic wrap on your cutting board.
Place the bacon on the plastic wrap, overlapping the pieces.
Place the pork tenderloin on the bacon and wrap using plastic wrap to lift the bacon. Grap the end of the wrap and twist to tighten. Let sit for 10 minutes or put in the fridge for up to 2 days.
Heat your oven to 375°f.
Put a pan on the stove on medium-high heat. Once the pan is hot add the vegetable oil. Take the pork out of the plastic wrap and place in the hot pan with the ends of the bacon down. Cook for 2 to 3 minutes or until the bacon is browned. Then repeat on all sides.
Take the bacon out of the pan, and put it in a small roasting pan. Brush with half of the barbecue sauce and put in the oven for 12 minutes.
Take the pork out of the oven, flip, and brush with the remaining sauce. Return the pork to the oven for another 8 to 10 minutes or until it is cooked.
Let the pork rest for 5 minutes, then thinly slice on a slight bias and serve.
You know that old pork chop recipe where you take a can of cream of mushroom soup and cook the pork chops in it. This recipe for Pork Chops with Creamy Mushroom Sauce is like the elevated restaurant-quality version of that dish. Rather than using store-bought canned soup, the creamy mushroom sauce is made using high-quality mushrooms, fresh herbs, brandy, stock, and cream. The pork chops are thick-cut, seared in a hot pan, then finished in the oven to ensure an even and perfect cook. Whether you are looking for a quick weeknight meal or something high-end to make for a special occasion, this is it. Serve it with mashed potatoes and vegetables, and you’ve got a delicious dish that anyone would be happy to pay money for. You can find the recipe directly below and keep reading past that for a more detailed explanation.
Pork Chops with Creamy Mushroom Sauce
We've all had pork chops with cream of mushroom soup. This is like that but elevated. Rather than using a store-bought can of cream of mushroom soup, the sauce is made of high-quality mushrooms, brandy, herbs, chicken stock and cream. This is a restaurant-quality dish that you can make at home any day of the week.
Pull or cut the king oyster mushrooms into thin strips.
Pull or cut the portobello mushrooms into thumb-width chunks.
Heat a skillet over medium-high heat.
Pat the pork chops dry with paper towel and season on both sides with salt and pepper.
Add the olive oil to the pan and sear the pork chops on both sides until brown. About 1 to 2 minutes per side.
Remove the pork chops from the skillet and place them on an oven-safe sheet pan. Put the pork chops in the oven for 10 minutes.
Drain the excess oil out of the skillet, leaving about 1 tbsp. Add the shallots, garlic, mushrooms, rosemary, and thyme. Cook, stirring, for 2 to 4 minutes or until the shallots soften and the mushrooms are cooked.
Add the brandy to the skillet and cook for about a minute or until it has all but evaporated.
Add the chicken stock, bring to a boil, and cook until it has reduced by half. About 2 minutes.
Add the cream and continue to cook the sauce until it is thick enough that a wooden spoon dragged across the bottom of the skillet leaves a line for at least 1 second.
Remove the pork chops from the oven, top with the creamy mushroom sauce and serve.
Notes
You can substitute the two thick-cut pork chops for 4 thinner pork chops. Once seared, cook the thinner pork chops in the oven for 5 to 7 minutes. There is no need to adjust the sauce recipe as it will be enough for 4 pork chops.
The ingredients for my Pork Chops with Creamy Mushroom Sauce are pretty straightforward, but if you don’t have some of the ingredients, you can substitute them for others. To start, I have these beautiful bone-in thick-cut pork chops. You don’t have to use these, they just look excellent in pictures, and honestly, they are of outstanding quality. I got them at Sobeys for anyone in Canada. But whatever pork chops you have will be fine. You will have to adjust the cooking time a little so that thinner chops don’t end up overcooked. The mushrooms for the recipe are one portobello and three king oyster mushrooms. You can use button mushrooms, creminis, or any other mushroom you want. The key is that you have about two cups of loosely packed mushrooms. Herbs, I used thyme and rosemary, but sage, parsley, tarragon, or even just Italian seasoning will work well. You can switch out the shallot for half a small onion, and you can substitute the brand for white wine, sherry or leave it out altogether. Leave the cream as whipping cream as the recipe requires a high-fat content.
Preparing the Mushrooms
To prepare the mushrooms, you can cut them into strips or chunks, but the easiest and quickest thing to do is pull the mushrooms apart with your hands. Pull the king oyster mushrooms into long thin strips, and break the portobello into thumb-width chunks.
Preparing the Shallot and Garlic
To prepare the shallot and garlic, peel them and slice them as thinly as you can. The herbs, just leave whole.
Preparing and Cooking the Pork Chops
Pat the pork chops dry with a paper towel. Season generously with salt and pepper. Heat a skillet over medium-high heat and add in 2 tbsp of olive oil. Sear the pork chops for a minute or two or until browned. Season the upside, then flip and sear for another minute or two. Take the pork chops out of the skillet, put them on a sheet pan, and put them in a 400°f oven for 10 minutes. For thinner pork chops, reduce that amount of time to 5 to 7 minutes. That may not seem like much time, but they don’t need to cook too much more because the pork chops are already partially cooked after searing in the pan. Make sure to sear the fat on the side of the pork chop as well before putting them in the oven.
Making the Creamy Mushroom Sauce
Drain the excess fat out of the pan, leaving about one tablespoon. Add the mushrooms, shallots, garlic, thyme and rosemary. Season with salt and pepper and cook for about three minutes or until the shallots have softened. Pour a quarter cup of brandy into the pan and cook until it has almost all evaporated. Add half a cup of chicken stock, bring to a boil and let it cook for about two minutes or until it has reduced by half its volume. Finally, add a quarter cup of whipping cream. Continue to cook the sauce until it is thick enough that a spoon dragged across the bottom of the pan leaves a line for at least one second.
Finishing The Pork Chops with Creamy Mushroom Sauce
Remove the pork chops from the oven, let them rest for two minutes, spoon the sauce over them and serve. When cooked, the pork chops should be juicy and tender with a slight pink colour. If the pork chops are solid white and dry, they have been overcooked. All in all, with prep and cooking, this recipe for Pork Chops with Creamy Mushroom Sauce should take less than 25 minutes, but it will taste like you’ve been cooking all day. Try it for yourself.
The Wrap-Up
Something about the air cooling down makes me crave mushrooms, especially in a cream sauce. That flavour, for whatever reason, is the taste of fall to me. What is your favourite fall flavour? Keep in mind that this sauce work just as well on beef, chicken, or pasta as it does on pork chops. Add it to your repertoire, change the mushrooms, change the protein, and you’ve got a secret weapon up your sleeve that you can break out whenever you want to impress or have something special. Now, get cooking!!!
Thank you for reading this post. I hope you enjoyed it. Remember to subscribe to Chef’s Notes by putting your email address in the box below, so you never miss a post.
Tender grilled pork seasoned with homemade shawarma spice served with quinoa tabouleh, homemade pickled turnip and tahini dressing. Is this the exact meal you need? I think we both know the answer to that. So, fire up the grill, sharpen those knives and let’s get cooking. This is my grilled pork shawarma bowl with homemade pickled turnip.
Where have I been?
Before we get too deep into today’s post, I want to talk a little about where I’ve been and why there haven’t been any new posts on Chefsnotes.com in over a month. Near the end of April, I decided to take a week off to spend some time with my family, rest and reset. The day before I was supposed to get back to work, I hurt my shoulder, neck, and back. More accurately, I aggravated an old injury. Since then, the pain has ebbed and flowed but has mostly been bad enough that I could not cook or even type. The few times it’s felt okay, it was set off again by something simple like opening the fridge. I’m sure you can imagine my frustration. I’ve been doing everything I’m supposed to be doing and have been seeing some minor improvements. But enough is enough. I am dying to work, so that’s what I’m going to do. I am getting back to work, however, on a limited schedule. Rather than posting three days a week, I’m only posting once, which should be manageable. I want to thank you all for sticking by me and for your understanding. This is an incredibly frustrating time, and I am happy to be back to work.
What’s to come?
When I had to stop working, I had two series that I was working on. The casserole series and the bowl series. This post is the last in the bowl series and was supposed to be posted about a month ago. I am also ending the casserole series early. If I’m only posting once a week, I want to make sure that the one post really counts. So, all the upcoming posts will be one-offs, and when I’m able to get back to work full time, I’ll jump back into some different series.
Pickled Turnip
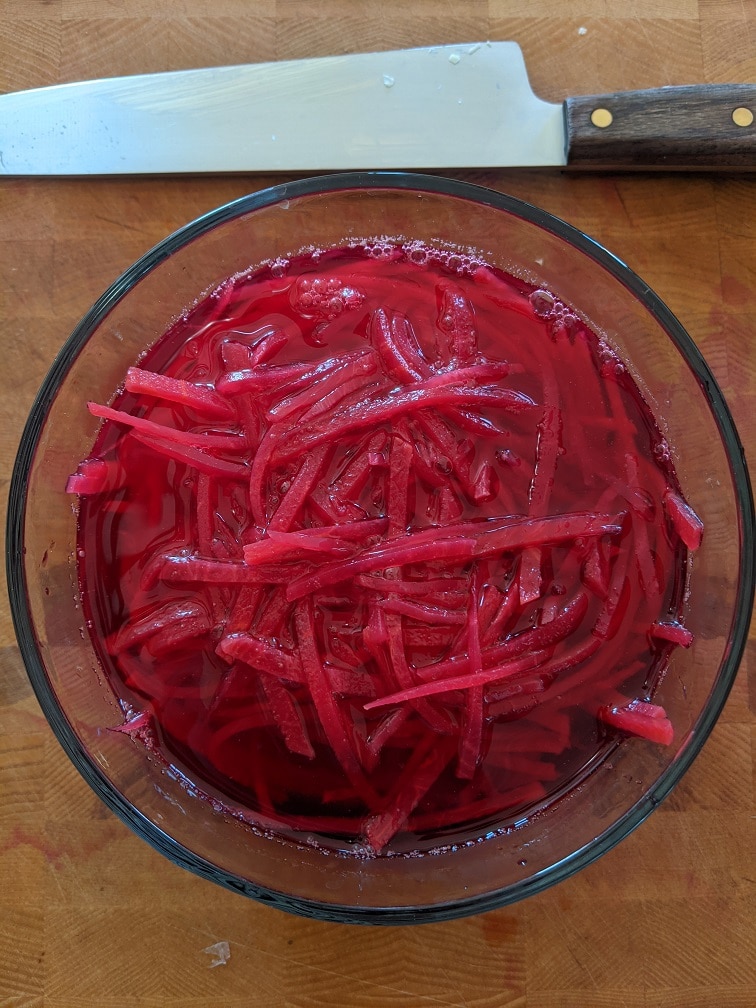
Pickled turnip is a classic topping for shawarma and falafel, but it works just as well on pork chops or a grilled chicken sandwich. And, because it is pickled, it will last in the fridge for about a month. To make it first, julienne about one cup of turnip. You can do this by hand or use a julienne peeler. Then do the same thing to one beet until you have about half a cup of julienne beet. Put the beets and turnip in a medium pot with two cups of water, half a cup of red wine vinegar, two tablespoons of sugar and one teaspoon of kosher salt. Bring the contents of the pot to a boil and cook for five minutes. Take it off the heat and cool it to room temperature before using or storing it in the fridge.
Pickled Turnip
Pickled turnip is a classic topping for shawarma or falafel and its easy to make. Serve it with pork chops, or grilled chicken breast too.
Tahini is a spread made of sesame seeds. Essentially, tahini is sesame butter (like peanut butter), and you can find it in the health food section of most grocery stores. It has a great flavour that makes the perfect sauce for our pork shawarma bowl. To make it combine half a cup of tahini with half a cup of hot water, one tablespoon of minced garlic, the juice of one lemon, a quarter teaspoon of cumin, three-quarters of a teaspoon of kosher salt and half a teaspoon of honey. Mix until smooth. You can use the tahini dressing right away or store it in the fridge in an airtight container for up to a week.
Tahini Dessing Recipe
A simple and delicious tahini dressing recipe that works as well on a salad as it does a pita sandwich, a shawarma or a falafel.
Tabouleh is a salad from the Levantine region of the world. It is traditionally made of parsley, tomatoes, mint, onion, bulgur wheat, olive oil and lemon juice. This simpler version substitutes the bulgur wheat with quinoa to make the salad gluten-free and a little more nutritious. Quinta Quinoa gave me this bag of quinoa to try. What interested me about this specific brand is that it is produced in Canada. I didn’t even know that we produced quinoa in Canada. And I have to say, as far as quinoa goes, this was an excellent quality one. Worth checking out for sure.
How to make quinoa tabouleh
To make the quinoa tabouleh, we first have to cook the quinoa. Start by measuring out one cup of quinoa. Rince it and drain it well. Combine the one cup of rinsed quinoa with one and a quarter cup of water. Bring the quinoa and water to a boil over high heat, turn the heat down to low, cover the pot and let it simmer for fourteen minutes. Take the pot off the heat and let it sit, covered for five minutes. Put the cooked quinoa in a medium mixing bowl and combine it with one cup of chopped parsley, one tablespoon minced garlic, the zest and juice of one lemon, one tablespoon olive oil, and a quarter teaspoon of kosher salt. Mix well and serve.
Quinoa Tabbouleh
A great side dish or base of a salad bowl. Also works well as a garnish inside a pita wrap sandwish.
Put the quinoa in a medium pot and cover with 1 1/4 cup of water. Stir and slosh the quinoa around, then drain it very well.
Return the quinoa to the pot and add the remaining 1 1/4 cup of water. Put the pot on the stove and bring to a boil on high heat. Once the pot starts to boil, turn the heat to low, cover the pot and let it sit for 14 minutes.
Take the pot off the heat, leaving the lid on and let it sit for 5 minutes before fluffing it with a fork.
In a medium mixing bowl, combine the cooked quinoa, parsley, lemon zest and juice, olive oil and salt. Mix well.
Taste the tabouleh and season with additional salt as needed.
Shawarma spice is something I’ve used before on this blog because I love it. You can buy it in most grocery stores now, but I find no comparison to homemade. The full recipe is below.
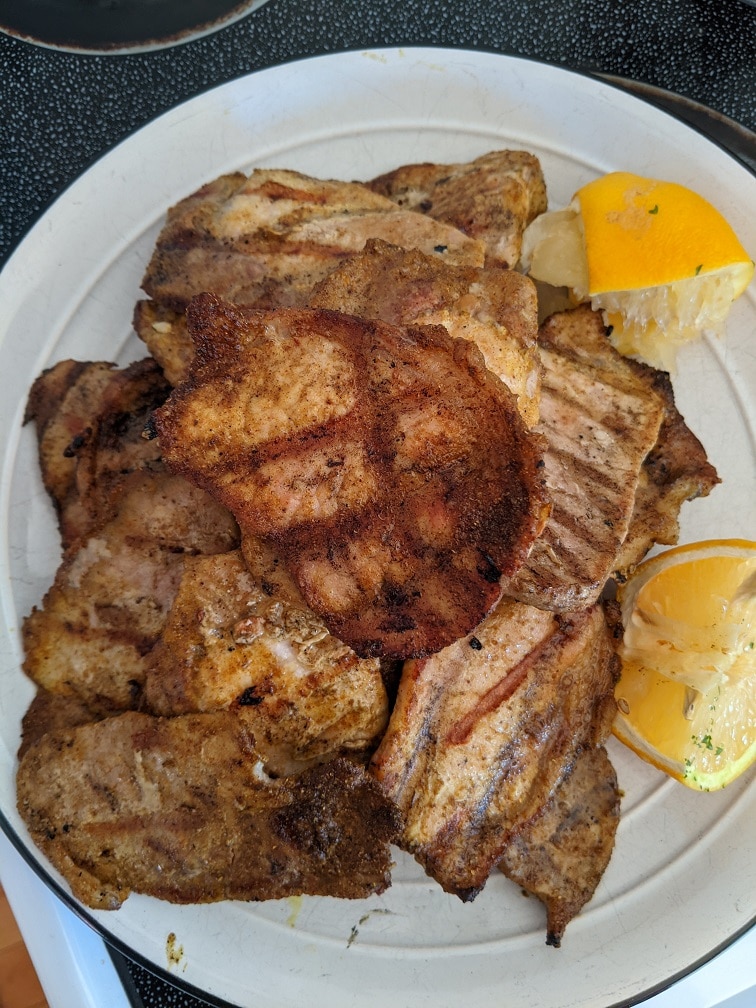
For the pork shawarma, I used pork loin (1 kg). You could use pork shoulder or tenderloin if you’d prefer. If you do use tenderloin, cut it after it is cooked, not before. Start by slicing the pork loin into thin pieces (about 1/8 inch). It helps if the meat is partially frozen while you are cutting it. Then, in a medium mixing bowl, combine the meat with the shawarma spice and a few tablespoons of olive oil. Mix well. At this point, you can grill the pork right away or put it in the fridge to marinate for up to a day.
How to cook pork shawarma
Traditionally, shawarma is cooked on a vertical spit. I’m guessing you don’t have one of those, and neither do I, so our shawarma is going to be grilled. If you don’t have a grill, you can cook it in a hot pan with a bit of oil or in a 400°f oven for 12 to 15 minutes. To grill the pork, preheat your grill to 400°f, lay each piece of pork down in a single layer and grill for 2 to 3 minutes per side or until it is cooked. Finish the pork by squeezing some lemon juice over it and serve.
Pork Shawarma
Serve the pork shawarma as is with rice and vegetables, wrap it up in a pita with vegetables and sauce, or serve it in a shawarma bowl.
In a medium mixing bowl, combine the shawarma spice and olive oil, then add the meat and stir to coat it.
You can let the meat marinate in the fridge for up to 24 hours or grill it right away.
Heat your grill to 400°f for 10 minutes. Lay the pieces of pork loin on the grill and cook for 2 to 3 minutes per side with the lid down. Once the pork is cooked, squeeze the juice out of the lemon over the pork and serve.
First things first, grab the biggest bowl you have. Put about half a cup of the quinoa tabouleh in the bottom of the bowl and top with a little bit of sliced iceberg lettuce. Besides the lettuce, add a few tomato slices. Take a few pieces of the pork shawarma, thinly slice them and put them beside the lettuce. Top meat and vegetables with a tablespoon or two of the tahini dressing and finish with the pickled turnip and a lemon wedge. It is absolutely delicious and actually pretty healthy.
The Wrap-Up
There are obviously many components to this shawarma bowl, but it is well worth the effort. If you do want to cut down on prep, you can substitute the picked turnip for some sliced dill pickle if you’d prefer. It won’t have the same flavour, but it will be delicious nonetheless. Thanks for reading, and man, is it good to be back. See you next Wednesday.
Remember to share this post on Facebook or Pinterest if you enjoyed it. Thank you for reading, and have a great day! Remember, there are new Chef’s Notes posts every Monday, Wednesday, and Friday, and you can subscribe below, so you never miss one.
Is there anything more comforting than digging into a big helping of Shepherd’s Pie? I don’t think there is. In fact, Shepherd’s Pie has been one of my favourite foods for as long as I can remember. This Shepherd’s Pie recipe gives you that comforting feeling you love but with a barbecue pulled pork twist. And yes, it is as good as it sounds. The pulled pork is mixed with sautéed onion, bell pepper, jalapeno, and barbecue sauce and is then topped with sour cream and scallion mashed potatoes and cheddar cheese. It is amazing. Now, let’s get to it.
Minor Rant
Before someone inevitably points out that Shepherd’s Pie is supposed to be made with lamb, I will say I know that. But I also know that the term Shepherd’s Pie has transcended its humble origins to become a broad term used to describe anything topped with mashed potatoes and baked like the French word Parmentier. Language is fluid, and as time passes, words develop new and different meanings. I think we can all agree that at this point, a Shepherd’s Pie is whatever we want it to be.
Ingredients
The ingredients for this Pulled Pork Shepherd’s Pie are pretty straightforward. They are red onion, red and green bell pepper, jalapeno, pulled pork, barbecue sauce, potatoes, butter, cream, sour cream, scallions, cheddar cheese, and of course, salt and pepper. To be clear, this is not a recipe for pulled pork. This is a recipe made using leftover pulled pork. I’ve only just now realized that I’ve never done a post about pulled pork, so I’ll have to do that soon. In the meantime, any pulled pork you have will work. You can find a great pulled pork recipe in my new cookbook, which you can get here. You can always make this same recipe using pulled chicken, turkey, or beef.
Sour Cream and Scallion Mashed Potatoes
Making Mashed Potatoes
Start things off by making the mashed potatoes. While the potatoes are cooking, you can put the Shepherd’s Pie base together to cut down on prep time. I’m sure you know how to make mashed potatoes, but I also know that some people out there don’t, so I’ll walk through this first step for them. For the potatoes, use 4 to 5 fist-sized russet potatoes. Peel them, dice them, and rinse them until the water runs clear. Put them in a pot with hot, salted water, bring to a boil and cook for 10 to 15 minutes or until tender. Pour the potatoes into a strainer, add 2 tablespoons of butter and a 1/4 cup of cream to the pot, and put it back on the burner until the butter melts and the cream just starts to boil. Using a food mill, ricer, or masher, mash the potatoes into the cream and butter.
Flavouring The Mashed Potatoes
Add 2 tablespoons of full-fat sour cream (I said this was delicious, not healthy) and 3 diced scallions to the potatoes. Season the with salt and pepper to taste. The potatoes should be creamy but not watery, and they should have a fresh onion flavour. You have to use full-fat sour cream so that it doesn’t split in the oven.
Prepping The Shepherd’s Pie Filling
While the potatoes are cooking, thinly slice half a red onion and dice half a red and green bell pepper. In total, you want about half a cup of each. If you have a little more or less, it won’t hurt anything. Also, dice one jalapeno. You can remove the seeds if you don’t like too much heat.
Cooking The Shepherd’s Pie Filling
Heat a large skillet over medium-high heat and add in 1 tablespoon of cooking oil (canola, olive, peanut, grape seed, avocado…). Add the onion, bell pepper, and jalapeno and cook for 3 to 4 minutes or until the onions start to soften. Add the pulled pork (about 500g or just over a pound) along with 1 cup of water and 1 cup of barbecue sauce of your choice. Simmer for 2 to 3 minutes or until the sauce coats the back of a spoon.
Assembling the Pulled Pork Shepherd’s Pie
Pour the pulled pork mixture into a small roasting pan or casserole dish. I use the small roasting pan from IKEA, which is about 8-by-10-inches. Spread the mixture out into an even layer so that it covers the bottom of the dish. Top with the mashed potatoes and finish with about 1/2 cup of grated cheddar cheese.
Baking and Serving the Pulled Pork Shepherd’s Pie
Bake the Shepherd’s Pie in a 425°F oven for 15 to 20 minutes or until the cheese has melted and starts to brown. Take the Shepherd’s Pie out of the oven and let it rest for 5 to 10 minutes before serving. Serve with a side salad…or don’t.
Pulled Pork Sheperd’s Pie
Classic Pulled Pork mixed with sautéed peppers and onions, and finished with barbecue sauce. Topped with sour cream and scallion mashed potatoes, and cheddar cheese then baked to perfection.
700grusset potatoes 4 to 5 fist-sized russet potatoes
2tbspbutter
1/4cupwhipping cream
2tbspsour cream
3scallion, diced
salt and pepper to taste
1/2cupgrated cheddar cheese
Instructions
Filling
Heat a large skillet over medium-high heat.
Add the cooking oil to the pan along with the onion, bell peppers, and jalapeno. Sauté for 3 to 4 minutes or until the onions soften.
Add the pulled pork, sauté for 1 minute then add the water and barbecue sauce. Cook, stirring every 30 to 45 seconds for 2 to 3 minutes.
Taste the filling and season with salt and pepper as needed. Put the filling in an 8×10 roasting pan or casserole dish.
Potatoes
Peel and dice the potatoes.
Rinse the potatoes in cold water until the water runs clear.
Put the potatoes in a medium pot and cover them with hot water. Season the water with salt and put it on high heat. Bring the potatoes to a boil and cook for 10 to 15 minutes or until the potatoes are tender.
Drain the potatoes. While the potatoes are draining, put the pot back on the stove and add the butter and cream. Cook just until the cream is warm and the butter is melted.
Using a food mill, ricer, or masher, mash the potatoes and mix well with the cream and butter.
Stir in the sour cream and scallion. Taste the potatoes and season with salt and pepper as needed.
Assemble
Heat your oven to 425°F
Spread the potatoes in an even layer on top of the pulled pork filling. Top the potatoes with cheddar cheese.
Bake the shepherd's pie for 15 to 20 minutes or until the cheese melts and browns.
Let the shepherd's pie cool for 10 minutes, then serve.
Notes
To speed up the process, start cooking the potatoes before the filling.
When I had originally conceived this recipe, I meant to put corn and black beans in it, but I completely forgot and left them out when it came time to cook. I’m glad I did because I don’t know that they would have added to the dish, and in fact, may have taken away from it. I think it is great as it is, but you be the judge. Feel free to play with the recipe, change out of the protein, add whatever you want to it, and really, make it yours.
On a personal note, I have not been posting for over two weeks. The first week I was on vacation. The second week, I hurt my neck and shoulder or aggravated an old injury, to be more precise and couldn’t really do anything. Even now, it isn’t 100%, but it is feeling much better and well enough for me to work. This is the longest I’ve gone without posting in a long time, and I really missed it. I want to say thank you to everyone for all the support and well wishes. It means the world to me.
Remember to share this post on Facebook or Pinterest if you enjoyed it. Thank you for reading, and have a great day! Remember, there are new Chef’s Notes posts every Monday, Wednesday, and Friday, and you can subscribe below, so you never miss one.
Ham, it’s delicious. It’s even more delicious when it’s glazed with a mixture of maple syrup and mustard. When it’s then slow-roasted to perfection, there is nothing that can beat it. Today, I will share my recipe for Maple-Mustard Roasted Ham, so you can enjoy it at home any time you want. There are only a few ingredients in this recipe, it takes very little time to put together, and it tastes amazing. What are you waiting for? Let’s get to it!
The Ham
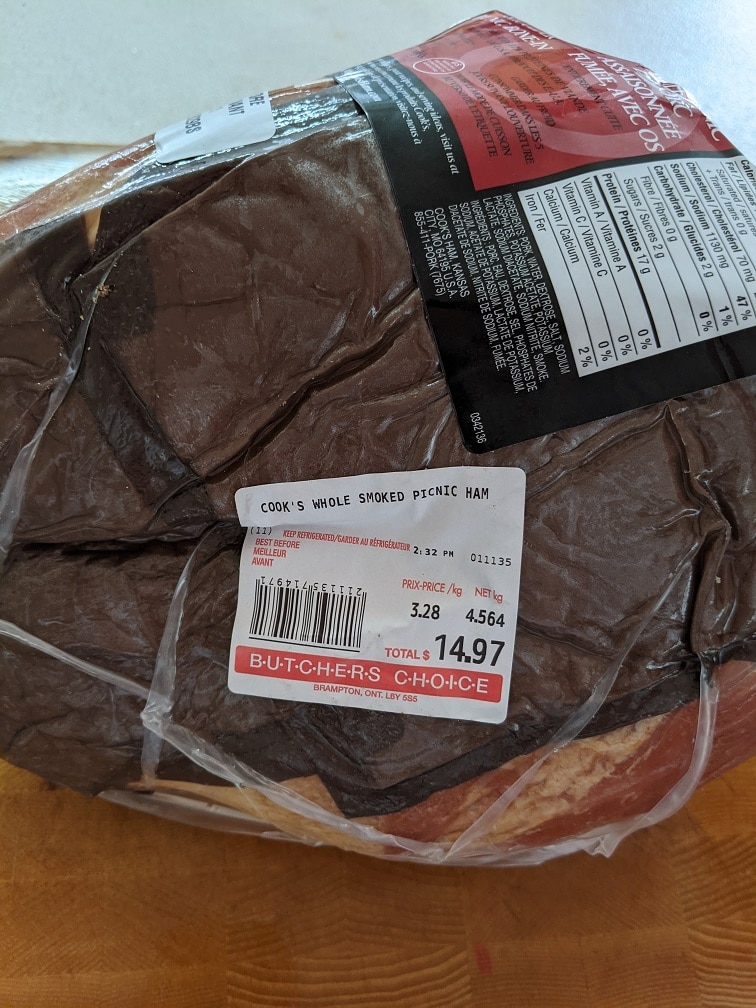
Right after the last thanksgiving, my local grocery store had Cook’s Ham on sale. I’d never had Cook’s before, and the price couldn’t be beaten. So, I bought one, and I couldn’t believe how good it was. I cooked it up and did a post about it. (You can find that here.) I sliced up the leftovers, vacuum-sealed them, and froze them for later use. They did not last long. My wife and I used the leftovers in pasta, soup, chowder, sandwiches, and breakfast. As Christmas approached, I had a sneaking suspicion that these hams would go on sale again after the holiday. I was right. I bought this ten-pound ham, a little bit after new years for fifteen dollars. You just can’t beat that price, and I thought it would be a great opportunity to show you another way to cook a ham.
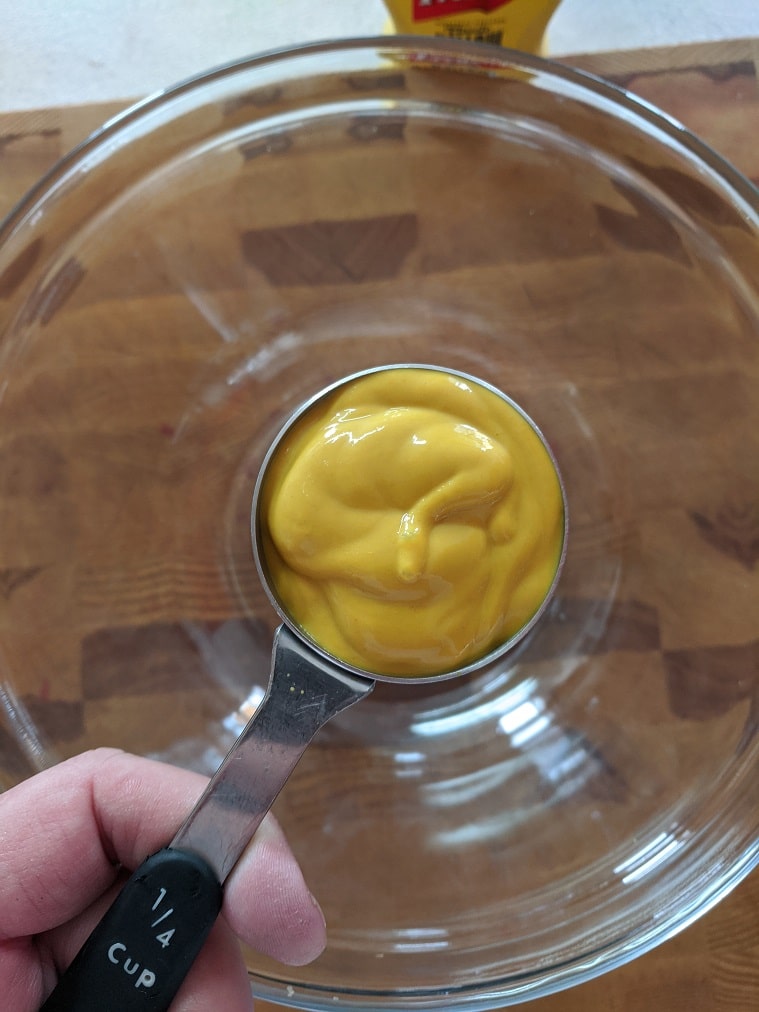
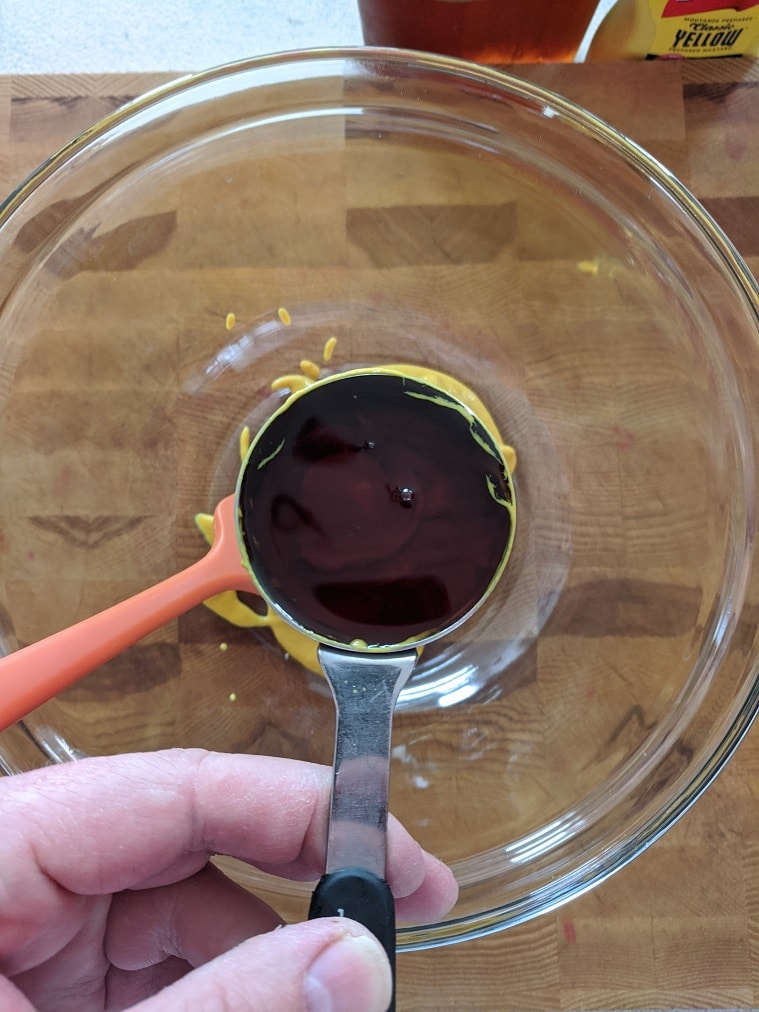
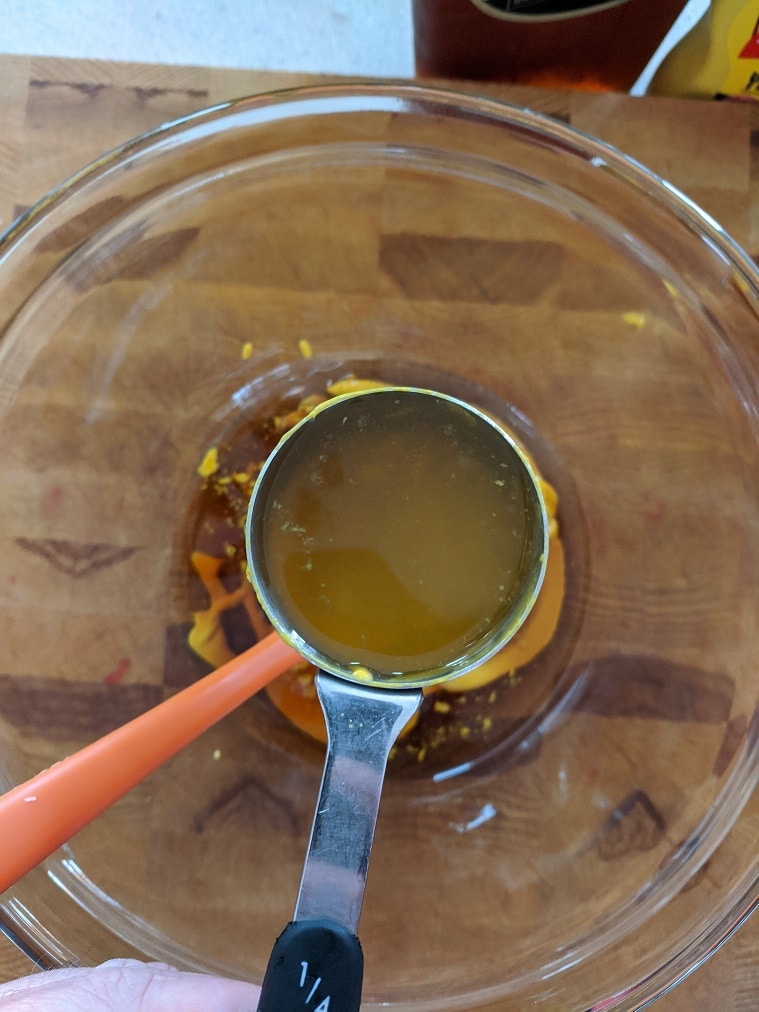
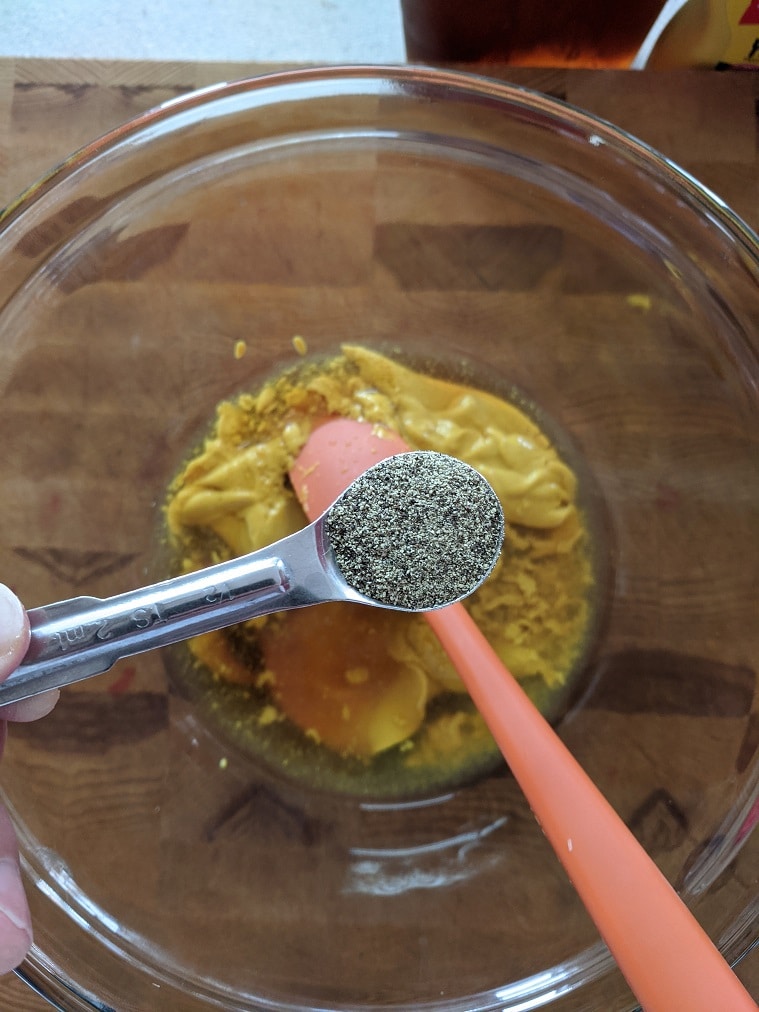
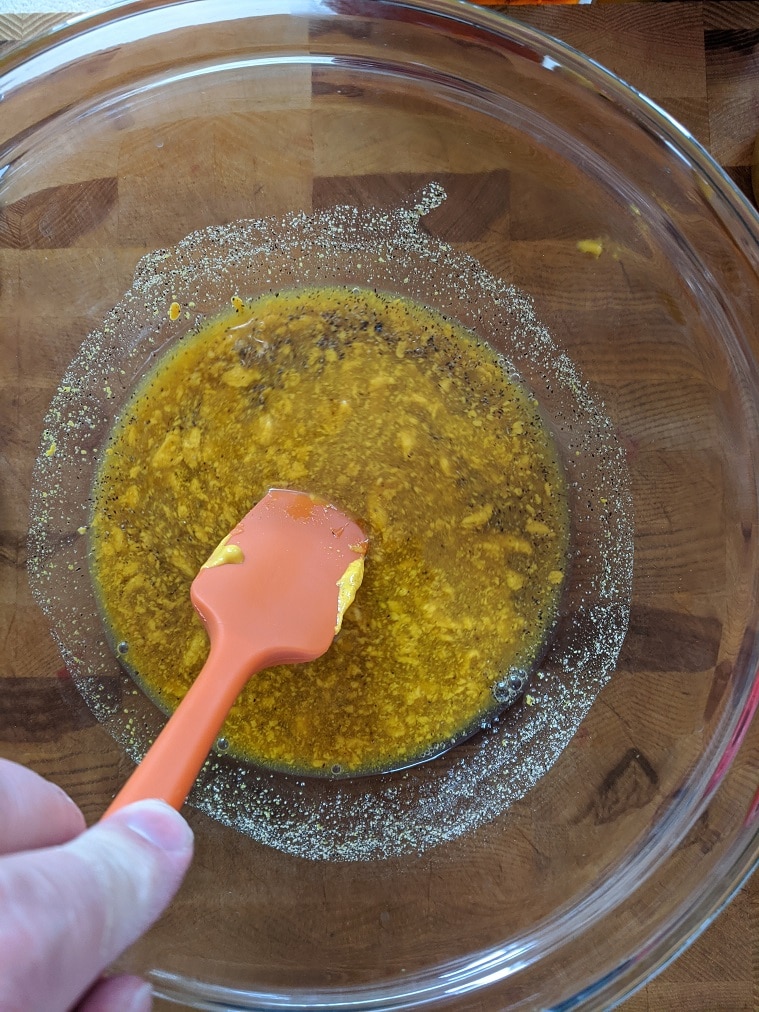
Making The Glaze
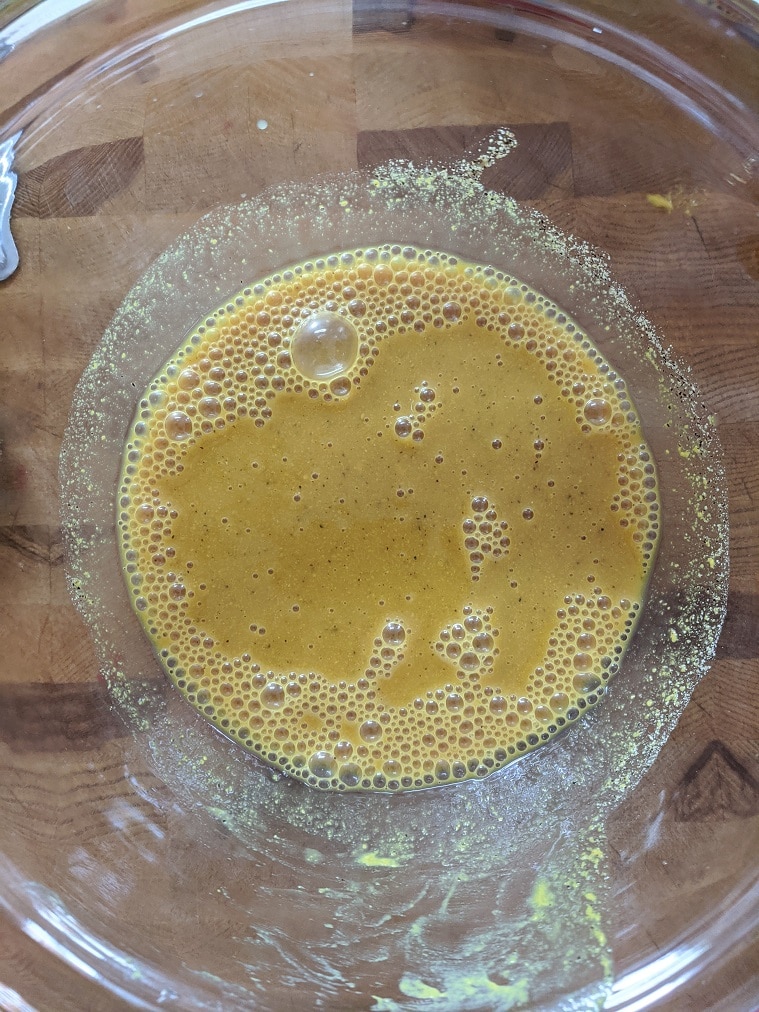
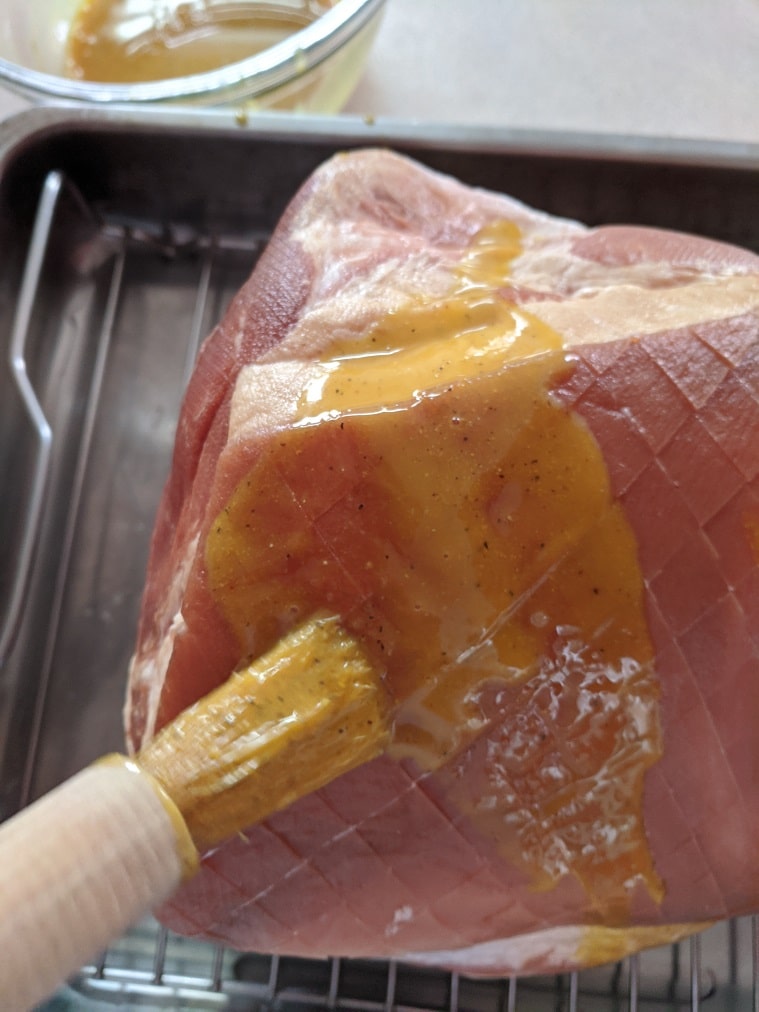
First things first, we need to make the glaze. It is a quarter cup each of yellow mustard, maple syrup (real maple syrup), cider vinegar, and a half teaspoon of black pepper. Put all the ingredients in a bowl and whisk with all your might until the mixture looks uniform.
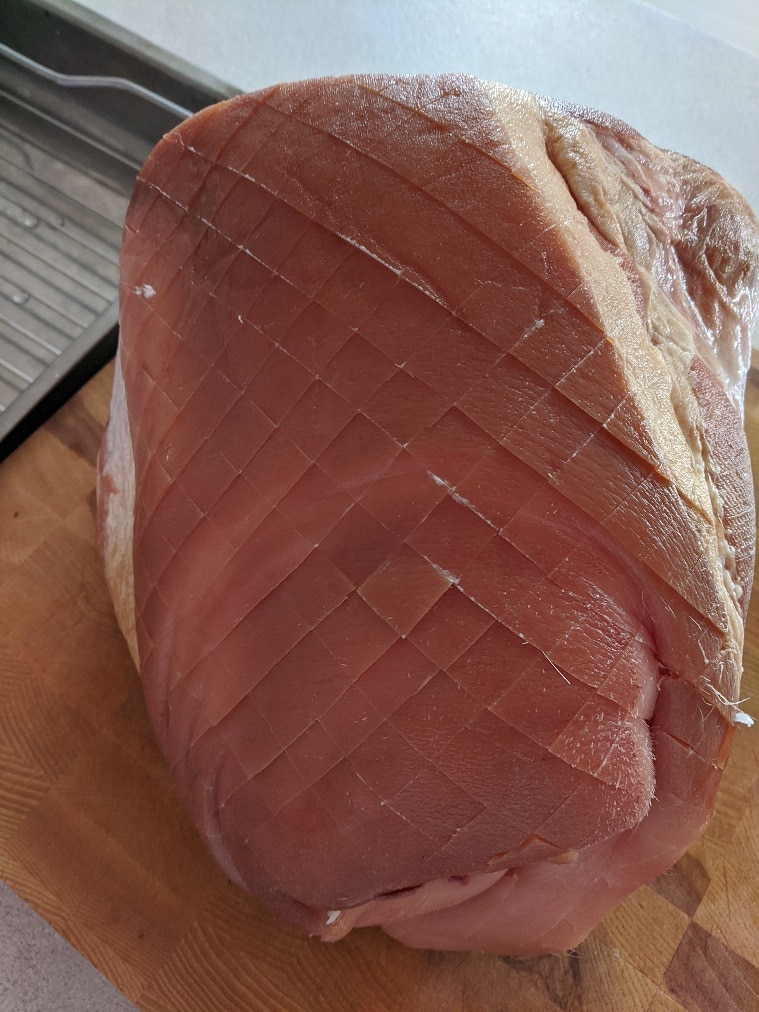
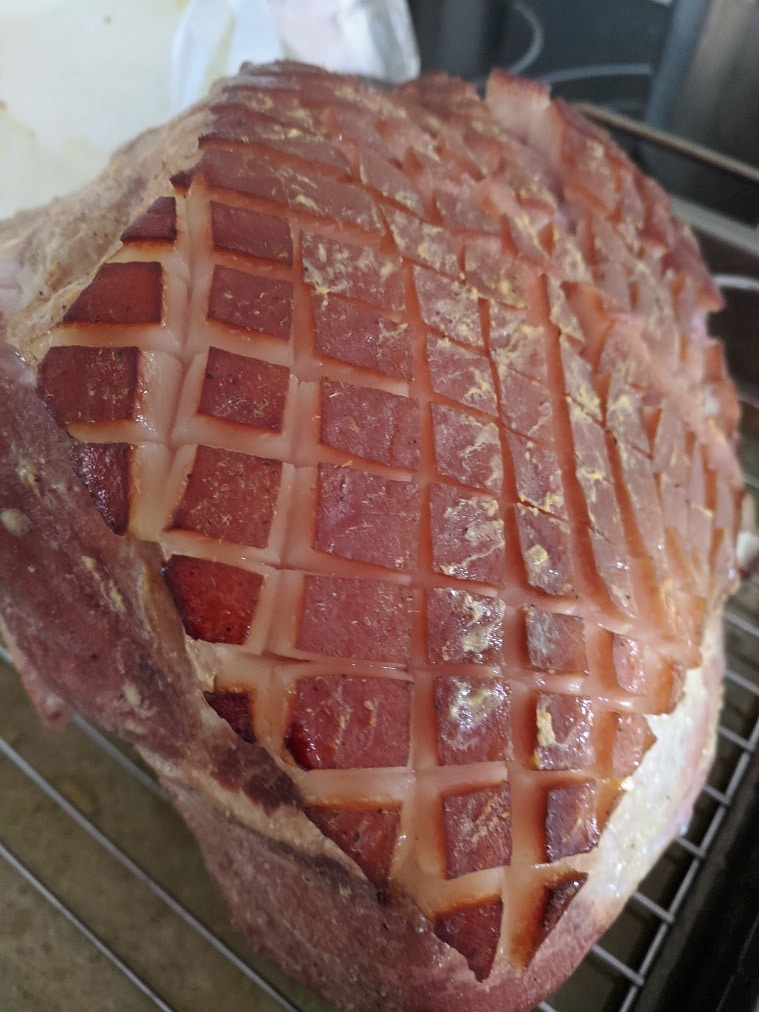
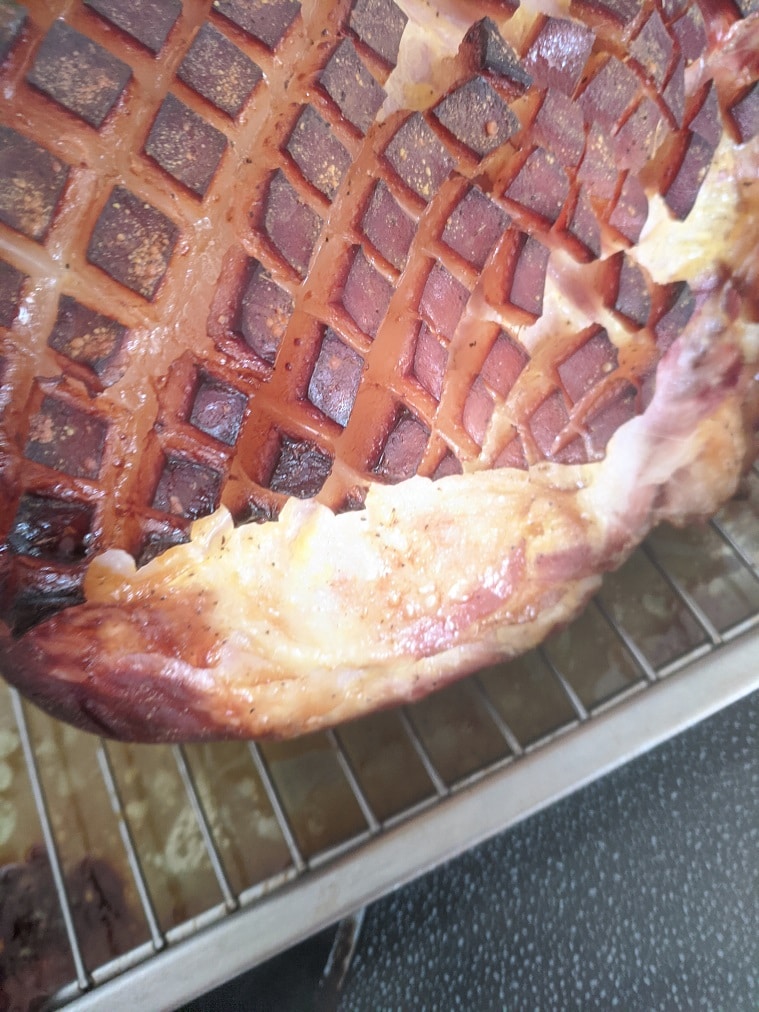
Scoring The Ham
Once the glaze is made, set it aside and turn your attention to the ham. Put it skin side up on your cutting board. Using a sharp (it has to be sharp) knife, make shallow parallel slices about a finger width apart, the whole way across the ham. Give the ham a quarter-turn (turn it by 90°), repeat the process, cut across the first cuts and create a diamond pattern in the skin, or a bunch of little squares depending on how you look at it. This will do two things. It will help the ham cook evenly, and it will help the flavour of the glaze penetrate a little deeper into the meat.
Cooking The Ham
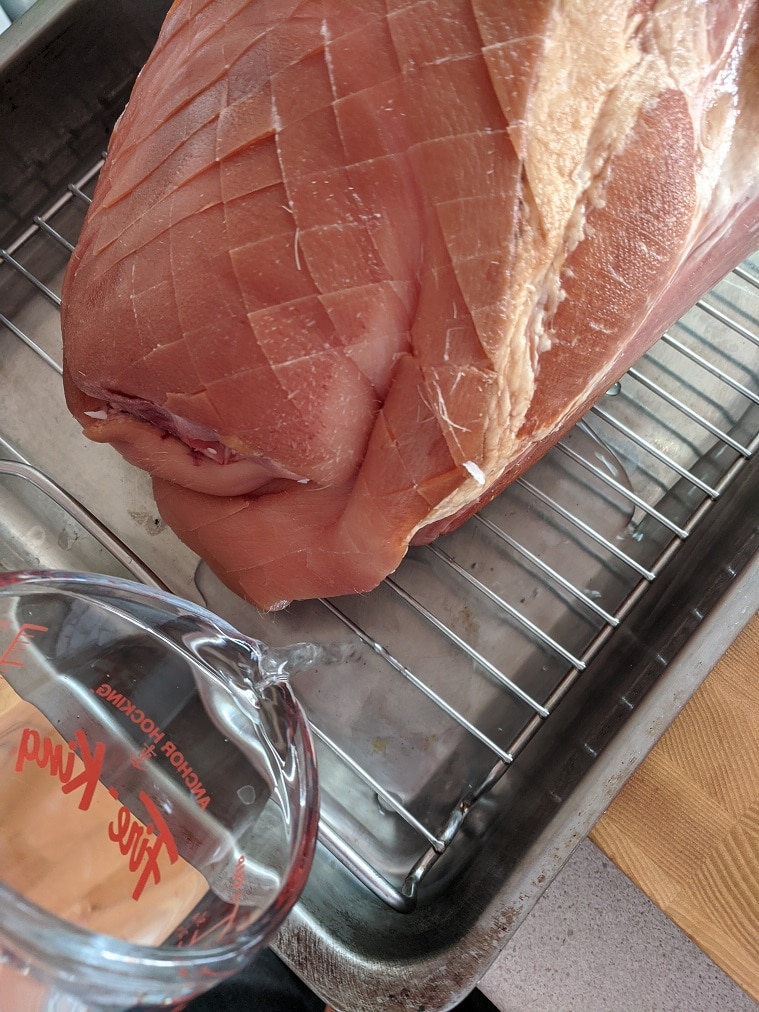
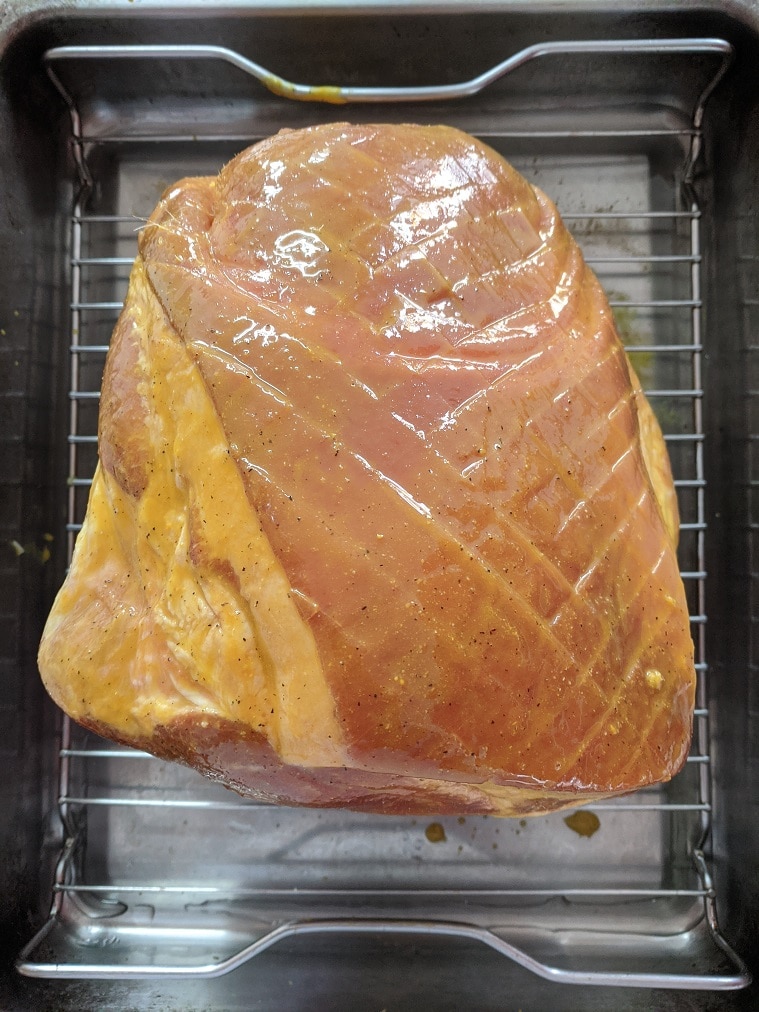
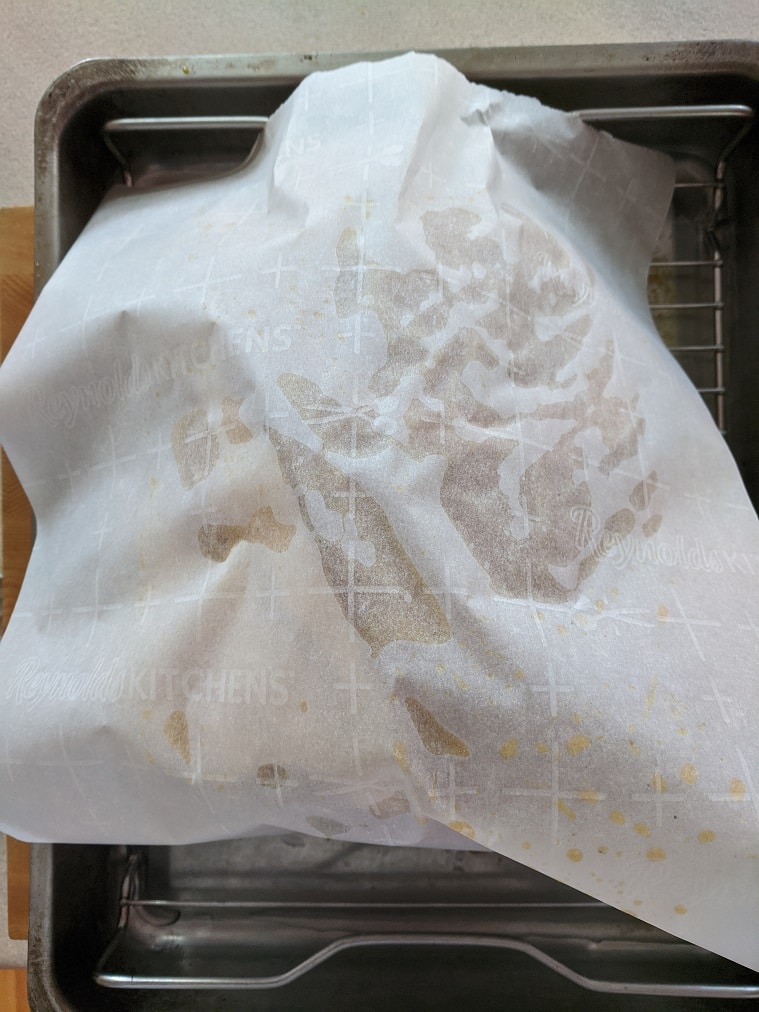
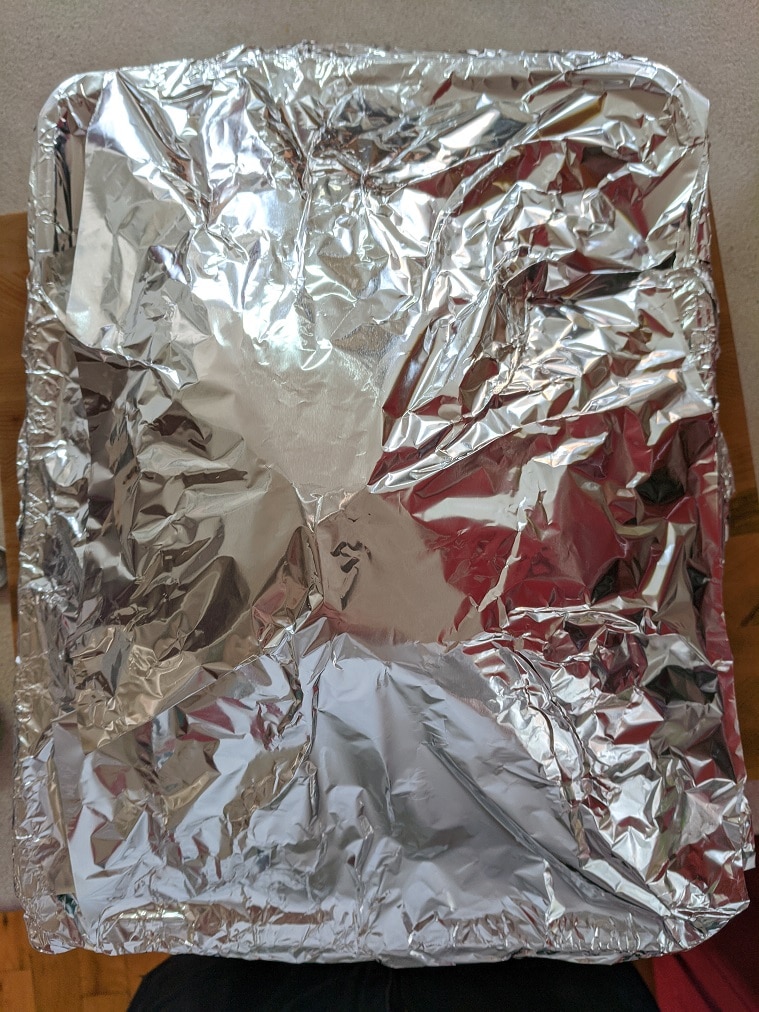
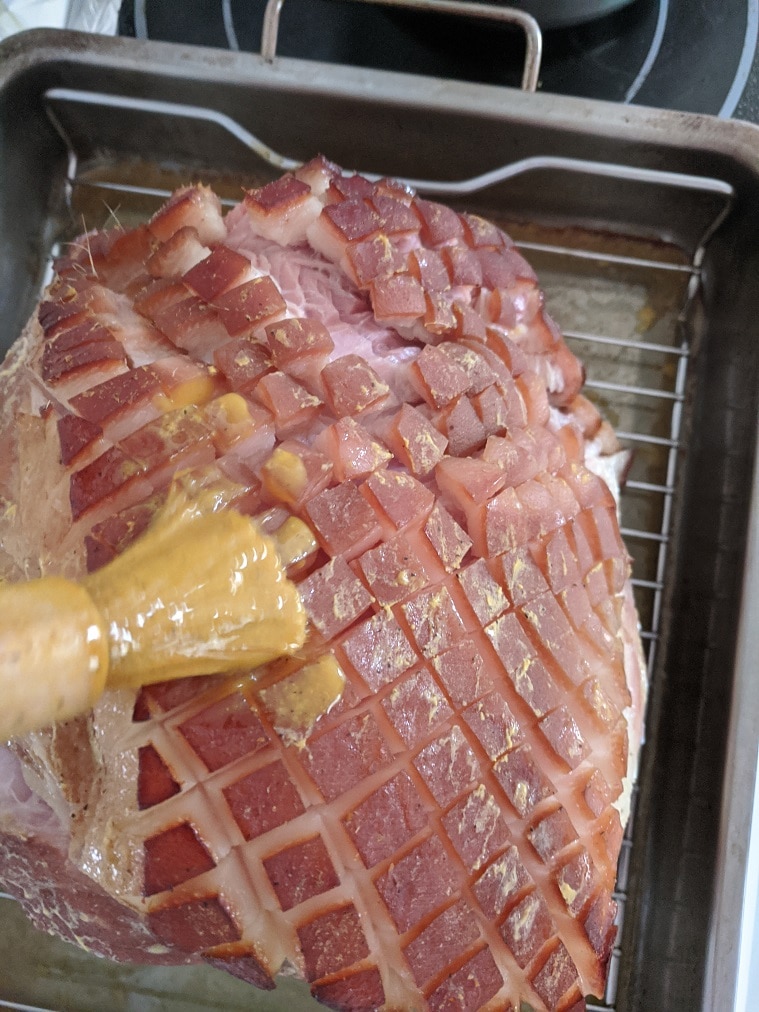
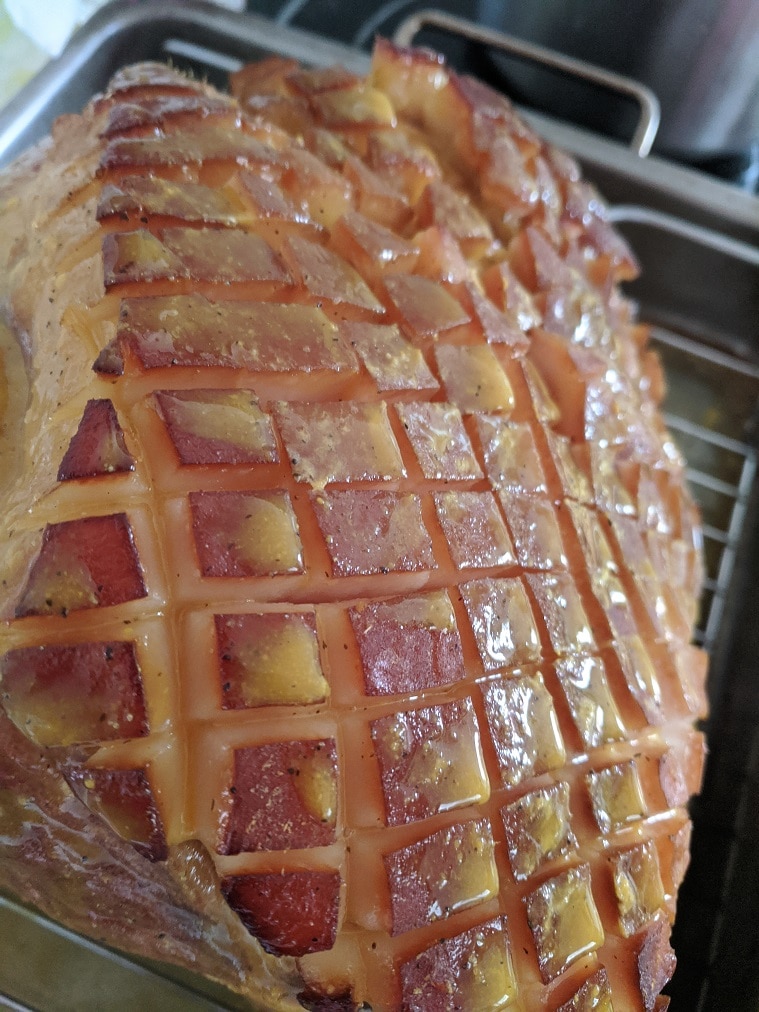
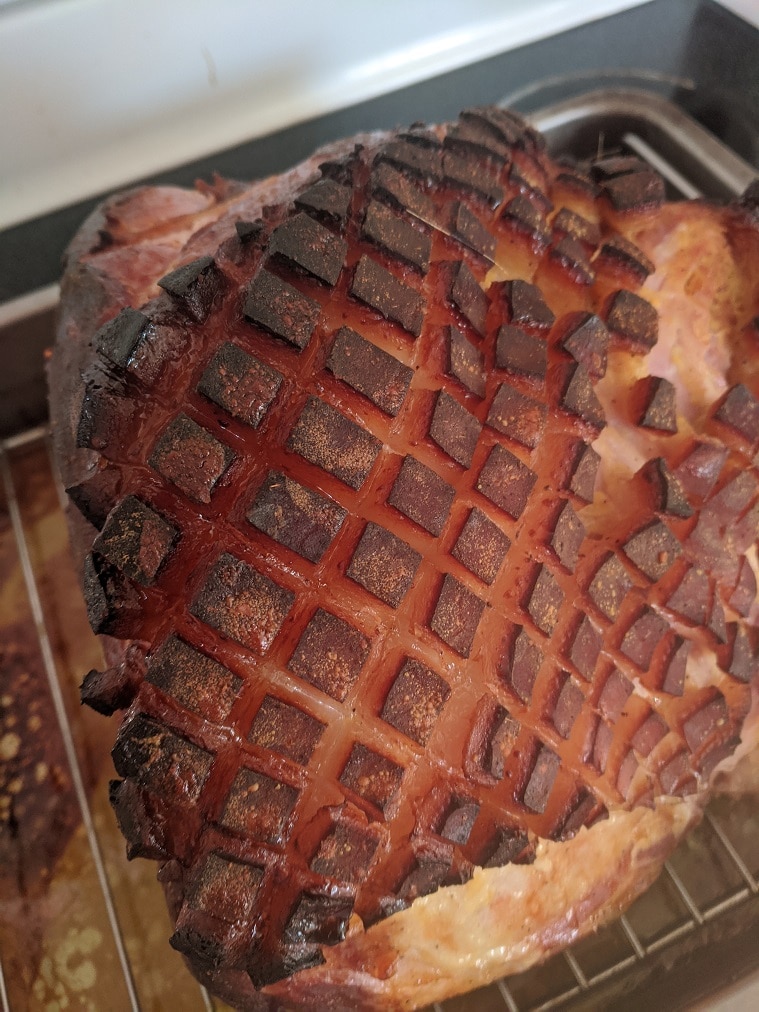
Put the ham on a rack set over a roasting pan. Pour a half cup of water in the bottom of the pan, then brush the ham with half the maple-mustard glaze. Cover the ham with parchment paper, then wrap the whole thing tightly in foil. Put the ham in a 325°f oven for two and a half hours. Take the ham out, remove the foil and parchment, brush the ham with the remaining glaze, and return it to the oven for another hour or until the ham’s internal temperature reaches 165°f.
Note* I very rarely cook food in direct contact with aluminum foil. Any acidity, which this ham has from the mustard and vinegar, will degrade the foil, which may leach chemicals into your food. I almost always put a piece of parchment between my food and the foil. You can do it or not, but that is what I recommend.
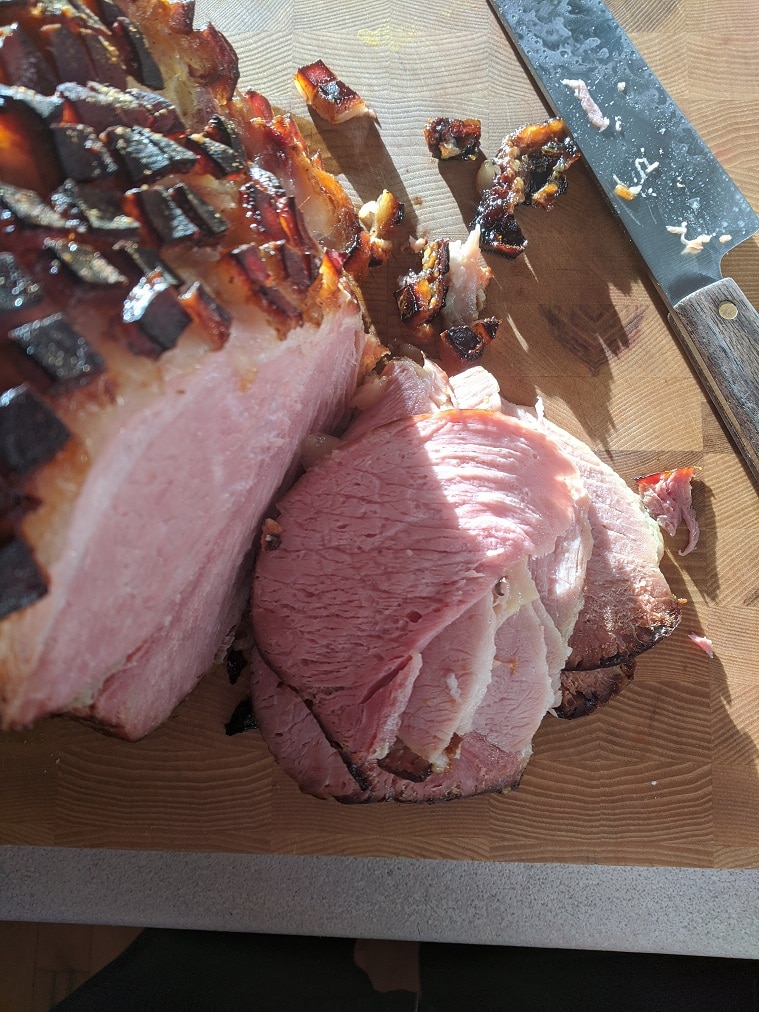
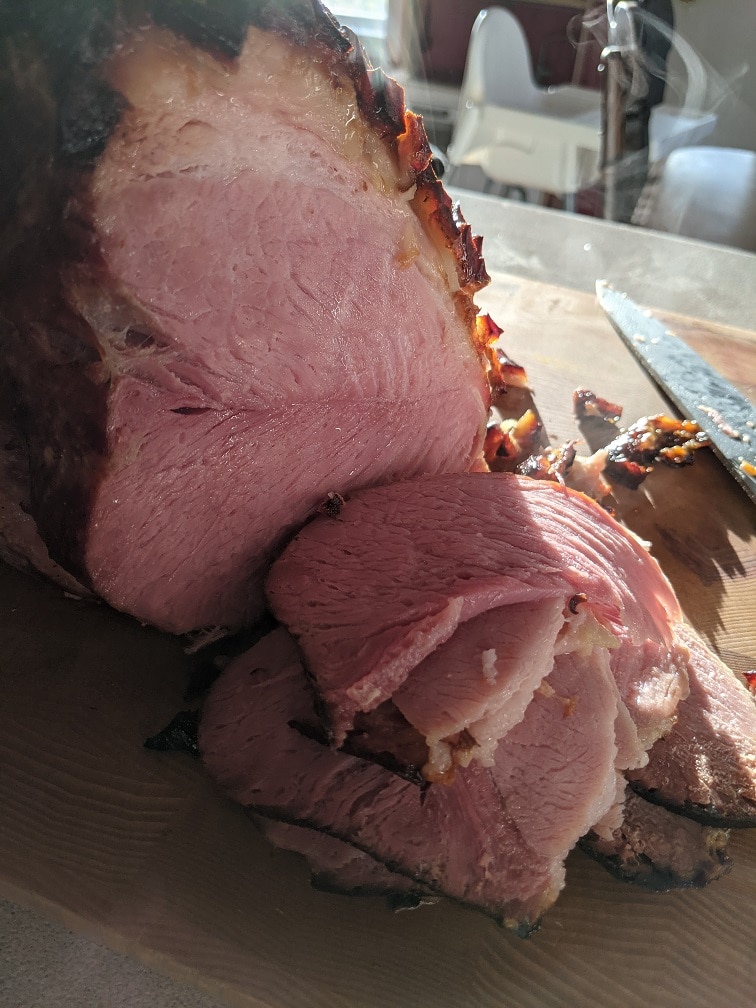
Serving The Maple-Mustard Roasted Ham
Remove the roasted ham from the oven, cover it loosely with foil, and let it rest for half an hour before cutting into it. Slice the ham as thin as you can and serve it with a biscuit (I used Duinkerken Gluten-Free Biscuit mix. I highly recommend it.), vegetables, and creamed corn, which acts as both a side and a sauce.
Maple-Mustard Roasted Ham
You've had honey roasted ham, now have it with maple and mustard.
Keyword: ham, Maple, Mustard, Roast Series, Sunday Roast
Servings: 12servings
Author: Chef’s Notes
Ingredients
10lbsSmoked Ham
1/4cupMaple Syrup
1/4cupMustard
1/4cupapple cider vinegar
1/2tspBlack Pepper
1/2cupwater
Instructions
Preheat the oven to 325°f
Using a sharp knife, score the skin of the ham in a diamond pattern. Place the ham on the rack of a roasting pan.
In a medium mixing bowl, mix the maple syrup, mustard, cider vinegar, and pepper.
Brush half the Maple-Mustard glaze on the ham.
Pour the water into the bottom of the roasting pan.
Place a large piece of parchment paper on the ham, then wrap tightly with foil.
Roast the ham for 2 1/2 hours, then take the ham out of the oven, remove the foil and parchment. Brush the remaining glaze on the ham and return it to the oven. Roast for another hour or until a thermometer inserted into the thickest part of the ham reaches 165°f.
Take the ham out of the oven, cover loosely with foil, and let it rest for 30 minutes before thinly slicing and serving.
Notes
Cook ham for 18-20 minutes per pound on 325°f or until the internal temperature of the ham reaches 165°f.
I know that some of you will message me and say that roasted ham needs to be served with scalloped potatoes. To that, I will say, in the nicest way possible, you’re wrong. Ham and scalloped potatoes do go very well together, but limiting yourself to that one side dish, is a mistake. You’re missing out on a world of possibility. But, you do you. If that’s how you like it, I’m not going to stand in your way. How do you roast your ham? Tell me in the comments below or on Facebook or Twitter.
Thank you for reading this post. Share it on Facebook, Pinterest, or Twitter to help Chef’s Notes grow. Subscribe to Chef’s Notes below, and you will never miss a post again.
Pork, you either love it or you hate it. I love it. And I firmly believe that if you eat pork that is perfectly done, meaning not dry and overcooked, you will love it too. This pork roast is a little more forgiving than some others. That in part is due to the long marinating time. The marinade consists of onion, apples, garlic, and a bunch of other stuff. This pork roast has loads of flavour and will remain juicy and tender even if slightly overcooked (but don’t overcook it). This is the first post in my six-week roast series, and I am very excited to get going. So, without another moment’s hesitation, let’s get to it.
The Right Pork To Roast
For my pork roast, I used a piece of pork shoulder. Pork shoulder is generally pretty cheap, it’s well-marbled, and it is often sold with a piece of bone in it. Those are all pluses. The marbling, meaning the lines of fat within the meat, helps prevent the meat from drying out. That fat also adds to the flavour of the pork. The bone, though it extends the cooking time, also helps to keep the pork moist. For roasts, pork shoulder or butt is the way to go, in my opinion. Pork loin is far too lean and requires very close attention to ensure that it is not overcooked the slightest bit. If pork loin is overcooked, it is as dry as anything and lacks all flavour.
Pork Marinade
The pork’s marinade is made primarily of grated apple, sliced onion, garlic, and thyme. To those base ingredients, juniper berries (optional) are added along with cider vinegar, olive oil, grainy mustard, maple syrup, smoked paprika, salt, and pepper. As always, you can find the full measurements in the recipe at the end of the post. All of the marinade ingredients are mixed, then rubbed on the pork. This gets covered and put in the fridge for up to two days before roasting.
Roasting The Pork
To roast the pork, take it out of the marinade and remove any excess. Place the pork on a rack set over a roasting pan. Cook the pork in a 375°f oven for one hour and forty-five minutes or until a thermometer inserted into the pork reaches a temperature of 155°f. Let the pork rest for at least fifteen minutes before slicing. If you want to speed up the cooking time a little, you can directly place the pork on the roasting pan rather than on a rack. This should take about fifteen to twenty minutes off of the total cooking time.
Maple Dijon Gastrique
What is a gastrique?
Gastrique is essentially a French sweet and sour sauce. This version is made of a mixture of maple syrup and cider vinegar to which grainy Dijon mustard and butter are added. To make the gastrique combine a quarter cup of maple syrup and two tablespoons of cider vinegar in a small pot. Bring to a boil and cook for three minutes. Take the pot off the heat and whisk in the mustard, then whisk in the butter. The gastrique should be the consistency of thick maple syrup and should be served warm.
Red Cabbage and Apples
One of my favourite sides with roast pork is red cabbage cooked with apples. As I love it so much, I thought I would share my recipe with you. This cabbage also goes very well with scallops and bacon.
Heat a large skillet over medium-high heat. Add in some olive oil along with four cups of sliced red cabbage, one cup of sliced onion, one cup of sliced green apple and two tablespoons of sliced garlic. Cook until the cabbage starts to soften. Season the cabbage with salt and pepper, add in a quarter cup of water along with two tablespoons of maple syrup. Continue to cook until the cabbage is completely soft. Finish the cabbage with two tablespoons of cider vinegar and a tablespoon of butter. Cook for three more minutes and serve.
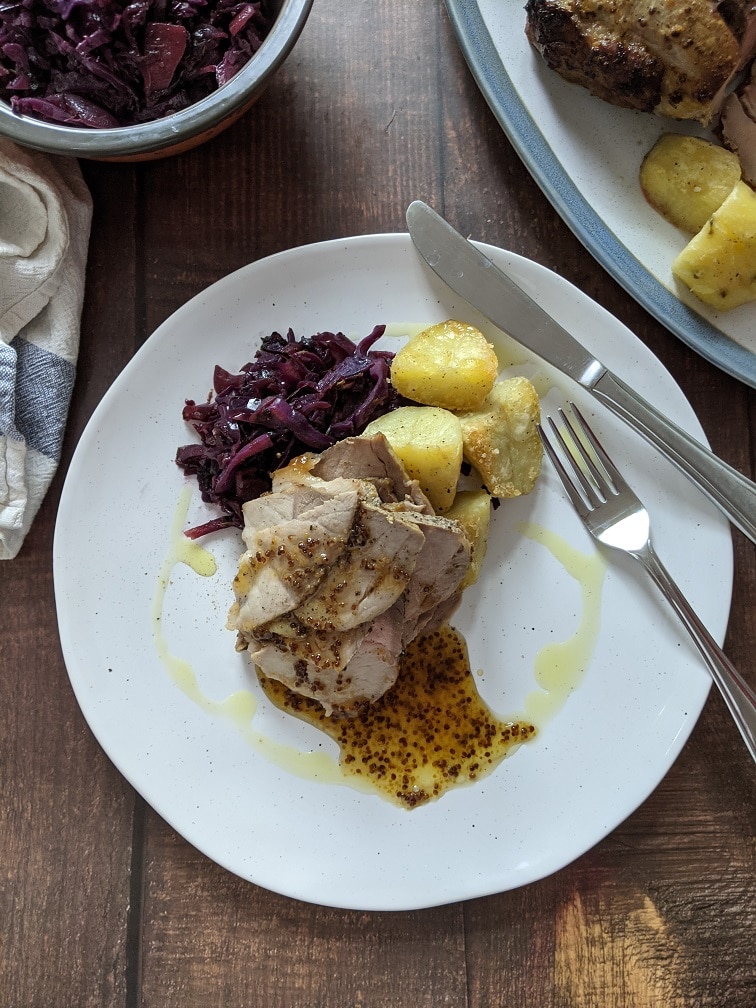
Serving The Pork Roast
Serve the pork roast with either roasted or mashed potatoes, the red cabbage, and a green vegetable like green beans if you’d like. Slice the pork as thin as you can, and top it with the gastrique. This is an absolute winner. Enjoy!
Perfect Roast Pork With Maple Dijon Gastrique and Red Cabbage and Apples
Tender, juicy pork roast, with a sweet and sou maple dijon gastrique, and cabbage cooked with apples.
In a large mixing bowl combine all of the ingredients except the pork. Mix well.
Rub the marinade into the pork, cover with plastic wrap and put in the fridge overnight or for up to two days.
Take the pork out of the fridge, remove excess marinade and place the pork on a rack set over a roasting pan.
Roast the pork in the oven at 375°f for 1 hour and 45 minutes or until an instant-read thermometer reaches a temperature of 155°f. Remove the pork from the oven and let it rest for 15 minutes before slicing.
Red Cabbage and Green Apple
Heat a large skillet over medium-high heat.
Add the olive oil, cabbage, onion, apple, and garlic to the skillet. Cook, stirring every once in a while for about 8 minutes or until the cabbage starts to soften. Add the maple syrup and water, cook for another 5 to 6 minutes or until the cabbage is completely soft.
Season the cabbage with salt and pepper and add in the cider vinegar. Cook for 3 more minutes, take off the heat and serve.
Maple Dijon Gastrique
In a small pot combine the maple syrup and cider vinegar. Bring to a boil over medium-high heat. Cook for three minutes, making sure it doesn't boil over.
Take the pot off the heat and whisk in the mustard and butter. Serve warm.
There you have it—the first post in my new roast series. We’ve got many exciting roasts coming up, including roast lamb, chicken, salmon, and more. I hope that you are looking forward to this as much as I am. I’ll see you soon and have a great weekend.
Thank you for reading this post. Share it on Facebook, Pinterest, or Twitter to help Chef’s Notes continue to grow. Subscribe to Chef’s Notes below, and you will never miss a post again.
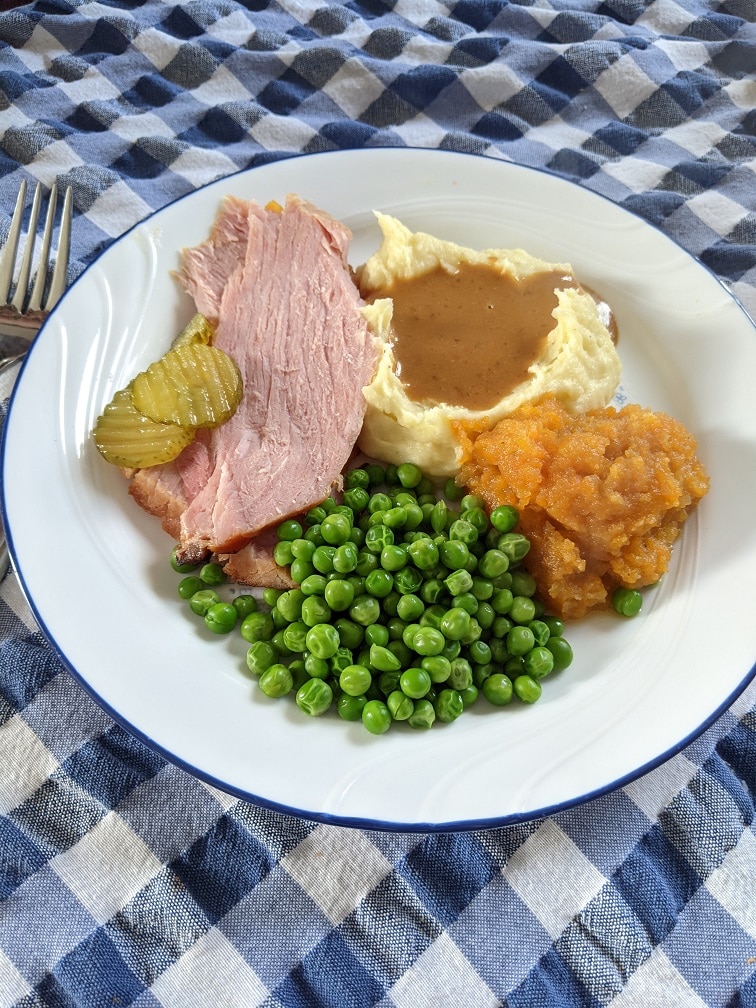
It’s early on a Sunday morning. The oven has just finished preheating, and in goes a large smoked ham. Within an hour, your house is filled with the smell of hickory smoke and roasting meat. Before long, the windows are steamed from the sides, boiling away on the stove. In no time at all, you and your family are sitting down to a large Sunday lunch, and in a moment of perfect happiness, you take the first bite of your ham dinner. Join me as I share with you my Classic Ham Dinner With All the Fixings.
The Sides
Mashed Potatoes
I love mashed potatoes so much that I’ve written not one but two dedicated posts about them. You can check them out here and here. When it comes to mashed potatoes, I prefer to push the potatoes through a food mill instead of using a hand masher. The food mill gives the potatoes a uniform smooth texture, exactly what I want from my mashed potatoes. Another secret of mine for great mashed is to use whipping cream instead of milk (and heat it before adding it to the potatoes). The cream adds a richness to the potatoes that just can’t be beaten. Of course, I save the creamy potatoes for special occasions. Other than that, lots of butter, salt and pepper, and you will have perfect potatoes every time.
Mashed Turnip and Carrot
Mashed carrot and turnip are one of my all-time favourite side dishes for a big roast dinner. The saltiness of the ham is balanced perfectly by the sweetness form this side dish. To make it peel and dice equal parts carrot and turnip (or rutabaga). Put the vegetables in a pot, cover with water and boil until tender. Drain the vegetables and mash well. Add a tablespoon or two of butter to the mashed veg along with a tablespoon or two of brown sugar, a big pinch of salt and pepper, and a small pinch of nutmeg. You really just can not go wrong with masher carrot and turnip.
Peas
The only thing I can say about peas is not to overcook them. Peas should be bright green and pop when you bite into them. And yes, I used frozen peas for this. I put the peas in a pot of water, brought them to a boil and let them cook for about three minutes before draining them. That is all the time they need. Once the peas are drained stir into them a tablespoon or two of butter, and a big pinch of salt and pepper. Delicious!
Red-Eye Gravy
Red-eye gravy is a staple of ham dinners in the Southern United States. It is made of ham drippings and strong coffee. The traditional version generally has a watery consistency similar to au jus. For my version, I wanted a more gravy-like consistency, so I thought it with a roux.
To make my gravy, I started by melting two tablespoons of butter, to which I add two tablespoons of gluten-free all-purpose flour. I whisked this mixture over moderate heat for about three minutes before adding in two shots of espresso. The roux and the espresso made a thick paste, which made the perfect base for my pan drippings from the ham. I whisked until the gravy was a smooth, thick consistency, then added whole milk until I got the gravy consistency I wanted. The gravy was a little sweet from the honey glaze, it was slightly bitter from the coffee, it was creamy from the roux and the milk, and it was a bit salty from the ham. All that is to say that it was delicious.
Honey Roasted Ham
Type of Ham
The ham I used for my Ham dinner was a shank-in hickory-smoked ham. It was already fully cooked but needed to be heated through. I was lucky enough to get it on sale right after Thanksgiving, so this 4.6 kg ham (10 lb) has only $15.22. When I saw it in the grocery store, I couldn’t say no. Not only was I craving a ham dinner, I couldn’t help but think of all the wonderful things I can make with the leftovers. From broccoli and ham pasta to western sandwiches, to split pea and ham soup. The possibilities are endless.
Roasting the ham
In all honesty, it is not very often that I roast a whole ham. So, for cooking advice, I turned to the instructions written on the package. They said to roast the ham at 325°f for 15-20 minutes per pound. For my ham, that works out to be about three and a half hours. For the first two hours of cooking, I did nothing to the ham. I didn’t season it or anything. I did score the ham’s surface with a sharp knife before putting it in the oven, but that’s it.
Honey Glaze
After the first two hours of cooking my ham, I glazed it with a mixture of equal parts honey and hot water, combined with a pinch of nutmeg. I glazed the ham at the two-hour mark and the three-hour mark. In total, the glaze was about 1/2 cup honey, 1/2 a cup water, and a 1/4 teaspoon of nutmeg. Once the ham was heated through, I let it sit for twenty minutes before cutting into it.
Conclusion
As much as I love a big bowl of pasta or spicy fried rice, there is something to be said for a classic roasted ham dinner with all the fixings. It feels homey and comforting, especially on a cool fall day in late October.
I am very curious to hear about how you cook your ham and what your favourite side dishes are to have with it. Tell me in the comments below or on Facebook. Have a great rest of your day. I’ll see you soon. Oh, and if you haven’t already, you can read about who I am and how I came to be writing about ham in my very personal story, “Life on the line.”
Thank you for reading the post. If you liked it, remember to share it on Facebook, Pinterest, or Twitter by clicking the icon to the left of the page. Did you know that Chefsnotes.com has almost 400 posts just like this one? Don’t ever miss a post again. Become a Chef’s Notes member right here. You will be notified of every new post. And if you would like to know more about me, click the link below to read my story.
Hello everyone, and happy Monday. Today, as we jump into our new cooking and eating on a budget series, we will be taking a look at how to make Balsamic Glazed Pork Chops with Roasted Potatoes and Green Beans for $2.99 per person. The goal of this series is to show you that you can eat on the cheap and not sacrifice flavour. Yes, it is possible. Let’s take a closer look at the recipe and the financial breakdown.
Before we get going
Before we jump into this, I want to take a second to talk about something a reader pointed out on Facebook last week. You can read their full comment below. But, at the heart of what this reader is saying is that I am only really speaking to one specific financial situation in this budgeting series, my own. That is an entirely fair and accurate point. I am not an expert in budgeting or anything to do with finances; just ask my wife. I am a chef and blogger, trying to cut down my expenses while still eating things that I enjoy. I want to share my experience with you in hopes that it will help some of you out there. But, if you are in a more restricted financial situation, you may want to look elsewhere for advice. I did want to share some resources here, but I honestly couldn’t find any that didn’t seem condescending. If anyone knows of any practical budgeting and eating resources for people living on a low income, please share them in the comments section at the end of this post.
Reader Comment
Lots of good thinking and smart math here Ben but as a person who lives on a limited fixed income, there are a few points that I feel need making.
This approach is excellent for people who have enough leeway in their budget to calculate based upon percentages and set an arbitrary amount. Many people with low income don’t have that luxury. They pay their fixed expenses and after that’s been covered the amount left over is what buys the food. Often, it’s very little indeed but it’s what they have to work with so they make some hard choices.
While buying in quantity does save money, those on a low income may not have room in their budget to make that big purchase. The $6 bag of rice may be as much or more than they can afford. It’s one reason that it’s often said that being poor is expensive.
People with low incomes are likely to have little or no space to store extra food and, in some cases, have no kitchen at all.
Meal planning can save money or it can lead to waste. Many small households find that meal planning causes them to over-buy because it’s tempting to overlook repeated use of the same ingredients when in search of variety. It’s often more practical to “shop your kitchen” each day and plan your meals based upon what you actually have on hand, incorporating leftovers and scraps into your recipes so that nothing gets thrown away.
The process of “shopping your kitchen” can make doing a big shop intermittently impractical. It makes more sense under this practice to buy produce often, in small amounts, and other ingredients only as needed. This practice, paired with checking flyer prices on the things you actually do need can be a very effective way of limiting costs.
Your advice will indeed be helpful for middle-income families and I applaud your generosity in sharing your experience. I just wanted to say that such blanket advice rarely applies in every situation. Adaptability is key.
A reader’s comment on Facebook
Shopping the sales and the season
It is mid-August right now. Fresh, local produce is at its peak. Along with being able to buy fresh vegetables at a reasonably low price, there have been a lot of great sales. For example, I got a three-pack of pork chops for $2.96 and butter for $2.49. Without these sales and the current price of local vegetables, I could not have made this meal for the price I did. So, keep that in mind. This series is not so much about making a recipe that you can recreate for the same price. You’d have to find the exact same sales I did, and if you find this post in January, the cost of fresh vegetables is going to be considerably more. The point of this series is to show you that it is possible to eat well at a low cost. And, to show you how to break down the price of a recipe, to know what it actually costs you. Of course, you are welcome to recreate the recipe, and I think you will be happy that you did.
You can find the full cost breakdown below the recipe.
Potatoes
The potatoes I used for this recipe are baby potatoes that I bought in a 5-pound bag for $8.99. I used half a pound of the potatoes in the recipe for a total price of $0.89. Along with the potatoes, I used 1 tbsp of olive oil ($0.29), 1 tsp dried thyme ($0.04), and salt and pepper ($0.10 approx.).
To make the potatoes, cut them into quarters, put them in a pot of cold water, bring them to a boil and let them cook for five minutes. Drain the water off the potatoes then heat a small frying pan over medium-high heat. Add the olive oil to the pan, along with the potatoes, season them with salt and pepper, and cook until they are browned on all sides. Season the potatoes with dried thyme, then put in the oven on 400°F for 15 minutes or until cooked. Flip the potatoes at the halfway mark to make sure they cook evenly.
Green Beans
The total cost of the green beans for a 2-pound bag was $2.89. I used about one-quarter of the bag bringing the price to $0.72. To cook the green beans, trim off the ends, put them in cold water, bring them to a boil and cook them for about three to four minutes or until they are tender but still bright green. When the green beans are cooked, drain them and serve.
Balsamic-Glazed Pork Chops
As I said, I bought the pork chops on sale for $2.96. Along with the pork chops, I used 1 tbsp olive oil ($0.29) and salt and pepper ($0.10 approx. total for the whole recipe.).
To make the pork chops, heat a large pan over medium-high heat. Add in the olive oil. Pat the pork chops dry, season them with salt and pepper and sear them for about two minutes per side or until they are golden brown. Take the pork chops out of the pan (they are not fully cooked yet) and set them aside to move on to the glaze.
Making the Balsamic Glaze
The ingredinets in the glaze are 1/4 cup balsamic vinegar ($0.47), 2 tbsp brown sugar ($0.06), 1 tbsp butter ($0.07), and 1/4 cup water.
To make the sauce, drain any oil out of the pan and add in the butter and brown sugar. Cook for about one minute then add in the balsamic and the water. Cook the mixture for about two minutes, or until it just starts to thicken up, then add in the pork chops. turn the heat down to low and cook for another two to three minutes or until the pork chops are cooked. Put the pork chops on a plate, and pour the glaze over them to serve.
Financial Breakdown
Below you can see my full financial breakdown of the meal. Some prices like the salt and pepper, are approximate. To get the cost per tablespoon of the brown sugar, I had to know how much a tablespoon of brown sugar weighed (I could have just weighed the tablespoon, but that would have been too easy.). To figure out the weight of a tablespoon of brown sugar, I googled how much 1 cup of brown sugar weighed (200 g) then divided that by 16 (# of tbsp in a cup), which gave me 12.5 g. Then, if I divided the total price of the brown sugar ($2.49) by the total weight (1 kg or 1000 g), I get a price per gram of $0.00249. If I multiple that price per gram by the 12.5 g that makes up my 2 tbsp, I get a total cost of $0.06. Does that make sense? This is probably more work then you need to do, but it does help to know exactly what you are spending.
1/4 pkg Green Beans = $0.72(Total price per pkg = $2.89/4 = $0.72)
2 tbsp Olive Oil = $0.59(500ml = $9.99/500 = $0.019 per ml x 29.4[ml in 2 tbsp] = $0.58
1/4 cup Balsamic Vinegar = $0.47(500 ml = $3.79/500 = $.00758 [per ml] x 62.5 ml [1/4 c] = $0.47
2 tbsp Brown Sugar = $0.06(1 kg = $2.49 [1 c brown sugar = 200g there are 16 tbsp in a cup. 200/16 = 12.5g per tbsp ] $2.49/1000g= $.00249 x 12.5= $0.03 x 2 [tbsb] = $0.06
2 tbsp Butter = $0.15(2 c [1 lb] butter = $2.49 / 32 [tbsp in 2 c] = $0.07 x 2 [tbsp] = $0.14
1 tsp Dried Thyme = $0.04(45 g thyme = $1.99/45=$0.04 per g x 0.91 g [ 1 tsp] = $0.036
Keyword: balsamic glaze, budget cooking, Eating on a budget, green beans, pork chops, roasted potatoes
Servings: 2
Author: Chef’s Notes
Cost: 5.98
Ingredients
Pork Chops
3Bone-in pork chops
2 tbsp Olive Oil
Salt and Pepper
1/4cupBalsamic Vinegar
2tbspBrown Sugar
1tbspButter
1/4cupWater
Potatoes
1/2lbBaby potatoescut into quarters
1tbspOlive Oil
1tspDried Thyme leaves
Salt and Pepper
Green Beans
1/2lbGreen Beansends trimmed and cleaned
Instructions
Pork Chops
Heat a large frying pan over medium-high heat. Add in the olive oil.
Pat the pork chops dry and season with salt and pepper. Add the pork to the pan and cook on each side for about 2 minutes or until golden brown.
Take the pork out of the pan and set it aside. Drain any oil out of the pan and add in the butter and brown sugar. Cook for about 1 minute, gently stirring.
Add the balsamic and water into the pan, bring to a boil and cook for about 3 minutes or until it just starts to thicken. Add the pork chops back into the pan along with any juices, turn the heat down to low and simmer for about 3 minutes per side or until the pork is cooked.
Take the pork out of pan, put it on a plate and pour the glaze over it to serve.
Roasted Potatoes
Preheat your oven to 400°f
Put the potatoes in a pot of cold water. Bring to a boil over high heat and cook for about 5 minutes. Drain the potatoes well.
Heat a small frying pan over medium-high heat. Add in the olive oil and the drained potatoes. Season with salt and pepper. Cook the potatoes just until they are browned on all sides. Add the dried thyme and put the potatoes in the oven for 15 minutes, tossing halfway throuhg.
Green Beans
Put the green beans in a pot of water, bring to a boil and cook for 3 minutes. Drain and serve.
From my point of view, this is all utterly pointless if the food is no good. So, was the meal good? Yes, it was. The glaze was delicious and would be fantastic on pork tenderloin, chicken legs, or salmon. I will be making this again. The roasted potatoes were spot on. The only thing that was missing was a bit of butter on the green beans, but the eater can put that on themselves.
What I spent on groceries in total for the week.
How did my first week of grocery budgeting go? The short answer, not well. Now, the long answer. Things started off pretty well. I started the week with some meat in my freezer, so my main grocery store trip was only around $114, which I was pretty happy with. Had we left it there, we would have been well within our budget of $148.72. Of course, we didn’t stop there. There was one day this week where neither my wife nor myself could bring ourselves to cook anything, so we ended up buying junk at the store, which brought us right up to our budget. Then, we made a spontaneous overnight trip to Halifax, where we purchased take-out and food for the drive. In all honesty, I don’t yet know the full extent of what we spent, but I can tell you it was way over our budget. But it’s a new week, and there will be no more last-minute trips.
Thank you for reading the post. If you liked it, remember to share it on Facebook, Pinterest, or Twitter by clicking the icon to the left of the right of the page. Did you know that Chefsnotes.com has almost 400 posts just like this one? Don’t ever miss a post again. Subscribe to Chef’s Notes by putting your email address in the subscription box below or by becoming a Chef’s Notes member right here. You will be notified of every new post. And if you would like to know more about me, click the link below to read my story.
Pork tacos with pineapple salsa, yes, it is as delicious as you think it is going to be, maybe even more so. But do you want to know what the best part is? You can make this at home. Yes, you! I don’t care if you have never cooked anything in your life. I don’t care if you have never eaten a taco before. You can make this; I’m going to show you how. I am going to walk you through the whole process, and I’m going to make it look easy. Why? Because when you break it down into small steps, it is easy. Even for the most inexperienced cooks out there. Are you ready? Let’s go.
The Right Pork For The Job
First and foremost, we have to talk about the pork. It’s kind of the star of the show, so it seems like a logical place to start. Don’t use a lean piece of pork like loin or tenderloin for this. The pork needs to have a bit of fat because it is going to be slow-cooked. If there isn’t enough fat, it will dry out and ruin your tacos. I like to use pork shoulder. It might be called picnic roast or picnic ham (though it is not smoked). You can usually find it at the grocery store in relatively small pieces, on the cheap.
The pork shoulder is going to have a bit of skin on it, and a bone that runs through the middle of it. If you have the time to marinate the pork overnight, you don’t have to worry about the skin and bone. Just leave it alone. However, if you want to do this all in one day, you will need to remove the skin and cut the meat away from the bone.
To remove the skin from the pork shoulder, find the thinnest part of the skin (usually around the bone) and cut through it. Now, grab one piece of the skin that you just cut through and using your knife, slightly angled up towards the meat, cut the skin away from the meat. You should be able to take all the skin off in one piece.
Now that the skin is off the meat, you have to cut the meat into smaller chunks and remove it from the bone. If you look down at the piece of pork, you will see a few white lines. These lines separate individual muscles. Use these lines as your guide. Follow them with your knife making shallow cuts with the knife’s tip until you get one muscle cut away. At some point, your knife is going to hit bone. When this happens, angle your knife so that the side of the blade is being guided by the side of the bone. Use the tip of the knife to cut away any bits that you are finding difficult.
That’s it, you did it! You just cut up a pork shoulder. Now, it’s ready for the marinade.
The Marinade
For the most part, the marinade for this pork is pretty straight forward. There is, however, one ingredient that may be a little difficult to find. The ingredient in question is Annatto paste. You may be able to find it in the international section of your local grocery store. More than likely, however, you will have to find a Speciality Latin American Grocery Store. If neither of these options works for you, you can order Annatto on Amazon right here. You can leave Annatto out of the recipe, but it will affect the flavour and colour.
What is Annatto?
Annatto is a seed that is native to the tropical regions from Mexico to Brazil. You’ve eaten it whether you know it or now as it is used to colour cheddar cheese orange, among other everyday things. By itself, Annatto doesn’t have much of a flavour, though it does have some. More typically, it is used to add colour to a dish. The Annatto paste that I used is a combination of Annatto and spices. Even with the spices, the paste still has a mild flavour, but somehow, it adds a lot to the pork. For more information on Annatto, check out this Wikipedia article about it.
Making The Marinade
The marinade for the pork is a combination of the Annatto, citrus, garlic, onion, and spices. This mixture is puréed in a blender or with an immersion or stick blender, then poured over the pork. For full measurements and ingredients, see the recipe below.
If you are leaving the Annatto out of this recipe, double the cilantro, add in 1 tbsp dried oregano, 1/4 cup chopped parsley, and double the cumin and coriander. For a more smokey flavour, you can replace the jalapeno with an equal amount of chipotle in adobo. You can find this at most grocery stores.
When zesting the citrus (this can be done with a Microplane or on the finest part of a cheese grater), stop as soon as you get to the white part of the rind, this white bit is very bitter and can turn the whole marinade and the pork bitter. Also, zest the citrus directly into the bowl of the blender if you can. This will help to keep the natural citrus oil and most of the flavour in the dish rather than being lost in your cutting board.
Marinating The Pork
With the marinade made and ready to go, and the pork cut up and ready to go, it’s time to combine the two. Put the pork in a large ziplock bag. Pour the marinade over the pork, squeeze as much air out of the bag as possible and seal it. Gently toss the bag around to coat the pork in the marinade. Put the pork in the fridge for at least two hours to marinate. If you have the time, overnight is better.
Roasting The Pork
It’s been at least two hours, and the pork is ready to cook. Turn the oven on to 300°F and let it preheat for about 15 minutes. Put the marinated pork into a roasting pan, along with all the marinade. Cover with parchment paper, and wrap tightly with foil. Roast in the oven for 2 – 2 1/2 hours or until the pork is tender enough that it can easily be shredded with two forks.
Once the pork is cooked, take the meat out of the roasting pan and pull into small pieces using two forks or a set of tongs. Pour half the liquid from the roasting pan onto the pork, stir it in and taste. I used all of the liquid from my roasting pan, and you can too, but start with half and add more as needed. All of that liquid is pure flavour. You don’t want to lose it if you can avoid it. Once you get the pork and the liquid mixed, taste the pork again, and adjust the seasoning with salt, pepper, and lime juice to suit your taste.
Pork Taco Marinade
This citrus, annatto, and jalapeno, marinade, is the perfect thing to take those pork tacos from good to great.
Put all of the ingredients except the pork in a blender and blend until smooth. Taste and adjust the seasoning as needed.
Put the pork in a large ziplock bag and cover with the marinade.
Remove as much air as possible from the bag, seal, and put in the fridge to marinate for a minimum of 2 hours or up to 24 hours.
Remove the pork from the marinade, put in a mediumesized roasting pan and cook on 300°F for 2 – 2 1/2 hours or until the pork is easy to pull apart with two forks.
Shred the pork into the juices that have accumulated in the roasting pan. Taste adn adjust the seasoning with salt, pepper, and lime juice as needed.
Pork and pineapple are one of those magical combinations that go perfectly well together in most cases, but not all. (I’m looking at you Hawaiian Pizza). And so, pineapple salsa is the perfect accompaniment for our pork tacos. To make this Pineapple Salsa, combine 1 cup of diced fresh pineapple (dice it as fine as you can because it makes it easier to spoon on to the tacos) with 1/2 cup minced red onion, and the zest and juice from 1 lime. Add to that 1 tbsp chopped cilantro, 1/2 a tsp of cumin, 1/2 tsp kosher salt, 1 tbsp chopped pickled jalapeno (you can use fresh jalapeno, but I like the extra acidity these provide to the salsa.), and 1 tbsp olive oil. If you would like the salsa to be a little sweeter, you can add 1 tbsp of honey as well. Mix this all up, taste and adjust the seasoning with salt as needed then put in the fridge for at least 1 hour.
Pineapple Salsa
A simple, and delicious pineapple salsa recipe that pairs perfectly with pork or fish tacos.
Okay, you have the pork cooked and shredded. The pineapple salsa has been in the fridge for over an hour. It’s time to eat! You can take the pork as it is and throw it on a tortilla, eat it and be perfectly happy. However, I prefer to sauté the pork and brown it a little before serving it. As you can see in the pictures below, I did this on a little electric griddle, but of course, you can do this in a pan. Get the pan nice and hot over medium-high heat, add 1 tsp of oil then add in the pork along with the juices. Let the pork cook until most of the juices have evaporated and the pork is browned in some places. This will do two main things. It will give the pork a deeper more nuanced flavour by carmelizing some of the sugar. Secondly, a lot of the liquid in the sauce that the pork is in (the juices) will evaporate making the flavour of the sauce, and the pork, more intense. Do yourself a favour and do not skip this step.
The Tortillas
I made my own tortillas using P.A.N. masa flour. It is surprisingly easy to do, but it is a fair amount of work. I’m not going to judge you for buying tortillas for this. What I will say about it, though, is that you put in a tonne of effort up until this point, don’t blow it by cheap out on the tortillas. Buy soft, corn tortillas if you can, if not, buy soft flour tortillas. Leave the hardshell tacos to Old El Paso and Taco Bell.
You can heat the tortillas in the oven wrapped in foil, or a tortilla warmer if you have one. I heated mine right on the griddle with the pork. This way, the tortillas absorb a bit of the juice from the pork adding even more flavour. I’ll leave that up to you. If you are interested in making your own tortillas, check out this post I did about it a while back.
Time to eat some Pork Tacos
Once the meat is lovely and browned, put it on some warmed tortillas, along with a bit of the pineapple salsa. Add some of your favourite Mexican hot sauce (I like Cholula, which you can find in the hot sauce section of most grocery stores). Squeeze a bit of fresh lime over the tacos, throw on a sprig or two of cilantro and enjoy! If you’d like to, you can finish the tacos with a bit of queso fresco (I use ricotta cheese or sometimes feta because it is hard to find authentic Mexican queso fresco where I live). Just like that, you’ve made delicious homemade pork tacos with pineapple salad, congratulations!
Conslusion
Make these tacos. Seriously, you will be happy that you did.
If you enjoyed this post, share it on Facebook or Pinterest so more people can enjoy it. Subscribe to the blog at the top right of the sidebar, so you never miss a chef’s notes post again. Thank you for reading, have a great day!
We use cookies on our website to give you the most relevant experience by remembering your preferences and repeat visits. By clicking “Accept”, you consent to the use of ALL the cookies.
This website uses cookies to improve your experience while you navigate through the website. Out of these, the cookies that are categorized as necessary are stored on your browser as they are essential for the working of basic functionalities of the website. We also use third-party cookies that help us analyze and understand how you use this website. These cookies will be stored in your browser only with your consent. You also have the option to opt-out of these cookies. But opting out of some of these cookies may affect your browsing experience.
Necessary cookies are absolutely essential for the website to function properly. This category only includes cookies that ensures basic functionalities and security features of the website. These cookies do not store any personal information.
Any cookies that may not be particularly necessary for the website to function and is used specifically to collect user personal data via analytics, ads, other embedded contents are termed as non-necessary cookies. It is mandatory to procure user consent prior to running these cookies on your website.