My first restaurant job was in a mall Chinese food place. I learned a lot at that job about knife work, speed, and cooking. I’ve carried those lessons with me throughout my entire career. That job also helped to develop my love of Chinese food, authentic and North American. It’s with that in mind that I developed this recipe for Simple Sesame Garlic Noodles. They are an homage to that first job of mine. There are three things that I love about this noodle dish. Number one, they taste amazing. Two, as the name suggests, they are simple to make. And three, they remind me of one of my favourite dishes from that restaurant. This recipe makes a great quick meal for those days when you don’t know what to make and can’t find anything in the fridge. I can’t wait to share it with you.
Sesame Garlic Noodles Ingredients
The Noodles
The noodles are the most important ingredient in this Simple Sesame Garlic Noodle Recipe. The noodle has to stand up to stir-frying, or it will fall apart, and you will have a wok full of mush. I suggest ramen noodles. They are cheap, and you can find them in almost any grocery store. I use rice ramen noodles because they are gluten-free, but any ramen noodles will work. To cook, the noodles follow the instructions on the package, then rinse them under cold running water until they are cool. You can do this a day ahead and keep them covered in the fridge. If the noodles stick together when you take them out of the refrigerator, run them under cold running water to loosen them.
Green Pepper
These noodles are a blank canvas. You can put whatever you want in them. I like green pepper, so that’s what I use. You can add sliced cabbage, carrot, roast pork, whatever. In total, you want one cup of sliced green pepper. Use half a large bell pepper. Cut it in half, then slice it into thin pieces.
The Other Ingredients
The other ingredients you need to make this Sesame Garlic Noodles recipe are sliced garlic, chilli flakes, sesame seeds, soy sauce (or tamari), rice vinegar, salt, sugar, and sesame oil. You can find the measurements in the recipe at the top of the post.
How To Make Sesame Garlic Noodles
Stir-Fry The Peppers
Heat a wok or large non-stick skillet on high heat. Add one tablespoon of cooking oil. Use vegetable oil, peanut oil, grapeseed oil, or avocado oil. Olive oil and sesame oil will burn and leave a bitter flavour. I prefer peanut or grapeseed oil as they leave little to no taste. Add the peppers and stir-fry for about three minutes or until they brown.
The Next Step
Next, add the garlic, chilli, and sesame seeds. Stir-fry for a minute before moving on to the next step.
The Noodles
Add the noodles to the wok and stir-fry until hot, about two to three minutes. Pour in the soy sauce and vinegar, the sugar, and a pinch of salt. Stir-fry for another two to three minutes or until the noodles are coated in the sauce. Taste the noodles, season with salt, then add the sesame oil and toss. Remove the wok from the heat and serve.
The Wrap-Up
I love noodles of any kind, but these Simple Sesame Garlic Noodles have a special place in my heart. They take me back to a place and time that I have fond memories of. And, they are just so tasty. So, what’s your favourite noodle dish? Is there a dish that transports you to a different time and place? Leave a comment below and tell me about it. Thanks for reading. I hope you enjoyed this post. Remember to leave a rating on the recipe and share. Sharing is caring. Have a great day! I’ll see you back here next Thursday.
Have you signed up for the Chef’s Notes Monthly Newsletter? No? Why Not? Don’t miss exclusive recipes, cooking tips, and behind-the-scenes pictures and stories.
Simple Sesame Garlic Noodles
Looking for a quick meal? Can't find anything in the fridge? Don't know what to make for dinner? Look no further. These Simple Sesame Garlic Noodles are easy to make, have only a few ingredients, and taste amazing.
Prepare the noodles according to the package instructions, then rinse under cold running water until cool. Drain the noodles and set them aside.
In a small container, combine the soy sauce and vinegar.
Heat a wok or large non-stick skillet over high heat.
Add the peanut oil to the wok along with the green peppers. Stir-fry the green pepper until lightly browned, about 3 minutes.
Add the chilli, garlic, and sesame seeds to the wok and stir-fry for a minute before adding the noodles.
Stir-fry the noodles until they are hot, about 3 minutes, then pour in the soy sauce and vinegar mixture. Stir-fry the noodles for another minute, then add the sugar and a pinch of salt – Stir-fry for 1 more minute. Finally, add the sesame oil to the noodles and mix.
Taste the noodles and adjust the seasoning with a little more salt as needed. Serve.
If you are looking for a quick and delicious meal, look no further. This Sausage and Mushroom Penne ticks all the boxes. Italian sausage provides a base flavour that gives this pasta a big impact with only a few ingredients. Cremini mushrooms and rosemary add depth and body. White wine, stock, and cream create a rich yet elegant sauce. And parmesan cheese ties it all together to create a dish that you would happily pay good money for in any high-end restaurant. Oh, and it takes less than 30 minutes to make, start to finish, even with limited culinary skills. Sounds good, right? Well, what are you waiting for? The recipe is directly below, and you can keep reading past that for a more detailed explanation.
Quick and Delicious Sausage and Mushroom Penne
Italian Sausage and Cremini Mushrooms combine in the quick pasta dish with white wine, stock, and cream and create something so delicious and elegant you'll feel like you're eating in a fancy restaurant.
Fill a large pot 3/4 of the way with hot water, add 1 teaspoon of salt. Cover the pot and put it on the stove on high heat. Bring to a boil and cook the pasta according to the package instructions.
While the pasta is cooking, heat a large skillet on medium-high heat. Put the olive oil and sausage meat in the skillet. Use a wooden spoon to stir and break the meat up. Cook, for 3 to 4 minutes or until browned.
Add the minced onion to the sausage meat and cook for 2 minutes.
Put the mushrooms and garlic in the pan with the sausage meat and onions. Cook for 2 more minutes.
Deglaze the pan with the white wine and cook for 2 minutes.
Add the stock and rosemary. Cook for 2 minutes, then add the cream. Bring to a boil, add the cooked pasta and parmesan. Cook until the sauce is thick enough to coat the pasta.
Taste the sauce, season as needed with salt and pepper and serve.
The first thing you need to do when making this pasta is to get a large pot of hot water on the stove on high heat. Add a teaspoon of salt to it. Put a lid on it, and forget about it while you prep your ingredients.
Minced Onion
First up, take half an onion and mince it. Really just cut it as small and as evenly as you can. The recipe above says you need half a cup of onion, but if you have a little more or a little less, it isn’t going to hurt anything. Just use half an average-sized onion. It will always be enough and never be too much.
Sliced Garlic
Peel two cloves of garlic and slice them as thin as you can. You can mince the garlic if you’d prefer, but I like to have those nice thin slices in the pasta. Also, just like with the onion, if your cloves are a little bigger or a little smaller, it isn’t the end of the world. If they are a little small, add a third clove, otherwise, don’t worry about it too much. I promise it will not have a noticeable effect on the final dish. As long as there are about two cloves of garlic in there, it will be fine.
Cremini Mushrooms
Cremini mushrooms are available in almost every grocery store nowadays though they may be listed as brown mushrooms, mini-bellas, or some other name I’ve never heard before. Just look for a small brown mushroom. These have much more flavour than standard white mushrooms and a nicer texture too. Remove and discard the mushroom stems. Cut the mushroom in half, then cut it into slices. I like to make slices about half a cm or an eighth of an inch thick. Use four to five mushrooms, depending on their size.
Rosemary
Get one sprig of fresh rosemary. Hold it at the top of the stem between your thumb and index finger. With your other hand, grab the rosemary sprig with a gentle but firm grip right below your first hand. Now, pull down. This should strip most if not all of the needles off the sprig. Pull the top off and add it to the needle pile. Discard the stem. Bunch the needles into a nice little pile and cut them as small as you can. One sprig of rosemary should be about a teaspoon once chopped. What I’m about to say may come as a surprise to you, but it doesn’t matter if you have a little more or less chopped rosemary than what is listed in the recipe. Just go with what you get off of one sprig.
Sausage
Take two Italian Sausages (I used mild-Italian Sausage), make a slice down the length of the sausage and remove the meat from the casing. Discard the casing and set the meat aside. Whatever Italian sausage you can get from your local grocery store will be fine. I didn’t use anything fancy, and you don’t need to either. Though, if you want to use a locally sourced, organic Italian sausage, go for it.
Sausage and Mushroom Penne
By the time you’re done preparing all of your ingredients, your pasta water should be boiling. Before you put your pasta on, get a large skillet on the stove over medium-high heat. Let the pan heat up for a minute or two, then add a few tablespoons of olive oil and the sausage meat. Break the sausage meat apart with a wooden spoon and cook it for 3 to 4 minutes or browned. Drop the pasta in the water and cook according to the package instructions.
Onions in the pan
Add the onion into the pan with the sausage meat and cook for 2 minutes.
Mushrooms and Garlic in the pan
Put the mushrooms and garlic in the pan and continue to cook for 2 to 3 more minutes or until the mushrooms are cooked, and the onions have softened.
Deglaze the pan
At this point, there are probably some bits of food stuck to the bottom of your pan. Worry not, my friend, because it is now time to grab a nice bottle of white wine and deglaze your pan. Pour about a quarter cup of white wine into the pan and scrape up any bits of food that have stuck to the surface of the pan. These bits add lots of flavour to the sauce. Continue cooking the wine until it has all but evaporated and the pan starts to sizzle.
Rosemary and Stock
Throw the chopped rosemary into the pan along with about half a cup of beef or chicken stock. The store-bought stuff is fine, and if anyone tells you differently, send them to me, and I’ll set them straight. Of course, if you want to make the stock from scratch, go for it. It is easy to do. See below.
How to make stock
Put a chicken carcass in a pot (leftoverfrom a roast chicken is fine) with sliced onion, half a carrot, sliced, and half a stalk of celery sliced. Add in a bay leaf, a few sprigs of thyme or a sprig of rosemary and cover it all with cold water. Put it on the stove on high heat, bring it to a boil, then turn the heat down to low and simmer it for an hour. Strain the liquid. Discard the bones and vegetables. That golden liquid you have is chicken stock. You can do the same thing with beef, pork, or fish bones. The broth is made the same way but with meat instead of bones.
Cream
Let the beef stock and rosemary boil for about 2 minutes, then add in half a cup of whipping (heavy) cream. Before you ask, no, you can’t use a blend, coffee cream, or milk. It has to be whipping cream because you need that high-fat content, so the dairy doesn’t curdle. You aren’t using enough of it to worry that much about the calories, so just go for it.
Pasta
Once the cream goes in, bring it to a boil, add in the cooked and drained pasta, and about a quarter cup of grated or shaved parmesan cheese. Continue to cook for another minute or so or until the sauce is thick enough to coat the pasta. You might find it helpful to cook the pasta one minute less than the package instructions say. That way, the pasta can finish cooking in the sauce and won’t be overcooked. That’s it! You’ve just made Sausage and Mushroom Penne worthy of any restaurant menu.
The Wrap Up
Not many things in this life are better than the pleasures of a really good pasta dish. I include pasta from all parts of the world in that be it a nice Italian-style pasta, Japanese, Chinese, Thai, whatever it is, when it’s down well, it is an extraordinary thing. One thing that is as true with pasta as it is with any other food is that the less you mess with it, the less fuss, and the fewer ingredients you add, the better it is likely to be. I hope that this Sausage and Mushroom Penne illustrates that point to you. Make this. You won’t be disappointed.
Thanks for reading, and have a great week! And subscribe below so that you never miss a post.
Let’s talk about turkey burgers. All too often, when someone serves a turkey burger it is dry, tasteless and might as well be a hockey puck. I wanted to remedy this. So, I came up with a turkey burger recipe that isn’t dry and flavourless. It is the exact opposite actually. What’s even better than a recipe that takes something that usually isn’t that good and makes it delicious? What about a recipe that takes something that isn’t that good, makes it delicious, and makes it in less than 30 minutes? That’s what I’m going to share with you today.
This is how to make the…
BEST EVER TURKEY BURGERS IN 30 MINUTES OR LESS
12:45 pm – Getting Started
To get started I opened up a package of ground turkey put it in a bowl and measured out all of my other ingredients. They were a 1/2 tsp each onion powder, garlic powder, and smoked paprika. 2 tbsp each bread crumbs and chopped parsley. 1 tsp each kosher salt(use 1/2 tsp if using table salt) and fresh chopped thyme. Finally, I added a few turns of pepper from my pepper mill. In total it was probably about 1/4 tsp fresh ground pepper. I also added 1 whole egg.
12:52 – Mix it up and turn it on
Once I had all of my ingredients measured and ready to go, I turned my pan on to medium heat. I used a non-stick pan though it isn’t necessary. It just happened to be on the top of the stack in my cupboard. I also added about 2 tsp of olive oil to the pan. I did this before the pan was hot, just because I was about to cover my hands in raw turkey.
With the pan heating up I started mixing my turkey mixture only until all the ingredients were combined. Then I divided the mixture into half, then half again. Dividing the mixture in quarters rather than just grabbing handfuls gave me much more even burgers. I formed the burgers then added them into the pan.
I only cooked two of the four because it was just my wife and I. The rest of the burger mixture got saved for later.
12:57 pm – Cranberry Mayo
First things first, clean up the cutting board.
I love cranberry and turkey together and I thought that cranberry mayo would be great with this burger (I was right). Really simply, I took 1/4 cup of mayo (Hellman’s) and mixed into it 2 tbsp cranberry sauce. If you don’t have any cranberry sauce, just boil 2 tbsp dried cranberries, 1 tbsp sugar, and 1/4 cup water until most of the water has dissolved. Let the dried cranberry sauce cool to room temp before mixing it into the mayo.
12:58 pm – Flip the burgers
By 12:58 the burgers were ready to flip. This also seemed like a good time to toast the burger buns.
1:01 pm – Cheese
At 1:01 pm the burgers were just about cooked. I sliced a few thin pieces of swiss cheese (you can buy pre-sliced) then topped the burgers with them. Once the cheese was mostly melted the burgers were ready.
1:04 pm – Turkey Burgers
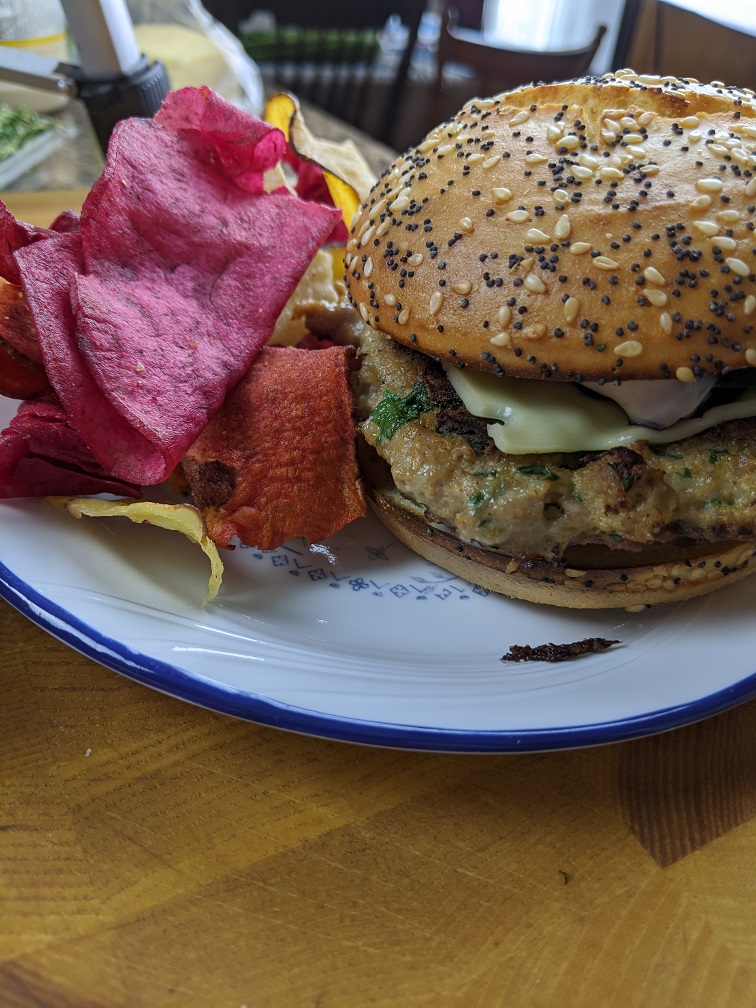
To assemble the burgers, I spread the cranberry mayo on both sides of the bun. On the bottom of the bun, I also added 3 bread and butter pickle slices. On the top bun, I added a small handful of salad greens. I added the burger, put it all together, and served it with vegetable chips.
Conclusion
I cannot express how delicious this burger was. I know that turkey sometimes has a tendency to dry out, but these weren’t dry at all. The burgers themselves had loads of flavour and a great texture. The cranberry mayo worked perfectly with the burgers and the bread and butters pickled added that perfect sweet tang. I absolutely recommend you make these. I know that you’ll be glad you did.
All too often turkey burgers are dry and tastless. No more!! These burgers are tender, juicy, and oh so good. Don't believe me? Try them for yourself. It will only take you 21 minutes.
Combine the turkey, spices, herbs, breadcrumbs and egg in a medium mixing bowl and mix to combine. Divide the mixture into 4 even pieces and form into burgers
Heat a skillet over medium heat with the olive oil. Cook the burgers until cooked through (about 4 minutes per side)
Top the burgers with the swiss cheese.
Mix the mayo and cranberry sauce and top the burger buns with it.
Place the bread and butter pickles on the bottom bun and the salad greens on the top bun. Put the pattie on the bun and serve with the chips.
Hello everyone and happy Monday! Today we are going to take a look at something I am super excited about; Curry Chicken Pilaf. What’s more, we are going to make it in 30 minutes from start to finish.
Before we get into this, let’s talk for a second about what exactly a pilaf is. Rice pilaf is a dish where the rice is generally sautéed in oil prior to being cooked in stock or sometimes water. Countries all around the world have versions of pilafs using localized ingredients. I think, despite its global popularity, pilaf is a technique that is underused in North America. So, I wanted to shed some light on it. With that, let’s take a look at how to make…
CURRY CHICKEN PILAF IN 30 MINUTES OR LESS
7:45 pm – Getting Started
First things first, get a large pan on the stove over medium-high heat.
While the pan is heating up measure out 2 tbsp olive oil, 1 tbsp grated ginger, 2 tbsp madras curry powder, 1/2 tsp cumin, 1/4 tsp coriander, 1/4 tsp crushed red pepper, and 1 tsp kosher salt into a larger mixing bowl and mix well. Add 1 pound of diced chicken thighs (you can use chicken breast) to the spice mixture and stir to coat.
7:22 pm – Chicken in the pan
Add 2 tbsp of olive oil into the pan. Add the chicken to the pan as well, spreading it out in an even layer. Leave the chicken alone to cook for about 2 minutes.
While the chicken is cooking, dice 1 onion and 2-3 cloves of garlic. In total, you want about 1 cup of onion and 1 tbsp of garlic. If you have a little more or a little less of each it isn’t going to hurt anything.
7:24 pm – Flip the chicken
Flip the chicken and add the onions and garlic into the pan. Cook for another 2 minutes.
7:26 pm – Add in the rice
Add the rice into the pan and stir to coat the rice with the oil and spices. After a minute or two add in 2 cups of chicken stock and 1/2 cup of peas. Turn the heat up to high and bring the stock to a boil. Boil for 2 minutes.
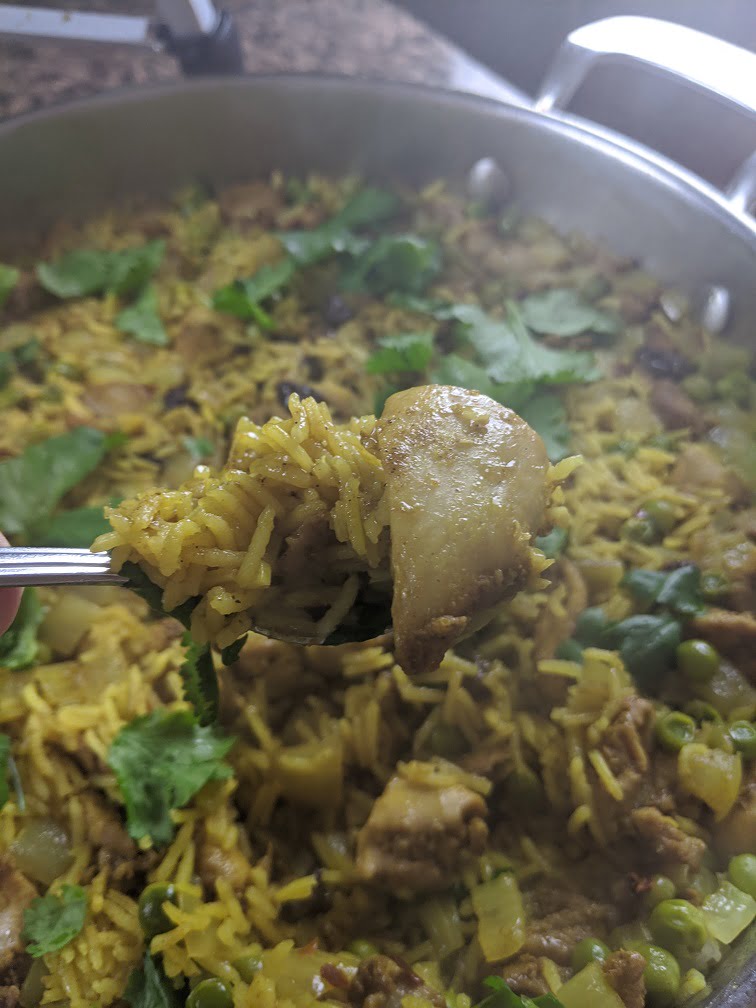
7:30 pm – Raisins
One thing that really enhances the flavour of curry is a little pop of sweetness. For this sweetness, I added 1/4 cup of raisins. I seasoned the curry with a pinch of salt and pepper put the lid on the pan and turned the heat down to low. I set a 15-minute timer then tidied up for about 5 minutes.
7:35 pm – Cilantro
While the curry chicken pilaf was cooking I picked about 1/4 cup of whole cilantro leaves. I washed them, dried them, and set them aside. I still had about 10 minutes left until dinner was ready so I just chilled out and waited.
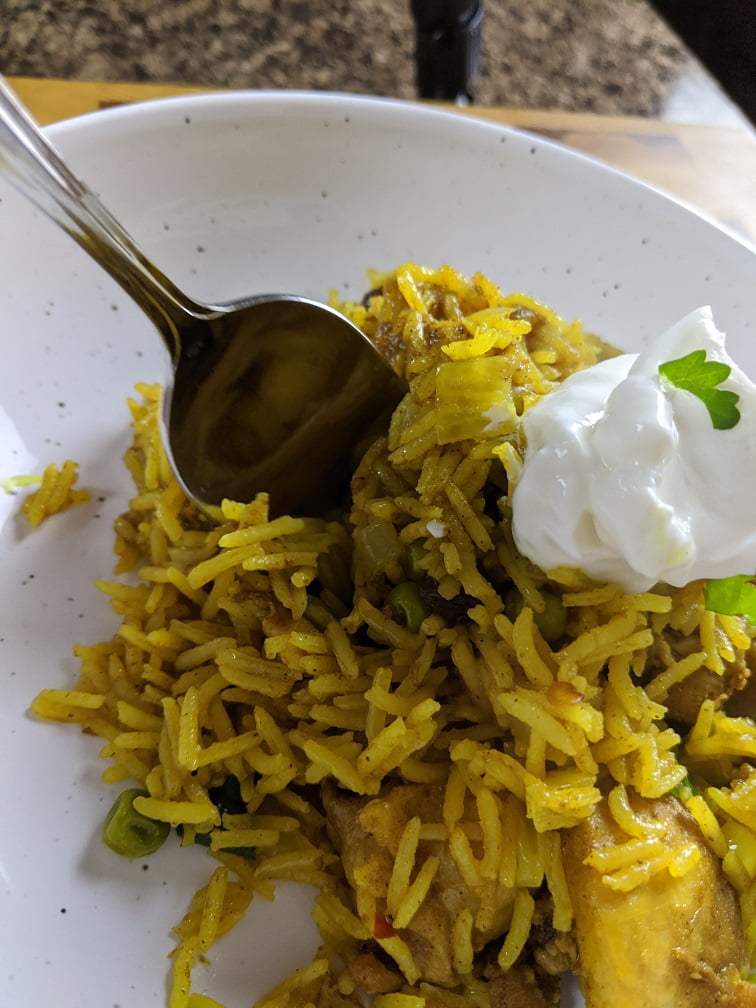
7:45 – Curry Chicken Pilaf
At 7:45 my timer went off and the curry chicken pilaf was ready. I finished it with the cilantro leaves and served it up.
Conclusion
First of all, I was a little concerned that I wasn’t going to have quite enough time to make this dish. My concern was misplaced. The timing worked out perfectly! The rice was cooked, the chicken stock was all absorbed, and the curry was incredible! It was flavourful, a little spicy, and actually pretty light.
Before I close this out I should say that I cheated a little. I bought bone-in chicken thighs but took the bones out to make the chicken stock for the curry. You can just use store-bought stock if you want. So, I had my chicken pre-diced. However, I think you can buy diced chicken thighs. If not you will need to dice some chicken, either thighs or breast. However, that really shouldn’t add more than a minute or two to the total cooking time.
I know that curry can be a daunting thing to make. I hope that I’ve described this in a way that you feel confident in making it. It really is worth the effort. Not only that, the actual active cooking time is only 15 minutes. The other 15 minutes is passive. You don’t have to do anything but wait. And yes, I do believe you could do this in a slow cooker.
If you have any questions about this recipe please feel free to ask me in the comments or on social media.
Have a great Monday and a great week everyone.
Curry Chicken Pilaf in 30 Minutes or Less
An incredably delicious Curry Chicken Pilaf that can be made in 30 minutes flat.
Hello and happy Monday, everyone! Today, we are going to kick the week off right with a quick recipe for Creamy Chicken Pesto Pasta. It’s so fast to make you can do it from start to finish in under 30 minutes. Oh, and it is delicious!
Some of you may remember that way back in March of last year; we did a 30 Minutes or Less Chicken Pesto. Though similar to what we are doing today, there are some apparent differences between the two. The Chicken pesto from last year was pretty much just chicken, cherry tomatoes, pesto, and pasta. Today our pasta has chicken, roasted red pepper, spinach, pesto, and cream. So again, it is similar but different. One other significant difference between the two posts is that in the one from last year, we made the pesto, this time we are using premade, though I did make it. You can make it or use store-bought stuff if that’s what you prefer.
Okay, let’s take a look at how to make…
Creamy Chicken Pesto Pasta in 30 Minutes or Less
7:05 pm – Getting Started
It was 7:05 pm when I started cooking last night. The first step was to get the pot on for the pasta. I filled a medium-sized pot with hot water, added some salt, and put it in the stove on high.
Once the pot was on the stove, I got to work on an onion and some garlic. The onion I used was pretty small, so if all you have are large onions, only use half. For whatever reason, I cut the onion as though I was going to dice it. At the last minute, I changed my mind and decided I want to slice it, so I went back after it was peeled and cut the root off. With the root cut off the onion, I proceeded to slice it. I also peeled and sliced one relatively large clove of garlic. Once the onion and garlic had been sliced, I put them on a plate and set them aside.
7:08 pm – Chicken
Once I was done with the onion and garlic, it was chicken time. But, before I got my hands all covered in chicken, I put a large, heavy-bottomed skillet on medium heat on the stove.
The chicken I bought was a chicken breast that still had a bit of the rib and wing bone attached. I bought this because it was cheaper than boneless chicken breast. I should also say I’m not generally a fan of chicken breast. However, on the rare occasion that I do buy it, I usually get it bone-in and skin-on. It is way cheaper and with a little practice takes next to no time to clean.
To clean the chicken, I found the bone and followed it with my knife to cut it away. I then took the tenders off the breast. The tender is the little flap of meat on the underside of the breast. If you’ve ever bought breaded chicken tenders, this is what they are made of. With the tender removed, I sliced the breast and tender into 1/2 cm pieces.
7:12 pm – Cooking the chicken
Now, that the chicken was all sliced, I added 1-2 tbsp of olive oil into my pre-heated pan along with the chicken. When I added the chicken in, I spread it out in a single layer to speed up the cooking process. I also turned the heat up a little on my pan as it wasn’t quite hot enough. You may not need to do this. The issue was that my pan is very thick and just wasn’t getting hot enough.
While the chicken was cooking I took a few minutes and thoroughly cleaned my knife, cutting board, and work area.
7:15 Cooking the pasta
Around 7:15 pm the water for my pasta was boiling, and my chicken was cooking. The pasta I used takes about 12 minutes to cook. I knew that if I started cooking it at this point it would line up pretty perfectly with when the sauce would be done. How did I know that? The chicken was almost cooked through and I knew that sauce wasn’t going to take that long. Also, even if the timing didn’t line up perfectly, there was only going to be a few minutes difference and I could compensate for that. So, I dropped the pasta in the water.
I also took this opportunity to season the chicken generously with salt and pepper then I flipped the chicken and finished cooking it through.
7:20 pm – Onions and Garlic In
At 7:20 I add the onion and garlic into the pan along with the chicken. I cooked, stirring for about 2 minutes before adding in the roasted red peppers.
The roasted red peppers I used were jarred. They came pre-roasted and sliced into thin strips. You can obviously roast your own peppers. However, I happened to have this on hand and wanted to use them up. They’re actually pretty good out of the jar so if you want to save some time I suggest going this route. I used about 1/2 a cup of peppers in total.
7:24 pm – Sauce It
At 7:24 pm I added in about 1/4 cup of pesto. Again, this was pesto that I had made a few days ago and had in the fridge. You can make it from scratch (link at the top of the post) or you can buy it. I prefer to make it because it tastes better and has no preservatives and stabilizers. But, if you want to save some time you can go that route. Once I added in the pesto I let it cook for about a minute before adding in the cream.
At first, I added in a 1/2 cup of heavy cream, but I ended up having to add in a bit more to loosen the sauce. In total, I used about 3/4 of a cup. If you don’t want to use the cream I suggest making a bechamel by cooking roux into milk to thicken it. You don’t want to add straight milk or anything less than heavy cream (whipping) because it will curdle when it hits the heat.
7:26 pm – Spinach
After adding the cream, which came to a boil very quickly I tasted the sauce and added a bit more salt and pepper as was needed. Then I added in 2 big handfuls of baby spinach and stirred until it was softened into the sauce.
7:28 pm – Drain Pasta
At 7:28 pm my pasta was done. I drained it and added it to my sauce.
7:29 pm – Turn off heat and finish
I grated about 1/4 cup of parmesan into the pasta, stirred everything together and served.
Conclusion
This is not a diet pasta recipe by any means but it also isn’t nearly as heavy as you may think it is. Recipes like this will often suggest multiple additions of cream, each one being reduced before the next is added. This makes the pasta very heavy. You don’t get that with this. Also, the roasted red pepper and spinach along with the pesto give this pasta an incredible flavour. I highly recommend you give this a shot. If you do, I’d love to hear what you think.
Thank you, everyone, and have a great Monday. And remember to tune into Dinner with Ben tonight at 6 pm Atlantic time on my Facebook page.
Creamy Chicken Pesto Pasta
What more is there to say? It's creamy, it's chicken, and it's pesto. Delicious!
Thank you for reading the post. If you liked it, remember to share it on Facebook, Pinterest, or Twitter by clicking the icon to the left of the right of the page. Did you know that Chefsnotes.com has almost 400 posts just like this one? Imagine all the great tips, tricks, and recipes you’ve missed. Don’t miss any more! Subscribe to Chef’s Notes by putting your email address in the subscription box at the top right of the sidebar. You will be notified of every new post. And if you would like to know more about me, click the link below to read my story.
Good morning friends! It is, of course, Monday, I am back from my vacation, and that can only mean one thing, 30 Minutes Or Less! I hope that you are all as excited as I am. Today, we are going to be taking a look at something that most of us probably haven’t had in a very long time, Sloppy Joes. Bonus points to anyone who can get through this post without hearing Adam Sandler in their head singing “Lunch Lady Land”.
When I decided I was going to make Sloppy Joes for today’s 30 Minutes Or Less, I took a few minutes and thought about what a Sloppy Joe is. What I realized is that every Sloppy Joe I’ve ever had was made with leftover spaghetti sauce, rather than some specific Sloppy Joe mixture. After a quick Google search I realized that to the rest of the world, or at least the Goolecentric part of it, a Sloppy Joe isn’t actually what I thought it was at all.
I did some research and came to the very surprising conclusion that I’d never had an actual Sloppy Joe before. It was obviously time to change that. I compiled my research, broke it down, took some pieces away, added a few of my own and what I was left with was the recipe I’m about to share with you. An entirely new-to-me Sloppy Joe recipe.
Most of the recipes I found had a base of ketchup and mustard. I couldn’t bring myself to pour a bunch of ketchup into my pan so I used tomato purée and added a little sugar and cider vinegar to kind of replicate the ketchup flavour. I also added fresh garlic when most of the recipes called for garlic powder. And, I used mustard powder when most recipes called for prepared mustard. Other than that I didn’t change too much. I wasn’t trying to reinvent the wheel, just make a delicious Sloppy Joe.
And with that, this is how to make…
Sloppy Joes in 30 Minutes Or Less
12:20 pm – Getting Started
First things first I put a large frying pan on the stove over medium-high heat. While that was heating up I diced one medium-sized onion by cutting the top off, then cut it down through the middle. I peeled the onion and then made a few horizontal slices about 3/4 of the way through the onion. I then made a few verticle slices all the while keeping the root of the onion intact so it didn’t fall apart. After that, I cut across the slices, and like magic, perfectly diced onions.
By the time the onion was cut the pan was hot and ready. I add about 1 tbsp of olive oil along with 2 lbs lean ground beef and my diced onions. I stirred the beef to break it up and to make sure everything was cooking evenly. Finally, I seasoned the beef and onions generously with salt and pepper then move on to my next task.
12:25 pm – Peppers & Garlic
With the beef and onions cooking away I diced up about a 1/2 cup of green bell pepper which was about 1/2 the pepper. Then I peeled and sliced 2 cloves of garlic.
By the time I was done with my slicing and dicing the onions were translucent and the beef was cooked through. It was time to add in the bell pepper and garlic. I cooked everything together stirring fro a few minutes.
12:31 – Seasonings
After a couple of minutes of cooking the bell peppers and onions, it was time to add in my seasonings. First up was 2 tbsp of brown sugar, 2 tsp ground mustard, 2 tsp cider vinegar, 1 tbsp soy sauce, and 1/2 tsp crushed red pepper flakes. I stirred the seasonings into the meat mixture and cooked it all together for about 2-3 minutes before moving on.
12:34 pm – Sauce
The last two ingredients to go into the Sloppy Joe mixture were 1 cup of tomato purée and 1 cup of beef stock. Once these were added in I turned the heat up slightly on the pan and brought it to a boil. Then, I reduced the heat to medium and let it simmer away.
12:37 pm – Salad
While the mixture was simmering on the stove I got to work making a quick salad. I first sliced up a chunk of cucumber, then a radish, and a carrot. I put of mesclun mix in two small bowls and topped it with the cut vegetables and couple cherry tomatoes.
12:45 – Buns
The salad was done, the Sloppy Joe mixture was almost done, all that was left was to toast the buns. I cut them in half and popped them in the toaster. My toaster has a “bagel setting” which only turns on one side of the element. I usually use this to taste the buns 90% of the way and then finish them on the regular setting. It works really well for me and my toaster.
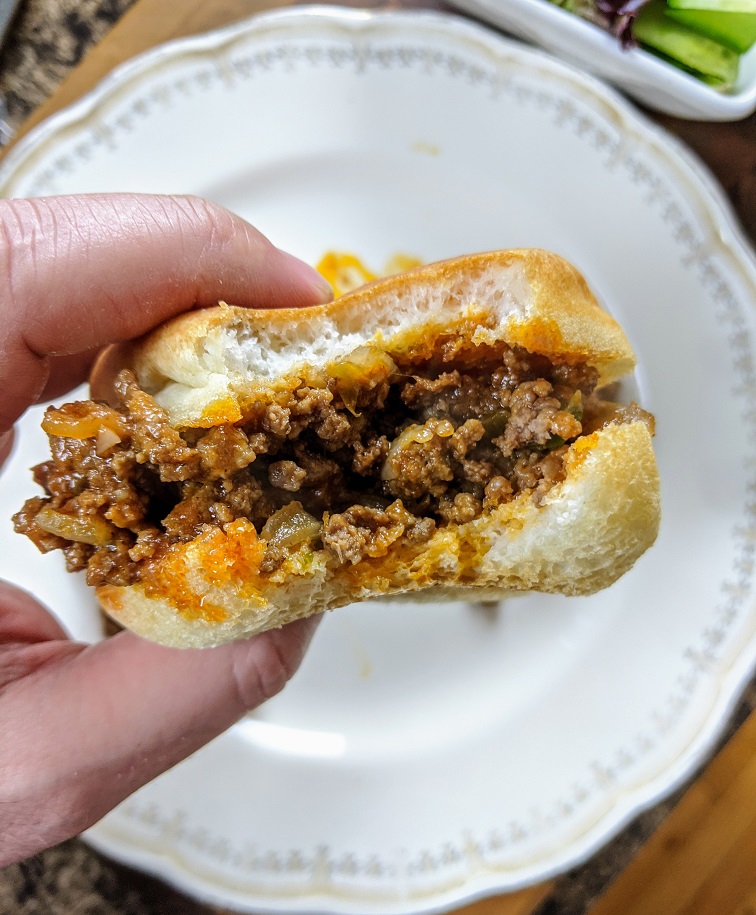
12:47 pm – Sloppy Joe
The Sloppy Joe mixture was done when there was very little moisture left in it. Essentially, when I scraped the bottom of the pan with a spoon, a clean line stayed. You can see this in the pictures below. That’s how you know the mixture is thick enough.
I big scoop of the filling on my bun dressed my salad and dinner was ready.
Conclusion
These Sloppy Joes were really tasty, and I would be more than happy to eat them again. However, what I realized is that what I actually wanted, was the spaghetti sauce style Sloppy Joes I had always had before. So, as good as this were, there was some sense of disappointment that went along with them for me. But all that means is that I will have to make so spaghetti sauce and redo this for lunch someday in the near future.
Oh, and one other thing. I actually put hot sauce on my Sloppy Joe as I was eating it. I felt like it needed a bit of a kick and I was right. If you are all right with a bit of heat, put some hot sauce on this, you’ll be happy you did.
And that does it for today. Thank you as always for reading and remember to tune into Dinner with Ben tonight and every Monday night at 6 pm on my Facebook page. Tonight we are making Chicken Fried Steak! See you then.
Heat a large frying pan over medium-high heat. Addin the ground beef and onions and cook until the onions are soft and the beef is cooked through (5-8 minutes). Season generously with salt and pepper.
Add the green pepper and garlic to the beef and onions and cook for another 2-3 minutes.
Next up, add in all the seasonings cook for 2 minutes then add in the tomato purée and beef stock. Bring to a boil, reduce the heat to a simmer and cook until thick.
The mixture is done when a spoon dragged across the bottom of the pan leaves a clean line. Taste and adjust the seasoning as needed.
When I was around 12 my mom had a friend who had children that closely matched the age of my sisters and me. She lived right by our school. Occasionally, when mom had to go into town we would go to this friend’s house for dinner. It was one of these days when I first experienced tuna casserole.
My mom’s friend’s version of tuna casserole, as I now know, was pretty classic. It was tuna, pasta, and vegetables in a cream of mushroom sauce, covered with crushed potato chips and baked. My mom was a great cook but for whatever reason had never made anything like the tuna casserole I had that day. It made such an impression on me that I remember it more vividly than almost anything else from that period of my life. Interestingly enough, to this day that is the only tuna casserole I’ve ever had.
It was that tuna casserole I had in mind while I was creating this creamy tuna pasta recipe. Essentially, I wanted to make an updated version of that tuna casserole I ate well over 20 years ago. Gone are the crushed potato chips, cream of mushroom soup and long baking time. Now, we can all have that flavour and experience in under 30 minutes. Let’s take a look at how to me my…
Creamy Tuna Pasta In 30 Minutes or Less
12:45 – Getting Started
I made this creamy tuna pasta for a late lunch and started cooking at 12:45. The first thing I did was get a big pot of salted water on the stove for the pasta. Next, I put a frying pan on the stove over medium heat for the sauce. With that, it was time to get down to the real work.
For the sauce I started with a base of carrot, onion, and celery, I peeled and diced 1 onion and 1 carrot, then sliced 1 celery stalk.
12:49 pm – Start cooking
By the time I was done cutting my vegetables my pan was nice and hot. I added in 1 tbsp each butter and olive oil. I used butter for the flavour and the olive oil to help prevent the butter from burning. Once the butter melted I added in the vegetables.
12:50 pm – Garlic
While the vegetables were cooking I peeled and sliced 2 cloves of garlic. I also diced about a 1/2 cup of roasted red pepper. I added roasted red pepper because I just happened to have it in my fridge. You don’t have to add this but I did find it added a nice sweet tone to the overall flavour.
I gave the carrot, onion, and celery a stir then added in the roasted red pepper and garlic.
12:54 pm – Tuna
While the garlic and peppers were cooking I opened up my can of tuna. I drained the liquid right into the frying pan. This added a really nice subtle tuna flavour to the pasta that you won’t get from the tuna itself. The pan was hot enough that the juice evaporated very quickly.
12:55 pm – Cream
After the tuna juice mostly evaporated I added in 1 cup of whipping cream and a 1/2 cup of frozen peas. I’ve said it before and I’ll say it again. Don’t skimp out on the cream here. If you use blend cream, coffee cream, half and half, or milk, it will curdle and it will be gross. If, for some reason you want a lighter version of this, take the time and make a bechamel. Otherwise enjoy the rich delicious flavour of full fat, 35% whipping cream.
Once the cream and peas go into the pan bring it to a boil then reduce the heat to low and simmer.
12:57 pm – Pasta in
Around this point, my pasta water was boiling and yours should be too. Add the pasta in and cook it according to the package instructions. While the pasta is cooking chop about a 1/2 cup of parsley.
1:05 pm – Drain Pasta
Once the pasta is cooked drain it as you normally would. While it is draining, add the tuna into the sauce and stir to break it up.
1:06 pm – Finish the creamy tuna pasta
Add the pasta into the sauce along with the parsley. Toss or stir the pasta to coat it with the sauce. Taste and adjust the seasoning with salt and pepper. Serve by itself or with a green salad.
Conclusion
The first bit of this pasta took me back to that dinner at my mom’s friend’s house all those years ago. I hope that you have a similar experience with it.
If you aren’t a big fan of tuna you could add canned or fresh salmon, chicken or ham instead. No matter what, it will be delicious. But don’t take my word for it. Try it for yourself.
Thank you as always for reading and stay tuned for Wednesday when I am launching my free 10-week basic cooking course “Kitchen Clueless to food independent” and remember to subscribe to the blog so you never miss a post.
Creamy Tuna Pasta
A new take on the old school Tuna Casserole. A quick meal your family will love.
Good morning everyone and happy Monday! Today on 30 minutes or less we are going to take a look at an absolute classic. We are going to make a version of Fish Fingers with fries. But, rather than having fries we are going to make really delicious pan-roasted potatoes. The fish fingers are going to be homemade. And, we are going to make a delicious sauce to go with them.
What are we waiting for? Let’s get to it. This is…
7:45 pm – Getting Started
I started cooking at 7:45 pm. The first thing I did was get the oven going. I turned it on to 425°F. I also put an oven-safe pan on the stove and turned it on over medium heat.
With the oven on and the pan heating up, I started working on the potatoes. I used 4 Yukon gold potatoes (any yellow flesh variety will work) I cut them into wedges, about 8 per potatoes. Once they were cut I set them aside for a minute while the pan finished heating up.
7:47 pm – Carrot
I had just enough time to peel a carrot before the pan was hot enough to add in the potatoes.
7:48 pm – Potatoes in the pan
At this point, the pan for the potatoes (I used a castiron pan) was ready to go. I added in about 2 tbsp of olive oil, added the potatoes in, and then seasoned them well with salt and pepper. I tossed the potatoes to make sure they were coated in oil and to evenly distribute the seasoning. Then, I left them alone to cook and sear.
4:49 pm – Cutting the Vegetables
We all know that we can’t have a well-balanced meal without a nice big serving of vegetables, right? So, with the potatoes cooking it was time to start prepping the veg.
I thinly sliced the carrot that I peeled while waiting for the pan to heat up. Next, I sliced half a red bell pepper. To the carrot and bell pepper, I added a big handful of fresh green beans. That’s it.
You may notice that I often cut vegetables on an angle. In cooking, we call this cutting on a bias. This is done because it looks more professional. However, there is a secondary reason. When cutting round vegetables like carrots, or even green onions or chives, they have a tendency to roll away if they are cut straight. Cutting them on an angle keeps them in place and prevents them from rolling onto the floor.
7:51 pm – Sauce
Before I got into making the sauce I made sure to give the potatoes a big stir to prevent them from burning on the bottom. This also helps to ensure a more even browning on the potatoes.
The sauce I made for my fish fingers is called a sweet chilli sauce. You may have had it at restaurants or even bought it at the grocery store. It is the easiest sauce in the world to make. I’m serious.
All you need to make the sauce is…
1/2 cup sugar
1/2 cup white vinegar
1/2 cup water
1/4-1/2 tsp red chilli flakes (crushed red pepper flakes)
Those four ingredients get put in a pot, brought to a boil and then simmered for about 10 minutes. That’s it. Not only is this sauce delicious and ridiculously easy to make but because of the high sugar and acid content, it will virtually last forever in the fridge.
So, at 7:51 pm I measured out all the ingredients for the sauce. Put them all in a pot on the stove and turned the burner on high then I moved on to my next task.
7:52 pm – Potatoes in the oven
By 7:52 the potatoes were looking pretty brown and ready to go in the oven. I gave them a quick stir and popped them in the oven on one of the center racks.
7:53 pm – Setting up the breading
At this point, I’ve been cooking for almost 10 minutes and haven’t even touched the fish yet. I’d say it’s about time I did. But, in order to do that, I first need to get my stuff set up for my breading.
I am going to use what is known as the standard breading procedure. It’s the same process I used to make the turkey fingers in the 5 Turkey Hors D’oeuvres post. The basic idea is that the food you are breading is first dusted in flour which sticks to the food. Then it is dipped in some beaten egg that sticks to the flour. Finally, it is rolled in bread crumbs that stick to the egg. This process gives you a really solid bread coating that is going to stick to the food.
The flour and bread crumbs I used for this are gluten-free but you can obviously just use the regular stuff. First up, I combined 1 cup of flour with 1/2 tsp salt and 1/4 tsp pepper. I used a fork to stir it up then set it aside. I measured out 1 cup of bread crumbs and I beat 2 eggs.
With the breading station set up and out of the way I also took this time to grease a sheet pan. I used about 2-3 tbsp of olive oil and evenly spread it on the sheet pan. It may seem like a lot of oil. Honestly, it could probably use more. The oil isn’t so much there so that fish doesn’t stick to the pan. It is actually going to help crisp up and brown the breading. I highly recommend you don’t cut this oil back.
7:56 pm – Fish
Right around this time, the sauce started to boil. I turned it down to a simmer and left it alone.
Now, it was time to get to work on the fish. I used 3 haddock fillets which made enough for about 4 people. I first cut the loin (the thicker part of the fillet) off, then cut that into 2 or 3 fingers depending on how thick it was. Next, I cut the other half of the fillets into finger-sized pieces too.
7:56 pm – Bread the fish
With the fish cut, it was now time to bread it. Each piece went into the flour first then the beaten egg, and then the bread crumbs. Once the fish fingers were breaded they got placed on the greased sheet pan. I left about a 1/2 inch between each finger. This helps them to cook and brown more evenly.
Once all the fish was breaded and on the sheet pan, I put them in the oven on the center rack. I set a 7-minute timer and left them alone.
Since I was opening the oven anyway I took this opportunity to give the potatoes a quick stir. Then I washed and dried my cutting board and wiped down my counters.
8:04 pm – Pan on for veg.
Once everything was clean I put a pan on over medium-high heat for the vegetables. I let it heat up for about 2 minutes then added in 2 tsp of grapeseed oil along with the vegetables and a bit of salt and pepper. Next, I sautéed the vegetables for about 3 minutes, put a lid on the pan and took them off the heat. I let the vegetables sit until the rest of the food was cooked.
This technique with the vegetables was something I came up with the other day. Essentially, you sauté the vegetables in a bit of oil in a really hot pan with a bit of salt and pepper. The vegetables get cooked only until they are heated through. This takes about 3-4 minutes. Then the pan gets covered and taken off the heat. As the vegetables sit they release moisture which condenses and falls back down on them and onto the surface of the hot pan. Essentially, the vegetables steam in their own juices.
I have used this technique multiple times now, with multiple varieties of fresh vegetables and they have come out perfect every single time.
At this point, I also took the sauce off the heat and set it aside.
8:09 pm – Flip the fish
Okay, at this point the sauce is done, the vegetables are sitting off the heat with the lid on and there is still some time left to go. I took the fish out of the oven, flipped each piece, then popped them back in. I also gave the potatoes one last stir.
8:15 pm – Dinner is ready
At 8:15 the fish and potatoes came out of the oven and were perfectly cooked. The vegetables were hot and ready. And the sauce was good to go. It looked to me like dinner was ready.
Conclusion
This is the exact type of meal I ate a lot growing up. The difference is that this version was all homemade. But, what’s interesting is that even though it was all homemade, it took about the same amount of time as the boxed, store-bought stuff. Honestly, I made this in 30 minutes and you can too. Oh, and you can even make extra fish fingers and freeze them. Why not right?
Thanks for reading and enjoy the recipe! Oh, and it would mean a lot to me if you could share this on Facebook, Pinterest, or wherever you prefer.
Thanks everybody, see you Wednesday!
Fish Fingers with Sweet Chilli Sauce
Delicious and quick homemade fish fingers with a sweet and spicy dipping sauce
Good morning everyone! Happy Monday, happy new year, and happy to be back! Today, in honour of the new year, and the fact that many of you are probably watching what you eat for the next few weeks, I thought I would make a recipe that is a little lighter than usual. And so today, we are going to make Sweet and Spicy Chicken lettuce wraps in 30 minutes or less.
Some of you more keen-eyed readers may remember that way back in June we made ginger beef lettuce wraps. The basic idea is the same; make a filling and wrap it in lettuce. Basically, I just want to show you that lettuce wraps don’t have to be one thing. They can be comprised of a multitude of ingredients and flavours. Today we are using ground chicken, last time it was beef, next time it might be pork or fish, or tofu! Who knows?
Alright, that’s more than enough of a set-up Let’s take a look at how to make…
12:30 pm – Rice
First things first, we need something to serve with the lettuce wraps. I thought sticky rice was a logical choice. You, of course, can serve whatever you would like with your lettuce wraps. Cauliflower rice would be a good option if you are currently anti-carb. Either way, the first thing I did was get the rice going.
I measured out 1 cup of sticky (or sushi) rice, 1 1/2 cups of water, and put it on the stove on high. Follow the direction on the package your rice comes in as they may be slightly different.
The rice, like most rice, starts on high until it comes to a boil, then it is covered and left to simmer on low heat. This particular rice only needs to simmer for 12 minutes and then rest for 5 minutes. This short cooking time makes it perfect for these quick 30 minute meals.
Along with getting the rice going I also turned a wok onto medium-high heat. You don’t have to use a wok for this, but I found it worked really well. Wok or not, your pan should be on and pre-heating.
12:32 – Getting Started
Now that the rice is on the stove and coming up to the boil, it’s time to get the other ingredients prepped. Up first is half an onion which should be diced nice and fine, minced even.
12:34 pm – Take the chicken for a wok
In the time it took to dice the onions, the wok has sufficiently heated, and the rice has started to boil. I added 2 tbsp of sesame oil to the wok along with 1 lb of ground chicken. Next, I gave the rice a little stir, put a lid on it, turned the heat down to low, and set a timer for 12 minutes.
The now diced white onion is not the only vegetables going in this dish, it isn’t even the only onion. That means, that it is time to get back to some knife work. I took 4 green onions, cut them in half and set the top half aside for later. I finely diced the bottom halves and added them to the white onions.
12:37 – More Knife Work
Once the green onions were chopped I took a second and gave the chicken a stir. Then I got right to work dicing half a red bell pepper.
12:39 pm – Garlic
With the bell pepper chopped I gave the chicken another stir and chopped up 3 cloves of garlic.
12:41 pm – Onions in
Okay, the chicken is nice and browned and the veg is all chopped and ready to go, let’s start cooking. First up, I added the white onion, green onion bottoms, and the garlic to the chicken and cooked for about a minute.
12:42 pm: Sweet pepper, hot pepper.
Next up, I added in the red bell pepper and 1/2 tsp of crushed red pepper (chilli ) flakes.
12:43 pm Ginger and five-spice
One minute after the peppers went in I added in 2 tsp Chinese 5 Spice and 1 tbsp grated ginger. I cooked all of these ingredients together for about three minutes.
12:46 pm- Liquids
Okay, time to add in the liquids. 1/4 cup water, 1 tbsp honey, 1 tsp rice vinegar (or white vinegar) and 3 tbsp soy sauce (gluten-free tamari).
I don’t have any pictures because this part happened pretty quick.
12:47 pm – Seasoning
At this point, I gave the mixture a taste and noticed it was missing three things. It needed a bit of salt, a bit more vinegar, and a bit more honey. So, I added about 1/2 tsp kosher salt, 1 tbsp honey, and 1 tsp vinegar.
It was right around now that the timer for the rice went off so I took it off the heat.
12:48 pm – Finishing touches
To finish the chicken I add in 1 tbsp sesame seeds and I chopped the tops of the green onions and added them in. I then took the wok off the heat.
12:49 pm – Wash lettuce
This is bibb lettuce also known as Boston Bibb or butter lettuce. It is my lettuce of choice for these types of things though iceberg or romaine would work too. The reason I like this particular lettuce is that it is very tender, and has a really great flavour. If you can find it, definitely try it.
One special thing about bibb lettuce is that it comes with the roots still attached. The reason for this is the lettuce dies very quickly so, leaving the roots on keeps the lettuce alive in the store.
To clean this lettuce simply cut the root off and discard. Rinse the leaves under slowly running water then gently pat them dry with a paper towel.
12:53 pm – Rice Done
Chicken, done. Lettuce, done. And now, rice, done. Give the rice a stir and start plating.
12:55 pm – Sweet and Spicy Chicken Lettuce Wraps
Finally, put the lettuce down, put the chicken on top of it taco-style. Serve the rice on the side or right in the lettuce wrap with the chicken.
Conclusion
If you are looking for something a little light and really quick to kick your new year’s diet into high gear, this may just be it. Give it a shot.
Sweet and Spicy Chicken Lettuce Wraps
A new year a new you! What better way to kick off that new years diet than with some deliciously sweet and spicy chicken lettuce wraps?
Keyword: 30 minute meals, 30 Minutes or less, Asian Food, Butter Chicken, Chicken, chicken recipes
Servings: 4servings
Author: Chef Ben Kelly
Ingredients
1lbGround Chicken
1/2lg White Onion, Minced
3clovesGarlic, Minced
1/2Red Bell Pepper, Minced
4eaGreen Onionswhites and greens separate and diced
1tbspGrated Ginger
2tspChinese 5 Spice
1/2 tspRed Chilli Flakes
2tbspSesame Oil
3tbspSoy Sauceor GF Tamari
2tspRice Vinegaror white vinegar
2tbsphoney
1headBibb Lettuceaka Boston Bibb Lettuce
Salt to taste
1tbspSesame Seeds
Instructions
Heat a wok over medium-high heat.
Add the sesame oil along with the chicken and cook until the chicken is browned, stirring occasionally.
Once the chicken is browned and cooked through add in the onion, green onion (whites), and the garlic. Cook for 1-2 minutes or until the onions start to soften.
Next up add in the red bell pepper and red chilli flakes, cook for 1 minute then add in the Chinese 5 spice.
cook the spices for 1-2 minutes before adding in 1/4 cup of water along with the honey, soy sauce, and vinegar.
Turn the heat down and simmer for 4-5 minutes.
Add in the sesame seeds and the tops (greens) of the green onions.
Season to taste with salt.
Wash and pat dry the lettuce and serve with sticky rice.
It’s Monday! We all know what that means, 30 minutes or less! Today, we are going to take a look at how to cook Thai Curry Salmon with sticky rice in under 30 minutes. Let’s get to it.
3:50 pm – Getting Started
The first step is to get the rice going. For the rice I used, it is a 1:1.5 ratio of rice to water. I used 1 cup of sticky rice or sushi rice and 1 1/2 cups of water. This goes in a pot, gets brought to a boil, then simmered for 12 minutes. To finish the rice has to sit for 5 minutes. That’s it.
So, I got the rice going and I put a 10-inch non-stick pan on the stove over medium heat.
3:52 pm Vegetables
With the rice going and the pan heating up I got to work prepping the vegetables. I cut three green onions separating the greens and the whites. The whites I chopped into thumb width pieces. The greens I sliced thinly to be used for garnish later.
I thinly sliced half an orange pepper, (use whatever colour of pepper you would like) and 1 clove of garlic.
3:54 pm Salmon
By the time I was done cutting the vegetables my pan was hot. I added in 1 tsp of oil then the salmon.
3:55 pm Rice
When I put the salmon in the pan, the rice started to boil. I turned the heat down to simmer and put a lid on the pot. I set a 12-minute timmer and moved on to the next task.
3:56 pm Flip the Salmon
The salmon had been cooking for about two minutes and had a nice sear so I flipped to get a little colour on the other side.
3:57 pm Salmon out of the pan
I cooked the salmon for one more minute then removed it from the pan. Then, I added in the green onions, bell pepper, and garlic.
3:59 pm Peas
While the peppers and things were cooking I got to work prepping some snow peas. There is a thread the runs the length of the snow pea and it isn’t very good to eat. To get rid of it, I grabbed the top of the snow pea, broke off the very end and pulled down. After I did this to all the snow peas I cut them into thirds.
4:00 pm Ginger
I added the snow peas into the pan along with 1 tsp of grated ginger.
4:01 pm Curry Paste
Next up, I added in 2 big tablespoons of Thai Red Curry paste. I cooked the curry paste for about 1 minute.
4:02 pm Coconut Milk
Next up, I added 1 cup of coconut milk into the pan. I brought this to a boil then added the salmon back into the pan and turned the heat down to a simmer.
4:04 pm Cilantro and Green Onions
While the salmon is simmering I cut up about 2 tbsp of cilantro and the tops of the green onions.
4:05 pm Flip the salmon
After the salmon cooked for about 3 minutes, I flipped it over to cook it evenly.
4:08 pm Rice
At 4:08 pm the rice had been cooking for 12 minutes and was ready to be taken off the heat and left to sit for 5 minutes. I flipped the salmon once last time and removed it from the heat.
4:09 pm Finish the Salmon
To finish the salmon with the juice of 1/2 a lime along with the cilantro and green onions.
4:13 pm Thai Curry Salmon
At 4:13 pm the rice was ready and the salmon was done. That means dinner was ready.
Conclusion
This was a really quick meal that just about everyone will love. All told this took me about 23 minutes. Even if this takes you a little longer you are still going to have a delicious meal in very little time. Give it a shot.
We use cookies on our website to give you the most relevant experience by remembering your preferences and repeat visits. By clicking “Accept”, you consent to the use of ALL the cookies.
This website uses cookies to improve your experience while you navigate through the website. Out of these, the cookies that are categorized as necessary are stored on your browser as they are essential for the working of basic functionalities of the website. We also use third-party cookies that help us analyze and understand how you use this website. These cookies will be stored in your browser only with your consent. You also have the option to opt-out of these cookies. But opting out of some of these cookies may affect your browsing experience.
Necessary cookies are absolutely essential for the website to function properly. This category only includes cookies that ensures basic functionalities and security features of the website. These cookies do not store any personal information.
Any cookies that may not be particularly necessary for the website to function and is used specifically to collect user personal data via analytics, ads, other embedded contents are termed as non-necessary cookies. It is mandatory to procure user consent prior to running these cookies on your website.