Panna Cotta is a classic Northern Italian Dessert made of cream and sugar set with gelatine. It is the perfect summer dessert because it is easy to make, it’s served chilled and is surprisingly refreshing. Despite its reputation as a “Classic Italian Dessert” the origins of Panna Cotta are unclear, of course, that doesn’t matter, it tastes good no matter where or when it comes from.
If you have never had Panna Cotta it may seem kind of odd, I mean it’s essentially milk jello. However, I promise it is way better than it seems like it should be. The milk/cream is flavoured with vanilla (and optionally rum or brandy) and sweetened with sugar. It is really delicious! Let’s take a look at how to make it.
This is…
How To Make Panna Cotta
Panna Cotta Ingredients
One of my favourite things about this panna cotta recipe is that there are only 7 ingredients in it. The ingredients are cream, milk, sugar, a vanilla bean, a pinch of salt, water and gelatine.
I use whole milk to make this because I find the higher fat content is good for the texture but you can use 2% if you would prefer. I wouldn’t use skim milk as it will be too watery. Definitely use whipping cream for this as opposed to half and a half or whatever else. Like the higher fat milk, the cream is important for the texture of the panna cotta.
Getting Started
To get started measure the milk, cream, and sugar into a medium-sized heavy bottom pot. Slice the vanilla bean down the middle lengthwise and add into the pot along with a pinch of salt. Put the pot on the stove and bring to a boil over medium heat, whisking occasionally.
Blooming the Gelatine
While the dairy is coming to a boil take a minute to bloom the gelatine. Pour 1/2 a cup of cold water into a medium heat-proof bowl. Sprinkle two packages of gelatine over the water and mix in. Let the gelatine bloom for at least 2 minutes.
Blooming the gelatine is an important step to ensure a smooth consistenttexture. Essentially, the gelatine granules absorb the cold water and enlarge. This allows them to break down and dissolve into the hot milk (or whatever liquid) much easier and more efficiently.
Dairy meet Gelatine
Once the milk mixture comes to a boil remove it from the heat and slowly whisk it into the gelatine. Remove the vanilla bean and the mixture is ready to chill.
Chilling the Panna Cotta
I like to transfer the panna cotta mixture into a measuring cup with a spout to make it easier to pour into the ramekins. Next, divide the panna cotta amongst 6-8 ramekins depending on the size. Cover the ramekins with plastic wrap making sure to press it right down to the surface of the panna cotta. If there is an air gap between the surface of the panna cotta and the plastic wrap a firm rubbery film will form which isn’t very pleasant.
Once all the Panna Cottas have been wrapped put them in the fridge to chill for at least 3 hours. I prefer to let them chill overnight. This allows the flavour to develop a little more and the texture to set a bit more.
Panna Cotta
A classic Vanilla Panna Cotta Recipe perfect for Summer
Combine the milk, cream, sugar, and salt in a medium pot.
Spilt the vanilla bean down the middle and add to the milk mixture.
Put the pot on the stove over meidum heat until the milk comes to a boil, whisking occasionally.
While the milk is heating pout the water into a medium-sized heatproof bowl. Sprinkle the gelatin over the water, mix, and let sit for at least 2 minutes.
Whisk the hot milk mixture into the gelatin then pour the mixture into ramekins, cover tightly with plastic wrap and refrigerate for at least 3 hours, overnight is better.
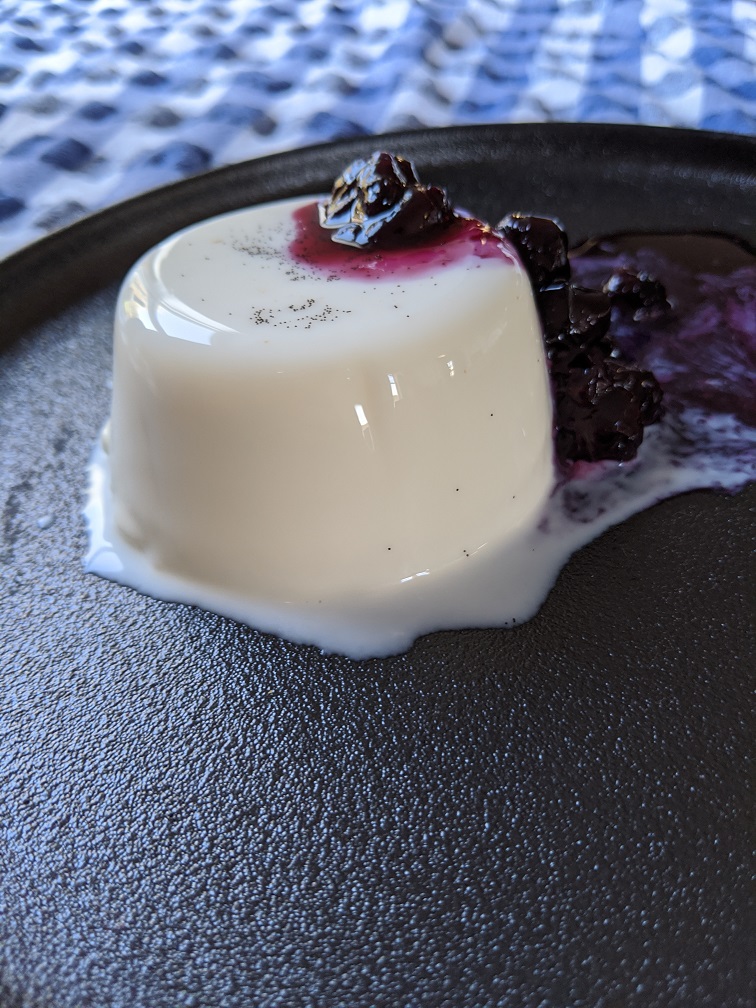
To unmold the panna cotta, dip the ramekin in hot water for 10 seconds, run a knife around the inside edge of the ramekin and invert onto a plate. Tap gently until the panna cotta releases. Serve with blueberry sauce or a fruit preserve.
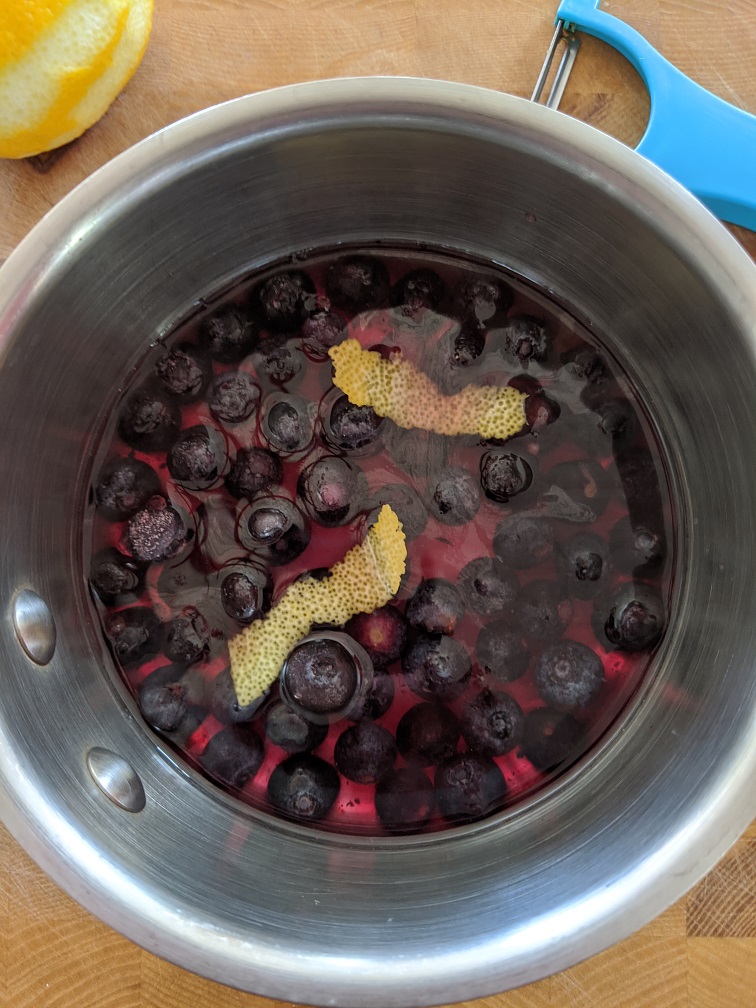
I like to serve the panna cotta with a sauce of some sort although this isn’t really necessary. I decided to make a quick blueberry sauce. This sauce is also great on pancakes, ice cream, or a spoon. To make it I just combine all the ingredients (see the full recipe below) in a pot, bring to a boil and cook for 5 minutes then chill. That’s it.
The final step for the panna cotta is to unmold it. To do this dip the ramekin in hot water for about 10 seconds, then run a knife on the inside edge. Invert the ramekin onto a plate and give it a giggle until the panna cotta releases. Top it with a bit of the sauce and serve.
Conclusion
Panna Cotta should be firm but not rubbery, it should pretty much melt on your tongue. The flavour should be light and slightly sweet with a hint of vanilla. Use this recipe as a base and play with it a bit. You can add chocolate, booze, or all kinds of other things. Give it a shot!
I hope you enjoyed this post in my Simple Summer Dessert Series. Check out last week’s post; Bananas Foster. Remember to share this post and subscribe to the blog so you never miss a post again. Thanks for reading and have a great Wednesday!
It was only a few years ago that I first had Bananas Foster. I’d never heard of it until someone requested it as a special dessert for a dinner and so I first made it at home so that I knew what I was doing. It was such a delicious and simple dessert that I immediately fell in love with it. Because of the simplicity of this dessert, I thought it was perfect for my Simple Summer Dessert Series. To me, this is like an adult banana split. There are bananas, ice cream, sugar, and rum. What else do you need?
Okay, enough chit chat, let’s get to it.
This is how to make…
Bananas Foster
Getting Started
I have found that for bananas foster it is best to use bananas that are slightly under-ripe. They don’t need to be completely green, but if they are too soft they will dissolve while being cooked.
To get started, peel the bananas, and cut into quarters. Once that’s done put a medium-sized pan on the stove over medium-high heat.
The Butter
Once the pan has had some time to heat up, about two minutes, add in 1 tbsp of butter. Let the butter melt and start to foam before you add in the bananas.
Cooking The Banana
Once the butter starts to foam add the bananas into the pan flat side down. Cook for about 1 minute then flip over.
Making the Sacue
After the bananas are flipped add in 2 tbsp brown sugar, cook for about 30 seconds then add in 2 oz of dark or spiced rum. Very carefully use a barbecue lighter to light the rum on fire. Please be careful. Make sure that there is nothing around the pan that is going to catch on fire, including your face. Once the flame burns out, the bananas are ready.
If you’d like you can add a bit of cinnamon into the dessert. It is best to sprinkle the cinnamon over the flames from the rum. This gives the cinnamon a really nice toasted flavour.
Finishing the Dessert
Serve the bananas with vanilla ice cream. That’s it, I told you it was pretty simple.
All I can really say about this dessert is that it is absolutely worth making. It comes together so quickly and tastes so amazing. Give it a shot!
Thank you for reading and as always remember to subscribe to the blog so you never miss a post again. Remember sharing is caring. If you enjoyed this post share it!
Last week I finished my Basic cooking course and in that final post I said that I was going to be taking a bit of a break from doing a series, but then I had an idea. I thought it would be fun to do something I really haven’t touched on here on the blog; desserts. For the next ten weeks I will be dedicating every Wednesday’s post to Simple Summer Desserts.
I will be covering a variety of desserts in this series. Some will be new twists on old favourites some may be ones you’ve never seen, and some may be desserts that you have always wanted to try (or wanted to make) but you just never got around to it. I hope that you are looking forward to this as much as I am.
Today, we are going to look at how to make Chocolate Pot De Créme. Let’s get to it!
This is how to make…
Chocolate Pot De Créme
What is pot de créme?
A pot de créme is French custard dessert. Generally, pot de créme is made in the same way as other custards starting with beaten eggs to which hot cream and flavourings are added. This mixture is then baked in a water bath until the eggs set.
The version that we are going to look at today is not a true pot de créme. Our version is made as a loose ganache. Meaning hot, flavoured cream is poured over chocolate which is then cooled to set. The key to this is the ratio of chocolate to cream. The more cream, the looser the ganache will be. For a more traditional pot de créme recipe check out this one from Epicurious.
The reason our pot de créme is made differently than traditional versions is for simplicity. The recipe we are going to look at today takes about ten minutes to make, plus time to cool. The traditional version takes much longer. Also, when making traditional custard there is always the chance that the custard may split if the heat is too high or something isn’t mixed well enough. That will not happen with our ganache version.
Okay, let’s take a look.
Making the pot de créme
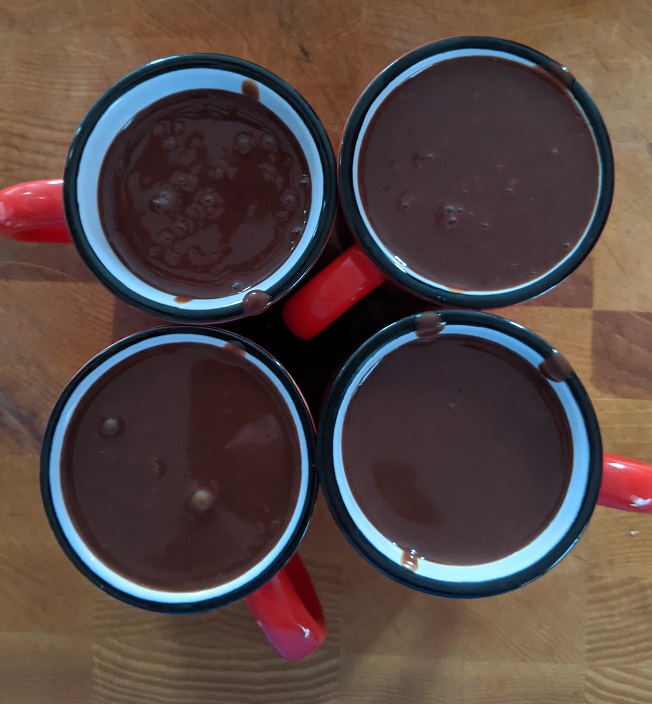
The first step in this recipe is to combine some cream with sugar, instant espresso powder, vanilla, and a pinch of salt and bring it to a boil. While the cream is heating, break up some semi-sweet chocolate and put it in a heatproof bowl. Once the cream comes to a boil, pour it over the chocolate and let it sit for about three minutes then whisk until all the chocolate is melted and the mixture is smooth. The final step is to pour the chocolate mixture into some dishes and let it cool in the fridge.
Instant espresso powder can be found in coffee section of the grocery store. It is fantastic for things like this or flavouring butter cream. It is a great baking ingredients to have around.
There is not much to this recipe. However, top it with a little whipped cream and a chocolate covered coffee bean and you have something truly decidant. Give it a shot for yourself. The full recipe is below. Enjoy!
P.S. This also makes a great frozen dessert.
Chocolate Pot De Créme
A simple and delicious ganache based pot de créme recipe.
Once again that special day to celebrate the one you love is upon us. I know that a lot of you are planning on avoiding the busy restaurant scene this year in favour of having a nice meal in. Some of you are even lucky enough to have me cooking your Valentine’s dinner for you (thank you!). I think that’s a great idea to avoid the regular downtown restaurant scene and I want to help. This morning I am going to show you how to make a very quick, very simple, very delicious Valentine’s Day dessert. Specifically, we are going to take a look at how to make no-bake strawberry cheesecake cups.
Okay, let’s take a look at my…
QUICK AND SIMPLE NO-BAKE STRAWBERRY CHEESECAKE CUPS
Ingredients
One of the great things about these no-bake strawberry cheesecake cups is that they are made of only seven ingredients. The ingredients are cream cheese, whipping cream, sugar, vanilla, lemon zest and juice, graham crackers (I used kinnikinnick gluten-free graham crackers), and strawberries. That’s it. For full measurements check out the recipe at the bottom of this post.
One important thing to keep in mind here is that you want the cream cheese to be at room temperature. If you are in a rush you can microwave the cream cheese for 30-45 seconds.
Making the no-bake strawberry cheesecake
The first step in making these no-bake strawberry cheesecake cups is to beat half the block of cream cheese until it is nice and smooth. The rest of the cream can be wrapped and put in the fridge for another use. It should only take 1-2 minutes of beating to get smooth. Again, make sure the cream cheese is at room temperature.
Once the cream cheese is nice and smooth add in the cream and beat until it is fully incorporated into the cheese. Next up add in 2 tbsp of sugar, the zest and juice of half a lemon, and 1 tsp of vanilla extract. Beat the mixture until it is fully combined and has a nice light texture. Set aside.
Cream Cheese
Strawberries
With the cheese mixture done and set aside you can hull (remove the stems) from the strawberries and cut them into quarters. When hulling strawberries it is easiest to use a paring knife. Stick the tip of the knife into the strawberry about 1 cm on a 45° angle. Put your thumb in the center of the stem and turn the strawberry 360°. The hull should come right off.
Putting it all together
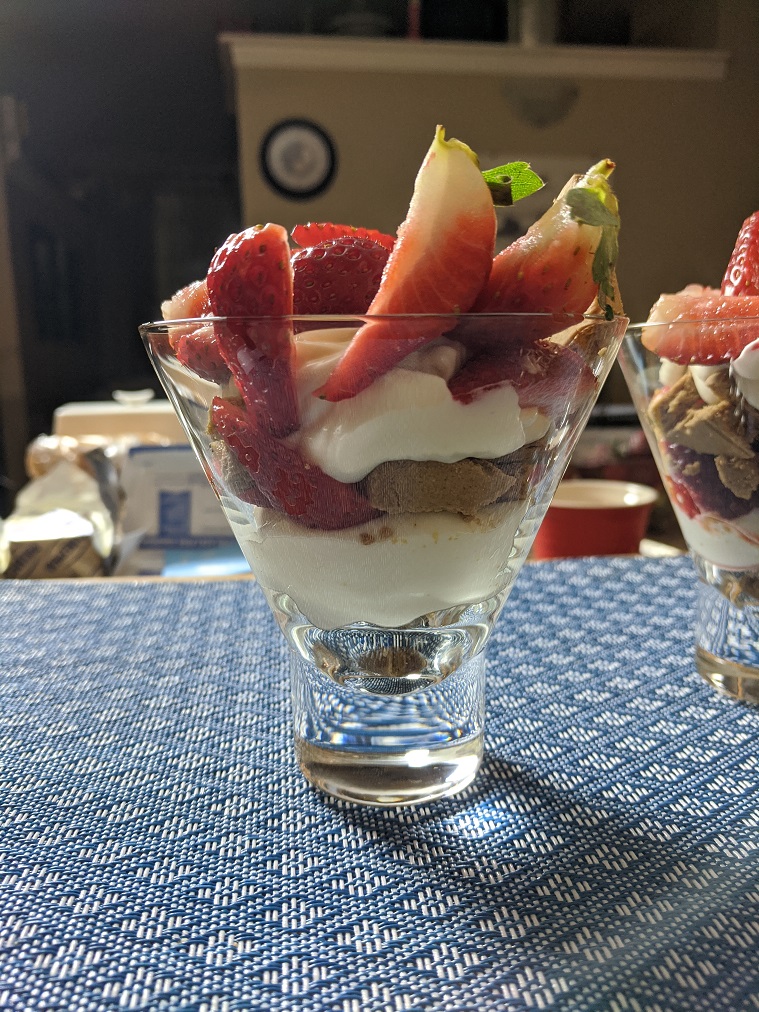
To assemble the no-bake strawberry cheesecake start with two empty martini glasses, ramekins, rocks glasses, or whatever you would prefer. Break one of the graham crackers in half and break each half into small pieces into each of the glasses. Top the graham crackers with a spoonful of the cheese mixture, then some strawberries. Repeat this process once more.
I garnished my glasses with a strawberry with the stem still on and a graham cracker. You could also top this with some whipped cream and a sprig of mint. If you want to get really crazy shave some chocolate over the top using a vegetable peeler.
Once the dessert is assembled put it in the fridge for at least 20 minutes. If the dessert will be in the fridge for longer than a few hours wrap it with plastic.
Conclusion
I try very hard not to say that things are easy on this blog for a lot of reasons. The main reason being that easy is a relative term based on skill level and knowledge. However, this is very easy. Not only that, it is really delicious and well worth the few minutes it takes to make it. I promise, whoever your sweetheart is, they will be really happy with you for making them this.
Happy Valentine’s Day Everyone!
No-Bake Strawberry Cheesecake Cups
A very quick, very easy, very delicious dessert for your Valentine's Dinner
I don’t often talk about baking on this blog. In part because I don’t really enjoy baking. As you all know I also can’t eat gluten which makes baking even more difficult. So, when I do make desserts I prefer ones that aren’t baked.
Today I thought that since we never talk about desserts it was high time. So I decided to put together a list of no-bake desserts that I love to eat and make. These are all desserts that I have made at home and at dinner parties, and they will please just about everyone you serve them too. Being no-bake, they are also great for the summer as they don’t heat your house up too much.
So, without further ado, this is my
Number 5 – Strawberry Cheese Cake Cups
Okay, let’s talk about these little guys. Regular cheesecake is made by mixing cream cheese with eggs, sugar, and vanilla. The mixture is then poured over a graham cracker crumb base and baked. Once cooked it is cooled and topped with strawberry jam or something like that.
Similar to the original, this no-bake strawberry cheesecake is made by whipping together cream cheese, sugar and vanilla and a little bit of whipping cream. The cream thins out the cream cheese just enough that it can be squeezed through a piping bag.
This cheese mixture is then layered with fresh or macerated strawberries and graham cracker crumbs. This gives all the elements and flavours of cheesecake without the need for baking and in a fraction of the time. Portioned individually they make a great dessert for a party or large get-together.
No-Bake Strawberry Cheesecake cups
A quick and delicious no-bake dessert, great for parties
1 cupgraham cracker crumbsgluten-free if preferred
1 pint Strawberries washed, dried, and sliced
1/2cupWhipping Cream(more may be needed)
Instructions
Cut the cream cheese into small pieces and place in the bowl of a mixer with the paddle attachment.
Add the sugar, vanilla, lemon zest and juice and beat on medium speed for about two minutes.
Add in the cream in a slow steady stream.
Once all the cream is incorporated turn the mixer to high and beat until light and fluffy.
Put the cheese mixture in a piping bag and allow it to chill in the fridge for 30 minutes.
set up 6 equal-sized cups or ramekins.
Place a few sliced strawberries in the bottom of the cup, top with graham cracker crumbs, and a layer of the cheese mixture. Repeat for two more layers, finishing with a layer of cheese and strawberries.
Lemon curd is one of my all-time favourite desserts. It has such a bright, fresh flavour that it is great to finish almost any meal. Lemon juice and zest, cooked with eggs, butter, and sugar. What could be better?
I have talked about lemon curd here before and shared this recipe from Epicurious. It is the recipe I use and so I am going to share it again. It couldn’t be simpler.
Number 3 – Bananas Foster
Bananas Foster is a dessert that originates in New Orleans. It is bananas cooked in caramel doused in rum, lit on fire, sprinkled with cinnamon, and served with vanilla ice cream. Yeah, I’m drooling too!
To make this dessert you first make caramel with brown sugar and butter. Take about 1/2 cup of brown sugar and 2 tbsp of butter and put them in a heavy-bottomed pan over medium heat. Once the butter and sugar melts and starts to bubble add in 2 bananas that are peeled sliced in half lengthwise and widthwise. Start the bananas flat side down, cook for about 30 seconds, flip and cook for 30 more seconds. Now add in 1 oz of rum, stand back and light it on fire. While the flames are still burning sprinkle over 1/2 tsp of cinnamon. Serve with vanilla ice cream as soon as the flames burn out.
Number 4 – Chocolate Mousse
You guys know I love Julia Child. I talked about it last week. Well, I have yet to find a chocolate mousse recipe that is better than hers. So, that is the recipe I use.
Chocolate mousse is like the most decadent chocolate pudding you will ever have. Chocolate is melted with espresso, mixed into egg yolks that have been beaten with sugar, and then enlightened with whipped egg whites. The mixture is left to chill and set and what you get is the richest, chocolatiest dessert known to man. The kicker is it isn’t difficult to make. Yes, there is some skill involved, and it takes a bit of time, but the effort is well worth it.
Do yourself a favour and make this at least once in your life.
Number 1 – Tiramisu
The word Tiramisu literally means “pick me up” in Italian. The name is likely due to the amount of coffee, brandy, and sugar, in the dessert and the little jolt of energy you get after eating it. So, what exactly is Tiramisu?
It starts with a mousse. Similar to the chocolate mousse we just talked about except this version is made with mascarpone cheese. The cheese is mixed with vanilla, egg yolk, sugar, and a touch of brandy, then whipped until it is light. The egg whites are then whipped to soft peaks and folded into the yolk mixture to make a light mousse.
To make the Tiramisu, ladyfinger cookies are dipped in a mixture of hot espresso, sugar, and brandy, and layered with the mousse. The top layer of the cheese mousse is then sprinkled with cocoa powder. The dessert is then put in the fridge to set for a few hours.
While the tiramisu is in the fridge something magical happens. The cookies soften and form a moist cake-like layer. This is juxtaposed by the delicate airiness of the mousse. Finally, it is all tied together by the bitterness of the cocoa. Amazing!
Dessert doesn’t have to be really complicated, it doesn’t have to heat your house, and it can still be amazing. All of these are examples of no-bake desserts that will blow your family and friends away and every one of them can be made gluten-free (use gluten-free cookies for the tiramisu).
I highly suggest that you pick at least one of the desserts from this list and make it at least once. You will be so happy that you did.
As always, thanks for reading and have a great weekend!
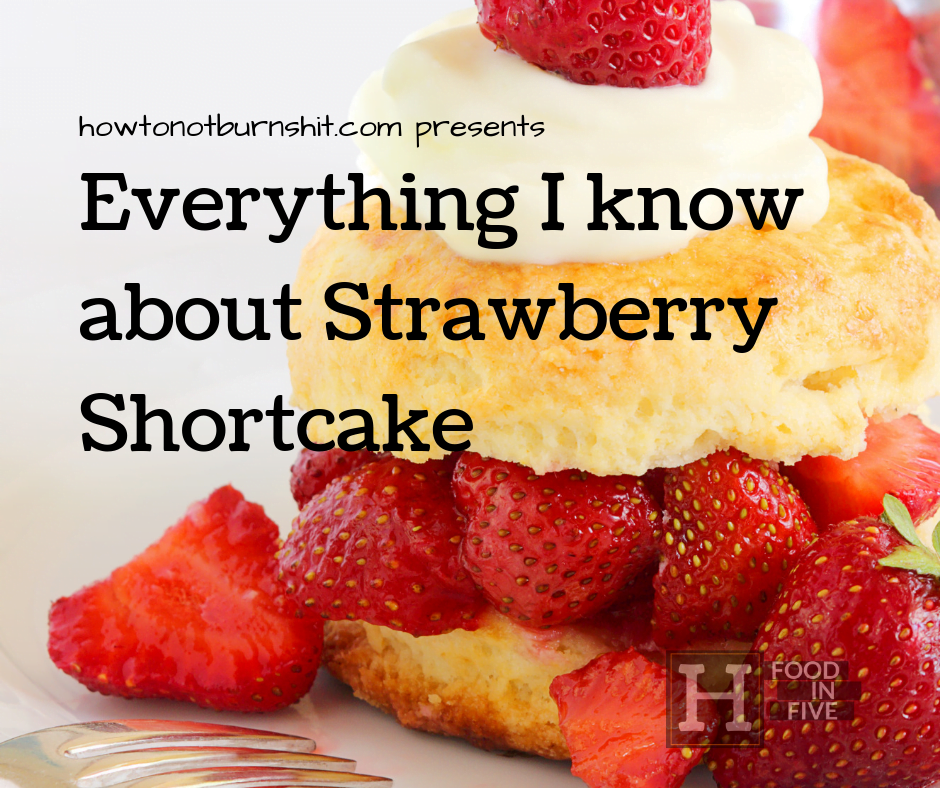
It’s that time again! Fresh local strawberries are appearing on grocery store shelves and at farmers’ market stalls. That can mean only one thing; it’s strawberry shortcake time!
I know that we are fortunate enough to live at a time when we can buy “fresh” strawberries all year round. But, I think we can all agree that the strawberries we buy in January are not the same as the berries that we can buy now. There is no comparison. Fresh local in-season strawberries actually taste like strawberries. And, they are way cheaper than they are in January. Take advantage of them.
Strawberry shortcake comes in many different forms. But, all forms have three basic elements; some kind of cake or biscuit, whipped cream, and of course strawberries.
Today I am going to break down the fundamentals of strawberry shortcake, share with you my little secret additions, and hopefully inspire you to get out there and fill your belly up with amazing strawberries while you still can.
Are you ready? Because this is…
Everything I know about Strawberry Shortcake
Shortcake
What exactly is a shortcake?
Shortcake is a sweet cake or biscuit. Most commonly the shortcake part of strawberry shortcake is either yellow sponge cake or a sweetened tea biscuit. However, there are some versions that also use rounds of pie crust or crumbled pieces of pie crust.
The word “short” in shortcake doesn’t refer to height but rather the consistency of the crumb of the cake or biscuit. Shortcakes have a more crumbly texture than regular cakes and biscuits.
Cake or Biscuit?
I’m sure we have all had those little yellow cakes you can buy in a six-pack at the grocery store. Let’s be honest, they make a pretty good strawberry shortcake. However, for my money, I prefer a fresh tea biscuit over sponge cake any day.
I find that a tea biscuit holds its structure better than a sponge cake. And, it feels a bit more substantial. I know that some people feel that tea biscuits are a little too firm and would rather the soft texture of the cake. But, that is why I always suggest warming the biscuits to soften them. I will also often drizzle some strawberry juice over the biscuit before topping it with the strawberries. This helps to soften it and adds a bit of extra flavour.
In all honesty, whether you decided to use a tea biscuit or sponge cake is really a matter of personal preference. There is no right or wrong answer. Just make sure that whatever you are using is good quality and everything will be good.
Strawberries
The strawberries for a strawberry shortcake are most commonly macerated. What that means is that the berries are sliced, tossed with a little sugar, and left to sit for about an hour. As the berries sit the sugar draws moisture out of them creating a syrup. This a classic way, and a fantastic way to prepare the berries. And, most of the time this is what I do as well but with a few adjustments.
Often I will add a few leaves of mint and let those sit with the berries. I take them out before I serve the dessert. This imparts a very light mint flavour to the berries. I will also occasionally add some strips of lemon zest to the berries as they are macerating which has the same effect as the mint leaves.
Some other possible additions to the berries are a little thyme. Yup, you read that right. And even a little balsamic vinegar.
One of my personal favourite things to do with the berries is to actually add a little Sprite or Gingerale to them along with the sugar. This creates a bit of extra syrup but also adds extra flavour. For a pint of berries, I would use about 1/4 cup Sprite or Gingerale and 2 tbsp of sugar. I often also use a few mint leaves along with the pop to really jack the flavour up.
When spooning the berries over the biscuits make sure to add a bit of the extra syrup. Your guests won’t know what they are tasting, but they will know they like it.
Whipped Cream
When most people make whipped cream they will add a bit of sugar and a bit of vanilla whip it and stop. That’s good. That makes a delicious cream, just don’t over whip it. But, there is an oportunity to add a bit of extra flavour, so why not?
I like to add a bit of additional flavour to the cream by adding a bit of finely grated lemon zest, minced crystallized ginger, a little brandy, or even a little bit of the strawberry syrup. The minimal effort involved in doing this will be paid off tenfold by the additional WOW factor the comes with that hint of flavour.
When whipping cream it is extremely important not to over whip it. Really, for this application, you only want to whip it to the point that it holds its shape. Any more than that and you are making the cream denser and taking away that lighter than air texture. Once the cream is whipped, gently fold in any additional ingredients and serve.
If you are still using cool whip or canned whip cream it is time to stop. Whipping cream is not that expensive. Whipped cream is not that hard to make. And the difference in quality and eating experience is a thousand times different.
Conclusion
Strawberry Shortcake is one of the most classic and delicious summer desserts. But, making it the same way over and over can get boring and even tedious. Mix it up, try new things. You never know how good something can be, and how much you may love it until you try it.
Thanks for reading and remember to subscribe so you never miss a post. Also, if you enjoyed this post please like and share.
Everyone loves dessert. There is nothing like having that little pop of sweet after a delicious meal to tie it all together. But during the week, that little bit of sweet can seem like a big effort. I mean who has time on a Tuesday to bake a cake?
On the flip side, store bought desserts and sweets can be expensive. Of course, they are also loaded with crap that you would don’t want to eat or feed to your family. But, there is another way to get that sweet fix.
Today, I thought I would share with you my five favourite throw-together dessert that are perfect for any weeknight.
Let’s take a look…
Yogurt, and honey
This very simple dessert out of the Middle East is exactly what it sounds like. Plain yogurt, drizzled with honey and topped with chopped pistachios.
It sounds a little too simple. Kind of boring. Maybe even sort of gross. Try it. Seriously.
I also like to add a pinch of ground cardamom to the yogurt. Just a pinch goes a long way and really compliments all the other flavours.
To make this all I do is put about 1/2 cup of yogurt in a cup that I have mixed with a small pinch of ground cardamom. Then I drizzle the yogurt with 1-2 tbsp of honey, depending on how sweet I want it. Finally, I top it with a small handful of chopped, salted pistachios. I’m drooling just thinking about it.
This will satisfy that sweet craving. It also works really well as a refreshing snack on a hot summer afternoon.
Lemon Curd
Lemon curd is one of those things that seems really complicated but actually isn’t. Epicurious has an amazing lemon curd recipe that only takes about 10 minutes to put together. The only kicker is that it has to cool for about an hour. But, if you make it while you’re making the rest of your dinner, by the time you eat and get the dishes done, it will be ready to go.
I like to serve it with a dollop of whipped cream, and some fresh raspberries.
You can find the recipe from epicurious right here.
Sautéed Bananas with Caramel
This is such a delicious dessert. To make it you just need a few firm bananas, some vanilla ice cream, a bit of brown sugar, and some butter. You can also add a bit of rum or bourbon to this.
To make it get a frying pan hot over medium heat. Add 1 tbsp of butter. Once the butter starts to foam add bananas that have been peeled, sliced in half length wise, and then split down the middle. Put them in the pan flat side down.
Let the bananas cook for a minute or two browning the under side. Flip the bananas, and sprinkle 1/4 cup of brown sugar into the pan along with 1-2 more tablespoons of butter. If you are using alcohol add it before the sugar and butter and cook it for a minute to get rid of the alcohol flavour.
Once the sugar has formed a caramel, about four to five minutes, remove from the heat, let cool for a minute or two and then serve over vanilla ice cream. I like to top it with crushed peanuts.
Crumbles
Crumbles take a bit of time to bake, but no time to put together. If timed properly, just like with the lemon curd, by the time dinner is over and the tidying is done, the crumble should be cooked and cooled enough to eat.
You can even speed up the cooking time by making the crumbles in ramekins.
You can check out my post about crumbles here for more information about them.
Berry and Cream Cups
This can be as simple as putting some berries in a cup and topping with whipped cream. Or you can do things a little different and marinated/macerate the berries in ginger ale or simple syrup with mint.
You can layer the berries and cream with cookies similar to a trifle. You can even just finish it with some graham cracker crumbs for a little crunch.
No matter how you make it, this is guaranteed to please.
Conclusion
When we think of dessert we often think of cakes and pies. Those are delicious, but they aren’t the only option.
I hope you walk away from this realizing that you can have a nice, delicious dessert any night of the week. It’s doesn’t have to take a lot of time or effort to satisfy that sweet craving after a delicious meal and a hard day.
Did you know that you can get this blog in audio form? Listen here or search “Food In Five” wherever you find your podcasts.
A crumble is a baked dessert with a fruit base and an oat topping. The fruit can be any number of things from apples to pears, peaches to blueberries.
I love crumbles for three main reasons. They are easy to make. They’re versatile. And, they are delicious.
As I said, a crumble is made up a fruit base and a oat topping. That’s really it. So, let’s take a look at these two elements separately and then we can put them together.
The Oat Topping
The topping of a crumble is really what gives the dessert it’s name. It is a “crumble” topping. Which is essentially just a light granola.
The base of this topping is oats, brown sugar, flour, and butter. To this, seasonings like cinnamon and nutmeg are often added as well as a pinch of salt.
A quick Google search of apple crumble recipes will show you that there is no one way to make a crumble. Every site has different recipes and different ratios. My preference is three parts each of oats and flour (I always use gluten-free for both), four parts brown sugar and then two parts butter.
Ratios
If you don’t fully understand the ratio here is how it may look for a large pan of crumble:
3/4 cup oats
3/4 cup flour
1 cup brown sugar
1/2 softened butter
For smaller pans of crumble the ratios stay the same but the volumes change.
1/4 cup + 2 tbsp oats
1/4 cup + 2 tbsp flour
1/2 cup brown sugar
1/4 cup of softened butter
This second formula looks a bit odd. So what’s important to keep in mind is that this doesn’t have to be perfect. If you add a little less oats and flour or a little more it’s not going to make too much of a difference. With that in mind you could easily change the above recipe to:
1/3 cup oats
1/3 cup flour
1/2 cup brown sugar
1/4 cup softened butter
In this formula the ratio of oats and flour to sugar and butter is slightly off. However, it’s not going to have that much of an effect. That’s another reason why I love crumbles. Precision isn’t necessary.
Other Ingredients
To the basic crumble recipe spices like cinnamon and nutmeg can be added. So to can a bit of lemon or orange zest and of course, a pinch of salt. The amounts of these ingredients really comes down to personal preference. Generally, for a full batch of crumble I would say:
1/2 a tsp of cinnamon
1/8 tsp of nutmeg
a pinch of salt.
If opting for citrus zest, use zest from half the fruit. For the smaller portion, half all the ingredients.
How to make the crumble topping
Making the topping is a fairly straight forward process.
Put all the ingredients in a bowl and using your hands rub the mixture together, or use a pastry blender.
Do this until all the butter has been incorporated.
As the name suggests, the topping is going to be crumbly.
Wrap the bowl and put the crumble topping in the fridge until you are ready to use it. It can sit in the fridge for a few days, and freezes well.
The Fruit Base
The base of the crumble is made of fruit that is usually tossed with a mixture of cornstarch, spices, and sugar. The fruit, as I said in the opening can be almost anything. And again, that’s what makes this dessert so great.
Cornstarch
The reason we put cornstarch in the fruit base is because it captures the juices that come out of the fruit and thickens it into a sauce. Flour can be used to do this but I find cornstarch much for effective.
The amount of cornstarch you use is determined by the size of the crumble you are making and the fruit you are using. Peaches and blueberries are going to require more cornstarch than an apple as they have a higher moisture content.
For a full sized apple crumble I would likely only use 2-3 tsp of cornstarch where I would use 1-2 tbsp for blueberries.
Keep in mind the more cornstarch you added the thicker the sauce for your fruit crumble will be and the more the fruit will stay together.
Sugar
Often a bit of sugar is added to the fruit. This has three purposes.
It obviously adds sweetness.
It will lightly caramelize while cooking which will add to the sauce.
It will draw more moisture out of the fruit providing more sauce.
The amount of sugar you use is largely based on personal preference. However, I suggest going fairly light here. You don’t want the fruit to be too sweet. 2 tbsp for a large crisp and 1 tbsp for a small crisp should be plenty.
Seasonings
Just like with the topping, a bit of cinnamon and nutmeg can be added for flavour. However, it is important to remember that if you are adding spices to both the base and the topping of the crumble they can very quickly become overpowering.
I suggest either only using spices in the topping or the base but not both. Of course you can spice both just go light on it.
Citrus
For fruit like apples and pears a bit of lemon juice is often added to prevent the fruit from oxidizing while you are working with it. It also adds a bit of acid which will make the flavour “pop”. I always like to add a bit of citrus zest and juice to my fruit base for this purpose.
Basic Fruit Base Recipe for a large crumble
4 cups of fruit (blueberries, peeled and sliced apples or pears, peaches, or strawberry and rhubarb)
2 tbsp sugar
1-2 tbsp cornstarch (more for wetter fruits like blueberries and ripe peaches)
zest and juice from 1/2 a lemon
1 pinch of cinnamon
1 pinch of nutmeg
All these ingredients get tossed together until the fruit is evenly coated.
Putting the crumble together
To put the crumble together you first want to butter a 9 x 13 inch casserole dish. Add the fruit mixture to the dish and spread evenly. Cover the fruit with an even layer of the crumble topping.
Baking the Crumble
The optimal cooking temperature for crumbles seems to be about 375°f. This temperature allows the fruit to cook without burning the topping. The crumble is going to need to bake for between 40 and 60 minutes.
Once the fruit is soft, the edges are bubbling, and the crumble is golden brown it can be taken out of the oven.
It’s best to place the crumble on a sheet pan in the oven. This will collect any overflows that may occur during cooking.
It is best to let the crumble cool for 15 – 45 minutes before serving it. This will give the sauce time to set a little bit.
Serve the crumble with vanilla ice cream or whipped cream.
Conclusion
I can’t emphasize enough how great this dessert is. It works all year round and will always please. It can be made in a big dish or even individual portions and frozen.
If you haven’t really played around with crumbles, you should. They will be your new go-to dessert.
We use cookies on our website to give you the most relevant experience by remembering your preferences and repeat visits. By clicking “Accept”, you consent to the use of ALL the cookies.
This website uses cookies to improve your experience while you navigate through the website. Out of these, the cookies that are categorized as necessary are stored on your browser as they are essential for the working of basic functionalities of the website. We also use third-party cookies that help us analyze and understand how you use this website. These cookies will be stored in your browser only with your consent. You also have the option to opt-out of these cookies. But opting out of some of these cookies may affect your browsing experience.
Necessary cookies are absolutely essential for the website to function properly. This category only includes cookies that ensures basic functionalities and security features of the website. These cookies do not store any personal information.
Any cookies that may not be particularly necessary for the website to function and is used specifically to collect user personal data via analytics, ads, other embedded contents are termed as non-necessary cookies. It is mandatory to procure user consent prior to running these cookies on your website.