Pasta Con Broccoli is a simple pasta dish made with broccoli, lemon, crushed red pepper, garlic, and parmesan. As with most pasta dishes, it’s the simple ones, the ones with a handful of ingredients, that are the best. And this recipe for Pasta Con Broccoli is no exception. The pop of flavour from the lemon and red pepper brings the broccoli to life and makes this the kind of dish you’ll return to. So, what are we waiting for? Let’s get to it!
Preparing The Broccoli
In total, you want four cups of broccoli florets. I’m sure you could use frozen broccoli for this, but I opted for fresh as it is the middle of summer, and this stuff is everywhere. When cutting broccoli or cauliflower, cut from the bottom. Only cut through the stem to prevent a big mess and keep your florets intact. Cut the broccoli into bite-sized pieces. Bring a large pot of salted water to a boil, add the broccoli and cook for four minutes. Scoop the broccoli out of the water and set it aside. Save the water and use it for cooking your pasta for a little extra flavour.
Additional Pasta Con Broccoli Ingredients
Other than the broccoli and pasta, the ingredients for this recipe are crushed red pepper flakes, thinly sliced garlic, salt, parmesan cheese, butter, and olive oil. See the recipe at the end of this post for the measurements. Organize the ingredients before making the pasta because things will happen quickly once you get going.
Cooking The Pasta Con Broccoli
Bring the large pot of water back to a boil and set a timer according to the instructions on the package. Once the timer hits five minutes, put a large skillet on medium-high heat. Let it heat up, then add the olive oil and butter. Once the butter starts to foam, add the garlic. Cook for one minute, add the crushed red pepper flakes and cook for another thirty seconds. Put the broccoli in the pan, and sauté for two minutes. Add a cup of the pasta water and the lemon zest to the pan, put it back on the heat and bring it to a boil and reduce it by half its volume. Drain the pasta, and add it to the pan. Toss in the parmesan cheese and salt. Mix well. Take the pan off the heat again, add the lemon juice, toss, taste and adjust the seasoning with salt and pepper as needed.
Wrap-Up
Pasta Con Broccoli should be a little creamy, a little lemony, a little spicy, and a lot flavourful. This is the perfect weeknight pasta dish because it comes together so quickly. You can also add some shredded chicken, cooked salmon, or tuna to the dish to bulk it up. This is definitely worth a try. Broccoli done in a similar fashion to this pasta dish makes a great side dish. You can find my recipe for Roasted Lemon & Parmesan Broccoli here.
Thank you for coming to Chef’s Notes. I hope you’ve enjoyed this post. The mission of Chef’s Notes is to share over twenty years of professional cooking experience. If you’d like to be a part of that mission, you can share this post on Facebook or Pinterest or leave a comment below and rate the recipe. You can also subscribe to the Chef’s Notes Patreon by clicking here. You’ll get access to exclusive content, including live streams, monthly cooking videos and more. And remember to subscribe to the Chef’s Notes newsletter.
Pasta Con Broccoli
Pasta Con Broccoli is a perfect weeknight pasta dish. Serve it as it is, or add cooked chicken, salmon or tuna.
Bring a large pot of salted water to a boil. Add the broccoli and cook for four minutes. Remove the broccoli from the pot reserving the water.
Add the pasta to the water and set a timer according to the package instructions.
Once the pasta timer reaches five minutes, put a large skillet on medium-high heat.
Add the olive oil and butter to the skillet. Once the butter starts to foam, add the garlic and cook for one minute. Add the red pepper flakes and cook for thirty seconds. Add the broccoli to the pan and sauté for two minutes.
Add one cup of pasta water to the skillet along with the zest of one lemon. Bring the pasta water to a boil and cook until it has reduced by half its volume.
Drain the pasta and add it to the skillet along with the parmesan cheese and salt. Toss the pasta to mix. Add the lemon juice, toss the pasta again and taste. Adjust the seasoning as needed with salt and pepper. Serve.
My first restaurant job was in a mall Chinese food place. I learned a lot at that job about knife work, speed, and cooking. I’ve carried those lessons with me throughout my entire career. That job also helped to develop my love of Chinese food, authentic and North American. It’s with that in mind that I developed this recipe for Simple Sesame Garlic Noodles. They are an homage to that first job of mine. There are three things that I love about this noodle dish. Number one, they taste amazing. Two, as the name suggests, they are simple to make. And three, they remind me of one of my favourite dishes from that restaurant. This recipe makes a great quick meal for those days when you don’t know what to make and can’t find anything in the fridge. I can’t wait to share it with you.
Sesame Garlic Noodles Ingredients
The Noodles
The noodles are the most important ingredient in this Simple Sesame Garlic Noodle Recipe. The noodle has to stand up to stir-frying, or it will fall apart, and you will have a wok full of mush. I suggest ramen noodles. They are cheap, and you can find them in almost any grocery store. I use rice ramen noodles because they are gluten-free, but any ramen noodles will work. To cook, the noodles follow the instructions on the package, then rinse them under cold running water until they are cool. You can do this a day ahead and keep them covered in the fridge. If the noodles stick together when you take them out of the refrigerator, run them under cold running water to loosen them.
Green Pepper
These noodles are a blank canvas. You can put whatever you want in them. I like green pepper, so that’s what I use. You can add sliced cabbage, carrot, roast pork, whatever. In total, you want one cup of sliced green pepper. Use half a large bell pepper. Cut it in half, then slice it into thin pieces.
The Other Ingredients
The other ingredients you need to make this Sesame Garlic Noodles recipe are sliced garlic, chilli flakes, sesame seeds, soy sauce (or tamari), rice vinegar, salt, sugar, and sesame oil. You can find the measurements in the recipe at the top of the post.
How To Make Sesame Garlic Noodles
Stir-Fry The Peppers
Heat a wok or large non-stick skillet on high heat. Add one tablespoon of cooking oil. Use vegetable oil, peanut oil, grapeseed oil, or avocado oil. Olive oil and sesame oil will burn and leave a bitter flavour. I prefer peanut or grapeseed oil as they leave little to no taste. Add the peppers and stir-fry for about three minutes or until they brown.
The Next Step
Next, add the garlic, chilli, and sesame seeds. Stir-fry for a minute before moving on to the next step.
The Noodles
Add the noodles to the wok and stir-fry until hot, about two to three minutes. Pour in the soy sauce and vinegar, the sugar, and a pinch of salt. Stir-fry for another two to three minutes or until the noodles are coated in the sauce. Taste the noodles, season with salt, then add the sesame oil and toss. Remove the wok from the heat and serve.
The Wrap-Up
I love noodles of any kind, but these Simple Sesame Garlic Noodles have a special place in my heart. They take me back to a place and time that I have fond memories of. And, they are just so tasty. So, what’s your favourite noodle dish? Is there a dish that transports you to a different time and place? Leave a comment below and tell me about it. Thanks for reading. I hope you enjoyed this post. Remember to leave a rating on the recipe and share. Sharing is caring. Have a great day! I’ll see you back here next Thursday.
Have you signed up for the Chef’s Notes Monthly Newsletter? No? Why Not? Don’t miss exclusive recipes, cooking tips, and behind-the-scenes pictures and stories.
Simple Sesame Garlic Noodles
Looking for a quick meal? Can't find anything in the fridge? Don't know what to make for dinner? Look no further. These Simple Sesame Garlic Noodles are easy to make, have only a few ingredients, and taste amazing.
Prepare the noodles according to the package instructions, then rinse under cold running water until cool. Drain the noodles and set them aside.
In a small container, combine the soy sauce and vinegar.
Heat a wok or large non-stick skillet over high heat.
Add the peanut oil to the wok along with the green peppers. Stir-fry the green pepper until lightly browned, about 3 minutes.
Add the chilli, garlic, and sesame seeds to the wok and stir-fry for a minute before adding the noodles.
Stir-fry the noodles until they are hot, about 3 minutes, then pour in the soy sauce and vinegar mixture. Stir-fry the noodles for another minute, then add the sugar and a pinch of salt – Stir-fry for 1 more minute. Finally, add the sesame oil to the noodles and mix.
Taste the noodles and adjust the seasoning with a little more salt as needed. Serve.
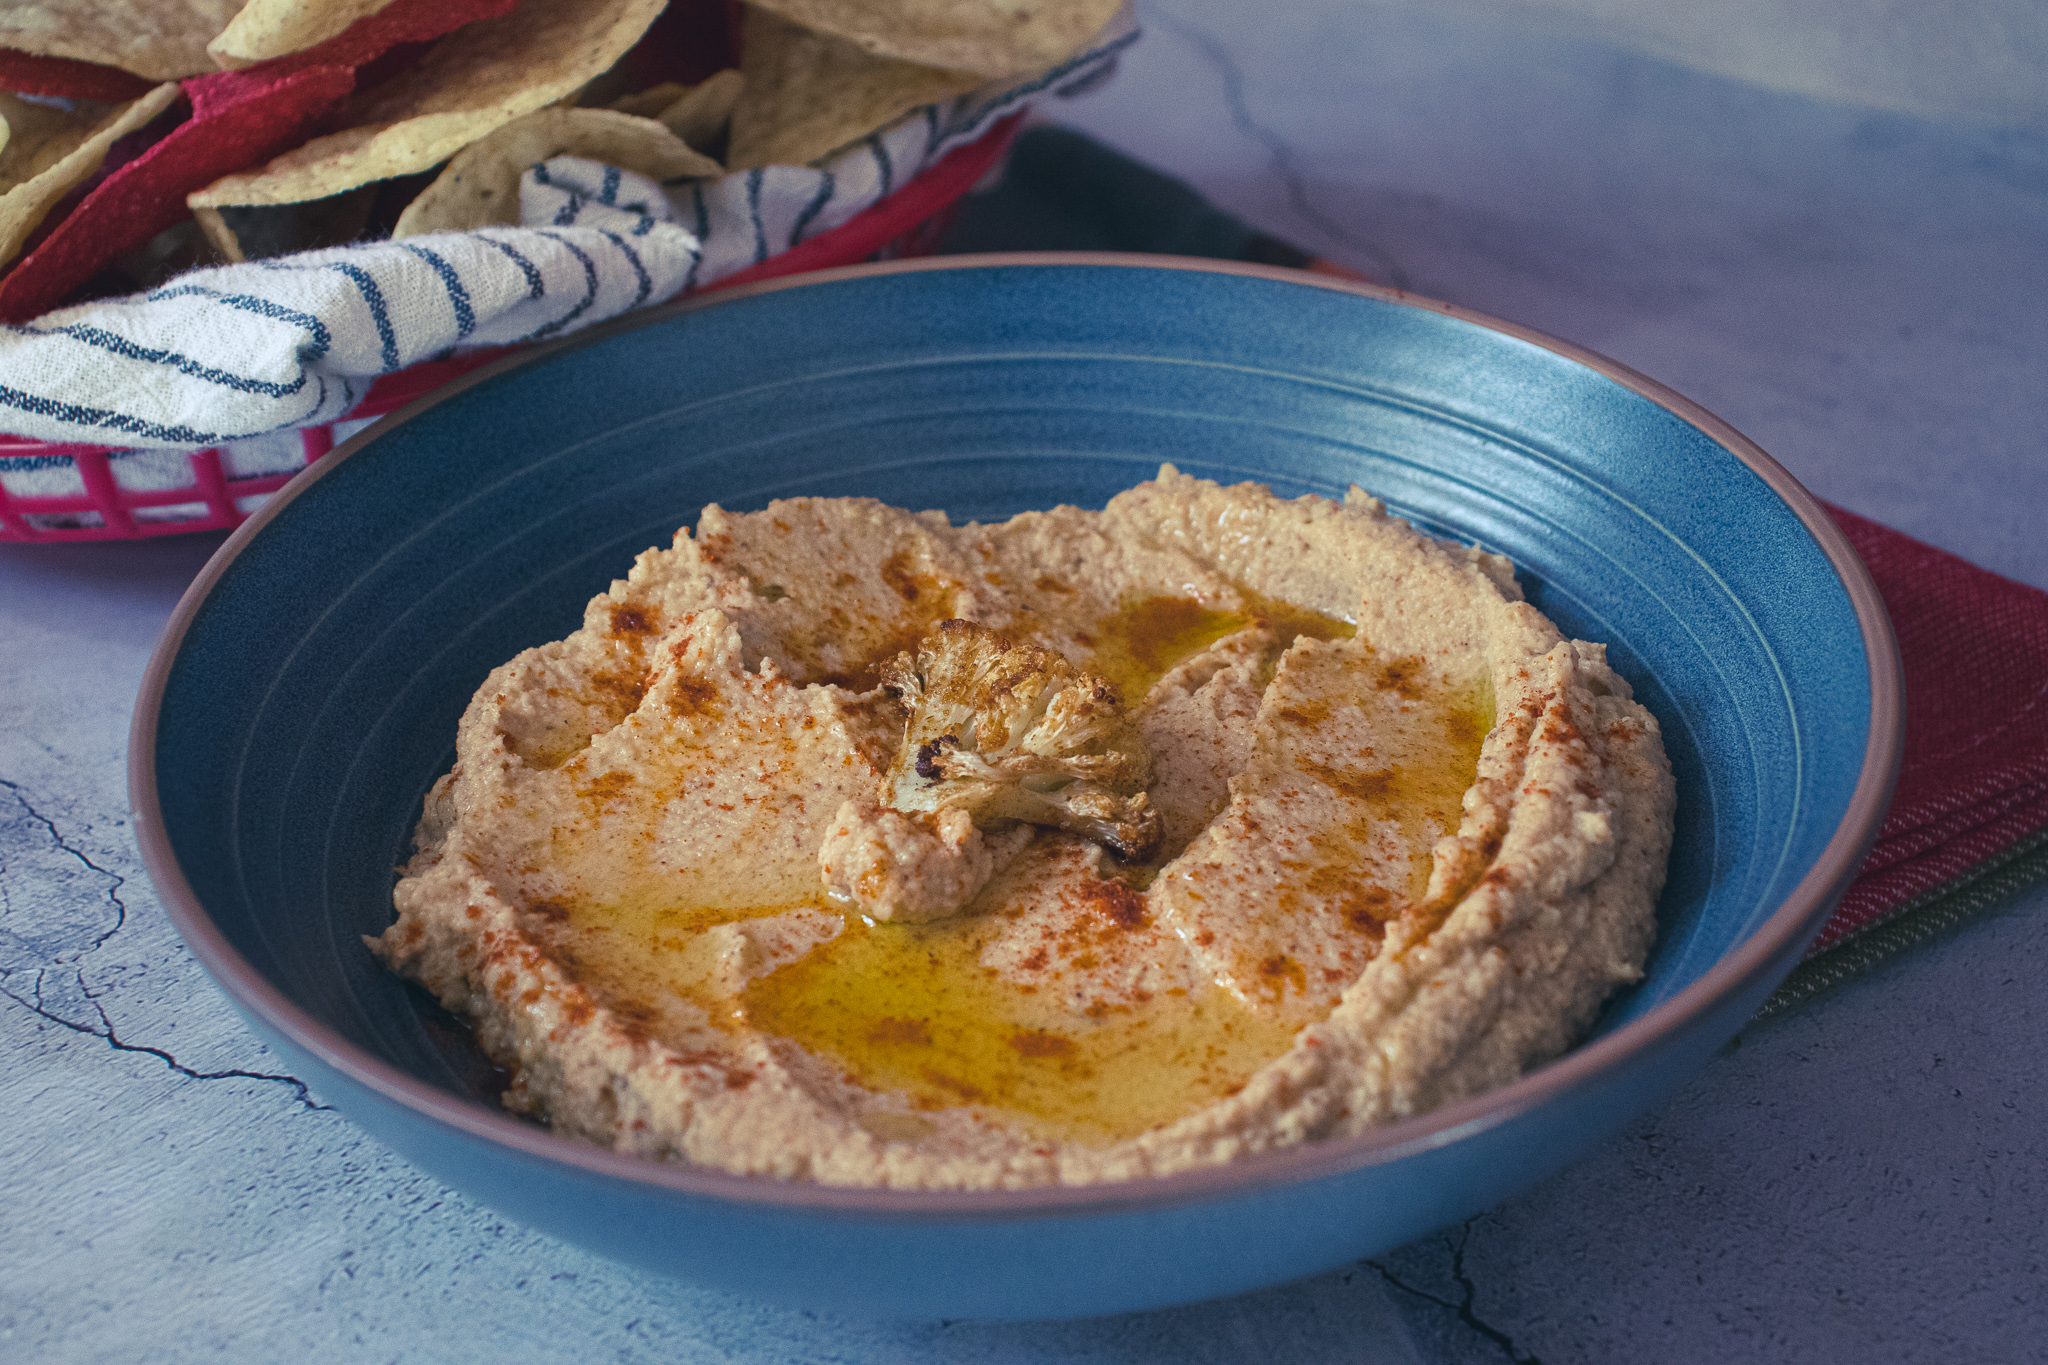
Do you like making hummus? You do? Good! I’ve got just the thing for you. But first, throw away those chickpeas and grab a head of cauliflower because today is all about Roasted Cauliflower Hummus. Don’t worry. You’re not seeing things. You read that right. Hummus, made of cauliflower. It probably sounds crazy to you now, but once you try it, it might become your new favourite hummus recipe. I know that’s a bold statement. But, if you’ve been reading this blog for any amount of time, you know I don’t make those statements lightly. You know I also don’t want you to take my word for it. So, grab a head of cauliflower, crank up your oven, and let’s get cooking.
Roasting The Cauliflower
I didn’t invent cauliflower hummus. But, I think I’ve taken it to a level I’ve not seen before. Maybe I’m wrong, but it’s still a great recipe. One of the challenges to making cauliflower hummus is that you still want that deep nutty flavour from chickpeas. So, to do that, I decided to roast the cauliflower. Since I’m roasting the cauliflower, I thought, why not roast the spices too to add more depth to them. So, that’s what I did.
Making the Cauliflower Rub
The first step to making Roasted Cauliflower Hummus is to create a rub. It is composed of spices you would expect to see in any hummus recipe. It’s cumin, salt, and paprika mixed with olive oil (you can get the measurements in the recipe above). Mix the spices and the oil until they are thoroughly combined.
Preparing the Cauliflower
Once the rub is made, turn your attention to the cauliflower. First, cut the stem and leaves away, then cut the cauliflower into florets. As with broccoli, it is easiest to dismantle the cauliflower from the bottom, cutting the stems rather than from the top cutting through the florets. This technique will leave much less of a mess behind. Not all cauliflower heads are the same size, so aim to get one about the size of a canteloupe.
Roast the Cauliflower
Once the cauliflower is cut into smaller pieces, put those in the bowl with the spice rub and stir or toss until the cauliflower is completely coated. Try and use all of the rub. Next, spread the seasoned cauliflower onto a parchment-lined sheet pan and roast in a 400°f oven for 30 to 35 minutes or until tender. Once the cauliflower is roasted, you have a hard choice to make. Do you eat the cauliflower as it is? Or do you save it and make the hummus? Why is this a hard decision? The roasted cauliflower tastes fantastic as it is, and I found it very addictive. If you choose to proceed and make the hummus, let the cauliflower cool to room temperature.
How To Make Roasted Cauliflower Hummus
In a food processor, combine garlic (One to two cloves. Two cloves if you like a very strong garlic flavour), tahini (you can use almond or peanut butter), roasted cauliflower, lemon juice, and a quarter cup of water. Purée until smooth. You may need to add a little more water to get the consistency right. Taste the cauliflower nbummus and season with salt and a bit more lemon juice as needed.
The Wrap-Up
You can serve the Roasted Cauliflower Hummus with warm pita bread, tortilla chips, crackers, or fresh vegetables. I’m willing to bet that if you serve this at a party, no one will believe it is made of cauliflower. All they’ll think is that it’s one of the best tasting hummus’ they’ve ever had. All right, time to get cooking. Thanks for reading. I hope you enjoyed this post. Remember to leave a comment below, a rating on the recipe, and share. Sharing is caring. Have a great day! I’ll see you back here next Thursday.
Have you signed up for the Chef’s Notes Monthly Newsletter? No? Why Not? Don’t miss exclusive recipes, cooking tips, and behind-the-scenes pictures and stories.
Roasted Cauliflower Hummus
Hummus, made of roasted cauliflower. Some how just as good, if not better than the original.
In a medium mixing combine the olive oil, cumin, paprika, and salt. Toss the cauliflower with the olive oil and spices.
Spread the cauliflower out onto a parchment-lined sheet pan. Roast the cauliflower in a 400°f oven for 35 minutes.
Let the cauliflower cool to room temperature. Put it in a food processor with the garlic, tahini, and lemon juice. Purée until smooth. Taste and adjust the seasoning with salt, lemon juice.
Halloumi nuggets make a great appetizer and a great chicken nugget alternative for vegetarian friends. But, what is a halloumi nugget, what’s halloumi, and how do you make them? Those are all great questions, and this post will answer them all. As always, the recipe is directly below but keep reading for a more detailed walkthrough and more information.
What is Halloumi and where can you buy it?
Halloumi is a Greek cheese traditionally made with a combination of goat and sheep’s milk, though the stuff we get here is usually cow’s milk. It has gained popularity over the last few years, meaning it is available in most grocery stores. It is a squeaky cheese similar to cheese curds. That firm texture means that it holds up well to cooking. When cooked, the texture is like that of slightly over-cooked chicken. That might not sound appealing, but it surprisingly is. Over the next year or two, you will see halloumi popping up a lot as an easy meat alternative in dishes just like the one in this post. But, you don’t have to be vegetarian to enjoy it. Give this recipe a try next time you are having a dinner party and want a fun appetizer or when you have a vegetarian coming to dinner.
Why Make Oven-Baked Halloumi Nuggets Anyway?
As I said, halloumi is quickly becoming a meat alternative. That’s a big reason why you should make halloumi nuggets, but it’s not the main reason. The main reason you should make these is that they are insanely delicious. I was home alone when I made these and ate the whole tray by myself. I’m not proud of that…(lol), but it goes to show how good they are. A word of caution though, don’t make these when you’re alone unless you want to eat a whole block of halloumi like I did.
How To Make Oven-Baked Halloumi Nuggets
Making The Coating
Making these halloumi nuggets is as simple as mixing some flour with rosemary, salt, pepper, onion powder, and garlic powder, then coating the halloumi in it. You can find all the measurements in the recipe above. Use fresh rosemary if you can rather than dry. It will give the nuggets a better flavour. I use Bob’s Red Mill All-Purpose Gluten-Free Flour in my recipe, but regular all-purpose flour can be used instead.
Cutting and Coating The Halloumi
To prepare the halloumi, take it out of the package and pat it dry with a paper towel. Cut the halloumi into half centimetre pieces. Don’t worry about the width too much. Just try to get 7 or 8 pieces per block. If you’d like, you can cut the pieces in half to get more. Once the halloumi is cut, gently toss it in the flour mixture. Halloumi usually has a gap in the middle of the block. If you are too rough with it, it may fall apart. Make sure all the pieces are evenly coated in the flour.
Bake the Halloumi Nuggets
Get a small roasting pan or casserole dish and coat the surface of it with 3 tbsp of olive oil. I know that seems like a lot, but it is crucial to get the crispy exterior on the halloumi nuggets. Place the nuggets in the pan in a single, evenly spaced layer. Bake the nuggets in a 425°f oven for 7 minutes. Take the halloumi out of the oven, flip, and bake for another 7 minutes. Do that one last time for a total baking time of 21 minutes. When done, the nuggets will be golden brown, crispy on the outside, and soft inside. Amazing!
Sriracha Honey Sauce
While the halloumi is in the oven, make the sauce. Combine the sriracha, honey, and rice vinegar in a small mixing bowl. If you don’t have rice vinegar, you can use cider vinegar, white wine vinegar, white vinegar, or even lime juice. If you don’t have sriracha, tabasco, or any other hot sauce will work. Mix well, then put the sauce in a small ramekin or dish. You can use any other type of sauce that you’d like. Anything that works with chicken nuggets will work with these halloumi nuggets. I find the sweet-spicy sauce really cuts through the richness of the halloumi and adds a lot to it, but I’ll leave that up to you.
Serving the Halloumi Nuggets
As I’ve said, you can serve these nuggets as an appetizer at a party, or as a vegetarian-friendly alternative to chicken nuggets. I think that if you are serving them as an appetizer, it would likely be best to cut the halloumi into fingers rather than nuggets. You’ll get more bang for your buck. These are some of my favourite things I’ve made in a while. 100% worth a make. They take less than 30 minutes to prepare, so what are you waiting for?
The Wrap-Up
Years ago, I worked at a Greek Restaurant in Halifax. We served halloumi like most Greek Restaurants. But, in the kitchen, it was one of our favourite ingredients to play with. We would do all sorts of things with it for staff meals. It was like our little secret. Now, I’m sharing that secret with you. Enjoy!
On a personal note, this is my first post of 2022, and I have to say it is good to be back. I’ve got some cobwebs to shake off, but it’s good to be back at it and sharing recipes with you once again. You may have noticed that Chef’s Notes looks a little different than it did in 2021. I’m always trying to improve the site and make your experience here as good as possible. If you have any feedback, I’d love to hear it. Also, as part of my 2022 revamp, I’ve created a monthly newsletter with exclusive recipes, tips, tricks, and information. Sign up if you haven’t already. You don’t want to miss out.
Halloumi Nuggets with Sriracha Honey
Halloumi nuggets make the perfect appetizer or a great chicken nugget replacement for your vegetarian friends. They are quick to make, crispy and delicious. They have a similar texture to chicken nuggets and an even better falvour.
In a medium mixing bowl, combine the flour, rosemary, salt, pepper, garlic powder, and onion powder. Mix well.
Oil a 9×13 casserole dish with all the olive oil.
Take a the halloumi out of the package, pat dry with paper towel and slice into 5 mm (1/8 inch) slices.
Coat the halloumi in the flour mixture. Shake off the excess and place the halloumi in a single layer in the oiled casserole dish. Leave at least 2 to 3 cm between each piece.
Roast the halloumi in the oven for 7 minutes, flip and roast for 7 more minutes. Flip the halloumi one last time and bake for a final 7 minutes.
Remove the halloumi from the oven and serve hto with sriracha honey sauce.
Sriracha honey sauce
In a small bowl, mix the sriracha, honey and vinegar. Serve.
I’ve said before, many times, in fact, that the sign of a great cook is someone who knows when not to add too many ingredients. The cook’s job is never to keep adding ingredients until something tastes good. A cook’s job is to add just enough to bring out the great natural flavour of the ingredients. I don’t think that I could come up with a dish that better illustrates that point than this balsamic marinated tomato bruschetta. It is about as basic as it comes. Take some fresh tomatoes, add a few fresh herbs, a bit of garlic, salt, pepper, sugar, and a touch of balsamic vinegar. Put the tomatoes on bread with herb and garlic ricotta and call it a day. Let the flavour of those beautiful tomatoes shine through. Ready to see exactly how to make this? Good, because I’m ready to show you. Find the recipe directly below but keep reading for more expanded instructions.
Marinated Tomato Bruschetta with Herbed Ricotta
Whether you are looking for a great snack, a delicious summer lunch or the perfect party hors d'oeuvre this balsamic marinated tomato bruschetta with herb and garlic ricotta is all you ever wanted.
4sliceegluten-free sour dough breador whatever bread you want
1tbspolive oil
Instructions
Marinated Tomato
Toss the grape tomatoes with 1 tbsp of olive oil, season with salt and pepper, and roast in a 400°f oven for 15 minutes.
While the grape tomatoes are roasting combine the cherry and vine tomatoes in a medium mixing bowl with the garlic, herbs, remaining olive oil, balsamic vinegar, salt, pepper, and sugar. Add the roasted tomatoes, mix well. Cover the bowl and put it in the fridge for 2 hours.
Herb and Garlic Ricotta
In a small mixing bowl, combine the ricotta with the herbs and garlic. Mix well.
Cover the bowl with plastic wrap and set it in the fridge until you are ready to use it.
Assemble the bruschetta
Spread the slices of bread out onto a sheet pan and drizzle with olive oil.
Toast in a 400°f oven for 5 to 6 minutes per side.
Remove the bread from the pan and divide the ricotta mixture evenly among the 6 slices. Spread the mixture right to the edges of the bread.
Using a slotted spoon, top each slice of bread with the tomato mixture and serve.
For an hors d'oeuvre, slice a baguette into thin slices, drizzle with olive oil and toast in the oven then top as directed above. This recipe should make about 48 hors d'oeuvres.
Unsurprisingly, the first step in making this delicious bruschetta is to make the bruschetta mix. It starts with a pint of grape tomatoes. Toss the tomatoes with a bit of olive oil, about a tablespoon, then season them generously with salt and pepper. Put the tomatoes in a small roasting pan and roast them at 400°f for 15 minutes.
Quartered Cherry Tomatoes
The next step is to quarter some cherry tomatoes. If you can, get cherry tomatoes in a variety of shapes and colours. This will add to the visual appeal of the bruschetta. Once quartered, put the cherry tomatoes in the bowl you tossed the grape tomatoes in.
Sliced Vine Ripened Tomatoes
Finally, take two vine-ripened tomatoes, cut them in half, then slice them about half a centimetre thick. Add them to the bowl with the cherry tomatoes.
Onion and Garlic
Now that all the tomatoes are in the bowl or still in the oven, it’s time to move on to the other bruschetta mix ingredients. Take half a small red onion and slice it as thinly as you can. You want about half a cup. Then, mince two to three cloves of garlic. Add the onion and garlic to the tomatoes.
Herbs and Seasoning
To finish the bruschetta mixture, slice (chiffonade) six basil leaves and add them to the tomatoes. Season the mixture with a big pinch of kosher salt and a few turns of a pepper mill. Add a teaspoon of sugar, a tablespoon of olive oil and three tablespoons of balsamic vinegar. At this point, the roasted grape tomatoes should be ready to come out of the oven and can be added to the mixture. Stir well. Cover the bowl with plastic wrap and put it in the fridge for at least two hours. The longer this sits, the more flavour it will develop, so feel free to make it the day before you want to serve it.
Herb and Garlic Ricotta
Okay, the bruschetta mixture is great on its own. Really, you can eat it as is. But, if we can make it that little bit better, why wouldn’t we? So, now it is time to make the herb and garlic ricotta. If you want to skip this step, you can use herb and garlic Boursin or cream cheese. Start with three sprigs of fresh thyme, one sprig of fresh rosemary, and about six basil leaves. Mince the thyme and rosemary. Slice (chiffonade) the basil. Mince two cloves of garlic, then mix the herbs and garlic with a 280 g container of ricotta. Keep the mixture covered in the fridge until you are ready to use it.
Assemble The Bruschetta
Just two little notes before we finish this off. First of all, my new book officially comes out today!! You can get your copy here. When you get your copy, it would mean the world to me if you left a review on amazon. Secondly, in the recipe above, I say to drizzle the bread with olive oil, then toast it in the oven. I only made one piece of toast, so I toasted it in my toaster. You can do the same. But, if you are making the full recipe for using baguette rounds to make hors d’oeuvres defiantly toast it in the oven.
Take your toasted bread and spread the ricotta mixture in a thick layer, right to the edges of the bread. Use a perforated spoon to scoop out the tomato mixture and top the bread with it.
Serving The Balsamic Marinated Tomato Bruschetta
Serve the bruschetta as is or garnish with basil leaves or microgreens. A nice crisp white wine or prosecco goes very well with this, BTW.
The Wrap Up
If you are wondering how good this actually is, let me tell you that I recently served this as the first course at a wedding and the bride’s mother liked it so much that she requested I share the recipe. So, this recipe is dedicated to her. If that isn’t a solid endorsement of this bruschetta, nothing is.
Enter your email address below to subscribe to chef’s notes to get every post in your inbox.
Do you want a quick meal that you can put together in only a few minutes? Are you looking for the perfect recipe to make on a Tuesday night after work? Is your perfect meal one that takes little to no effort? If you answered yes to any of those questions, move along because this baked eggplant parmesan isn’t any of those things. This is the kind of meal that you need to invest at least two hours of your life into. Is it worth it? I think so. But you be the judge. Let’s get to it.
Preparing The Eggplant
Buying Eggplant
There are many people, and you may be one of them, who have never bought an eggplant. If you’ve never bought an eggplant, you probably don’t know what to look for when you do. Let me help you out. Look for eggplant with clear purple skin. It shouldn’t have discoloured spots, bruises, or punctures. The skin should be tight, and the eggplant should feel firm with no soft spots. To tell if the eggplant is ripe, give it a little squeeze with your fingertips. If your fingers leave dents, the eggplant isn’t ripe yet. For this recipe, you will need an eggplant that is about one pound (454 g). There should be a scale around the produce section, so if you are unsure, you can weigh it.
Cutting the Eggplant
Once you get the eggplant home, rinse it really well under cold running water and pat it dry with a clean kitchen towel or a paper towel. Cut the top off and discard it. Cut the eggplant into quarter-inch (1/2 cm) rounds. You can discard the very end piece.
Salting the Eggplant
Why salt eggplant?
The next step is to salt the eggplant. Salting the eggplant has two purposes. The salt extracts moisture from the eggplant giving it a firmer texture when cooked and removing some of the eggplant’s bitter flavour. So, salting the eggplant makes it taste better and gives it a better texture.
Salting the eggplant
I find that the easiest way to salt eggplant is to line a baking sheet with a paper towel and sprinkle it with a tablespoon or two of kosher salt. Lay the eggplant down in a single layer, then top it with another tablespoon or two of salt and another layer of paper towel. You can put a second layer of paper towel, salt, eggplant, salt, and paper towel on top of the first layer if you need to. Let the eggplant sit at room temperature for at least 30 minutes or up to an hour. Then, rinse the salt off the eggplant, and pat it dry with a paper towel.
Setting Up Your Breading Station
For this eggplant parmesan recipe, the eggplant is breaded. You can skip this step, but the finished dish isn’t going to be as good, so I don’t recommend it. Plus, you’ve come this far. Why not go all the way? To set up, the breading station get three containers. Fill one container with 1 cup of flour seasoned with 1 teaspoon of kosher salt and 1/8 teaspoon of black pepper. Crack 3 eggs into the second container and whisk until the yolks and whites are fully combined. In the third container, measure out 1 1/2 cups of bread crumbs. For the record, I used gluten-free flour and bread crumbs for this.
Breading The Eggplant
To bread the eggplant, which is the same process for breading anything, coat the slices of eggplant in flour, then in the egg, and finally in the breadcrumbs. Put the breaded eggplant on a tray until you are ready to cook them.
Frying The Eggplant
Whether you bread the eggplant or not, you will need to cook it before assembling your eggplant parmesan. To fry the eggplant, heat a large skillet over medium-high heat. Add in a 1/4 cup of olive oil, and cook the eggplant for 2 to 3 minutes per side or until golden brown. Take the cooked eggplant out of the pan and set it on a cooling rack until all the eggplant is cooked. You may need to add more oil to the pan as you go.
Making Marinara Sauce
If you really want to, you can use a store-bought marinara sauce to make the eggplant parmesan, but again, you’ve come all this way. Why take the easy way out now? Marinara sauce is not hard to make. Let me show you. To save time, make the marinara sauce while the eggplant is sitting with the salt.
Prepping the Onion and Garlic
The first step in making marinara sauce is to pep the onion and garlic. Use a medium-sized onion. You want about 1 cup of diced onion in total. If you have a little more, or a little less, it isn’t the end of the world. Cut the top off the onion and cut it in half through the root, then peel it. Make on horizontal slice halfway up each half about 90% of the way through the onion. Make 5 to 6 verticle slices through the onion towards the root, but not through it. Cut across those verticle slices to get a diced onion.
For the garlic, cut the ends off, and gently crush the cloves with the side of your knife. Peel the garlic cloves and chop them as fine as you can. You want about 1 tbsp of minced garlic.
Prepping The Tomatoes
You can use either whole tomatoes and crush them for the sauce or use passata, which is crushed and strained tomatoes. I often use passata, but today I wanted to do something a little differently, so I opted for the whole tomatoes. If you can get them, go with San Marzano tomatoes, they are more expensive, but they taste amazing. The tomatoes I got are “San Marzano Type Tomatoes,” which means absolutely nothing. San Marzano is an area in Italy that is famous for growing tomatoes. They have a specific designation that allows only tomatoes grown in that area to be classified as San Marzano. If they are real San Marzano tomatoes, they will be a product of Italy, first of all. Secondly, they will have the letters D.O.P. on the can. That’s the Italian designation. Crush the tomatoes by hand or with a potato masher.
Making The Sauce
To make the sauce, heat a medium pot over medium heat. Add in a 1/4 cup of olive oil, along with the onions. Cook the onions, stirring now and again, for about 10 minutes or until they start to brown. This browning sweetens the onions, which will help sweeten the sauce, meaning you won’t need to add sugar. Once the onions are browned, add the garlic, cook for 1 minute, then add the tomatoes. Season the sauce with 1/2 a teaspoon of kosher salt and a pinch of black pepper. Bring the sauce to a boil, turn the heat to low and simmer for 20 minutes. Depending on how thick the tomatoes are, you may need to add up to 1/2 a cup of water to them.
Basil
While the sauce is simmering, chop a handful of basil,. You want a 1/4 cup in total. Add that to the finished sauce, stir it in, taste the sauce and adjust the seasoning as needed with salt and pepper. You can use dried basil here, but I don’t recommend it because it has a much different flavour than fresh basil. If you use dried basil, a 1/4 tsp will do. Add it when you add the tomatoes.
Marinara Sauce
A simple and delicious multipurpose marinara sauce.
To assemble the eggplant parmesan, put a ladle full of the sauce in the bottom of a 9-by-13-inch casserole dish. Top the sauce with a layer of eggplant. Top the eggplant with a ladle and a half of sauce, half a cup of grated mozzarella cheese and a 1/4 cup of grated parmesan cheese. Repeat with a second layer, finishing with mozzarella and parmesan.
Baking The Eggplant Parmesan
Cover the casserole dish with foil and bake in a 375°F oven for 20 minutes. Take the foil off the pan and bake for another 5 to 10 minutes or until the cheese is melted and slightly browned, and a knife easily slides through the eggplant. Take the eggplant parmesan out of the oven and let it rest for 10 minutes before serving.
Serving The Bake Eggplant Parmesan
Serve the eggplant parmesan with salad and garlic bread.
Eggplant Parmesan
Eggplant parmesan is a classic Italian dish that everyone should have at least once. When done well the eggplant is tender but still has some bite. The eggplant should have a mild flavour after being salted and properly cooked. This is not the kind of recipe you are going to throw together on a Tuesday, but it is great for a sunday afternoon project.
1cupflourseasoned with 1 tsp kosher salt, 1/8 tsp black pepper
3Eggs beaten
11/2cupsbreadcrumbs
2cupsgrated mozzarella
1cupgrated parmesan
1/2cupolive oildivided
1batch marinara sauce
Instructions
Rinse the eggplant, and pat it dry. Slice it into 1/4 inch thick rounds.
Line a sheet pan with paper towel and sprinkle with 1 tbsp of kosher salt. Lay the eggplant on the salted paper towel and top with the remaining 1 tbsp of salt and another layer of paper towel. Let the eggplant sit for 30 minutes.
Rinse the eggplant under cold running water and pat dry with paper towel.
Heat oven to 375°f.
Coat the eggplant by dredging it in flour, beaten egg, then breadcrumbs. Set the breaded eggplant on a rack while you finish breading the remainder.
Heat a large skillet over medium-high heat and add in 1/4 cup of olive oil. Fry the eggplant in batches until golden brown on each side. This will take 2 to 3 minutes per side. Take the eggplant out of the pan and set it on a rack until the rest has been fried. Add the second amount of oil to the pan as needed.
Coat the bottom of a 9-by-13-inch casserole dish with a ladle full of marinara sauce. Add a layer of eggplant and top with another ladle full of sauce, 1/2 a cup of mozzarella, and a 1/4 cup of parmesan. Repeat until all the eggplant has been used. Finish with the remaining sauce and cheese.
Cover the pan with foil and bake for 20 minutes. Take the foil off the pan and bake uncovered for 5 to 10 more minutes or until the cheese is golden brown and a knife easily slides through the eggplant. Take the dish out of the oven, allow it to rest for 10 minutes, then serve with salad and garlic bread.
Notes
To speed up the process, you can skip breading process. In this case, you would salt and rinse the eggplant as the recipe says, then pat the eggplant dry and fry it as is. The finished eggplant parmesan won’t have the same texture, but it will still be delicious.
As I said, this is not a quick recipe. However, it is worth making at least once. Eggplant parmesan is an amazing dish and one that I think you will really enjoy. Oh, and it’s vegetarian. You won’t even notice. I didn’t
Remember to share this post on Facebook or Pinterest if you enjoyed it. Thank you for reading, and have a great day! Remember, there are new Chef’s Notes posts every Monday, Wednesday, and Friday, and you can subscribe below, so you never miss one.
Tofu can seem like a strange, futurist food that only vegetarians and hippies eat. The truth is that tofu has been around for hundreds, if not thousands of years. It is made by acidulating soy milk, causing it to curdle, then pressing the curds into blocks (similar to making cheese). Tofu is high in protein, calcium, iron, and lots of other good things. If you never tried tofu, it might be the time, and this Crispy Honey Garlic Tofu Bowl is the perfect dish to initiate you. Let’s get to it.
Brown Rice
I used brown rice as the base for my Crispy Honey Garlic Tofu Bowl. You can use white rice, quinoa, or even noodles if you’d prefer. I chose brown rice to mix things up a little bit and because it is better for you than white rice.
Start by measuring the rice. A half-cup is enough for two people. Soak the rice in cold water for 30 minutes before cooking to speed up the cooking process and make the finished rice a little softer. Drain the rice and put it in a medium pot with two and a half times as much water as rice. You want to use one and a half cups of water for half a cup of rice. Add a pinch of salt, pepper, and a tablespoon of butter to the pot with the rice, bring to a boil, put a lid on the pot. Turn the heat to low and simmer for 20 minutes. Take the pot off the heat, leave the lid on and let the rice sit for 5 minutes. Cooking instructions may vary by brand, so make sure to read the instructions on the package.
Prepping The Vegetables
You can use any vegetables you’d like for this, but I opted for carrot, snow peas and green pepper. In total, you want about one cup of each vegetable after they are sliced. Peel one medium carrot, then cut the top and bottom off. Cut the carrot in half, then cut into matchstick. You can slice the carrot instead to make things easier. Pull the string off the snow peas, and slice the green pepper.
Cooking The Vegetables
To cook the vegetables, heat a wok or large frying pan over medium-high heat. Add one tablespoon of oil to the pan, then the vegetables. Stir-fry the vegetables for 3 to 4 minutes or until they soften and start to brown. Add one tablespoon of soy sauce (or tamari) to the pan, cook for 30 seconds and serve.
Prepping The Tofu
Tofu is generally sold in 1 pound (454 g) blocks and comes as silken, soft, medium-firm, and firm. For this recipe, you want to use either medium-firm or firm. Half a block is enough for two people. The other half block of tofu can be stored in the fridge in a ziplock bag for up to 5 days. Cut the extra tofu into small pieces and add to pasta or put it on pizza. Pat the tofu dry with a paper towel, then cut it into 1 cm thick slices. Cut the slices into 1 cm thick sticks, then cut the sticks into 1 cm cubes. In a medium bowl, combine half a cup of cornstarch with a pinch of salt and pepper. Gently toss the diced tofu in the cornstarch, making sure every piece is coated.
Prepping The Sauce
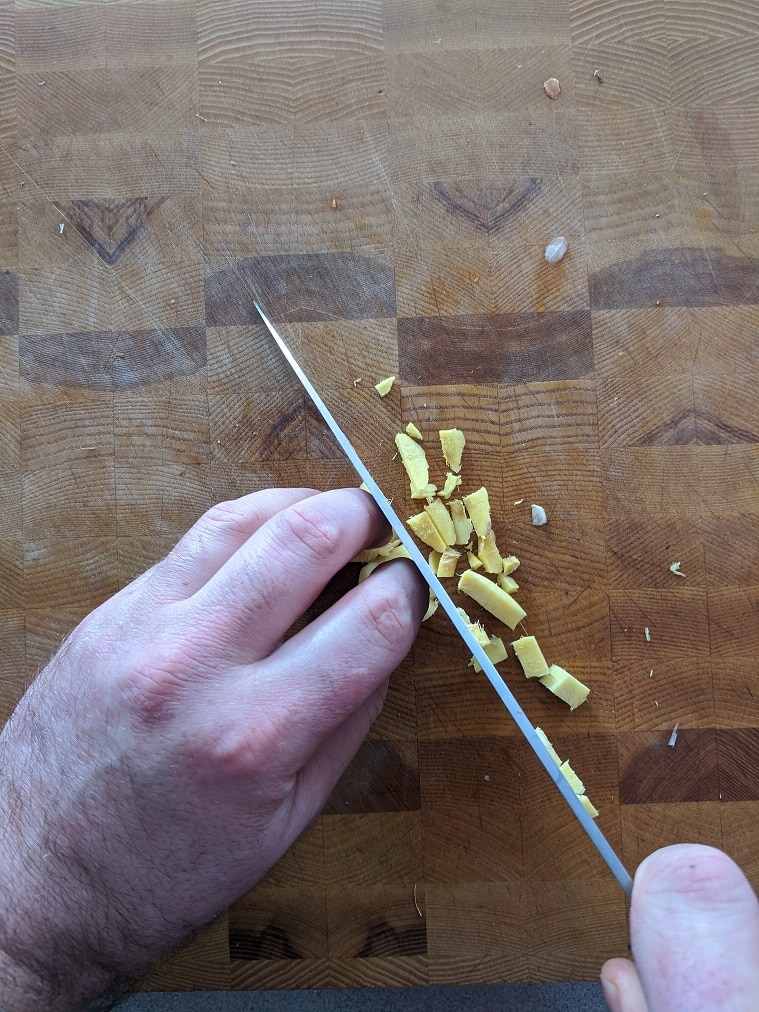
Before you start cooking the tofu, peel and slice two to three garlic cloves, you want about one tablespoon of sliced garlic in total. Also, peel and mince a piece of ginger. In total, you want about a teaspoon of minced ginger.
Cooking The Crispy Honey Garlic Tofu
Heat a wok or a large frying pan over high heat. Add in a quarter cup of canola oil and let it heat for a minute. Sake the excess cornstarch off the tofu and carefully add it to the wok. Cook for tofu for 2 to 3 minutes or until it turns golden brown. Stir it every 20 to 30 seconds. Turn the heat down to medium-high and add in the garlic and ginger. Cook for 1 more minute, then add a half teaspoon of crushed red pepper flakes and a tablespoon of honey. Continue cooking for 20 seconds, then adds two teaspoons of rice vinegar and a tablespoon of soy sauce. Cook for 1 minute and serve.
Putting The Crispy Honey Garlic Tofu Bowl Together
Divide a medium bowl into three sections. Fill one section with rice, one section with vegetables, and one section with crispy tofu. Serve and enjoy.
Crispy Honey Garlic Tofu Bowl
Crispy tofu in a simple, homemade honey garlic sauce with brown rice and stir-fried vegetables. The perfect meal for a no meat Monday or when you have a vegetarian coming over for dinner.
Put the rice in a bowl, cover with cold water and let sit for 30 minutes.
Drain the rice well, then put it in a medium pot with the measured water, salt, pepper, and butter.
Bring the rice to a boil over high heat. Once the rice starts to boil, stir it, put a lid on the pot, turn the heat to low and simmer the rice for 20 minutes.
Take the rice off the heat, and let it sit with the lid on for another 5 minutes.
Vegetables
Heat a wok or large frying pan over medium-high heat.
Add the oil to the pan along with the vegetables. Stir-fry the vegetables for 3 to 4 minutes or until the vegetables start to soften.
Add the soy sauce to the vegetables, cook for another 30 seconds to 1 minute, then serve.
Crispy Honey Garlic Tofu
Pat the tofu dry with a paper towel and cut it into 1 cm cubes.
In a medium mixing bowl, combine the cornstarch, salt, and pepper. Mix well.
Add the diced tofu to the cornstarch and gently toss until all the tofu is coated in cornstarch.
Heat a wok or large frying pan over high heat.
Add the oil, let it heat for 1 minute, then gently add the tofu to the oil, shaking off any excess cornstarch.
Turn the heat down to medium-high and cook the tofu stirring every 20 to 30 seconds for 2 to 3 minutes or until it is golden brown.
Add the garlic and ginger to the pan and cook for 30 seconds to 1 minute or until the garlic just starts to brown.
Add the crushed red pepper flakes and honey, cook for 30 seconds, then add the vinegar and soy sauce. Stir-fry for 1 more minute and serve.
If you are new to tofu or just want a new tofu recipe, this is perfect. At no point while you’re eating this Crispy Honey Garlic Tofu Bowl will you think to yourself, “This is tofu.” You will only think, “This is delicious.” But as always, don’t take my word for it. Try it for yourself. Have a great weekend and a happy easter!
Remember to share this post on Facebook or Pinterest if you enjoyed it. Thank you for reading, and have a great day! Remember, there are new Chef’s Notes posts every Monday, Wednesday, and Friday, and you can subscribe below, so you never miss one.
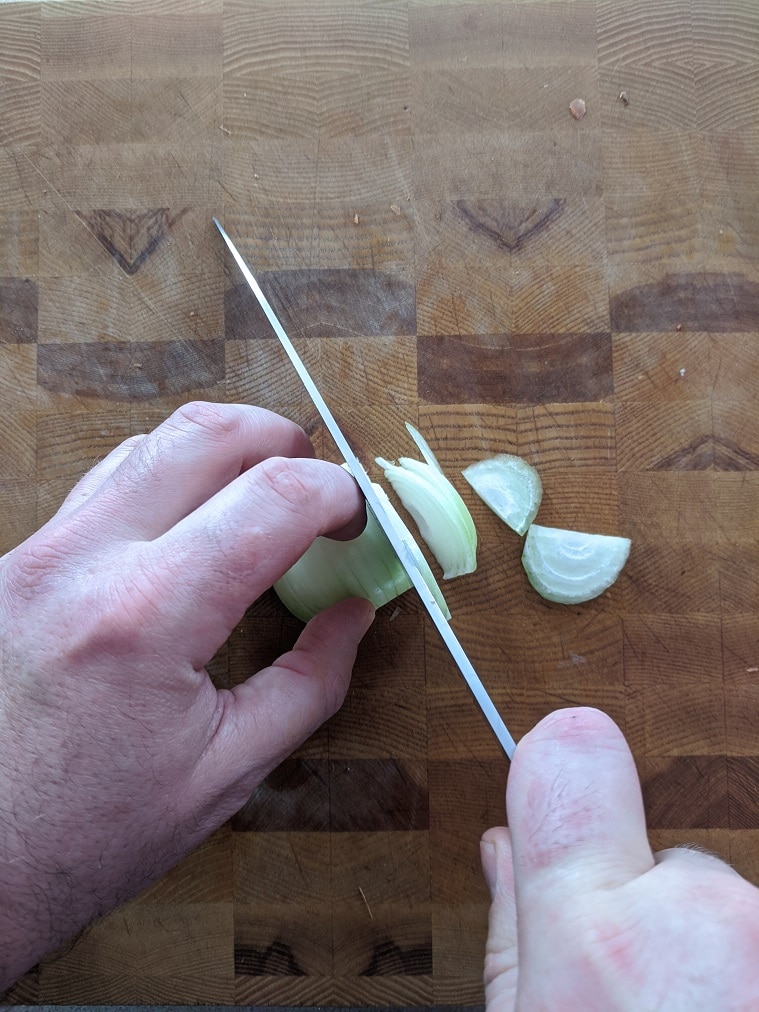
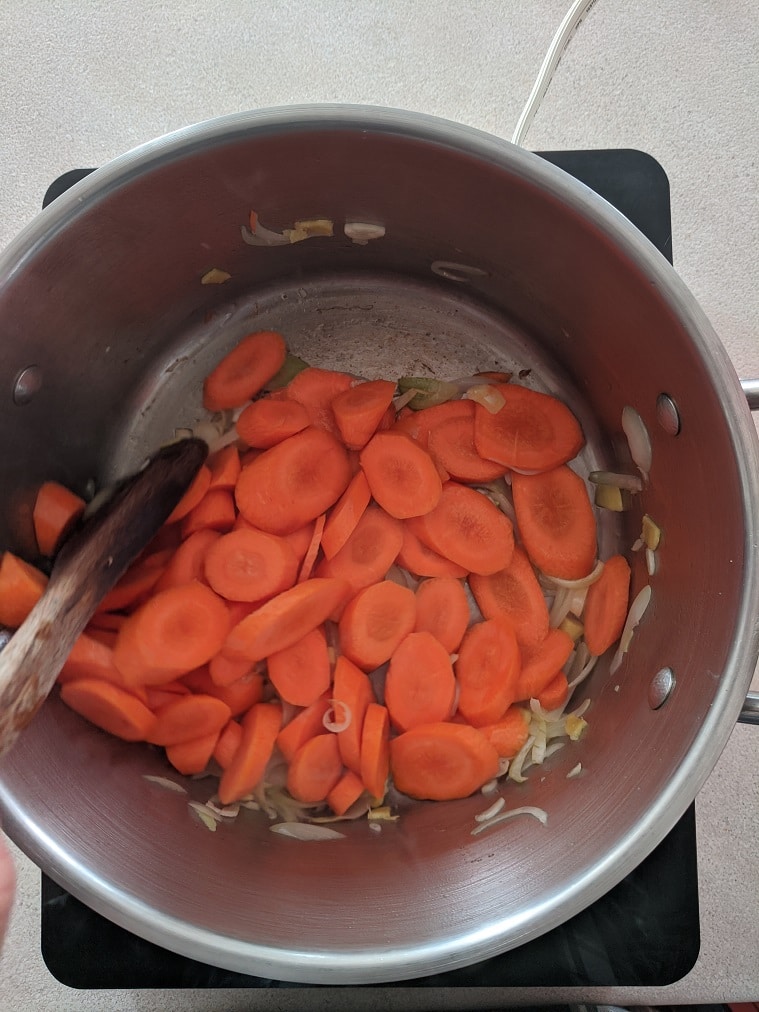
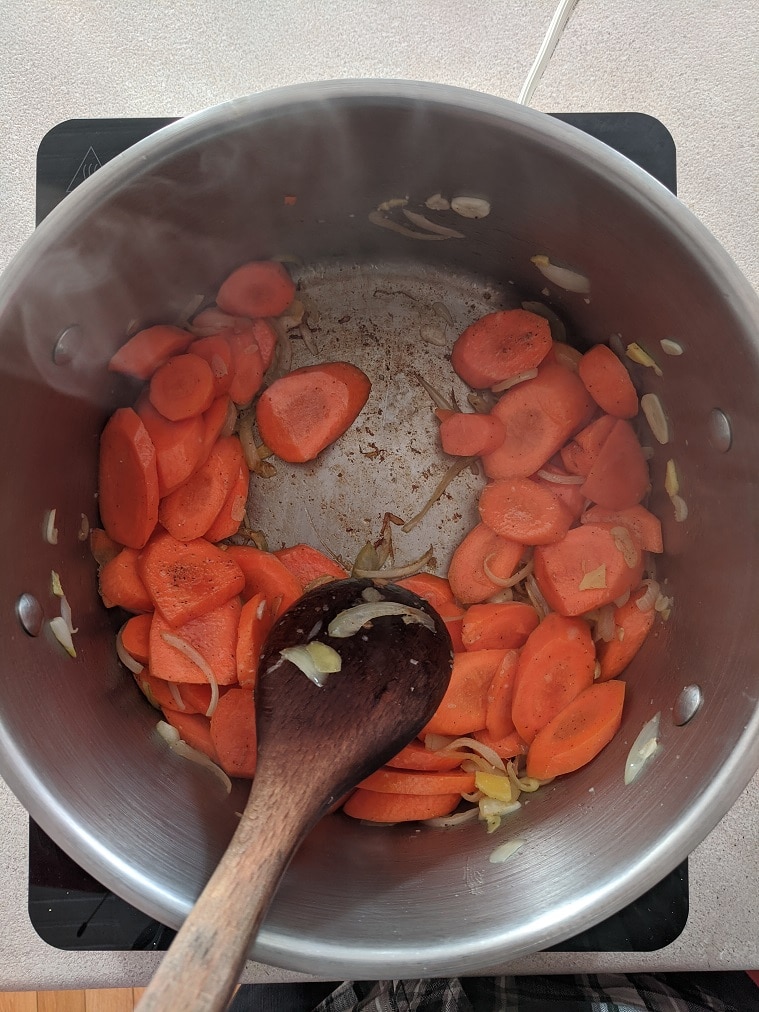
If you are a fan of Carrot and Ginger Soup, I think you will love this recipe. It packs a big ginger punch with a mild sweetness from the carrots. This is the second last recipe in the Chef’s Notes Hearty Soup Series, and I’m very excited to share it with you. Let’s get right to it.
Carrots
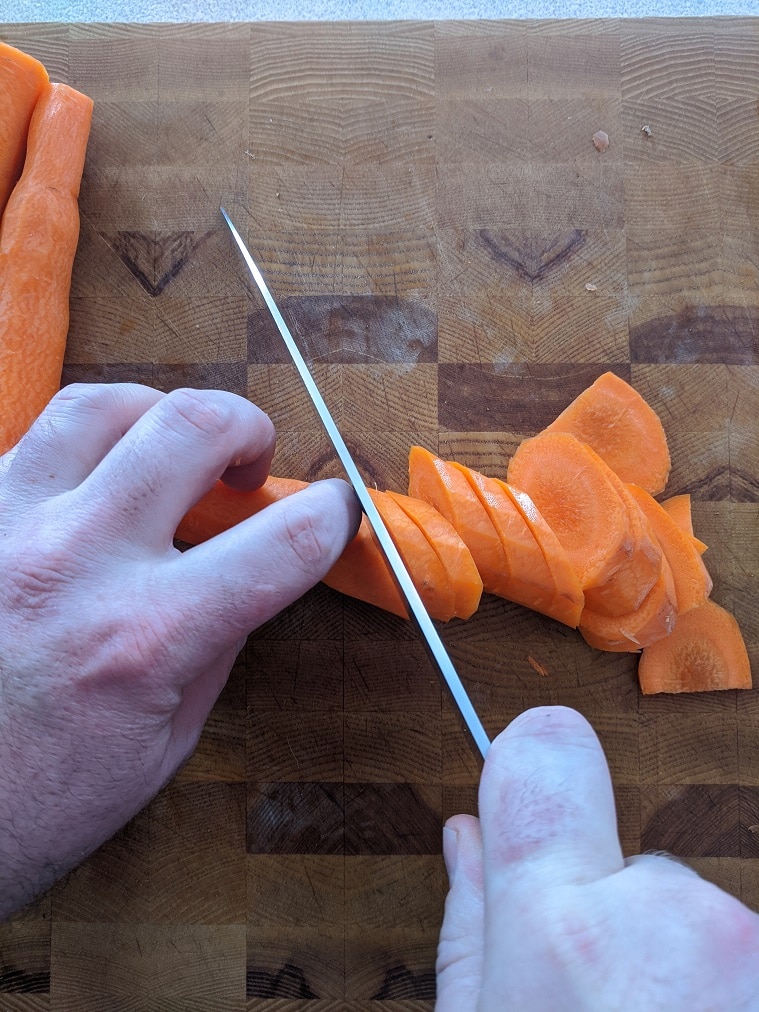
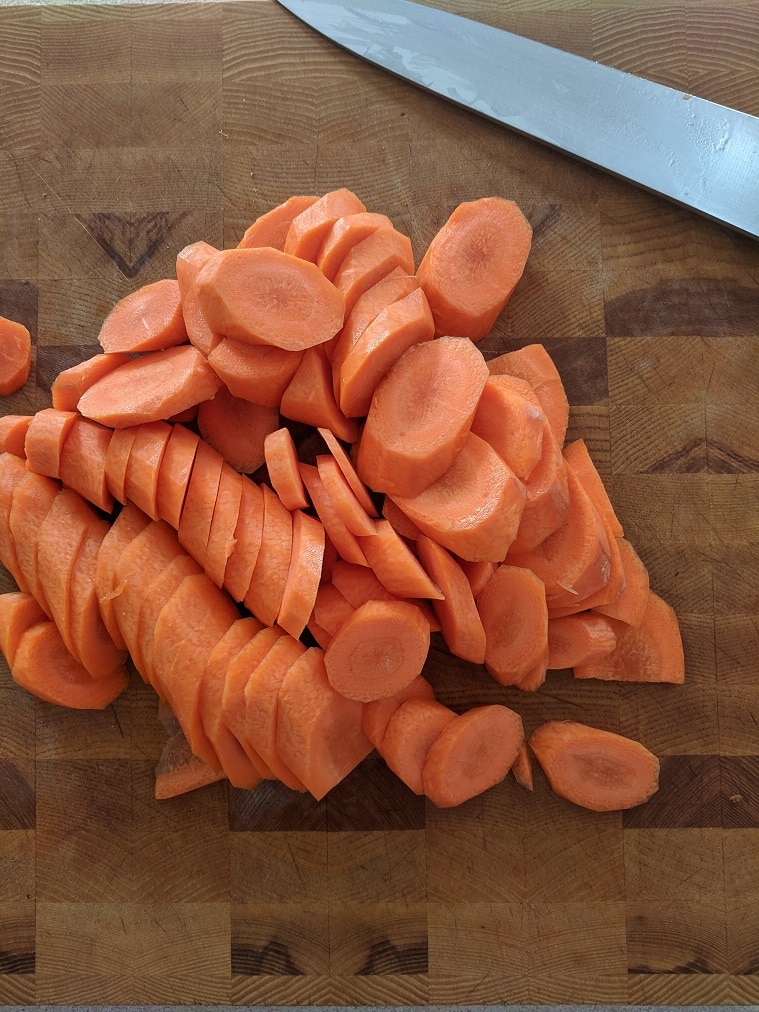
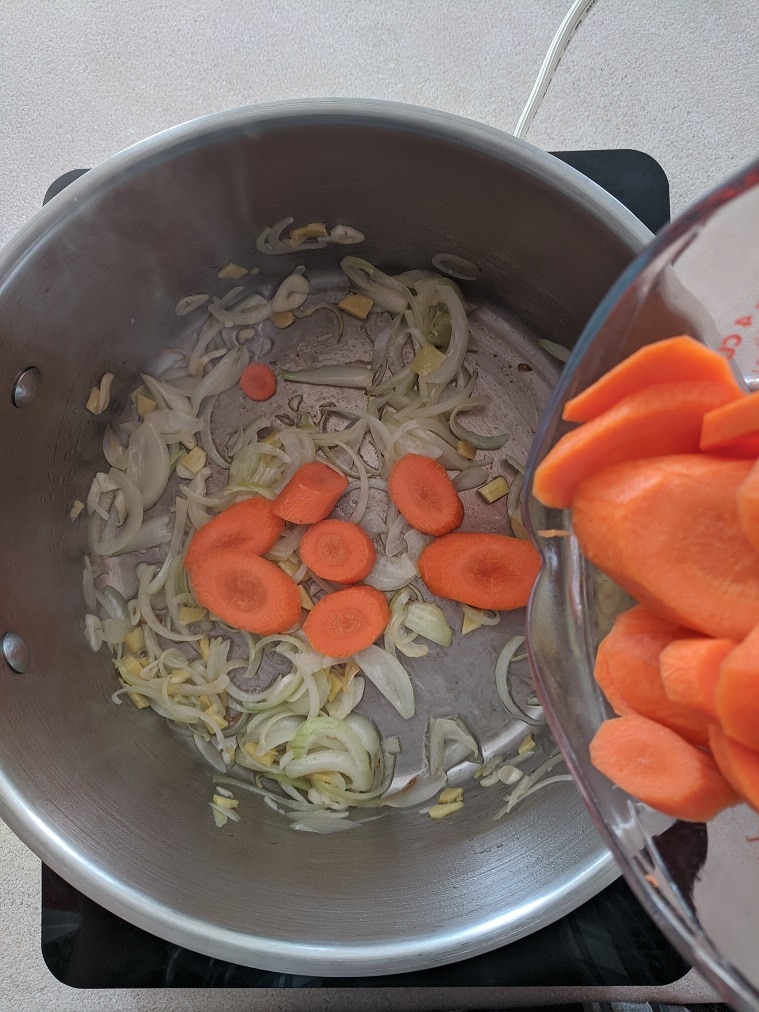
Start with four fairly large carrots. To start, cut the top and bottom off the carrots, then peel them and slice them. The size and width you cut the carrots don’t really matter that much becasue you will purée them. But the bigger you cut them, the longer they will take to cook. In total, you need about four cups of cut carrot.
Other ingredients
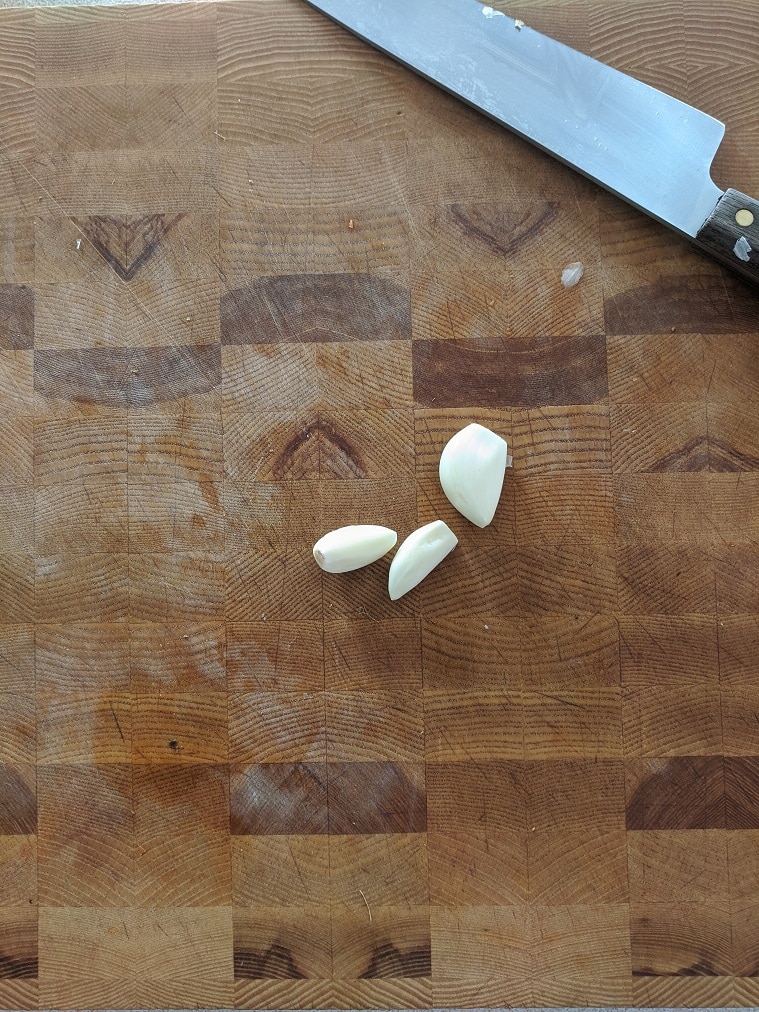
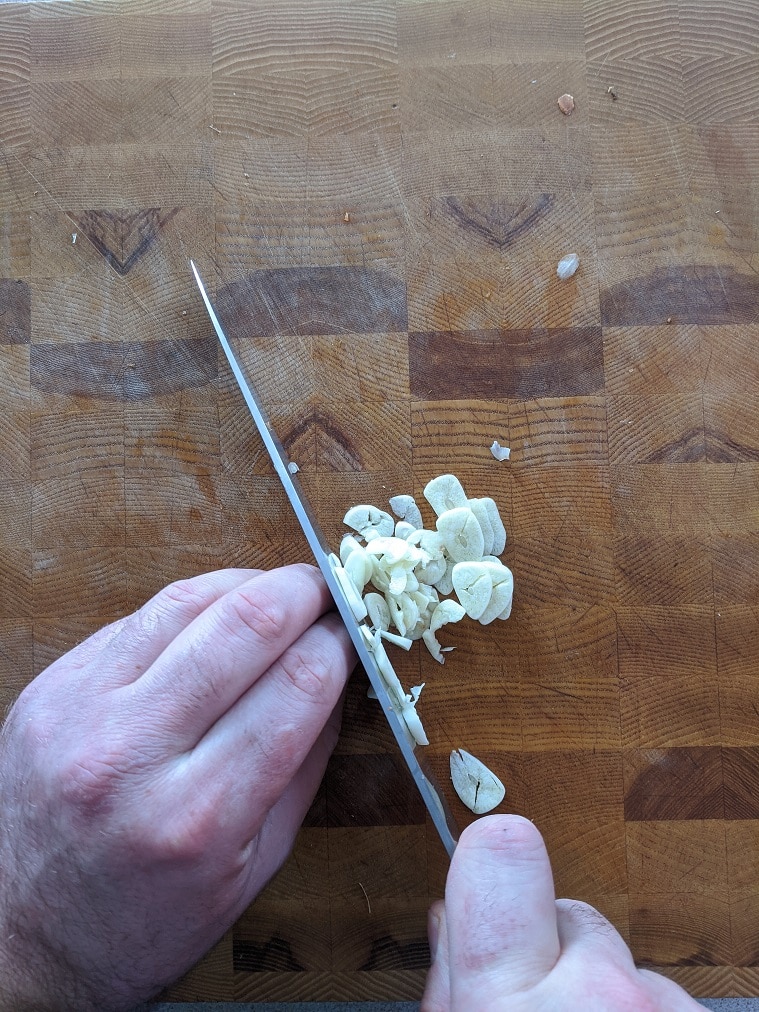
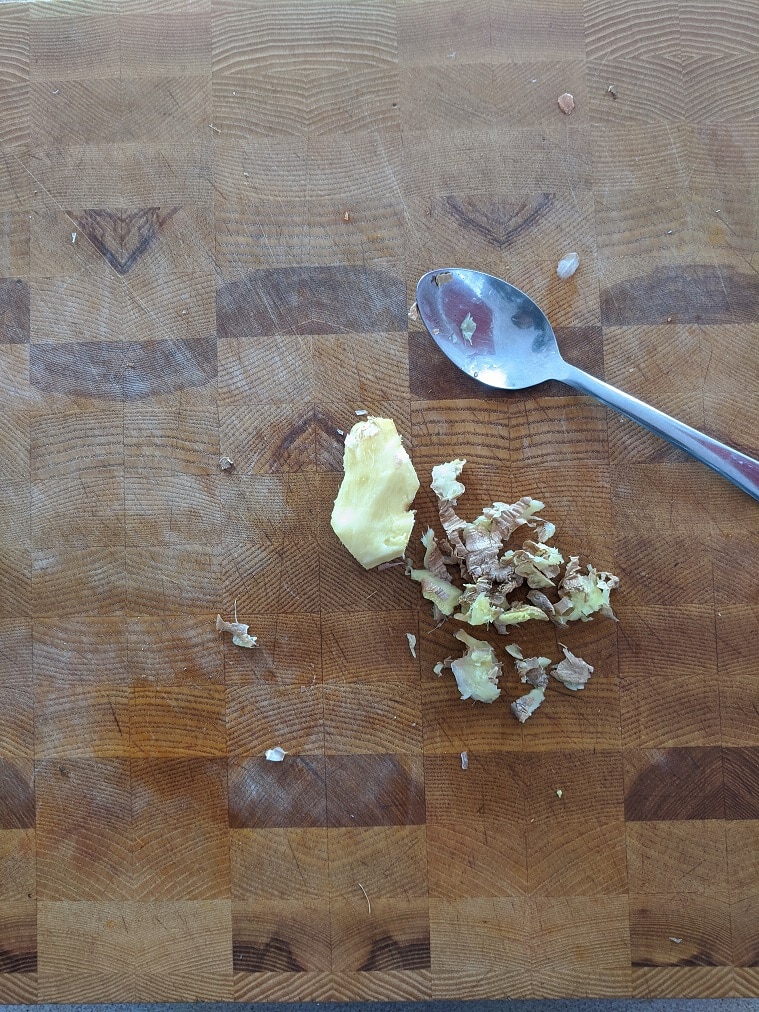
The other soup ingredients are one cup of sliced onion, one tablespoon sliced garlic, one tablespoon chopped ginger, one cup of orange juice and four cups of hot water. When I made the soup, I used about two to three tablespoons of ginger which was a bit overpowering. So I lowered the amount in the recipe to one tablespoon. If you like a strong ginger flavour, go with the full two tablespoons. Otherwise, leave it one.
Making The Soup
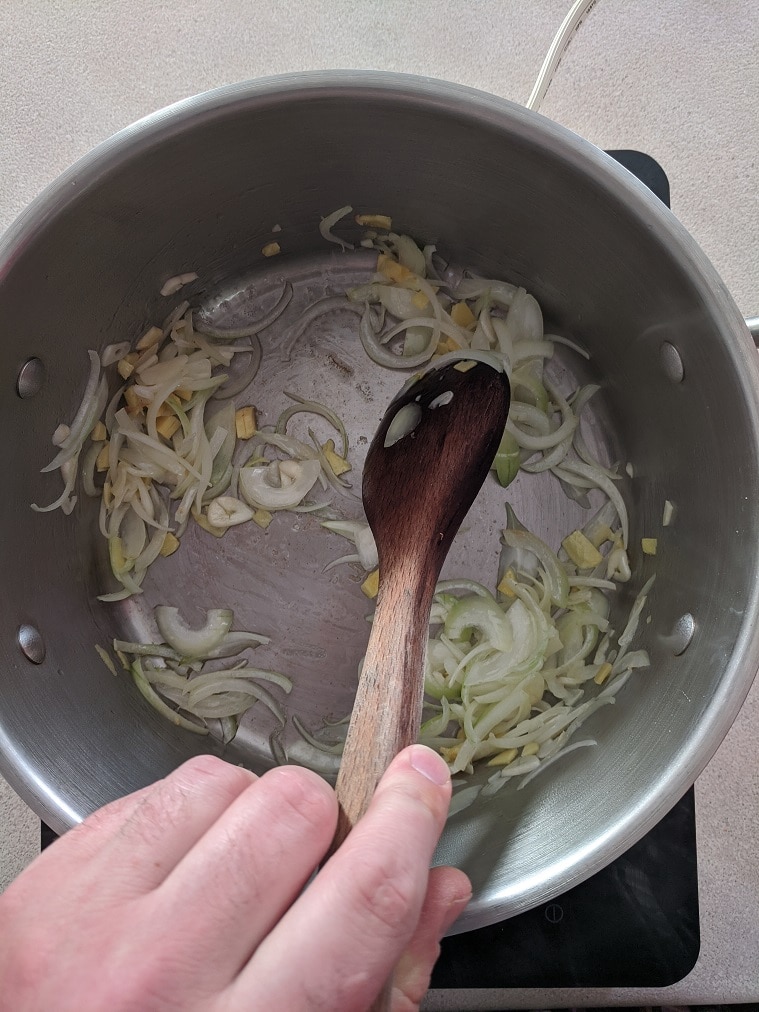
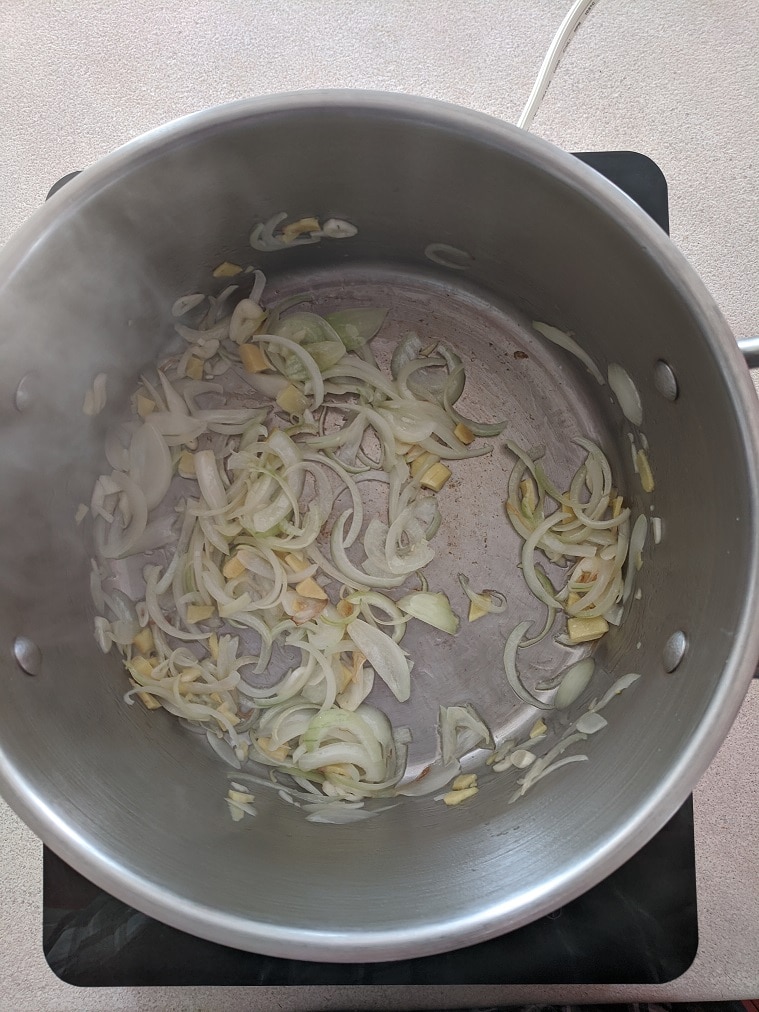
Warm a medium pot over medium-high heat. Add in a teaspoon or two of oil along with the onion, garlic, and ginger. Cook for three to four minutes or until the onions soften.
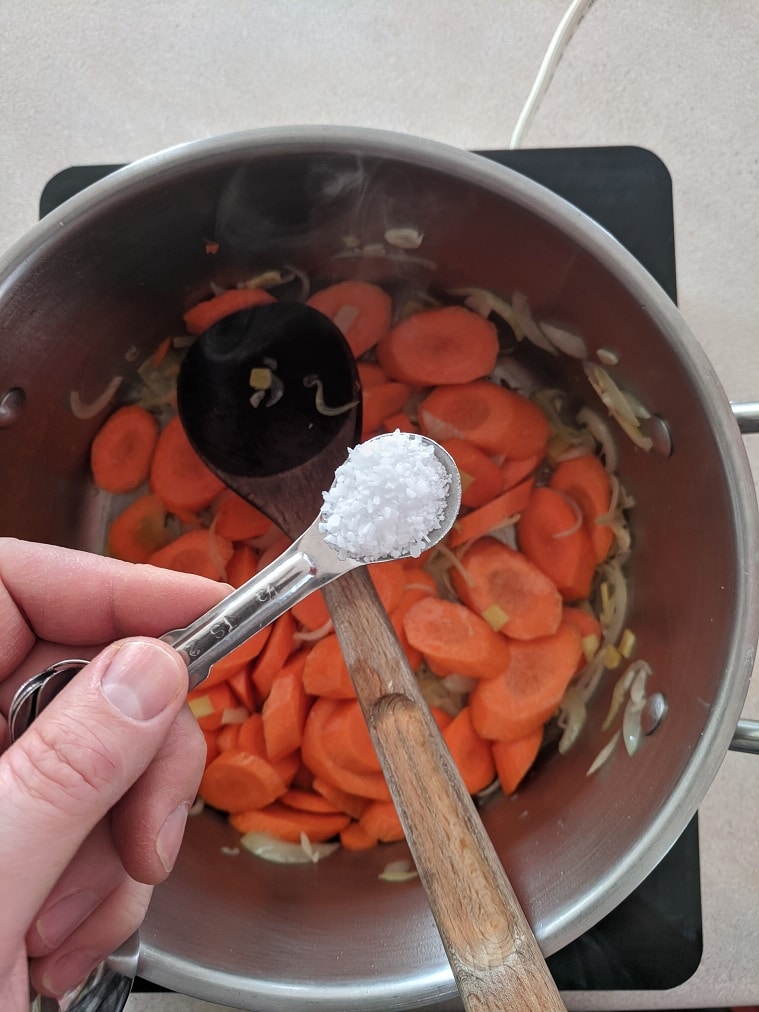
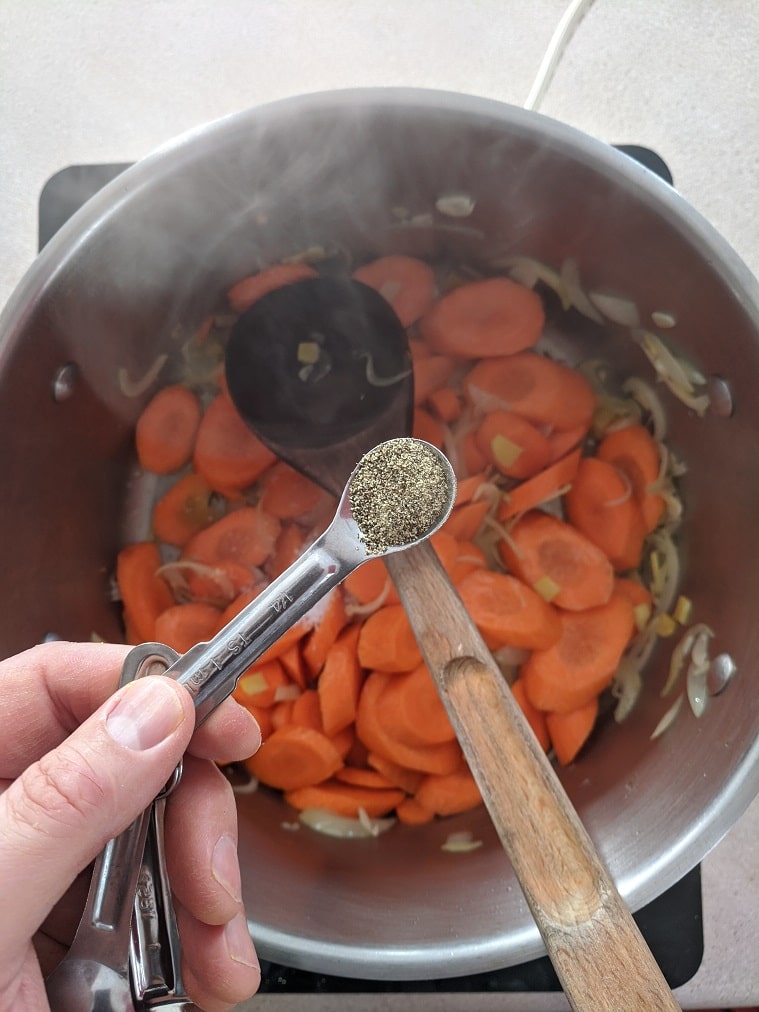
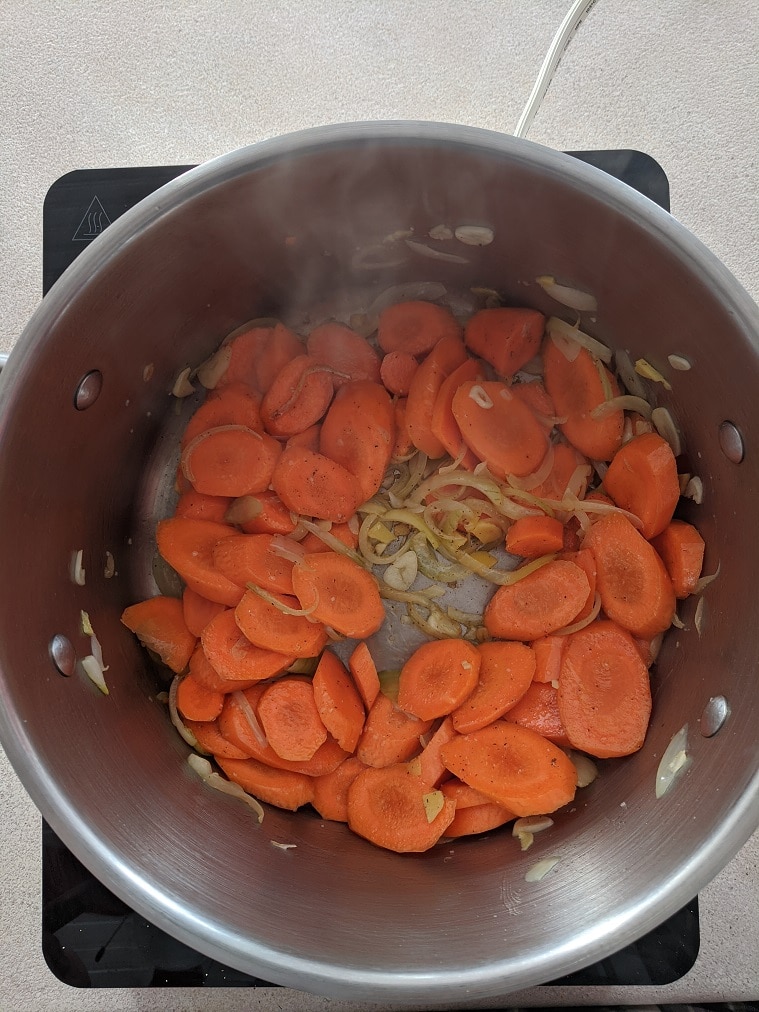
Adding the carrots
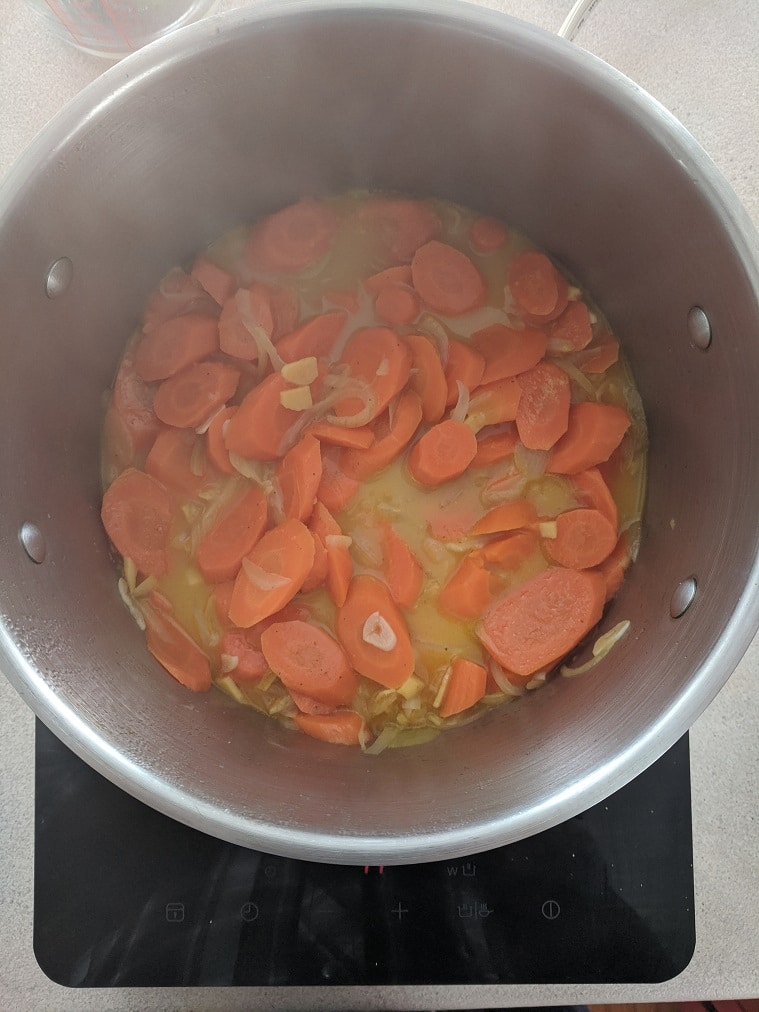
Add the carrots into the pot along with half a teaspoon of Kosher salt and a quarter teaspoon of black pepper. Cook the carrots for three minutes, then add the orange juice and cook for another three minutes before adding the water. Bring to a boil, turn the heat down to medium-low and cook until the carrots are very tender. This should take fifteen to twenty minutes, depending on how big you cut your carrots.
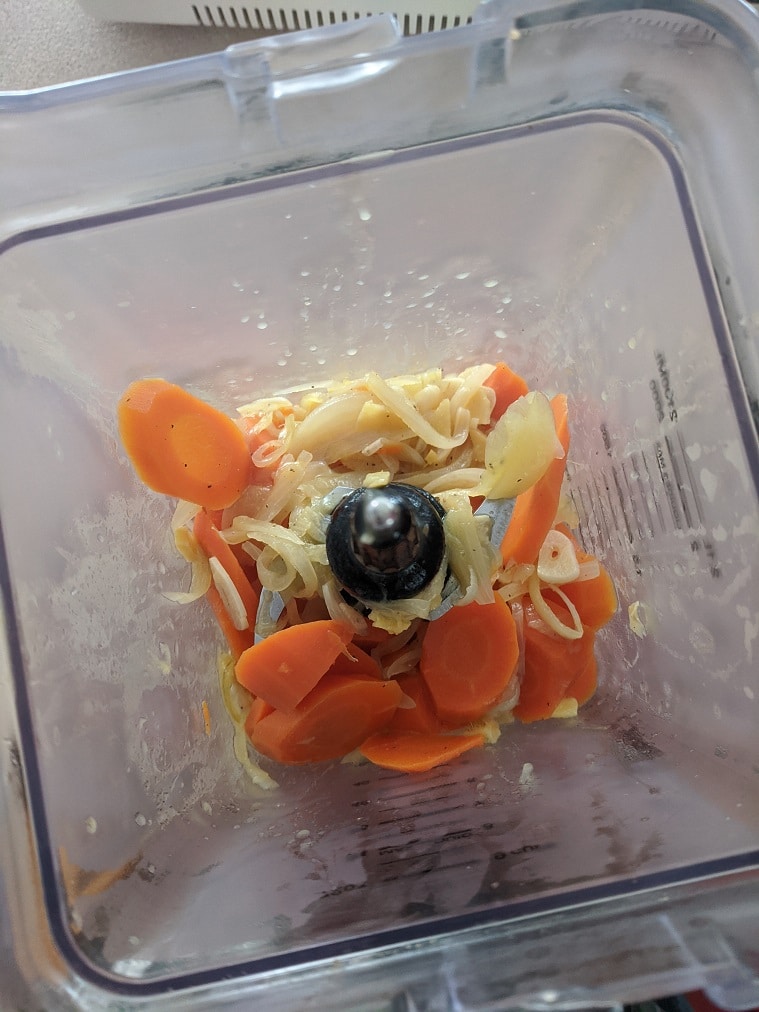
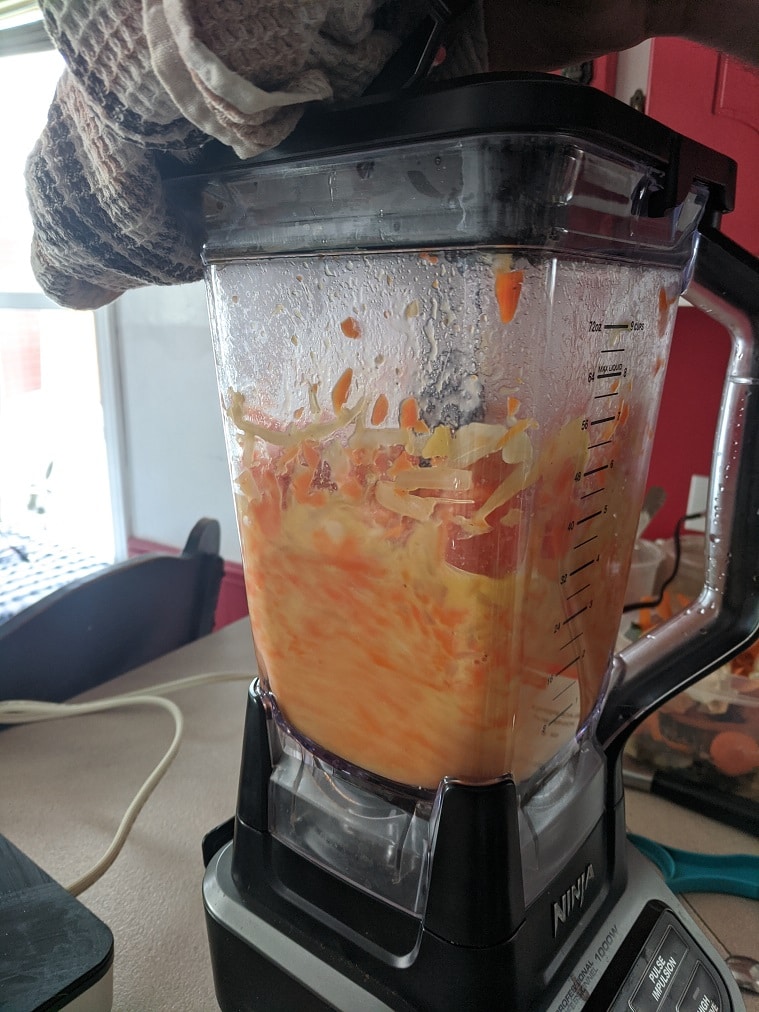
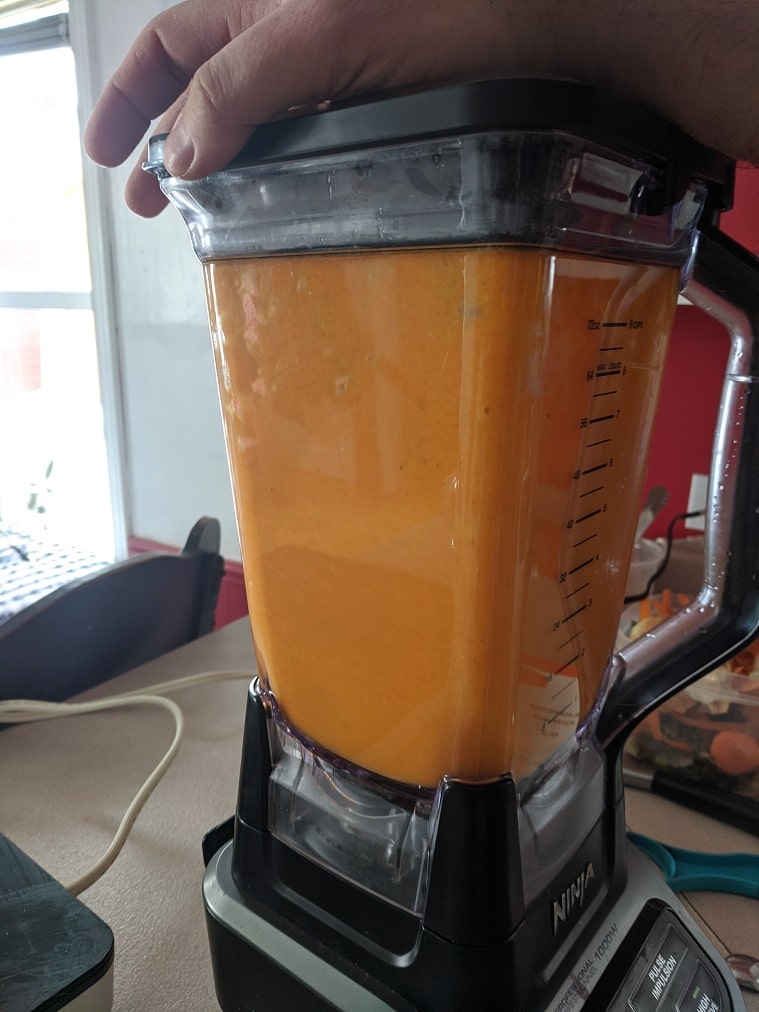
Purée The Soup
Once the carrots soften, allow the soup to cool slightly for about ten minutes, then pour it into a blender to purée. You can also use an immersion blender to purée if you prefer. When you purée the soup in your blender, be very careful and make sure to vent the lid. If the lid to your blender has a removable piece in the center, take it out and cover the hole with a towel. This will prevent pressure build-up inside your blender, which can cause the lid to fly off and hot soup to go all over you and your kitchen. Purée the soup until it is smooth. You may need to add a little more water to it to get the consistency you want. After the soup is puréed, taste it and adjust the seasoning with salt and pepper, then serve.
Carrot and Ginger Soup
A simple and delicious carrot and ginger soup recipe that you will love.
As I said in the intro to this post, if you love carrot and ginger soup, I think you are really going to like this recipe. But, don’t take my word for it. Make it for yourself and let me know what you think.
I can finally announce that I have written a cookbook. It’s called the 5-Ingredient Cookbook for men (of course, it is for everyone). It officially goes on sale on March 16th, but you can preorder it now from Amazon in Canada here, and Amazon in the US here.
Thank you for reading this post. Please share it on Facebook, Pinterest, or Twitter to help Chef’s Notes grow. Subscribe to Chef’s Notes below, and you will never miss a post again.
This week at Chef’s Notes is all about helping you craft a perfect Valentine’s day meal at home. Let’s face it, you probably aren’t going to a restaurant this year. Today, we’ll make a delicious Roasted Squash and Goat Cheese Salad with homemade balsamic vinaigrette and almonds. This salad makes the perfect starter for your Valentine’s Day meal. On Wednesday, we’ll make the main course, and on Friday we will make dessert. By the end of the week, you’ll have all the knowledge and skill to make a delicious three-course Valentine’s Day meal for two. Let’s get to it.
Roasted Butternut Squash
For two people, you’ll need half of a butternut squash. I prefer the bottom half for this salad, you’ll see why in a little bit. Cut the top half off your squash, use it to make soup, or roast it for a side dish. Cut the bottom part of the squash in half and remove the seeds. I recommend peeling the squash even though I didn’t. It’s easier to eat if you do. Once you have the bottom of the squash freed of seeds and skin, slice it into one-centimetre slices. Put the squash on a sheet pan lined with parchment paper and drizzle with olive oil, salt and pepper. Roast in a 400°f oven for 35 minutes or until the squash is tender and slightly brown. Take the squash out of the oven and let it cool to room temperature.
Balsamic Dressing
While the squash is roasting, make the balsamic vinaigrette. You can find the full measurements in the recipe below. Start with mustard powder, salt, pepper, and honey. Then add in your balsamic vinegar. Slowly whisk in your oil, perferrably canola or vegetable oil. The dressing should be thick enough to coat the back of a spoon. Put the finished dressing in a jar and store it in the fridge until you are ready to use it.
Putting The Squash Salad Together
The salad ingredients are the roasted squash, the balsamic vinaigrette, arugula, sliced almonds, and goat cheese. If you aren’t a fan of arugula, you can substitute it for baby spinach or mesclun if you’d like. I really like arugula and I find the peppery nuttiness of it balances the tartness of the dressing with the sweetness of the squash. The goat cheese can be substituted for blue cheese, parmesan, or old cheddar. You can also substitute the almonds for hazelnuts, cashews, or pecans.
Dressing The Arugula
For two people put three to four cups of greens in a mixing bowl and toss with two to three tablespoons of the dressing. You want just enough dressing to coat the greens, but not drown them.
Plating The Squash Salad
Get two small round plates, and plate the roasted squash in a circle around the middle of the plate. Put the dressed greens in the middle of the squash, then top with a few tablespoons of the cheese and the nuts. If you’d like, you can finish the salad with a little bit of fresh cracked pepper and a pinch of salt.
Squash Salad
Roasted butternut squash salad with balsamic vinaigrette, arugula, almonds and goat cheese. This makes the perfect start for a dinner party, or a romantic dinner for two.
Keyword: Butternut Squash, Starter, Valentine’s Day
Servings: 2servings
Author: Chef’s Notes
Ingredients
Roasted Butternut Squash
The bulb of a butternut squash
2tbspolive oil
Salt and Pepper
Balsamic Vinaigrette
2tbspBalsamic vinegar
1/2tspmustard powder
1tsphoney
1/4tspsalt
Pinchof pepper
1/2cupcanola oil
Roasted Squash Salad
4cupsof arugula
1/4cupssliced almonds
1/4cupof goat cheese
Instructions
Roasted Butternut Squash
Cut the squash bulb in half through the middle. Remove the seeds and peel it. Slice the squash into 1 cm slices.
Put the squash slices on a sheet pan lined with parchment paper and drizzle with olive oil, salt and pepper.
Roast the squash in a 400°f oven for 35 minutes of until the squash is soft and slighty brown around the edges. Take the sqaush out of the oven and let it cool to room temperature.
Balsamic Vinaigrette
In a medium mixing bowl combine the mustard powder, salt, pepper, honey, and balsamic vinegar.
Whisk in the canola oil in a slow steady stream. If you notice that the oil isn't mixing in, stop adding oil, and whisk until it has been incorporated then continue to whisk in more oil.
The finished dressing should be thick enough to coat the back of a spoon.
Once the dressing is made, transfer it to a jar and put it in the fridge until you are ready to use it.
Roasted Squash Salad
Put the arugula in a large mixing bowl and toss with 2 to 3 tablespoons of the balsamic vinaigrette. You want just enough dressing to goat the arugula, but not so much that it is drowning.
Get to small round plates and palce the roasted squash in a circle around the center of the plates. Put the dressed arugual in a pile in the center of the squash circle.
Divide the almonds and goat cheese among the two salads. Season with salt and pepper, and serve.
The hardest part of making this salad is the dressing. If you are that intimidated by it, you can buy balsamic vinaigrette at the grocery store instead. The fact is that this a very simple salad that looks beautiful and tastes amazing. Whoever you are making this salad for is going to be blown away because it is exaclty the type of thing you would get in a nice restaurant on Valentine’s Day. The difference is that you made it yourself for a fraction of the price. You can’t beat that. Remember to come back on Wednesday for your Valnetine’s Day main course.
Thank you for reading this post. Please share it on Facebook, Pinterest, or Twitter to help Chef’s Notes grow. Subscribe to Chef’s Notes below, and you will never miss a post again.
If you’re looking for a soup that will fill you up, delight your senses, and cure your winter blues, look no further. This Curried Lentil Soup has everything you need. It’s hearty. It’s a little spicy. And, it’s a lot delicious. You probably even have most, if not all, of the ingredients on hand to make right now. That begs the question; What are you waiting for? Let’s get to it.
Ingredients
This Curried Lentil Soup has minimal ingredients. Again, you probably have most on hand already. You can find the recipe measurements at the end of the post, so for now, I’ll just run through the ingredients list. To start, you’ll need an onion, a carrot and a celery stalk. You’ll also need two cloves of garlic, a small piece of ginger, red chilli with the seeds removed, a bit of tomato paste, and two small potatoes. For spices, you need cumin, coriander, and garam masala. You can buy garam masala in most grocery stores or, you can make your own, which I’ll share a recipe for at the end of the post. Finally, you’ll need water and some salt and pepper.
An optional ingredient that I didn’t think about until now is a quarter cup of frozen peas. Those would make a great addition to the soup. Also, the lentils should be soaked in water for half an hour before you start cooking. Soaking will soften the lentils and shorten the overall cooking time.
Making The Curried Lentil Soup
Getting Started
To start the soup, heat a medium-sized (2 qt) pot over medium-high heat. Add in two tablespoons of olive oil along with the onion, carrot, and celery. Cook for five minutes or until the onions soften. Stir occasionally.
Flavouring the Soup
The next step is to start building the flavour of the soup. Add the ginger, garlic, and chilli and cook for one minute then add in the spices and cook for thirty more seconds. It’s important that you stir while cooking these ingredients otherwise they may burn. Finally, add in the tomato pasta and cook for two minutes. Again, stir the whole time and make sure to scrape the bottom of the pot.
You should follow the timing I’ve laid out becasue that will open up the ingredients and pull out their flavours. For example, cooking the tomato paste for two minutes will take away the harshness of the paste and even make it a little sweet. Cooking the spices for thirty seconds will cause them to start releasing their oils, giving the soup more flavour than it otherwise would have.
Make the soup a soup
After the tomato paste has had time to cook, add in the water, potatoes, salt, and pepper. Bring the pot to a boil and let it cook for five minutes. Do this to ensure that the potatoes are cooked at the same time as the lentils, which will be added next.
Adding The Lentils and Finishing The Soup
Once the potatoes have boiled for five minutes, drain the lentils and add them into the pot. Bring the pot back to a boil, turn the heat down to medium-low and simmer the soup for twenty minutes or until the lentils and vegetables are tender. Taste the soup and adjust the seasoning with salt and pepper as needed. If you were going to add peas to this, you should add them when you add the lentils.
Serving the Curried Lentil Soup
This curried lentil soup was delicious on its own, but I really wanted something to dip in it. So, I made roti or Indian flatbread using chickpea flour. You can find more about the bread from the Instagram post below or check out the book I got the bread recipe from; The Indian Cooking Course Cookbook.
1tspminced chilli, seeds and ribs removed.Use 1/2 tsp if you don't like heat.
1cupdiced onion
1/2cupdiced carrot
1/2cupdiced celery
1cupdiced potatoes
2tspgaram masala
1tspcumin
1/2tspcoriander
2tbspolive oil
2tbsptomato paste
6cupswater
1tspKosher salt
1/4tspblack pepper
Instructions
Soak the lentils in 2 cups of cold water for 30 minutes.
While the lentils are soaking, prepare all of your other ingredients.
Heat a 2 qt pot over medium-high heat.
Add in the olive oil, onion, celery and carrots and cook, stirring now and again, for about 5 minutes or until the onions start to soften.
Add in the ginger, garlic, and chilli, cook for one more minute, then add in the spices and cook, stirring, for 30 seconds.
Put the tomato paste in the pot and cook for 2 minutes. Make sure to stir the tomato paste and scrape the pot's bottom to prevent it from burning.
Add the water, salt, pepper and potatoes. Turn the heat up to high and bring the pot to a boil—Cook for 5 minutes.
Drain the lentils and add them to the pot. Bring it back to a boil, turn the heat down to medium-low and simmer the soup for 20 minutes until the lentils and vegetables are tender.
It’s been cold and stormy here the last few days, and it looks like that weather is going to keep up for a while. This curried lentil soup is the exact thing you need to beat the bad weather blues. It will warm you up. It will fill you up. And, it will make everything feel okay, at least for a little while. Give it a shot! If you do, please remember to rate the recipe.
Thank you for reading this post. Please share it on Facebook, Pinterest, or Twitter to help Chef’s Notes grow. Subscribe to Chef’s Notes below, and you will never miss a post again.
We use cookies on our website to give you the most relevant experience by remembering your preferences and repeat visits. By clicking “Accept”, you consent to the use of ALL the cookies.
This website uses cookies to improve your experience while you navigate through the website. Out of these, the cookies that are categorized as necessary are stored on your browser as they are essential for the working of basic functionalities of the website. We also use third-party cookies that help us analyze and understand how you use this website. These cookies will be stored in your browser only with your consent. You also have the option to opt-out of these cookies. But opting out of some of these cookies may affect your browsing experience.
Necessary cookies are absolutely essential for the website to function properly. This category only includes cookies that ensures basic functionalities and security features of the website. These cookies do not store any personal information.
Any cookies that may not be particularly necessary for the website to function and is used specifically to collect user personal data via analytics, ads, other embedded contents are termed as non-necessary cookies. It is mandatory to procure user consent prior to running these cookies on your website.