Looking for a hearty and flavorful soup that’s a little out of the ordinary? Look no further than this Peanut Butter Black Bean Soup recipe. While black bean soup is a staple of Southwestern US and Mexican cuisine, this recipe takes inspiration from various African cuisines to create a unique and satisfying dish. The combination of savoury black beans and rich, nutty peanut butter results in a flavour that’s both familiar and unexpected. In this post, we’ll show you step-by-step how to make this delicious and easy-to-prepare soup so that you can enjoy it in the comfort of your own home. Let’s get started!
Black Bean Soup Ingredients
If you’re looking for a flavorful and satisfying soup, the ingredients in this Peanut Butter Black Bean Soup are sure to hit the spot. The soup starts with a base of diced onion, minced garlic, grated ginger, and tomato paste, which create the foundational flavours and aromas that make this soup so delicious. The addition of diced potato and sweet potato adds substance to the soup while also providing a touch of natural sweetness that balances out the savoury ingredients. Diced red and green bell peppers also play a key role in providing flavour and texture to the soup.
Of course, the star ingredient of this recipe is the black beans. Not only do they add protein and essential nutrients, but they also provide a meaty texture that helps make this soup more filling and satisfying. For the broth, you can use chicken stock or water – both work well, and the choice is up to you. Finally, a bit of brown sugar and peanut butter add the perfect finishing touch to the soup, creating a rich and complex flavour that’s sure to delight your taste buds.
Spices
To create the rich and complex flavours in this Peanut Butter Black Bean Soup, a variety of spices are used. Cinnamon, cardamom, allspice, nutmeg, cayenne, coriander, cumin, smoked paprika, black pepper, and salt all play a role in creating the final flavour profile. It may seem like a lot of spices, but each one brings a unique flavour and aroma to the soup that’s worth the effort.
If you’re missing some of the spices in your pantry, don’t worry – you can easily substitute them with other spice blends. For example, you can use one tablespoon of either Madras Curry Powder (yellow curry), Garam Masala, or Berbere Spice to replace all of the spices except for the salt and pepper. These spice blends will bring a similar level of complexity and flavour to the soup, so you won’t be missing out on anything.
If you’re interested in making your own spice blends, we’ve included recipes for Madras Curry Powder and Garam Masala at the end of this post. You can also find these spice blends at your local grocery store, or you can order them online if they’re not readily available in your area. Whatever spice blend you choose, we’re sure that the final flavour of the Peanut Butter Black Bean Soup will be absolutely delicious.
Making Black Bean Soup
Building The Flavour
The key to making this Peanut Butter Black Bean Soup truly delicious is to build layers of flavour that complement each other. To start, add one tablespoon of olive oil to a 3-quart pot over medium-high heat. Once the oil is heated, add the diced onions and cook for about three minutes or until they begin to soften. This will help release the natural sweetness of the onions and create a strong foundation of flavour for the soup.
Next, add the minced garlic to the pot and cook for another minute. Garlic is a key ingredient in many soup recipes, adding an intense and slightly sweet flavour that pairs well with the other ingredients in the soup. By adding it after the onions have cooked for a few minutes, you’ll allow the garlic to cook just enough to release its aroma and flavour without burning it.
As the onions and garlic cook, be sure to stir them frequently to prevent burning and to ensure that they cook evenly. This will help to build a base layer of flavour that will continue to develop as you add in the other ingredients. With the right blend of spices and seasonings, you can create a complex and satisfying soup that’s sure to be a hit with family and friends.
For the full recipe and all the measurements, please refer to the printable recipe below. With a little bit of patience and careful attention to detail, you’ll be able to create a soup that’s both comforting and flavorful.
Adding Depth
To further enhance the depth of flavour in the Peanut Butter Black Bean Soup, incorporate the grated ginger and blend of spices into the pot. Add them to the pot with the onions and garlic, and cook, constantly stirring, for about thirty seconds. This will help to release the aromatic flavours of the spices and ginger.
Next, add the tomato paste to the pot and cook for two more minutes. This will help to deepen the flavour and colour of the soup while also adding a subtle sweetness that balances out the other spices. As you cook the tomato paste and spices, be sure to keep stirring and scraping the bottom of the pot. This will help to prevent burning and ensure that the flavours are evenly distributed throughout the soup.
By adding these ingredients and taking the time to cook them properly, you can create a rich and complex flavour profile that will satisfy your taste buds. Don’t be afraid to experiment with the blend of spices to find a combination that’s perfect for you. The beauty of soup is that it’s easy to adjust and customize based on your personal preferences. With a little bit of patience and careful attention to detail, you’ll be able to create a soup that’s both comforting and flavorful.
Finishing The Peanut Butter Black Bean Soup
Now that the spices and seasonings have had a chance to develop, it’s time to finish the Peanut Butter Black Bean Soup. Add the water or stock to the pot, and stir to lift any stuck bits of food off the bottom of the pot. Turn the heat up to high and bring the liquid to a boil.
Next, add in the diced potatoes and sweet potatoes and cook for about five minutes. This will allow the potatoes to cook while also absorbing the flavours of the soup.
Once the potatoes have cooked for five minutes, add in the black beans and diced peppers. Turn the heat back down to medium-high, and season the soup with salt and pepper to taste. Cook the soup for five more minutes, allowing the black beans and peppers to soften and the flavours to meld together.
Stir in the peanut butter and brown sugar, which will add a rich and nutty flavour to the soup. Turn the heat down to low and let the soup simmer for about ten minutes, allowing the flavours to meld together even further. Be sure to taste the soup and adjust the seasoning with salt and pepper as needed.
Once the soup has simmered for ten minutes, it’s ready to serve. Ladle the soup into bowls and garnish with your favourite toppings, such as sour cream, chopped cilantro, or avocado. The finished soup should be thick, hearty, and full of rich and complex flavours that will satisfy your taste buds.
Serving The Peanut Butter Black Bean Soup
Once the Peanut Butter Black Bean Soup is ready, it’s time to serve it up and enjoy. Ladle the soup into four bowls, and top each one with a small dollop of plain yogurt or sour cream. This will help balance the flavours and add a touch of tanginess to the dish.
Next, garnish the soup with thinly sliced green onions, which will add a pop of freshness and colour to the dish. You can also add additional toppings if you like, such as chopped cilantro, diced avocado, or a sprinkle of grated cheese. These toppings can help to add even more flavour and texture to the soup.
Finally, the soup is best served with some crusty bread or buttered bread on the side. This will allow you to soak up the flavorful broth and enjoy every last bit of the soup. You can also serve the soup with tortilla chips or crackers for an added crunch.
With its rich and complex flavour profile and hearty texture, this Peanut Butter Black Bean Soup will surely be a hit with family and friends. So go ahead and enjoy this delicious and nutritious soup, and don’t forget to experiment with your own custom toppings to make it your own.
Peanut Butter Black Bean Soup
Change up your favorite black bean soup with our Peanut Butter Black Bean Soup recipe. This unique soup uses African-inspired flavors, including peanut butter and spices, to create a rich and satisfying dish. Say goodbye to the same old Southwest or Mexican-inspired black bean soups and try something new today!
Put the olive oil and onions in a 3-qt pot preheated on medium-high. Cook for three minutes or until the onions start to soften.
Add in the garlic and cook for another minute, then add in the ginger and spices. Cook the ginger and spices, stirring for thirty seconds, then add the tomato paste and cook for two minutes stirring the whole time.
Add the water or stock, turn the heat up to high and bring to a boil, then add in the potatoes and sweet potato.
Boil the potatoes for five minutes.
Add the black beans and peppers, turn the heat back down to medium-high, season with the salt and pepper, and cook for another five minutes.
Stir the peanut butter and sugar into the soup, and cook for five more minutes.
Turn the heat down to low and simmer for 10 minutes.
Serve the soup garnished with a dollop of plain yogurt and sliced green onions.
When I first set out to make this Peanut Butter Black Bean Soup, I had a completely different vision in mind. But as I was cooking and experimenting with different flavours and ingredients, I made some adjustments and alterations to my original concept. The result? The rich and flavorful soup that you’ve seen here.
I have to say, I’m absolutely thrilled with how this recipe turned out. I know that some people may be skeptical about the idea of adding peanut butter to a soup, but trust me when I say that it makes all the difference. The peanut butter adds depth and richness to the soup that just wasn’t there before, elevating the dish to a whole new level of deliciousness.
I encourage you to give this recipe a try, especially on a chilly winter evening when you’re craving something warm and comforting. The unique blend of African-inspired flavours, including the richness of the peanut butter and a blend of aromatic spices, make this soup a standout dish that’s sure to please. So go ahead and give it a try, and let me know what you think. I’m confident that you’ll love it just as much as I do.
Thank you for reading this post. Share it on Facebook, Pinterest, or Twitter to help Chef’s Notes grow.
Subscribe to Chef’s Notes below, and you will never miss a post again.
Garam Masala
Garam Masala is what curry powder should be. It is a much more flavourful and authentic spice blend then the yellow curry powder we are all used to.
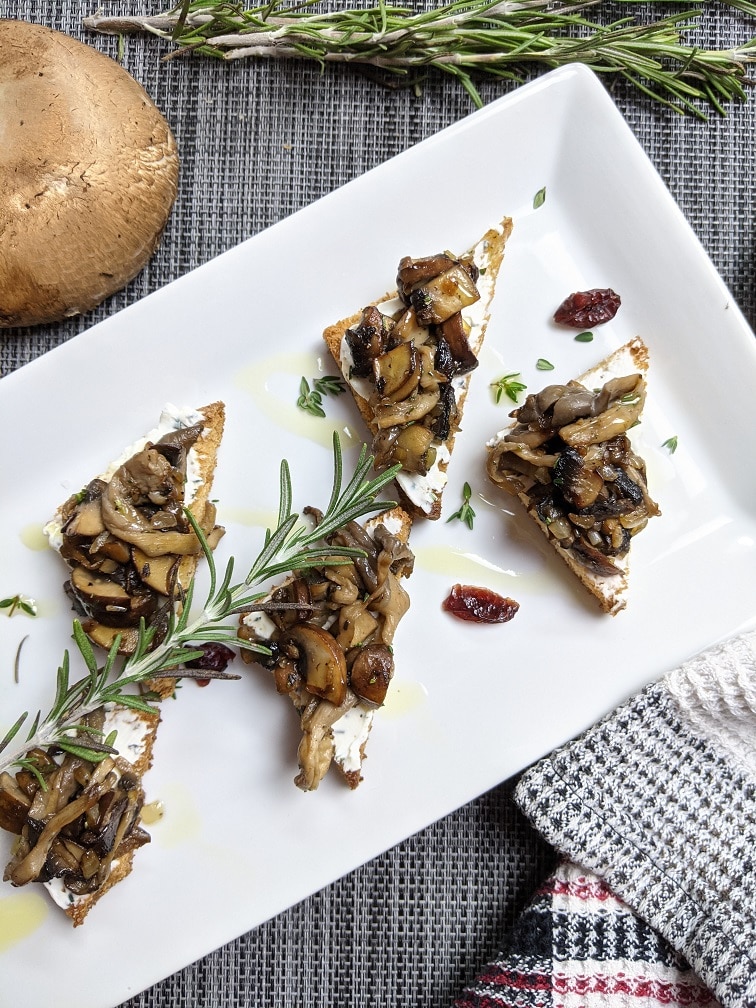
For the final Chef’s Notes post of the year, I wanted to share something very special with you. If you are looking for the perfect hors d’oeuvre for your Christmas party, New Year’s Eve, or just for a romantic evening, look no further. Mushrooms on toast with herbed cream cheese is exactly the thing for you, as long as you like mushrooms. Let’s take a look at what may just become your new favourite snack and your go-to party treat. Let’s get to it.
The Toast
You obviously can’t have mushrooms on toast without toast. So, first up, we need to toast some bread. The bread I use for this is Promise Gluten-Free Sourdough. You can use any bread you want but don’t cheap out. Please, don’t use regular white bread for this. It deserves better. Buy a loaf of sourdough or a baguette or something like that. Cut the bread into quarter-inch (1 cm) thick pieces. I like to cut the crusts off, though you don’t have to. Put the bread on a sheet pan, drizzle or brush it with olive oil, season it with salt and pepper, then bake at 400°f for about twelve minutes or until the bread is golden brown and crisp. The bread should be crunchy on the outside but soft in the middle. In total, you want eight little triangles for this recipe.
Mixing The Cream Cheese
The second part of this dish is cream cheese. Usually, when I do this, I use ricotta rather than cream cheese, but ricotta can be expensive, and cream cheese makes a good, cheaper option. However, if you want to use ricotta, the recipe is the same. You can also skip this step altogether if you’d like and buy some herb and garlic cream cheese, though I find it tastes better if you mix it yourself.
To make the herbed cream cheese, allow half a cup of cream cheese to soften at room temperature for about thirty minutes. Add a half teaspoon of each fresh chopped rosemary and thyme and a quarter teaspoon chopped garlic to the softened cream cheese. Mix well and set aside.
Cooking The Mushrooms
The final component of Mushrooms on toast with herbed cream cheese is, of course, mushrooms. The mushrooms that I used are a small portabello, three large creminis and a few oyster mushrooms. In total, it worked out to be a half cup of each mushroom after they were cut. Thinly slice the creminis, dice the portobellos, and pull the oyster mushrooms apart. The idea is to cut the mushrooms into different shapes to create a variety of textures. You can use whatever types of mushrooms you’d like, but you should try and cut them all differently.
Cooked along with the mushrooms are a quarter cup of minced onion, one teaspoon of minced garlic, and half a teaspoon each of chopped thyme and rosemary.
Cooking the mushrooms
To cook the mushrooms, heat a medium skillet over medium-high heat. Add in one tablespoon each of butter and olive oil. Once the butter melts and starts to foam, add in the onion and cook for three minutes or until the onions start to soften. Add in the mushrooms and garlic—Cook for four to five minutes or until the mushrooms start to brown. Add in the herbs, and season with salt and pepper. The mushrooms are done when they are tender and lightly browned. There should be no excess moisture in the bottom of the pan. If there is, it means that your pan wasn’t hot enough, or you added too many mushrooms for the pan’s size. If you want to double this recipe, either use a larger pan or cook the mushrooms in batches.
Mushrooms on Toast With Herbed Cream Cheese
To assemble the hors d’oeuvre, spread a layer of the cream cheese on a piece of toast, top with a few spoonfuls of the mushrooms. Put the mushrooms on toast on a platter, drizzle lightly with olive oil, and sprinkle some thyme leaves around. Serve warm.
You can also make this with two full pieces of bread and serve it as it is for breakfast or top it with a fried egg. It is also great for lunch served with a salad.
Mushrooms on Toast with Herbed Cream Cheese
Are you looking for the perfect Holiday Hors d'Oeuvre? This is just the thing you're looking for. Sautéed mushrooms, on crispy bread, with cream cheese mixed with fresh herbs and garlic.
Keyword: Christmas, cream cheese, Mushrooms, party food
Servings: 8pieces
Author: Chef’s Notes
Ingredients
Toast
2slicessourdough breadcrusts cut off, and cut into four triangles
1tbspolive oil
salt
pepper
Cream Cheese
1/2cupcream cheeseroom temperature
1/2tsprosemary
1/2tspthyme
1/4tspgarlic
Mushrooms
1tbspof olive oil
1tbspbutter
1/4cupminced onion
1/2cuppulled Oyster mushrooms
1/2cupdiced Portabello mushrooms
1/2cupsliced Cremini mushrooms
1tspgarlic
1/4tspsalt
1/8tsppepper
1/2tspchopped rosemary
1/2tspchopped thyme
Instructions
Toast
Put the bread on a sheet pan and drizzle or brush with olive oil. Season the bread with salt and pepper, then bake at 400°f for 12 minutes or until the bread is golden brown. It should be crisp on the outside and soft in the middle.
Cream Cheese
In a small mixing bowl, combine the softened cream cheese with the herbs and garlic. Mix well.
Mushrooms
Heat a medium skillet over medium-high heat. Add in the olive oil and butter. Once the butter melts and starts to foam, add in the onion and cook for 3 minutes or until the onion softens.
Add the mushrooms and garlic to the pan and cook for another 5 to 6 minutes or until the onions brown.
Add the herbs, and season with salt and pepper.
Mushrooms on toast with herbed cream cheese
Spread the cream cheese evenly on the eight pieces of toast.
Divide the mushrooms evenly among the toast then plate them on a platter.
Drizzle with a little olive oil and granish with some thyme leaves.
Lik the pear and blue cheese tarts from a few weeks ago, Mushrooms on Toast with Herbed Cream cheese are among my most popular hors d’oeuvres. Now, you can make it at home whenever you want. Enjoy!!
As I said in the intro to this post, this is my last post of the year. I’m going to take some time off to relax and spend with my family. I’ll be back on January 4th with all new posts. The first week back we are going to jump into two new series. The Wednesday series will be Hearty Soups, and the Friday series (which is a mini-series) will be all about Roasts. I am really excited about the New Year, and I hope that you are too.
Have a fantastic Christmas, or whatever you celebrate and a very Happy New Year. I’ll see you right back here in 2021.
Thank you for reading the post. If you liked it, remember to share it on Facebook, Pinterest, or Twitter. Did you know that Chefsnotes.com has over 400 posts just like this one? Subscribe to the blog below, and you will be notified of every new post so you will never a helpful tip or recipe again. And if you would like to know more about me, click the picture of me below to read my story “Life on the line.”
Last week I shared My Mom’s Cheese Ball Recipe, and it got me thinking that it would probably be a good idea to share some other holiday or Christmas hors d’oeuvre recipes. So, for the next few Fridays until Christmas, I am going to do exactly that. This week I will share my recipe for Caramelized Pear and Blue Cheese Tarts. Don’t let the name scare you. These are not complicated to make at all. I promise. I feature an item very similar to this on my hors d’oeuvres menu, and it is always popular, so I’m excited to share it with you. Obviously, most of us won’t be getting together in big groups this Christmas, so I’ve cut back all the recipes in this mini-series to suit two to four people, which should be ideal. Let’s get to it!
Tart Shells
When it comes to entertaining during the holidays, premade tart shells, puff pastry, and phyllo dough are your best friends. You can do so much with those three items as the base. I’ve never seen gluten-free puff pastry or phyllo here, but I did manage to get a hold of some gluten-free tart shells. I found them at Sobeys if anyone is looking for them.
To prepare the tart shells, I first defrosted them then poked them, or docked them, which is the technical term, with a fork and baked them at 375°f for fourteen minutes. The cooking time and temperature may vary depending on the tart shells you use, so always make sure to read the package’s instructions.
Caramelizing the pears
While the tart shells are baking get to work on the caramelized pears. Peel, core, and dice (1 cm x 1 cm) three bosc pears. Set them aside.
Additional Ingredients
Next up, peel and mince two shallots. You want about half a cup of minced shallot in total. If you don’t have or don’t want to buy shallots, you can use an equal amount of yellow onion, make sure to cut them as small as you can. Also, chop about one teaspoon of fresh thyme. You can use dried thyme for this, but fresh is much better. If you use dried thyme, use half as much and add into the pan with shallots, right in the beginning. You will need one tablespoon of cider vinegar, two tablespoons of sugar, two tablespoons of hot water, and a pinch of salt along with the shallots and thyme.
Cooking the pears
Heat a medium frying pan over medium heat. Put one tablespoon of butter in the pan and wait for it to melt and start to foam. Add the shallots and cook for two to three minutes or until they soften. If you are using dried thyme, add that in as well. Once the shallots have softened, add in the diced pears and cook for another three minutes or until they start to soften. Add in the sugar, vinegar, water, salt, and fresh thyme if you are using it. Cook the mixture, stirring, until all the liquid has evaporated. Take the pan off the heat.
Making the Pear and Blue Cheese Tarts
Assemble the pear and blue cheese tarts by spooning the pear mixture into the cooked tart shells. Top each tart with a few crumbled blue cheese pieces. Serve with dry white wine and enjoy. For lunch, you can also serve two of these tarts with a small green salad.
Pear and Blue Cheese Tarts
Things are going to be different this year, but they don't have to be THAT different. Enjoy pear and blue cheese tarts with the ones you love.
Cook the tart shells according to the package instructions.
Heat a medium skillet over medium-high heat. Add in the butter, wait for it to melt and foam, then add in the shallots and cook for two to three minutes or until they soften.
Add the pears to the pan and cook for three more minutes or until the pears start to soften as well.
Add the sugar, vinegar, and hot water. Cook for two minutes, then add in the thyme and a pinch of salt.
Cook until all the moisture has evaporated.
Remove the pan from the heat, spoon the pears into the pre-baked tart shells, and top with the crumbled blue cheese.
These Caramelized Pear and Blue Cheese Tarts are super simple, delicious and they look great. All the components can be prepared ahead and then assembled at the last minute, or you can make them all at once, as I did. Any guest, husband or wife, will be thrilled that you made these for them. They are the perfect thing for Christmas eve or New Years.
Thank you for reading the post. If you liked it, remember to share it on Facebook, Pinterest, or Twitter. Did you know that Chefsnotes.com has over 400 posts just like this one? Subscribe to the blog below, and you will be notified of every new post so you will never a helpful tip or recipe again. And if you would like to know more about me, click the picture of me below to read my story “Life on the line.”
Polenta is creamy, buttery, cheesy, and oh so delicious. It also happens to be very simple to make. If you can boil water and stir, you can make polenta. But why should you? You should make polenta not only becasue it is delicious but because it makes a great side dish for meat sauce, vegetarian ragu, braised meats, and more. It also can be eaten on its own with butter and cheese or topped with sausage and egg for a hearty breakfast. The point is that polenta is one of those all-purpose dishes that is a must for anyone who loves to cook or eat. Today, I’m going to show you how to make it. Are you ready? Good, let’s get to it.
What is Polenta?
Polenta is ground dried corn (cornmeal) cooked in boiling liquid (water, milk, or stock). The cooked cornmeal thickens and takes on a porridge-like consistency that is great when paired with rich tomato-based sauces or with lots of cheese and butter.
Different Types of Polenta
There are two main ways to serve polenta. They are creamy and firm. Firm polenta is creamy polenta that has had a little more moisture cooked out of it, and then it has been left to cool, cut into shapes and recooked. Creamy polenta has a higher moisture content and is served fresh. Firm polenta can be cut into many different shapes and fried or seared to develop a crisp exterior and a soft interior. Creamy polenta should resemble scrambled eggs.
Polenta Ingredients
Polenta really only has a handful of ingredients. They are cornmeal, liquid (water, milk or stock), seasoning (salt and pepper), cheese (usually parmesan) and butter (to add flavour and creaminess). Other ingredients added to polenta can include bay leaves, herbs like thyme and rosemary, different types of cheese like cheddar and asiago, or even onion and garlic.
How To Make Polenta
To make polenta, bring a pot of water to a boil (use four to five times more liquid than cornmeal), add the seasoning and herbs if you’re using them, then whisk in the cornmeal. Turn the heat down to medium and cook, continuing to stir, for about twenty minutes. Once the cornmeal has softened, and it resembles scrambled eggs take it off the heat and stir in some parmesan cheese and butter. Taste the polenta and adjust the seasoning with salt and pepper as needed.
What to serve polenta with
My favourite thing to serve with polenta is beef or pork braised in a rich tomato sauce. You can do the same with mushrooms. I also really like it served as a side with roasted meats. And I love it for breakfast with sausage, egg, and lots of cheese. Essentially, it can replace pasta or potato in most cases.
Perfect Polenta
Have you ever dreamed of a creamy side dish, made of corn and loaded with butter and cheese? Yes, you have? Oh, fantastic! Have I got the thing for you. This polenta fits all of those wants.
Add the salt and pepper to the boiling water then whisk in the polenta.
Turn the heat down to medium and cook the polenta, stirring constantly until it resembles scrambled eggs. About 20 minutes.
Take the polenta off the heat and stir in the butter and parmesan cheese.
Serve the polenta as it is, as a side dish with meat sauce or roasted meat, with mushroom ragu, or for breakfast with fried eggs and sausage. You can also spread the polenta out on a sheet pan and cool it, then cut it into shapes, and pan fry it to get a crisp exterior and a soft interior.
Polenta is one of the most versatile, easy to make, and delicious side dishes you’ll find. Not only that, but it seems fancy. It seems like the kind of thing that can only be made by true masters, but it really isn’t. Anyone, and I do mean anyone, can make polenta. So what are you waiting for? You probably already have all the ingredients on hand. Get cooking! And for more on polenta, take a look at this post I wrote way back in September of 2018 called Everything You Ever Wanted To Know About Polenta.
Thank you for reading the post. If you liked it, remember to share it on Facebook, Pinterest, or Twitter. Did you know that Chefsnotes.com has over 400 posts just like this one? Subscribe to the blog below, and you will be notified of every new post so you will never a helpful tip or recipe again. And if you would like to know more about me, click the picture of me below to read my story “Life on the line.”
Hello, and happy Monday! Today on Chef’s Notes, we will look at how to make a favourite dish among restaurant-goers the world over. Today, you are going to learn how to make Restaurant-Style Mushroom Risotto. One of the best things about learning to make Mushroom Risotto is that you’ll be able to use the same technique to make any risotto you’d like. Now, we’ve got a lot to cover, so let’s get to it.
What Is Risotto
Okay, first of all, what is Risotto? Well, that is a fantastic question. Thank you for asking it. When most people think of risotto, they think of rice. That’s not wrong, but it’s not fully right either. Though most commonly made with rice, Risotto is more of a cooking technique than one particular dish. The technique of risotto is to slowly and gradually cook a starchy ingredient by adding liquid in small amounts and stirring. This technique’s main purpose is to draw starch out of the main ingredient to give the dish a creamy texture. Cheaters will add cream to their risotto to achieve the creaminess. But that is very wrong. Ninety percent of the creaminess should come from the starch in the main ingredient. The other ten percent should come from butter and parmesan cheese. Risotto can be made with rice, barley, diced potato, or even oats.
Risotto Rice
There are two main types of rice used to make risotto. They are Arborio Rice and Carnaroli Rice. These rice are both short-grained and high in starch. They get very plump and tender when cooked. The high starch content makes them both perfect for risotto. You can find both rice types at most grocery stores, either in the rice and grain aisle or Italian food section. For my example risotto, I used President’s Choice Arborio Rice.
The Mushrooms
You can’t have Mushroom Risotto without mushrooms. Where I live, there is currently a limited selection of mushroom types, so I used cremini and button mushroom in my example risotto. You can use any kind of mushrooms you’d like. I suggest cremini, oyster, and king oyster mushrooms for great flavour and texture variety.
Mushroom stock
One of the key components for making risotto is stock. You can use chicken, beef, or vegetable stock. Or, since this is a Mushroom Risotto recipe, a mushroom stock may be a good idea. You can buy one, or make one very simply. Take the mushrooms’ stems and put them in a pot with two litres of water and a few sprigs of herbs of your choice. Bring the pot to a boil, turn the heat down and simmer for twenty to thirty minutes. You’ve just made mushroom stock.
Cooking the mushrooms
You don’t want to throw raw mushrooms into your risotto because they will get soggy and slimy. So, you have to precook them. You can cook the mushrooms in the oven by tossing them with olive oil, spreading them on a baking sheet and roasting them at 400°f for about 20 minutes. But, unless you are making a large batch of risotto, don’t bother doing that. Get a frying pan nice and hot over medium-high heat, add in a tablespoon each of olive oil and butter, and add them in the mushrooms. They should be quartered, or chopped, or sliced. Cook the mushrooms, about half a pound in total, with a bit of garlic until they are golden brown. Season them with salt and pepper, then take them out of the pan and set them aside. If the pan isn’t too dirty, you can use it to make your risotto. Otherwise, rinse it first.
Risotto Base
Risotto base is composed of five ingredinets. It is onion, garlic, rice, wine, and stock in that order. There are a couple of key points to keep in mind. First of all, when cutting your onions and garlic, you want them to be no bigger than a grain of rice, ideally. Don’t judge yourself too harshly, but do the best you can. Second of all, the pan should be hot when the onions go in, but not so hot that the onions burn. Remember the onions are cut very small and will burn quickly. The final point to keep in mind is that the stock needs to be hot. You can make the stock a head of time, or use store-bought, but make sure it is hot before using it to make your risotto. Adding cold stock to the risotto will cool the pan down, shock the rice and slow the cooking the down.
To make Risotto
Getting started
Heat a frying pan over medium heat. Add in a tablespoon each of olive oil and butter. Once the butter melts and starts to foam, add in the onion (1/2 cup). Cook the onion, stirring, for one minute, then add in the garlic (1 tbsp) and cook for about one more minute. Don’t burn the onion and garlic!
Adding the rice
Next up, add in the rice (1/2 cup). Use a quarter cup of rice per serving. Cook the rice with the onion and garlic for a minute or two or until the rice grains turn translucent and pearly. Then add in white wine (1/2 cup) and cook until it has all been absorbed by the rice while stirring. Oh yeah, there is going to be a lot of stirring.
Adding liquid
From this point on, it’s the same process over and over until the rice is cooked. Take a ladle or two of hot stock, add it to the rice and gently stir until all of the liquid has been absorbed, then add more and repeat. This is going to take about twenty minutes in total. You may be asking yourself why you don’t just add all the liquid at one? Well, because then you would make pilaf and not risotto. If you want that creamy, silky risotto texture, this is how you get it. The rice is done when it is plump and tender but not mushy. It should still have a tiny bit of chew to it.
From this point, any garnish can be add to the risotto. We are using mushroom but you could easily add seafood, peas, raddicho, whatever you want. What you’ve just made is risotto base, now you can make it any kind of risotto you want.
Make it Mushroom
To turn the risotto base into mushroom risotto, we need only to add in the mushroom. So, add in the pan-roasted mushrooms, a few fresh herbs (I used thyme, but rosemary or tarragon would work as well) along with a handful of parmesan cheese (about 1/2 a cup) and a tablespoon of butter. Season the risotto with salt and pepper to taste, and serve topped with a little more parmesan and a drizzle of olive oil.
Restaurant-Style Mushroom Risotto
For some reason making risotto at home never taste quite as good as the stuff you get in restuarants. Well, no more. This recipe is for restaurant-style mushroom risotto. Enjoy!
Keyword: Italian Food, Mushrooms, Risotto, Vegetarian
Servings: 2servings
Author: Chef’s Notes
Ingredients
1/2 lbMixed Mushrooms, quarteredsave the stems
4Sage leaves
2LWater
1/2 cup Onion, minced
2tbspGarlic, mincedsplit
3tbspButtersplit
2tbspOlive Oilsplit
1/2 cupParmesan, freshly grated
2tspThyme, fresh choppedor rosemary
1/2cupWhite Wine
Instructions
Take the mushroom stems and put them in a pot with the water and sage. Bring to a boil then turn the heat down and simmer for 20 minutes.
Heat a medium frying pan over medium-high heat and add in one tablespoon each olive oil and butter. Once the butter starts to foam add in the quartered mushrooms along with a big pinch of salt and pepper. Cook the mushrooms until they are golden brown then take off the heat and set aside.
Put the pan you cooked the mushrooms in, back on medium heat and add in another tablespoon of butter and olive oil. Add the onions and cook for 1 mintue then add in the garlic and cook for another minute.
Pour the rice into the frying pan and cook, stirring for 1 to 2 minutes or until the rice is translucent and pearly.
Add the wine into the pan and cook until it has been fully absorbed by the rice.
Now, add 1 to 2 ladles full of the mushroom stock to the pan and stir slowly unitl it has all been absorbed by the rice. Continue this process of adding liquid and stirring for about 20 minutes or until the rice is tender. Don't add more liquid until the first amount has been absorbed.
Add the mushrooms, thyme, parmesan cheese, and the final tablespoon of butter to the risotto then season to taste with satl and pepper.
Garnish the risotto with a drizzle of olive oil, shaved parmesan cheese, and some fresh herbs.
Good risotto should be able to stand up on it’s own while slowly falling away at the sides. The rice should be tender but still have a bit of a chew, and there should be an over-all creaminess to the dish. It seems like the kind of thing that is very complicated and that takes years of parctise, but if you can make porridge, you can make risotto. It’s pretty much the same thing only one is made with oats and one is made with rice. Give this a shot, play with it, make it your own, and let me know what you come up with. I always love to see and hear about what you all have made and what you think of the recipes. Have a great day, I’ll see you on Wednesday for General Tso chicken.
Thank you for reading the post. If you liked it, remember to share it on Facebook, Pinterest, or Twitter by clicking the icon to the left of the page. Did you know that Chefsnotes.com has almost 400 posts just like this one? Don’t ever miss a post again. Become a Chef’s Notes member right here. You will be notified of every new post. And if you would like to know more about me, click the link below to read my story.
Do you dream of eating a delicious panini whenever you want but don’t own a panini press? Get ready to have your dreams come true. Today, I am going to show you how to make a homemade roasted vegetable panini without a panini press. How are we going to do it? You’ll have to keep reading to find out. Let’s take a look.
The Vegetables
The vegetables used for the roasted vegetable panini are eggplant, zucchini, red bell pepper, and red onion. If you’d like to, you could include portobello mushroom, tomato, other coloured peppers, spinach or anything else you’d like. We have to cook the vegetables before they go on the sandwich, but first, we have to salt the eggplant.
Salting the Eggplant
Why do we have to salt the eggplant?
Salting eggplant does two main things. The first is that it removes moisture from the eggplant, giving it a more firm texture when cooked. The second thing that salting the eggplant does is remove bitterness. Eggplant on its own can sometimes be bitter. As the salt pulls moisture out of the vegetable (eggplants are technically a berry), it also pulls out some of the flavour compounds that cause bitterness.
How to salt an eggplant
To salt, the eggplant (I bought the smallest eggplant I could find), wash it well, then slice it into 1-centimetre rounds. Lay a piece of paper towel or a clean dish towel down on a sheet pan and sprinkle it generously with salt. Lay the eggplant on the towel in one even layer, sprinkle more salt over the eggplant, then cover it with another towel. Let the eggplant sit for about half an hour, then rinse each piece well under cold water. Pat the eggplant dry and you are good to go.
I know that this may seem like a lot of work, but it is absolutely worth the effort. The flavour and textural difference between an eggplant that has been salted and one that hasn’t is night and day. This small thing can make the difference between a person loving eggplant and hating it.
Other Vegetables
While the eggplant is sitting with the salt, prep the rest of the vegetables. In total, I used one small eggplant, one red bell pepper, one zucchini, and one red onion. This amount of vegetables made enough for about six sandwiches. However, any leftover vegetables can be tossed in a salad, a pasta, or warmed and eaten as a side dish. So, don’t worry about having extra. It won’t go to waste.
To prep, the vegetables, wash them all very well, then cut the sides, top and bottom off the pepper. Discard the seeds and stem and cut the peppers into 2 cm x 2 cm pieces (these don’t have to be exact). Cut the ends off the zucchini then cut it into 1 cm thick pieces on a sharp angle. Finally, peel the onion, and cut it into 2 cm x 2 cm pieces (again, these don’t have to be exact). Once the eggplant is ready and rinsed, cut the pieces in half and add to the other vegetables.
Roasting the Vegetbles
Put all the vegetables in a large mixing bowl with 2 tbsp of olive oil and a generous amount of salt and pepper. Toss all the vegetables together then spread out on a sheet pan lined with parchment paper. You may need to use two sheet pans depending on how big your vegetables are. Roast the vegetables in a 400°f oven for 30 to 35 minutes, flipping halfway through. The vegetables are done when they are tender and slightly browned. Take them out of the oven and let them cool slightly.
Pesto Mayo
While the vegetables are roasting, take a minute to throw together some pesto mayo. Combine 3 tbsp of pesto (you can find the pesto recipe in last week’s sandwich post here) with 1/2 cup mayo. This amount will be enough for four sandwiches. If you make extra, you can store the mayo in the fridge for up to a week.
Putting the Sandwiches Together
The bread typically used for a panini is an Italian bun or sandwich roll. I am using Udi’s Gluten-Free Hotdog Buns. I would prefer Kinnikinnick Buns, but my local grocery store was out. The Udi’s ones, make a decent substitute. If you have to eat gluten-free as I do, hotdog buns make a fantastic sandwich bun.
To make the sandwiches cut the bun in half, spread the pesto mayo on, then top with the roasted vegetables. A sandwich like this needs some cheese to tie it all together. I used provolone, which added a sharp flavour to the sandwich. You can use mozzarella, swiss, or whatever else you would prefer. Put the cheese on, then put the sandwich on your super expensive and fancy panini press. Oh, you don’t have one of those…yeah, me either. Let’s see how to turn this vegetable sub into a vegetable panini without expensive equipment.
Pressing Paninis Without A Panini Press
To toast and press a panini without a panini press, we are going to go as low tech as we can get. Heat two pans over medium-high heat. Brush the sandwiches, top and bottom with olive oil, then place in one of the pans. Put the other pan on top of the sandwiches and press straight down. Leave the sandwich alone for a minute or two, or until golden brown on the bottom. Flip the sandwich over and do the same thing. The panini is ready when the bread is toasted, and the cheese is melted. If you notice that the bread is getting a little too dark, but the cheese isn’t melting, you may want to put the sandwich in the oven on 350°f for a few minutes to heat it through.
I used a grill pan to make my panini, but you don’t have to. The only reason I used it is that I have it. The only reason I have it is because it was given to me by T-fal last year. Use what you have, that’s kind of the whole point.
Roasted Vegetable Panini
After a few minutes of squishing a sandwich between two pans, we have a delicious roasted vegetable panini with pesto mayo and provolone cheese. If you would like the sandwich to have a little more acidity you can marinate the vegetables in balsamic vinegar, or drizzle the sandwich with a balsamic reduction after it is cooked. Either way, that acidity will make the flavour of the sandwich really pop.
Conclusion
Although this may seem like a lot of work for a sandwich, it isn’t that bad. The vegetables can be made a day or two ahead of time, and again, any extras can be used for a variety of other purposes. More than anything, I hope that you see how you can make delicious paninis at home without spending a bunch of money on a grill press. One word of caution, make sure the pans aren’t too hot when you put the sandwich in. I burnt my first batch. We still ate them, but they weren’t very pretty.
Thank you for reading the post. If you liked it, remember to share it on Facebook, Pinterest, or Twitter by clicking the icon to the left of the right of the page. Did you know that Chefsnotes.com has almost 400 posts just like this one? Don’t ever miss a post again. Subscribe to Chef’s Notes by putting your email address in the subscription box below or by becoming a Chef’s Notes member right here. You will be notified of every new post. And if you would like to know more about me, click the link below to read my story.
Chickpea Curry is a classic vegetarian dish that can be made in about a thousand different ways. It can be served as either a main course or as a side dish with other curries. And, it is really, really tasty.
This version is made very quickly from scratch and still manages to have an intensely rich flavour. This is a fairly mild curry as far as my tastes go but, some may find it spicy. You know yourself better than I do so put only as much chili in as you are comfortable. If you like it really spicy, put in more.
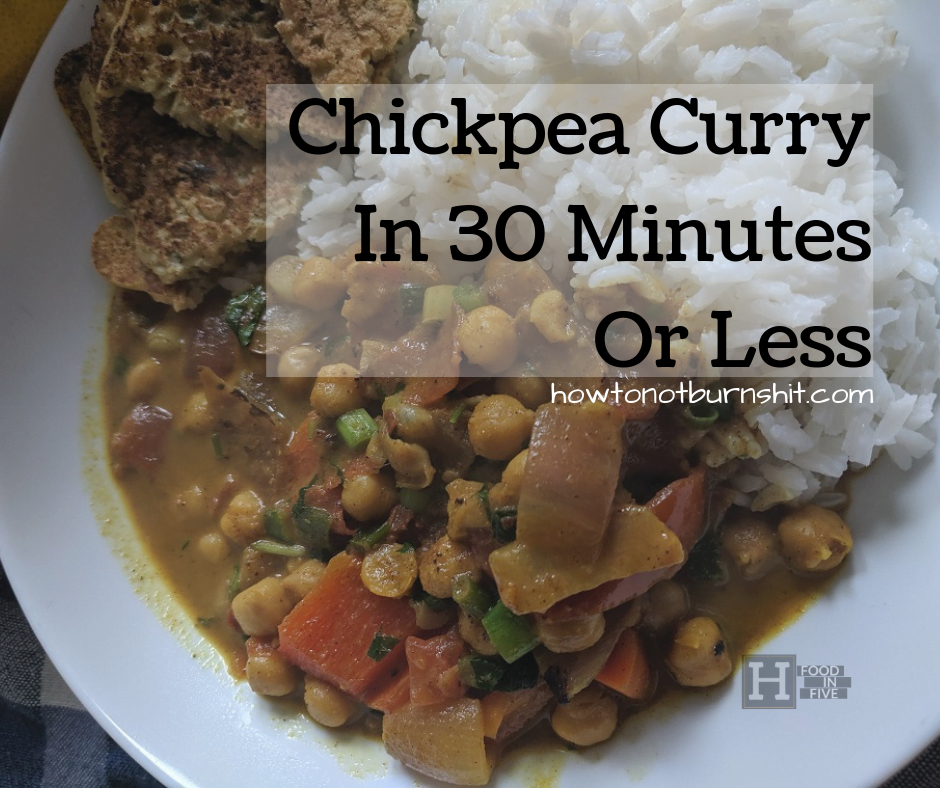
I suggest that if you are going to be serving this curry as a main dish that you serve it with naan bread or roti. We do make rice to have with it within the 30-minute window, but it is always nice to have a bit of bread with curry.
Let’s get to it. This is how to make
Chickpea Curry In 30 Minutes or Less
5:57 pm – Rice
Okay, I started at kind of a weird time but it doesn’t matter. The first thing I had to do was get the water on for the rice. I measured out 2 cups of hot tap water, poured it into a medium-sized pot and turned it on high. I added a pinch of salt to the water and then measured out 1 cup of rice and set it aside.
Even though most rice is cooked in a similar way there are often small differences that can have a big effect. Always read and follow the instructions for your specific brand of rice as they may be different than mine.
5:58 pm – Onion
With the water on for the rice, it was time to get down to business with an onion. I actually had half a red onion in the fridge leftover from something else so I decided to use that to make the curry. You can just as easily use white onion.
For the onion, I diced it into fairly large pieces. Then, I peeled and chopped three cloves of garlic and set this all aside.
6:00 – Pepper
Because we are cooking this kind of like a stir-fry it was really important that all the ingredients were prepped and ready to go before we started cooking.
With the onion and garlic prepped and set aside it was time to cut a red bell pepper and a carrot.
For the red pepper, I simply cut the sides off using my knife to follow the curves of the pepper to minimize cutting loss. I then diced the pepper pieces.
The carrot I washed, left the peel on and diced.
Also, just as I started cutting the carrot the water for the rice started to boil. I put the rice in the water, gave it a quick stir, covered the pot and turned the heat down to low. I set a fifteen-minute timer and went back to my vegetables.
6:03 pm – Tomato
The final vegetable I had to cut was one big tomato which I diced. Right before I started cutting the tomato I turned on my wok over medium-high heat. This way it would be nice and hot once I was done cutting the tomato and I could go right into cooking.
To dice the tomato I first cut it in half. Then, I made three horizontal slices, then three vertical slices. Finally, I cut across the slices I had made giving me evenly diced pieces of tomato.
6:05 pm – Wok with Ben
At this point, the wok was nice and hot. I add about 2 tbsp of canola oil to it along with the onions and garlic. In all honesty, I didn’t mean to add the garlic in at the same time as the onions but they had gotten all pushed together on my cutting board. I actually recommend that you cook the onions for a minute or two prior to adding the garlic in. My garlic didn’t burn but it was pretty close.
6:07 pm – Carrots in
I cooked the onion and garlic for about two minutes then added in my carrot. I would have preferred to cook the onions a bit longer but, like I said my garlic almost burnt.
6:08 pm – Spices
When making a curry it is important to cook the spices for a minute or two in oil. This “opens” the spices and draws out their essential oils. This frying of the spices completely changes their flavour. This is partly what gives Indian food such depth of flavour. However, it is important that care is taken when frying the spices as they burn and turn bitter very quickly. One to two minutes is all that is needed.
I used 2 tbsp yellow curry powder, 1 tsp coriander, 1 tsp cumin, 1-2 tsp chili flakes, a pinch of salt, and a few turns of pepper.
6:10 pm – Tomatoes
With the spices now toasted, it was time to add in the tomatoes. Adding in a wet ingredient like tomatoes will stop the toasting/frying process of the spices. This is crucial in preventing them from burning.
I cooked the tomato for about two minutes which helped to pull a little bit of natural sweetness out of it.
I also added in the bell pepper along with 2 tsp of grated ginger. I generally keep my ginger in the freezer and then just grate it on a microplane when I want it. So, I grated 2 tsp of frozen ginger right in on top of the tomatoes. Because the ginger is grated so fine it only takes a second to cook.
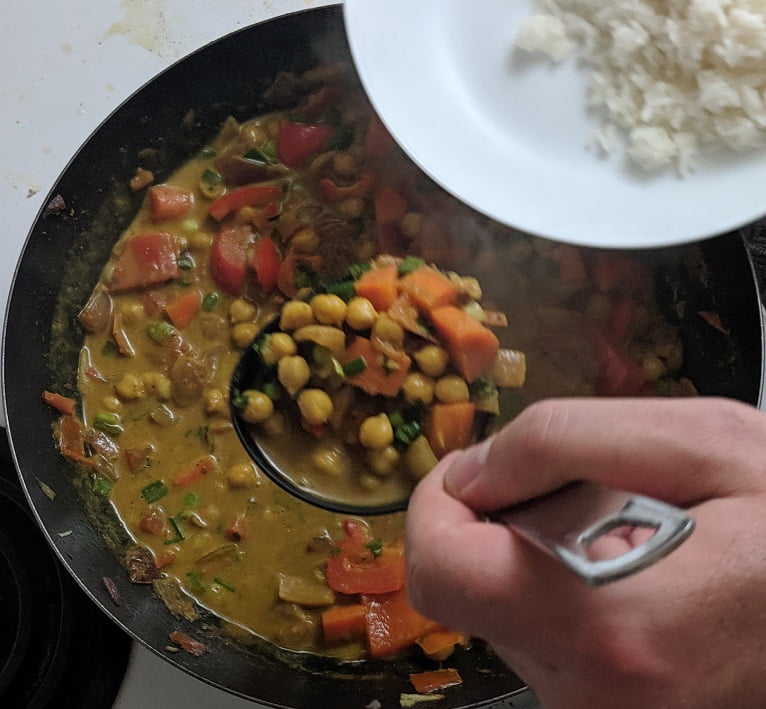
6:12 pm – Chickpeas
With all the vegetables and spices cooking away in the wok, it was time to add in the chickpeas which I opened and drained quickly then poured into the wok. I cooked the chickpeas for one minute before adding in 1 can or coconut milk.
I brought this to a boil and then reduced the heat to medium to let the curry simmer.
6:17 pm – Rice
At 6:17 the timer went off for the rice. I removed it from the burner, leaving the cover on the pot, and let the rice rest for another five minutes. This timing worked out perfectly with the curry.
While I was waiting for the curry and rice to finished I chopped up four green onions and 2-3 tbsp of cilantro to use to finish my curry. I set these aside until the very last minute.
6:22 pm – Finishing Touches
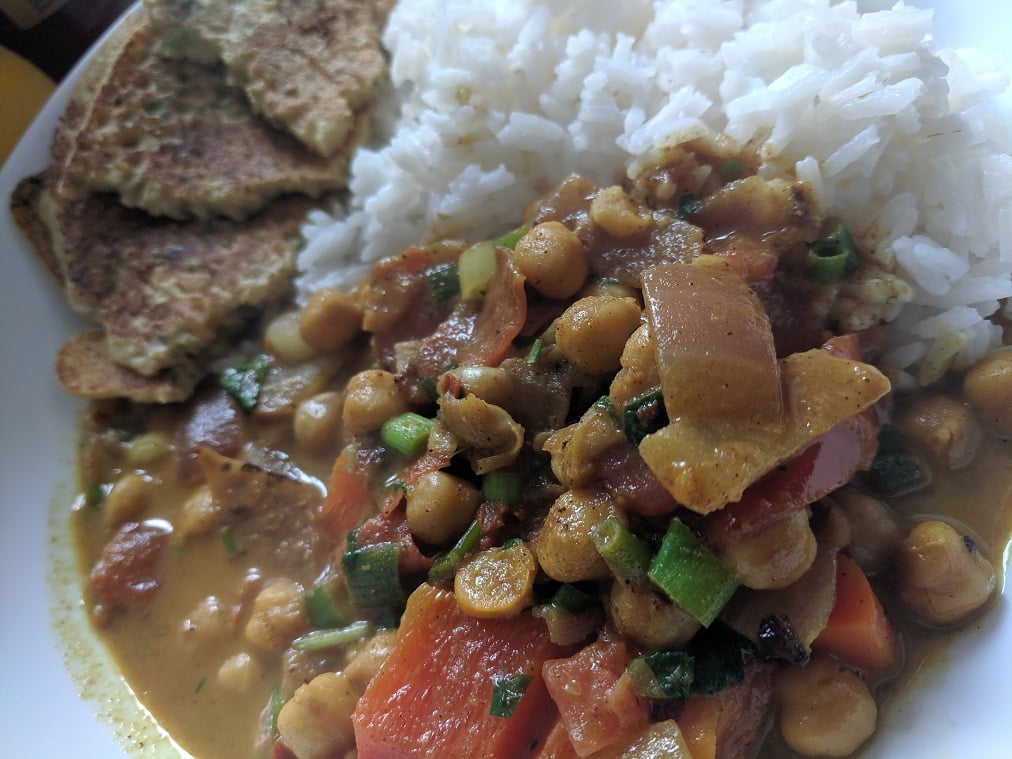
At 6:22 the rice had rested and the curry was pretty much done. I fluffed the rice with a fork and put some in a bowl. I added the cilantro and green onion to the curry tasted it and noticed that the flavours were just a little flat. To fix this I added a few squeezes of lemon juice along with a pinch of salt. That was all it took. I plated a scoop of curry next to the rice and finished it with a piece of homemade chickpea roti. Dinner was ready!
Chickpea Curry Conclusion
It goes without saying that this curry is quick to make. I mean, that’s the whole point of these posts. But, I can’t stress how delicious and filling this is. And, it makes amazing leftovers.
There are all kinds of other vegetables you could add to this like spinach and sweet potato for example. You could add more protein by adding black beans, tofu, chicken, or even fish. Or, as I said, in the beginning, you could serve this as I side dish with a few other curries.
With a dish this good and quick to make you just can’t lose.
Thank you as always for reading. If you enjoyed this post please share it with your friends. And, remember to subscribe to the blog so you never miss a post.
Chickpea Curry
A quick and delicious recipe for a filling chickpea curry
It seems that over the last few weeks everywhere you turn people are talking about hamburgers that aren’t hamburgers. Meat made from plants, and not in the traditional sense of cow eats plants, turns into more cow. These plants, mostly soy and pea, are turned into meat in a lab. But why?
Today we are going to take a look at the rise of these meat substitutes. We will look at the two main companies behind this new wave of vegan meat alternatives. We’ll find out how their products are different from each other, and why we should care about them.
Today we are going beyond meat, and taking a look at the impossible foods of the future. Let’s get into it.
Beyond Meat –
If you live in Canada you have likely been hearing a lot about the Beyond Meat Burger. A&W has been selling Beyond Meat in Canada since July 2018 but it has only really hit the grocery stores here in the last few weeks. There has been a push to get the meat alternative into the grocery store fridges before grilling season kicked off last weekend.
Beyond Meat is a California based company that has been in business since 2009. Their mission is to fulfill the world’s protein needs with plants rather than animals. Why? They say to improve human health. Reduce the impact that feeding a grown global population has on our environment. Reduce the use of global resources like fresh water (currently 1/3 of all our fresh water goes to feeding live stock). Finally, to improving animal welfare.
Beyond Meat makes their meat alternative mostly with pea protein. This is mixed with canola oil, coconut oil, cellulose, potato starch, maltodextrin, yeast extract, salt, beet juice for colour, and a bunch of other stuff.
Their products do not contain peanuts or tree nut, however there has been some new research stating people with peanut allergies may have a reaction to pea protein. Beyond meat burgers are also gluten and soy free and GMO free.
Currently Beyond Meat is valued at $3.8 billion dollars and is sold in 50 countries.
Impossible Foods –
Impossible foods is also a California based company. They were founded in 2011. Like Beyond Meat, Impossible foods is on a mission to reduce the environmental impact of meat production and to feed a growing population.
The impossible burger doesn’t seem to have hit Canada just yet but is widely available in the US. Currently the only place to get an Impossible Burger outside the US is in Hong Kong. Eventually, they will be everywhere though.
Impossible foods makes there product mostly out of soy and potato proteins. They use coconut and sunflower oil to give the burger that meaty greasiness.
What really sets Impossible Foods apart from their competitors, including Beyond Meat is something they call Heme. Heme is this mythical item that is found in all living things. It is found in it’s greatest concentration in flesh and is what makes meat taste like meat. According to the company when we crave meat, we are actually craving Heme.
Impossible foods uses a genetically modified strain of yeast which they ferment, like brewing beer. But, rather than making beer they make Heme. If you are a little confused, let me clarify as best I can. It seems to me that they are essentially making a synthetic, plant based blood that they are using to flavour and colour their soy and potato proteins.
Impossible foods has defiantly taken a much more scientific approach than Beyond Meat, working at a molecular level to make something that supposedly really tastes like meat.
Meat Alternative Opinions –
Full disclosure, I have yet to try either of these products. One, the Impossible Burger I can’t get unless I travel to the US. The other, Beyond Meat, I actually looked for in the grocery store last night and couldn’t find. I am not opposed to trying either of these I just haven’t done it yet. When I do I will write about it.
Due to the fact that I haven’t tried either of these products I can’t speak to the flavour, texture, or overall meatiness of either of them. What I can say is that love the idea or hate it, meat alternatives are only going to become more and more prevalent. Likely, in a few years, no one will be able to tell the difference between meat and not meat.
There are some issues with these products. They are both very high in sodium and saturated fats. I think that is going to have to change before these really become a true meat alternative. When I say “true meat alternative” I mean meat eaters choose them over meat sometimes.
I think that it is important and an inevitability that we move partially away from animal protein sources. Beyond any other issue, it just isn’t sustainable with the current rate of global population growth. It just doesn’t make sense. So, if a company can produce a meat alternative that really is easier on the environment, and tastes great then I think it is fantastic.
I think that these alternatives, and the ones these companies and companies like them will be producing in the near future will in some ways allow us to have our cake and eat it too. We may still be able to get that delicious meat flavour and texture, but without the meat. I think it is an exciting and important prospect. What do you think?
I am not a vegetarian. Obviously. But you don’t have to be a vegetarian to enjoy vegetarian meals. Good food is good food no matter what category it falls into. With that in mind, I thought I would compile a list of my five favourite vegetarian meals in hopes that it might inspire some of my more meat-centric readers out there to try something a bit different.
I want to say before I begin that I hate vegetarian food that pretends not to be vegetarian. Using fake meat, or just substituting tofu for meat is not creative, interesting, or usually very tasty. The vegetarian dishes that I like, as you will see are not low-end versions of delicious meat dishes. The vegetarian meals that I enjoy eating are vegetarian because they are supposed to be. That’s how they were designed. They are delicious on their own. There is a world of possibility out there when it comes to vegetarian food. Don’t limit yourself.
My Five Favourite Vegetarian Meals
Margherita Pizza
This isn’t really something most people would associate with vegetarian food but there is no meat and it definitely isn’t missed. This pizza is simply dough, tomato sauce, cheese and fresh basil and it is perfect. No meat needed. And, this isn’t just one of my favourite vegetarian foods, this is by far my favourite pizza.
Dal
There are versions of this dish from many different parts of the world but at its heart, dal is a lentil stew. The flavours are similar to that of a curry. Generally served with rice and flatbread this is a vegetarian meal that will definitely fill you up. Because the dish is so flavourful and so filling you won’t even think about meat.
Roasted Tomato Soup with Grilled Cheese
Another classic that most people don’t necessarily think about as a vegetarian meal. Again, this dish has no meat at all. I would describe this as more of a lunch than a dinner but it is delicious none the less. On a cold fall day or in the dead of winter few things fill the belly and the soul like this very traditional vegetarian meal.
Chickpea Curry
A vegetarian staple on menus written by lazy chefs the world over. Chickpea curry is an easy, cheap and delicious way to satisfy that vegetarian craving. Chickpeas, tomatoes, vegetable, and spices cooked together and then served over rice. Even though it is a staple of lazy chef’s who don’t want to take the time to create an interesting vegetarian dish, it is a staple for a reason. People love it.
Black Bean Soup
Years ago I briefly worked in a vegan restaurant. One of my favourite things on the menu was a black bean soup. It had black beans, sweet potatoes, onions, spices, and much more. It was sweet and spicy, flavourful and filling. Served with a slice of homemade spelt bread it was perfection. Again no meat needed.
Eating vegetarian doesn’t have to be hard. It doesn’t have to be difficult. And you don’t just have to eat meat dishes without meat. There are so many great vegetarian meals out there just waiting for you to discover them.
This post was inspired by my friend Peady. You should check out her blog Tempered with Kindness
We use cookies on our website to give you the most relevant experience by remembering your preferences and repeat visits. By clicking “Accept”, you consent to the use of ALL the cookies.
This website uses cookies to improve your experience while you navigate through the website. Out of these, the cookies that are categorized as necessary are stored on your browser as they are essential for the working of basic functionalities of the website. We also use third-party cookies that help us analyze and understand how you use this website. These cookies will be stored in your browser only with your consent. You also have the option to opt-out of these cookies. But opting out of some of these cookies may affect your browsing experience.
Necessary cookies are absolutely essential for the website to function properly. This category only includes cookies that ensures basic functionalities and security features of the website. These cookies do not store any personal information.
Any cookies that may not be particularly necessary for the website to function and is used specifically to collect user personal data via analytics, ads, other embedded contents are termed as non-necessary cookies. It is mandatory to procure user consent prior to running these cookies on your website.


 will definitely fill you up. Because the dish is so flavourful and so filling you won’t even think about meat.
 Another classic that most people don’t necessarily think about as a vegetarian meal. Again, this dish has no meat at all. I would describe this as more of a lunch than a dinner but it is delicious none the less. On a cold fall day or in the dead of winter few things fill the belly and the soul like this very traditional vegetarian meal.