This gluten-free sweet and sour chicken balls recipe with classic red sauce will make you forget that you’re eating gluten-free. It tastes just like what you’d find in an American-style Chinese Food Restaurant. More importantly, you don’t need a culinary degree to make this. The basic recipe is to make flavourful chicken meatballs, batter and fry them and toss them with the homemade red sweet and sour sauce. Anyone, no matter their skill level, can make this recipe.
Mixing The Chicken
Ingredients
In the meat mix itself, there are only five ingredients. This recipe will seem too simple for how delicious it is, but it works very well. The ingredients are two pounds of ground chicken, one teaspoon of salt, a quarter teaspoon of black pepper, one tablespoon of puréed garlic, and one tablespoon of grated ginger. Put all of those ingredients together in a bowl and mix.
Forming Chicken Balls
To form the balls, divide the meat into sixteen even pieces. If you’d like more petite chicken balls, you can get as many as 24 out of this recipe. Wet your hands with cold water when rolling the balls to prevent the chicken from sticking. Put the formed chicken balls on a greased baking sheet and cook at 400°f for twenty minutes. If you make twenty-four balls, it will only take seventeen minutes to cook them.
Why precook the chicken balls?
Precooking the chicken balls does three things. It makes them easier to batter. It makes them quicker to fry, giving them a lighter and crisper batter. And it makes them safer because they are fully cooked before they go in the fryer.
Gluten-Free Batter
While the chicken balls are cooking in the oven, make the batter and the sauce. Start with the batter because it needs to chill before being used. I’ve made this batter with two gluten-free flour brands, and both have come out very differently. This recipe would work the same with non-gluten-free flour as well. Depending on your flour, you may need to add more water than the recipe calls for. One of the gluten-free flour brands only required one cup of water, while the second brand needed two cups. The vital thing to note isn’t the exact quantity of water you add but the consistency of the batter. It should have the same consistency as melted ice cream.
Batter ingredients
The batter ingredients are one cup of all-purpose gluten-free flour, one teaspoon of baking powder, half a teaspoon of salt, one egg, and one to two cups of soda water (or sparkling water). Mix the dry ingredients first, then add the egg and soda water and mix. Again, add more water as needed to get the batter to the correct consistency. Once the batter is made, put it in the fridge for about fifteen minutes or until ready to use. The batter should be as cold as possible when it hits the hot oil to ensure a crisp texture.
Why Soda Water?
The reason the recipe calls for soda water over plain water is for the bubbles. The bubbles in the soda water will make the batter light and crisp. It is the reason why beer is used to batter fish. It’s all for the bubbles.
Sweet and Sour Sauce
The Red Colour
The red colour in some sweet and sour sauce recipes comes from either food colouring or ketchup. To get the red colour and that perfect sweet and sour flavour, this recipe uses the juice from a jar of Maraschino Cherries. If you’d like, you could use food colouring; cherry juice is a much better option because of the flavour although it obviously has food colouring in it.
Sweet and Sour Sauce Ingredients
The sweet and sour sauce ingredients are one cup of white vinegar, one cup of sugar, a quarter teaspoon of salt, half a cup of Maraschino Cherry juice, and a quarter cup of water mixed with a quarter cup of cornstarch.
Making Sweet and Sour Sauce
To make the sweet and sour sauce put the vinegar, sugar, salt and cherry juice in a medium-sized pot. Bring the pot to a boil over medium-high heat, stirring every minute or so. Once the sauce starts to boil, add the cornstarch and water mixture (stir the cornstarch and water before pouring it into the sauce). Whisk the sauce until it is thick and completely translucent. Take it off the heat until you are ready to serve.
Storing Sweet and Sour Sauce for later
You can store the sweet and sour sauce in the fridge in an airtight container for up to three weeks. To use it, heat it in a pot over medium heat with a tablespoon or two of water.
Finishing The Gluten-Free Sweet and Sour Chicken Balls
All that is left to do is to batter and fry the chicken balls. To do that, dredge the cooked balls in about half a cup of gluten-free flour first, dip them in the batter, then into a fryer set to 365°f and fry for five minutes. You can do this without a fryer, but it’s not recommended unless you know what you are doing. Deep-frying can be very dangerous. If you don’t have a deep-fryer, maybe you can borrow one from a friend. They would be glad to let you use their fryer in exchange for some chicken balls.
Once the chicken balls have cooked for five minutes, take them out of the oil and place them on a cooling rack set over a sheet pan. Continue until all of the balls have been cooked. At this point, the chicken balls can be cooled and frozen. They can be cooled and reheated in the oven or the fryer. Or, you can fry them again to brown them and eat them right away. If you want to eat the chicken balls immediately, keep the fryer’s temperature at 365°f and cook them for another four minutes or until they are browned. Once browned, take the balls out of the fryer, let them drain a little on a rack, then plate them and top them with the sweet and sour sauce.
Gluten-Free Sweet and Sour Chicken Ball Recipe
Make classic Chinese Take-Out Sweet and Sour Chciken Balls at home. You won't even know they are gluten-free.
Keyword: Chicken, Chinese Food, Chinese Food Series, Sweet and Sour, Take-out
Servings: 4people
Author: Chef’s Notes
Ingredients
Chicken Ball Mix
2lbsGround Chicken
1tbspPuréed Garlic
1tbspGrated Ginger
1tspSalt
1/4tspBlack Pepper
1tbspVegetables Oil
Batter
1cupAll-Purpose Flour(Gluten-Free)
1tspBaking Powder
1/2tspSalt
1Egg
1cupSoda WaterPlus More As Needed
Sweet and Sour Sauce
1cupWhite Vinegar
1cupSugar
1/2cupMaraschino Cherries Juice
3tbspWater
3tbpsCornstarch
Instructions
Chicken Ball Mix
Mix together the chicken, ginger, garlic, salt, and pepper.
Form the mix into 16 – 24 evenly-sized balls depending on the size chicken balls you'd prefer.
Place the balls on a greased sheet pan and bake them at 400°f for 17-20 minutes.
Batter
In a medium mixing bowl combine the flour, baking powder and salt.
Break the egg into the flour mixture and add 1 cup of soda water. Whisk until a smooth batter forms. Whisk in more water as needed. The batter should be the consistency of melted ice cream.
Put the batter in the fridge to chill for about 15 minutes before using.
Sweet and Sour Sauce
Put the vinegar, sugar, and cherry juice in a medium pot and bring to a boil.
Separately, combine the cornstarch and water then whisk it into the vinegar, sugar mix.
Boil and whisk the sauce until it is thick. Take it off the heat and let it sit until you're ready to serve.
Frying The Chicken Balls
Toss the chicken balls in a 1/2 cup of flour, dip them in the cold batter, and fry on 365°f for 5 minutes.
Let the balls cools on a rack then refry on 350°f until golden brown.
Serve with the sauce over them.
Notes
The last time I made these I used a different brand of gluten-free flour than I normally do and had to add about double the amount of water. Start with 1 cup of soda water then whisk in more as needed. The batter should be the consistency of melted ice cream.
It’s a good idea to take an afternoon and make a double or even triple batch of this recipe because once you taste these Gluten-Free Sweet and Sour Chicken Balls, you’re going to wish you had made more. The sauce works very well on all sorts of things from beef meatballs, to chicken legs. And it lasts a long tie in the fridge.
Let’s talk about sandwiches. This week, along with the Eating on a Budget Series, I am also launching a Gourmet Sandwich Series to take the place of the Simple Summer Dessert Series that ended last week. The first sandwich in the series is a Gluten-Free Chicken Parmesan Sandwich. If you don’t have to or don’t want to eat gluten-free, you can easily make this with full-on gluten ingredients. No problem. Just as a side note, for those of you that don’t know, everything on this site is gluten-free, whether it is labelled “gluten-free” or not. Now you know.
The Chicken Parmesan Sandwich is chicken breast, pounded thin, cut into bun-sized pieces, breaded, pan-fried, finished in the oven, put on a bun toasted with pesto butter, covered with marinara sauce and mozzarella cheese then broiled. Are you drooling yet? I am. Beyond the sandwich, in this post, you will find recipes for both the marinara and the pesto. Let’s take a look.
A quick note about eating gluten-free
I am a person who has no choice but to eat gluten-free. Gluten, unfortunately, makes me very sick. But, that doesn’t mean that I don’t still love junk food and gluttonous sandwiches. The majority of the gluten-free recipes I find on the internet are all based around healthy eating. That’s fine sometimes, but sometimes I get cravings for deep-fried things, or a burger, or whatever. So, if you are visiting this site for the first time, and are gluten-free, let me tell you right off the bat, that this site is 100% gluten-free, but it is not a health food site. You are going to find all kinds of things here like gluten-free deep-fried clams, and unhealthy, but gluten-free and delicious desserts. You are also going to see everyday foods that are delicious and gluten-free because I know, from experience, that being gluten-free doesn’t automatically make you a health nut.
Marinara Sauce Recipe
You can’t have a good Chicken Parmesan Sandwich without a tasty marinara sauce. Now, you could just use a jar of store-bought sauce, but why would you do that when you can make a much better sauce in very little time and with minimal effort? Follow the recipe below but substitute the rosemary for basil. Or don’t. That’s up to you. Either way, it will be delicious. You can store this sauce in your fridge for up to five days. It also freezes pretty well.
Basic Tomato Sauce
This is a really great all-purpose tomato sauce. Here I use it with Spaghetti and Meatballs, but it works just as well on a meatball or sausage and pepper sandwich, chicken parmesan or just about anything you can imagine.
1 796 mlCan Of Whole Italian Tomatoesdumped into a bowl and hand crushed
1cupDiced Onion
2tbspMinced Garlic
1-2tbspFresh Chopped Rosemaryor basil
3tbspOlive Oil
Salt, Pepper, and Sugar to taste
Instructions
Heat a large pot over medium heat then add in the olive oil and onions.
Cook the onions for 10-15 minutes or until they are lightly caramelized then add in the garlic and cook for 2 more minutes.
Add in the tomatoes, and a 1/4 to 1/2 cup of water if needed then add in the rosemary and seasoning.
Bring the pot to a boil, turn the heat down to low and simmer for 20 minutes. Taste and adjust the seasoning with salt, pepper, and sugar as needed. Remove from the heat and set aside until ready to use.
A good pesto sauce is simple, quick and delicious. This recipe will come together in less than two minutes and is better than anything you will buy at the store. Like the marinara sauce, this will last in the fridge for about five days. You can also freeze it in icecube trays. That way, when you need it, you grab a cube, and you are good to go.
In this chicken parmesan recipe the pesto plays double duty. First of all, as you will see, it gets mixed with butter to make a Pesto Butter to put on the bread (also great with mussels, fish or to finish a steak). Secondly, it gets added to the marinara sauce for a little extra pop of flavour. Fantastic!
Okay, now that we have our marinara sauce and our pesto sauce made and out of the way, it is time to focus on the chicken. To make two sandwiches, I used one chicken breast. Pretty economical. I took the chicken tender off the underside of the breast (The tender is that part that kind of hangs off the breast. It’s what breaded chicken tenders are made of.) Then, I used the flat side of a meat mallet to pound the chicken about an eighth of an inch thick. I sliced the chicken breast into thirds giving me four pieces in total with the tender. If you don’t have a meat mallet you can just whack the chicken a few times with a heavy pot or rolling pin.
Breading The Chicken Parmesan
The next step in making the Gluten-Free Chicken Parmesan Sandwich is to bread the chicken. To bread the chicken, set up a standard breading station which is a 1/2 cup of flour, 1 beaten egg, and a 1/2 cup breadcrumbs. Season the flour with salt and pepper then add 1 tbsp of parmesan cheese and 1 tbsp of fresh basil to the breadcrumbs. Dip each piece of chicken in the flour, then the egg, then the breadcrumbs and set aside.
For the flour, I used Bob’s Red Mill All-Purpose Gluten-Free Flour. The breadcrumbs are Presidents Choice Gluten-Free Bread Crumbs.
Cooking The Chicken Parm
Heat a large frying pan over medium-high heat, then add in 2 tbsp of olive oil and 2 tbsp of butter. Once the butter starts to foam and bubble add in the chicken. Cook the chicken for about two minutes per side or until they are golden brown. You can either drain the oil out of the pan and put it in a 350°F oven or take the chicken out of the pan, put them in a small roasting pan and put them in the oven that way for twelve minutes. I suggest transferring the chicken to a second pan. That way, you can use the frying pan, as you will see in the next section, to toast the bread.
The Bread
While the chicken is cooking combine 1 tbsp of pesto with 2 tbsp of softened butter. Mix well then spread on two Kinnikinnick Gluten-Free Hotdog buns (or whatever bun you want to use) and toast on medium heat in the pan you cooked the chicken in until the bread is golden brown. Make sure to drain the oil out of the chicken pan before toasting the bread.
Making the Chicken Parmesan Sandwich
Once the chicken is cooked, take it out of the oven and turn the broiler on to high. Take about 1 cup of the marinara sauce and mix in 1 tbsp of the pesto sauce. If you made the marinara sauce ahead of time, heat it up in the microwave for a minute before using it. The sauce doesn’t have to be crazy hot, but you don’t want it to be cold either. Spread a spoonful of the sauce on the bread, then top it with a piece of the chicken. Put the bread in the roasting pan, top the chicken with more marinara, then mozzarella cheese. Put the chicken parm sandwiches in the oven just until the cheese has melted. Watch carefully because the broiler can burn things very quickly. Once the cheese has melted, take the sandwiches out of the oven, fold them together to make two sandwiches and serve.
Gluten-Free Chicken Parmesan Sandwich
If you want to give this sandwich an extra boost of awesomeness, you can put a slice of prosciutto and a few basil leaves between the chicken layers. Either way, it is a delicious sandwich. The only problem I had with it was that I didn’t make enough of them. Serve the sandwich with a salad so that you don’t feel too guilty about eating something so decadent.
What is your favourite sandwich? And, are there any sandwiches that you would like to see me make in this series? Let me know in the comments below.
Thank you for reading the post. If you liked it, remember to share it on Facebook, Pinterest, or Twitter by clicking the icon to the left of the right of the page. Did you know that Chefsnotes.com has almost 400 posts just like this one? Imagine all the great tips, tricks, and recipes you’ve missed. Don’t miss any more! Subscribe to Chef’s Notes by putting your email address in the subscription box below or by becoming a Chef’s Notes member right here. You will be notified of every new post. And if you would like to know more about me, click the link below to read my story.
It’s a bold claim to say that this is going to be the best-smoked chicken recipe that you will ever make. I know that. But, this smoked chicken recipe is the best-smoked chicken I’ve ever eaten. And I’ve eaten a lot of smoked chicken. Before you send me a bunch of messages telling me how yours is better, try this one. I’m willing to bet that you won’t have much to say afterwards except maybe thank you. Of course, I’m always happy to be proven wrong. If you do think you have a better recipe, let me know about it in the comments at the end of this post.
Okay, that is more than enough chit chat, let’s get down to business.
Prepping The Chicken
The first step in making smoked chicken is prepping the chicken. Cutaway any extra fat and skin from the tail end of the chicken and discard it. Take the backbone out by cutting just inside the back legs, then down through the ribs. I did a whole post about this not too long ago. You can check that post out here. Once you have the backbone out of the chicken, cut it straight down through the breast bone so that you have two even chicken halves. Save the spine and everything to make stock.
Making the Seasoning Blend
Once the chicken is cut and ready to go, make the all-purpose seasoning blend. You can find the full recipe below, but the blend is essentially equal parts kosher salt, black pepper, brown sugar, garlic powder, onion powder, and paprika. Add to that a half part each cayenne, and cumin. Mix all the ingredients, and you are good to go.
Best Barbecue Spice Blend
This is a great all-purpose spice blend for barbecuing meat, poultry, and game.
Season the chicken generously with the spice blend. Make sure to season under the wings and legs and in any other hard to reach places. You want to make sure that the entire chicken gets coated in the spice blend. Put the chicken in a bowl or dish, cover with plastic wrap and put it in the fridge for two hours.
Prepping The Smoker
The chicken has been in the fridge for about an hour and a half, start getting your smoker hot. I have a cheap barrel-style smoker that works by lighting a charcoal fire in the bottom and adding wood chips. You know your smoker better than I do, and there are so many varieties out there that I’m not going to try to explain your smoker to you. All you want to do is get the smoker hot (275°) and smoking before you put the chicken in. For the wood chips, use mesquite and soak them in water for about half an hour before adding them to the fire. Add a bowl of water to the smoker too to help prevent the chicken from drying out.
Smoking The Chicken
Put the chicken in the smoker, set a four-hour timer, and do everything you can to maintain the temperature at 275°F. I find that my smoker doesn’t keep the heat very well; it could use another vent or two, so I have to adjust the fire, every thirty minutes or so. Again, you know your smoker better than I do. Keep the heat up and the smoke flowing.
Finishing the Chicken
At the three hour mark, start brushing the chicken with barbecue sauce every ten to twelve minutes until it is cooked through. Check to see the chicken is cooked by sticking a probe thermometer in it through the thickest part of the thigh. The chicken should reach a temperature of 170°f before you eat it. When you cook a chicken in an oven on a higher temperature, it’s okay to cook it to 167°f because the heat in the chicken will push the temperature past 170°f as it rests. But, because you are smoking the chicken at such a low temperature, there isn’t going to be enough residual heat for the temperature to keep rising. So, cook it all the way to 170°f.
At the three hour mark, my coals had completely died down, and I decided that rather than light another fire, I would finish the chicken on the barbecue. I turned one side of the grill on to medium, and I left the other side off. I put the chicken on the grill over the elements that were not lit. This indirect cook meant that there would be no flareups or scorch marks on the chicken. I did finish the chicken for the last few minutes on medium-high direct heat to get a little extra caramelization on the chicken. I found this worked well for me, and there was more than enough smoke flavour on the chicken. When I do it again, I will finish the chicken on the smoker.
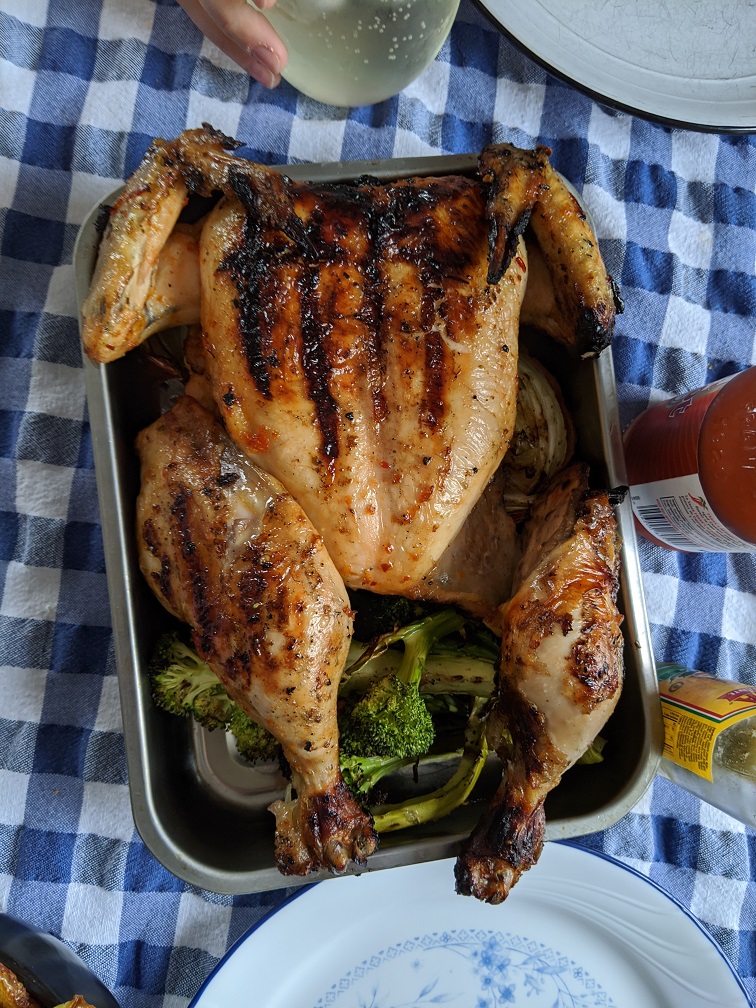
Serving the Chicken
To serve the chicken, I made garlic mashed potatoes, white gravy, and grilled smoked paprika green beans. You can find the green bean recipe on my Instagram. For the gravy, I made a simple bechamel with poultry seasoning, garlic powder, onion powder, salt, pepper, and a pinch of cayenne pepper. I think the smoked chicken would go really well with just about anything, but this combination was perfection. It also made fantastic leftovers, which I used to make a sandwich, and my wife had in a salad.
Conclusion
Again, when I say that this is the best-smoked chicken recipe you will make, I know that that is a big statement. I don’t say it lightly. I am confident saying it because this was one of the best chickens I’ve ever had, let alone smoked chickens. And in all seriousness, I would love to know how you smoke your chicken. Tell me about it in the comments below.
Thank you for reading the post. If you liked it, remember to share it on Facebook, Pinterest, or Twitter by clicking the icon to the left of the right of the page. Did you know that Chefsnotes.com has almost 400 posts just like this one? Imagine all the great tips, tricks, and recipes you’ve missed. Don’t miss any more! Subscribe to Chef’s Notes by putting your email address in the subscription box at the top right of the sidebar. You will be notified of every new post. And if you would like to know more about me, click the link below to read my story.
I have made no secret on this blog about the fact that I love chicken wings. I love them baked, roasted, deep-fried and of course barbecued. Today we are going to look at that last one, BBQ Chicken Wings. If you have never had BBQ Chicken Wings you are seriously missing out. I consider them to be superior to most other types of wings for a lot of reasons. The skin gets crispy, the meat stays tender, and a lot of the fat renders out making them a little bit better for you.
In this post we are going to talk specifically about how to make Sweet and Spicy BBQ Chicken Wings including a quick homemade sauce. However, more broadly, we are going to look at one of the many techniques for barbecuing chicken wings. Don’t worry, we will get to the other techniques over the next few months.
Okay, let’s get to it. This is how to make…
Sweet and Spicy BBQ Chicken Wings
The Sauce
If you want a delicious chicken wing, you need a delicious sauce. For the sauce I decided that I wanted to go with a Southeast Asian influence. To do this I used Sambal as the base which is an Indonesian Chili Sauce. You can usually find it at most grocery stores but if you can’t find it you can use Sriracha or any other hot sauce you prefer. Along with the sambal I used soy sauce (Gluten-Free Tamari), honey, powdered ginger, garlic, and onion. To add a little more tartness to the sauce I also used a touch of rice vinegar. To bulk up the umami flavour I added a touch of fish sauce then finished the sauce with some sesame seeds. This all got whisked together and the sauce was ready.
You can find the full sauce recipe below.
Sweet and Spicy Chicken Wing Sauce
A quick and delicious Sweet and Spicy Chicken Wing Sauce
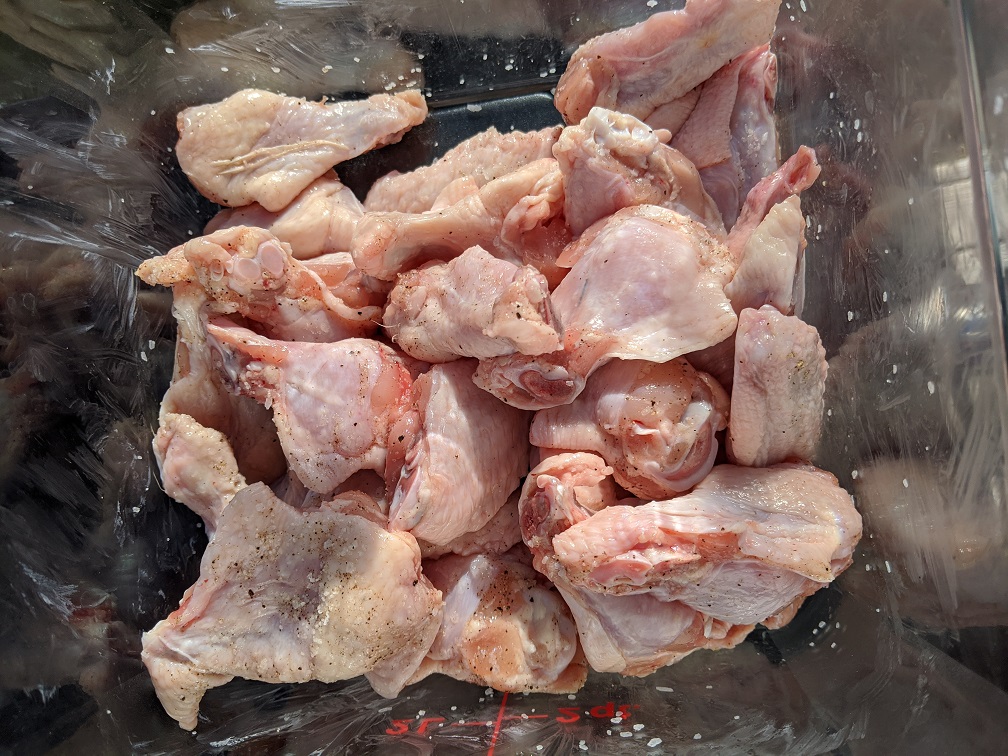
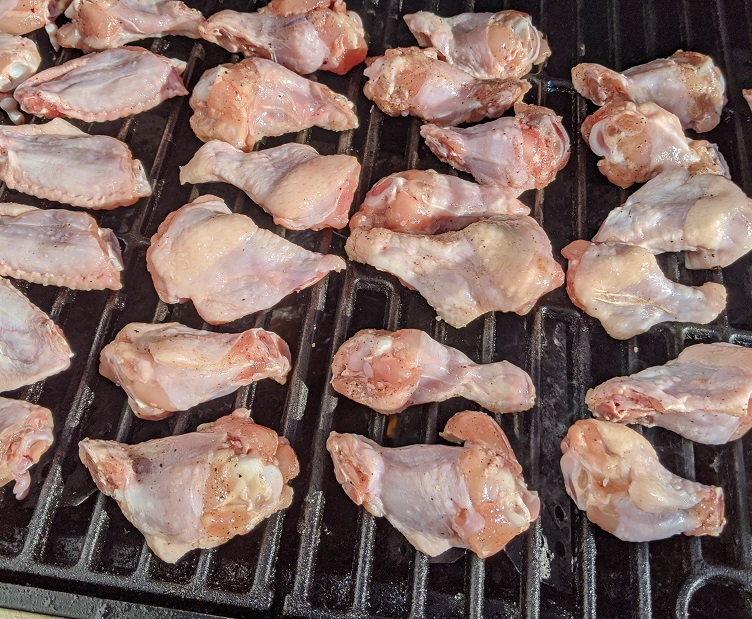
First things first, I heated my barbecue up over medium heat. Then I went to work on the wings. For the wings I used about two pounds which were slipt meaning the wings and drums were separated. I seasoned them lightly with salt and pepper. Lined them up on the grill then shut the lid and let them cook for four or five minutes.
After five minutes I flipped the wings, turned the heat down a little bit, moved the wings around a little bit to make sure they were all getting even heat. I put the lid back down and cooked them for another five minutes.
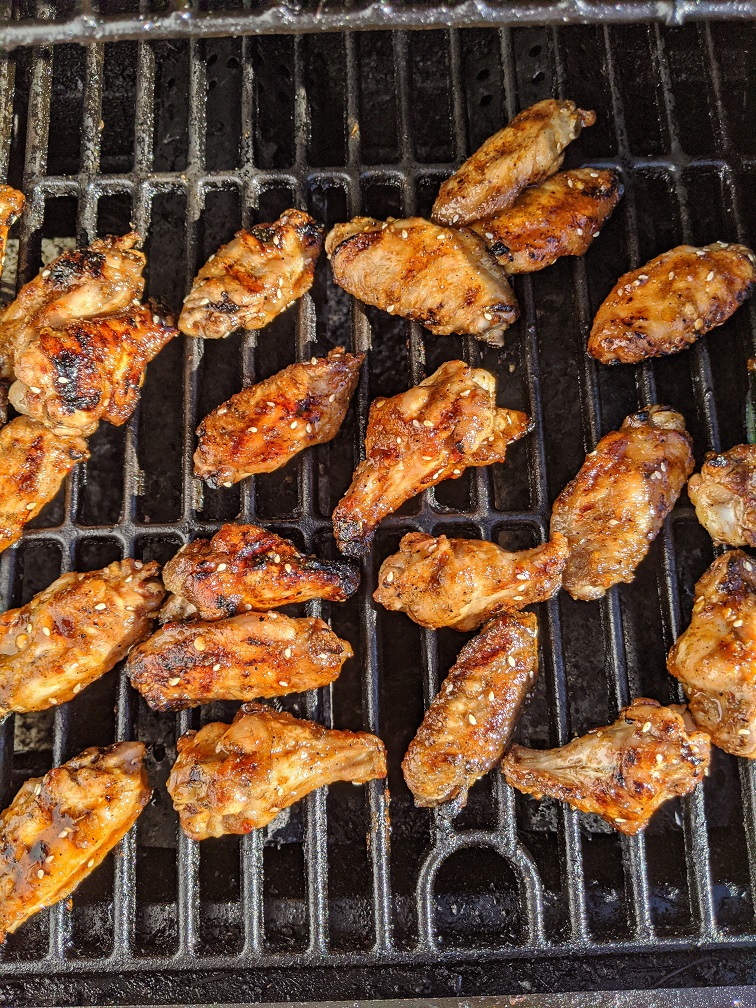
Once the wings cooked for about ten minutes in total I took them off the heat, tossed them in the sauce, then placed them back on the barbecue. I cooked the wings for about three minutes per side to bake the sauce on and caramelize a little bit. To me baking the sauce onto the wings is key. This makes the sauce sticky, and a little sweeter. It’s what really makes wings like this special. You can do this with any sauce, not just the sauce I used here.
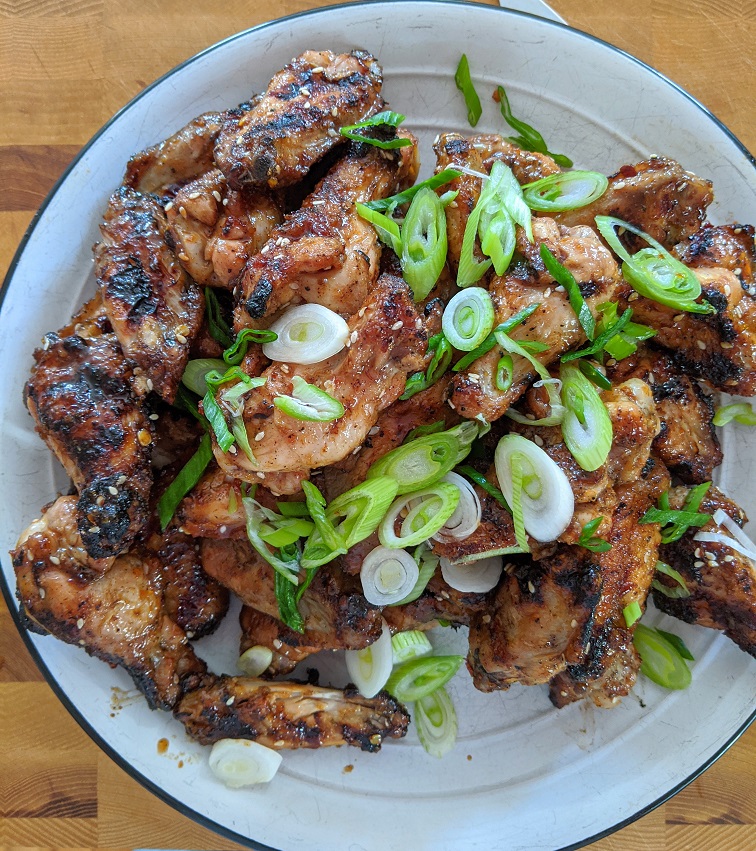
I check the wings to make sure they were cooked by picking up the biggest wing and pulling the meat away from the bone. If the meat comes away from the bone easily, the wings are done. You can also use a thermometer to make sure the wings reach an internal temperature of 170°F.
With the wings fully cooked, I removed them from the heat, put them on a nice plated and garnished them with some sliced green onions.
Conclusion
It will come as no surprise that I thought these wings were absolutely delicious and I think you will too. As delicious as these were, and yes, you should make them, the important part of this post is really the technique for barbecuing the wings. Season the wings lightly with salt and pepper. Grill them on medium heat for about five minutes per side, sauce them then cook for another three minutes per side. Done and delicious.
A very important thing to remember when barbecuing chicken wings or anything for that matter is heat management. If the wings are flaring up, turn the heat down a little or move them to a cooler part of the grill. If some of the wings aren’t crisping up and others are getting too crisp, switch them. Barbecuing is not a passive style of cooking like baking is for example. With baking you put something together, put it in the oven, then forget about it until it’s cooked. Barbecuing requires much more attention and activity than that.
Thank you for reading and remember to follow the blog so that you never miss a post again. Also, if you enjoyed this post share it on Facebook, Twitter, or Pinterest.
Good morning everyone and happy Victoria Day. Today we are going to do something a little different on the blog. Generally, on Monday, we look at a recipe that can be made fairly quickly. However, today, in part because it is a long weekend and in part, because someone asked for this post, we are going to look at how to spatchcock a chicken, what that means, and why you should know how to do this.
What is Spatchcock?
Spatchcock is when you remove the backbone from a chicken and flatten it. This is done for a few different reasons, the main reason is that it helps to cook the chicken faster and more evenly. This is very helpful when barbecuing or even oven roasting the chicken. The other reason is when you marinate the chicken the marinade has more surface area to penetrate leading to more flavour in the finished product. One other reason for Spatchcocking the chicken is that once it is cooked it is much easier to cut into smaller pieces.
Okay, let’s take a look at how to Spatchcock a chicken.
How to Spatchcock (Flatten) a Chicken.
Step 1 – Hips and Legs
The first step is to take a whole chicken and put it breast side up on your cutting board with the back opening towards you. Looking into the back of the chicken you can see the backbone running straight down the middle with the legs on either side. The legs are connected to the backbone by a ball joint which is about two inches in as you can see circled in red in the fourth picture in the group below. What you can see in the third picture is that before the ball joint is the hips (for lack of a better term) which come up in kind of a wide “U” shape.
Take your knife and slide it down the outside of the hips guided by their shape until you reach the ball joint that connects the legs. In the second picture in the below group, you can see the angle that your knife should go into the chicken. You also want the knife to be tilted on a 45°f angle. The knife is going to need a little bit of force to go through the hips but once you get to the ball joint it should go through fairly easily. You may need to move the leg around a little to uncover the ballpoint. Use the tip of your knife to cut the leg free of the ball joint, then do the same on the other side.
Step 2 – Ribs
Once the legs are free you want to keep cutting down towards the front of the chicken on either side of the backbone. At this point, you will be directly cutting through the ribs which will take a little force but shouldn’t be too tough. Stay as close to the backbone as you can to avoid cutting into the breast.
Once the backbone has been loosened a little you may find it easier to flip the chicken over, lift up the backbone and cut down through the ribs. Either way will work.
Step 3 – Wings and Wish Bone
Once you get to the front of the chicken your knife is going to hit bone. This is the “V” shaped bone commonly referred to as the wishbone. Run your knife on the outside of this bone until you reach another ball joint, this one connects the wings to the breast bone. Just like with the leg ball joint use the tip of your knife to either cut through it or cut it out. Then pick the backbone up and cut away any skin or meat that is still holding on. At this point, you should have a fully intact chicken with the backbone removed.
Step 4 – Flatten the Chicken
The final step to Spatchcock a chicken is to flip it over so the breasts are facing up and push down. There should be a few crunches as the ribs expand. With that, you should now have a flattened chicken. (My chicken, unfortunately, had a broken leg as you can see. )
Step 5 – Optional
The fifth and final step is completely optional. In this step, you flip the chicken back over and run your knife between the rib bones and the breast meat. Once the ribs have been loosened you cut them free. I prefer not to do this unless I am deboning the whole chicken. This will compromise the structure of the chicken causing it to fall apart when flipped on the grill. Leaving the rib bones on the chicken will also help protect the breast meat from the direct heat of the flame.
I don’t have a picture of this because I didn’t do it. However, you can see the rib cage in the picture below. If you want to remove the ribs run your knife on the outside of the rib cage, then cut the bones away.
Conclusion
This is going to take some practice. It is going to take a few times for you to get a feel for where to place your knife for the first few cuts, and how to cut through the ball joints. Eventually though, after doing this five or six times, this should take you only a few minutes. It takes me longer to scrub my cutting board after doing this than it does to actually do it.
I really cannot stress how valuable a technique this is to master. This single technique will change how you grill and even roast chicken forever, I promise. Oh, and you can do the same thing to turkey, game hen, or any other poultry.
If you have any questions about this or if any part of this is unclear please don’t hesitate to ask me to clarify. Thank you, have a great Victoria Day and remember to follow the blog so you never miss a post. Of course, if you enjoyed this post, please share it on Facebook or Pinterest.
The first time I’d ever heard of Chicken Cordon Bleu was when I was 19 and working in a National Pancake Restaurant. The chicken cordon bleu, in that case, was a chicken breast sandwich with ham and Swiss cheese. In the arrogance of my youth, I scoffed at this. I thought it was ridiculous to call this sandwich “Cordon Bleu” which is a term I only associated with the famous French Culinary Institue. In fact, the name and the dish are Swiss. “Cordon Bleu” means blue ribbon, which is associated with being the best, or of extremely high quality. I still don’t think the sandwich was worthy of the name either way.
What is Chicken Cordon Bleu?
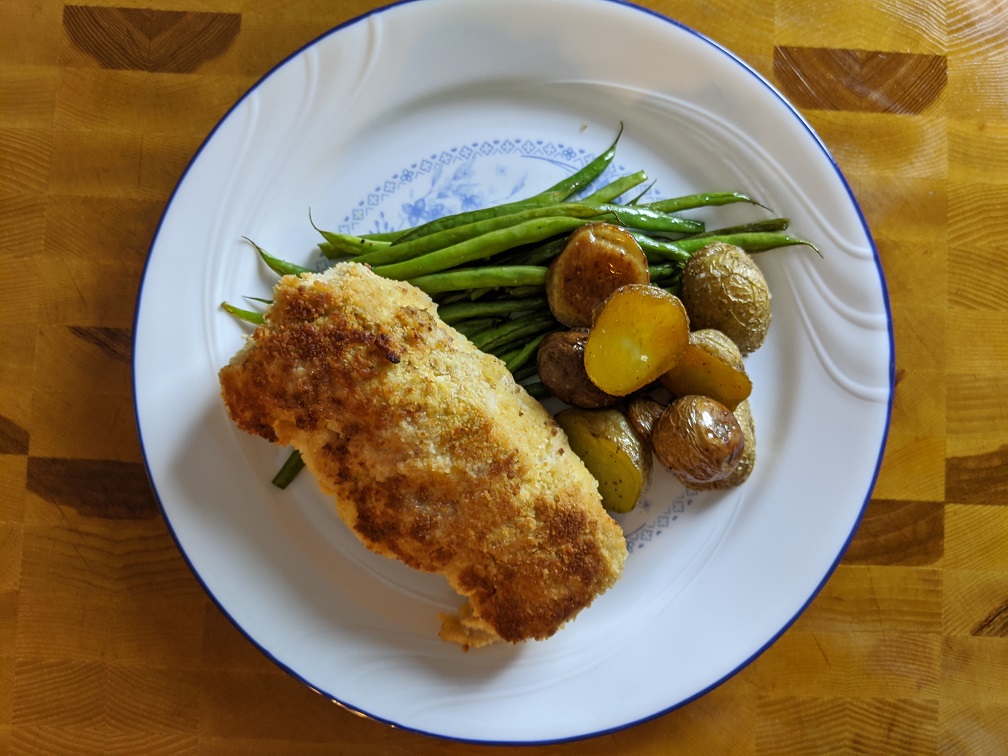
Chicken Cordon Bleu is a chicken breast that has been pounded thin, rolled with ham and Swiss cheese, then breaded, and pan-fried or baked. Yeah, it is as good as it sounds. What’s more, is that other than the pounding and rolling of the chicken, this is not a complicated dish, though it will taste like it is.
Okay, with that, let’s take a look at how to make it for yourself.
This is…
How to make Chicken Cordon Bleu
The Chicken
The first step in making Chicken Cordon Bleu is to butterfly the chicken. That means to cut from the thickest part of the breast to the thinnest, without cutting all the way through. You want to be able to open the chicken breast like a book. The sharper your knife, the easier it will be to do this. Take your time with this, as you really don’t want any holes in the breast.
Once the chicken has been butterflied it is time to pound it nice and thin. Just before you start pounding the chicken cover it all in plastic wrap so chicken juice doesn’t go flying everywhere. Use the flat side of a meat mallet, or even ur a pot or pan. Pound the chicken as thin as possible without breaking the chicken. I actually should have flattened my chicken a little bit more, but it still worked out fine.
Rolling the Chicken
Once the chicken is flattened spread each breast with about one teaspoon of dijon mustard, season with salt and pepper, then layer with 1-2 pieces of your favourite ham, and swiss cheese. Once all the ingredients have been added to the chicken, fold in the sides and roll from the bottom to the top.
Breading the Chicken
The final step in preparing the Cordon Bleu is to bread it. As we’ve talked about before on this blog, we are going to use the standard breading procedure. This is dredging food in flour, beaten egg, and then bread crumbs.
Once the chicken is breaded, heat a large skillet over medium heat. Add 1 tbsp of butter and 1 tbsp of oil into the pan. Brown the chicken on all sides, then put in a 400°F oven for 15-20 minutes or until the internal temperature of the chicken reaches 165°f.
Conclusion
This is a very classic dish that was really popular in the ’70s and ’80s. At one point it was considered the best of the best, hence the name. If you’ve never had this before, it is worth making. You can find out for yourself why it was so popular and why I think it is going to make a big come back in the next year or two.
Enjoy!
Chicken Cordon Bleu
A classic and straightforward chicken cordon bleu recipe that you can make at home.
Butterfly the chicken breasts then lay flat, cover with plastic wrap, and pound thin using the flat side of a meat mallet.
Season each breast with salt and pepper, brush each chicken breast with 1 tsp of dijon mustard then lay down 1 piece of ham, and a few pieces of cheese.
Fold the sides of the chicken breast then roll.
Bread the chicken by rolling them in flower, dipping them in eggwash, and then rolling in breadcrumbs.
Heat a large skillet over medium heat. Add 1 tbsp of butter, and 1 tbsp oil into the pan.
Add the chicken into the pan and brown on all sides.
Once the chicken is browned put it in a 400°F oven for 15-20 miutes or until the chicken is cooked through (165°F). Let cool for 3-4 minutes, then serve.
Let’s talk about turkey burgers. All too often, when someone serves a turkey burger it is dry, tasteless and might as well be a hockey puck. I wanted to remedy this. So, I came up with a turkey burger recipe that isn’t dry and flavourless. It is the exact opposite actually. What’s even better than a recipe that takes something that usually isn’t that good and makes it delicious? What about a recipe that takes something that isn’t that good, makes it delicious, and makes it in less than 30 minutes? That’s what I’m going to share with you today.
This is how to make the…
BEST EVER TURKEY BURGERS IN 30 MINUTES OR LESS
12:45 pm – Getting Started
To get started I opened up a package of ground turkey put it in a bowl and measured out all of my other ingredients. They were a 1/2 tsp each onion powder, garlic powder, and smoked paprika. 2 tbsp each bread crumbs and chopped parsley. 1 tsp each kosher salt(use 1/2 tsp if using table salt) and fresh chopped thyme. Finally, I added a few turns of pepper from my pepper mill. In total it was probably about 1/4 tsp fresh ground pepper. I also added 1 whole egg.
12:52 – Mix it up and turn it on
Once I had all of my ingredients measured and ready to go, I turned my pan on to medium heat. I used a non-stick pan though it isn’t necessary. It just happened to be on the top of the stack in my cupboard. I also added about 2 tsp of olive oil to the pan. I did this before the pan was hot, just because I was about to cover my hands in raw turkey.
With the pan heating up I started mixing my turkey mixture only until all the ingredients were combined. Then I divided the mixture into half, then half again. Dividing the mixture in quarters rather than just grabbing handfuls gave me much more even burgers. I formed the burgers then added them into the pan.
I only cooked two of the four because it was just my wife and I. The rest of the burger mixture got saved for later.
12:57 pm – Cranberry Mayo
First things first, clean up the cutting board.
I love cranberry and turkey together and I thought that cranberry mayo would be great with this burger (I was right). Really simply, I took 1/4 cup of mayo (Hellman’s) and mixed into it 2 tbsp cranberry sauce. If you don’t have any cranberry sauce, just boil 2 tbsp dried cranberries, 1 tbsp sugar, and 1/4 cup water until most of the water has dissolved. Let the dried cranberry sauce cool to room temp before mixing it into the mayo.
12:58 pm – Flip the burgers
By 12:58 the burgers were ready to flip. This also seemed like a good time to toast the burger buns.
1:01 pm – Cheese
At 1:01 pm the burgers were just about cooked. I sliced a few thin pieces of swiss cheese (you can buy pre-sliced) then topped the burgers with them. Once the cheese was mostly melted the burgers were ready.
1:04 pm – Turkey Burgers
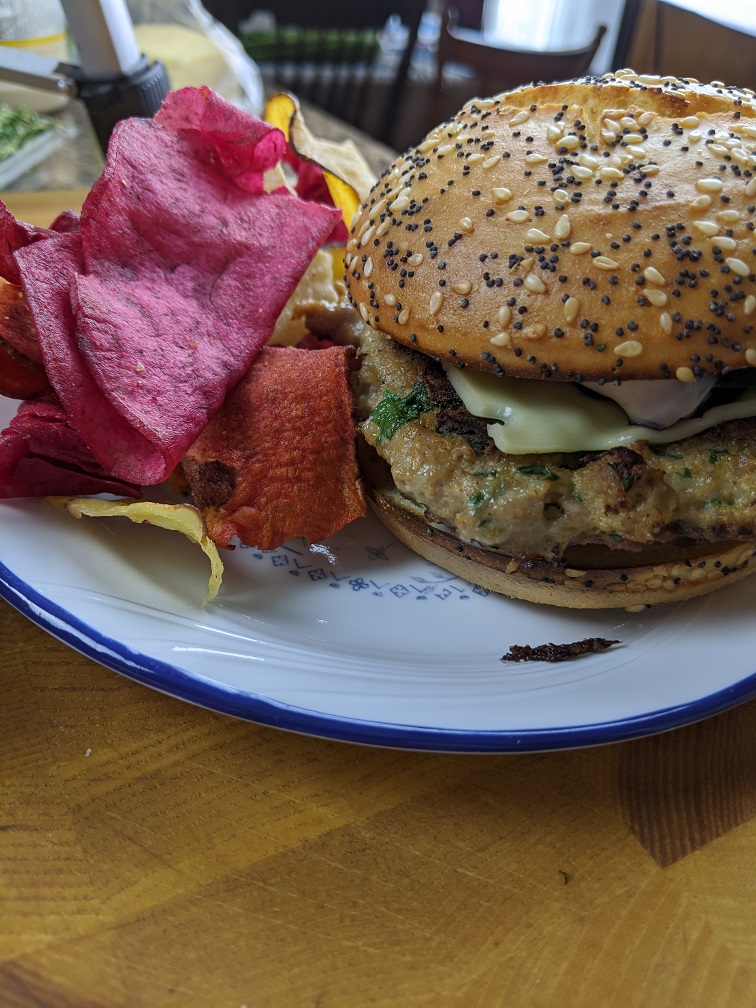
To assemble the burgers, I spread the cranberry mayo on both sides of the bun. On the bottom of the bun, I also added 3 bread and butter pickle slices. On the top bun, I added a small handful of salad greens. I added the burger, put it all together, and served it with vegetable chips.
Conclusion
I cannot express how delicious this burger was. I know that turkey sometimes has a tendency to dry out, but these weren’t dry at all. The burgers themselves had loads of flavour and a great texture. The cranberry mayo worked perfectly with the burgers and the bread and butters pickled added that perfect sweet tang. I absolutely recommend you make these. I know that you’ll be glad you did.
All too often turkey burgers are dry and tastless. No more!! These burgers are tender, juicy, and oh so good. Don't believe me? Try them for yourself. It will only take you 21 minutes.
Combine the turkey, spices, herbs, breadcrumbs and egg in a medium mixing bowl and mix to combine. Divide the mixture into 4 even pieces and form into burgers
Heat a skillet over medium heat with the olive oil. Cook the burgers until cooked through (about 4 minutes per side)
Top the burgers with the swiss cheese.
Mix the mayo and cranberry sauce and top the burger buns with it.
Place the bread and butter pickles on the bottom bun and the salad greens on the top bun. Put the pattie on the bun and serve with the chips.
Hello everyone and happy Monday! Today we are going to take a look at something I am super excited about; Curry Chicken Pilaf. What’s more, we are going to make it in 30 minutes from start to finish.
Before we get into this, let’s talk for a second about what exactly a pilaf is. Rice pilaf is a dish where the rice is generally sautéed in oil prior to being cooked in stock or sometimes water. Countries all around the world have versions of pilafs using localized ingredients. I think, despite its global popularity, pilaf is a technique that is underused in North America. So, I wanted to shed some light on it. With that, let’s take a look at how to make…
CURRY CHICKEN PILAF IN 30 MINUTES OR LESS
7:45 pm – Getting Started
First things first, get a large pan on the stove over medium-high heat.
While the pan is heating up measure out 2 tbsp olive oil, 1 tbsp grated ginger, 2 tbsp madras curry powder, 1/2 tsp cumin, 1/4 tsp coriander, 1/4 tsp crushed red pepper, and 1 tsp kosher salt into a larger mixing bowl and mix well. Add 1 pound of diced chicken thighs (you can use chicken breast) to the spice mixture and stir to coat.
7:22 pm – Chicken in the pan
Add 2 tbsp of olive oil into the pan. Add the chicken to the pan as well, spreading it out in an even layer. Leave the chicken alone to cook for about 2 minutes.
While the chicken is cooking, dice 1 onion and 2-3 cloves of garlic. In total, you want about 1 cup of onion and 1 tbsp of garlic. If you have a little more or a little less of each it isn’t going to hurt anything.
7:24 pm – Flip the chicken
Flip the chicken and add the onions and garlic into the pan. Cook for another 2 minutes.
7:26 pm – Add in the rice
Add the rice into the pan and stir to coat the rice with the oil and spices. After a minute or two add in 2 cups of chicken stock and 1/2 cup of peas. Turn the heat up to high and bring the stock to a boil. Boil for 2 minutes.
7:30 pm – Raisins
One thing that really enhances the flavour of curry is a little pop of sweetness. For this sweetness, I added 1/4 cup of raisins. I seasoned the curry with a pinch of salt and pepper put the lid on the pan and turned the heat down to low. I set a 15-minute timer then tidied up for about 5 minutes.
7:35 pm – Cilantro
While the curry chicken pilaf was cooking I picked about 1/4 cup of whole cilantro leaves. I washed them, dried them, and set them aside. I still had about 10 minutes left until dinner was ready so I just chilled out and waited.
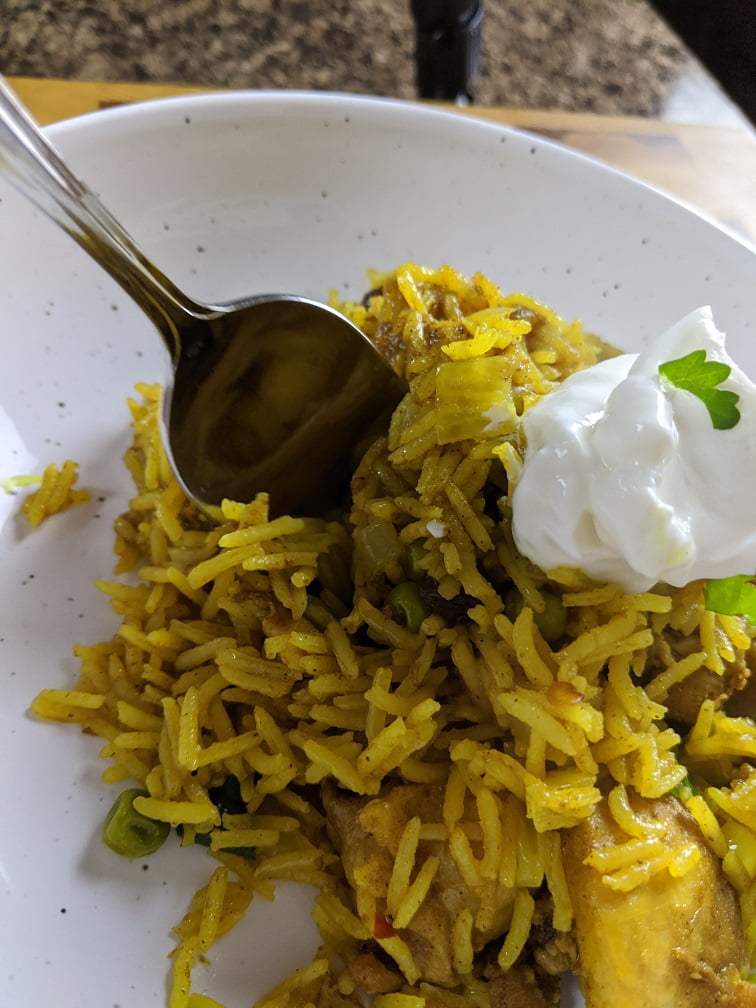
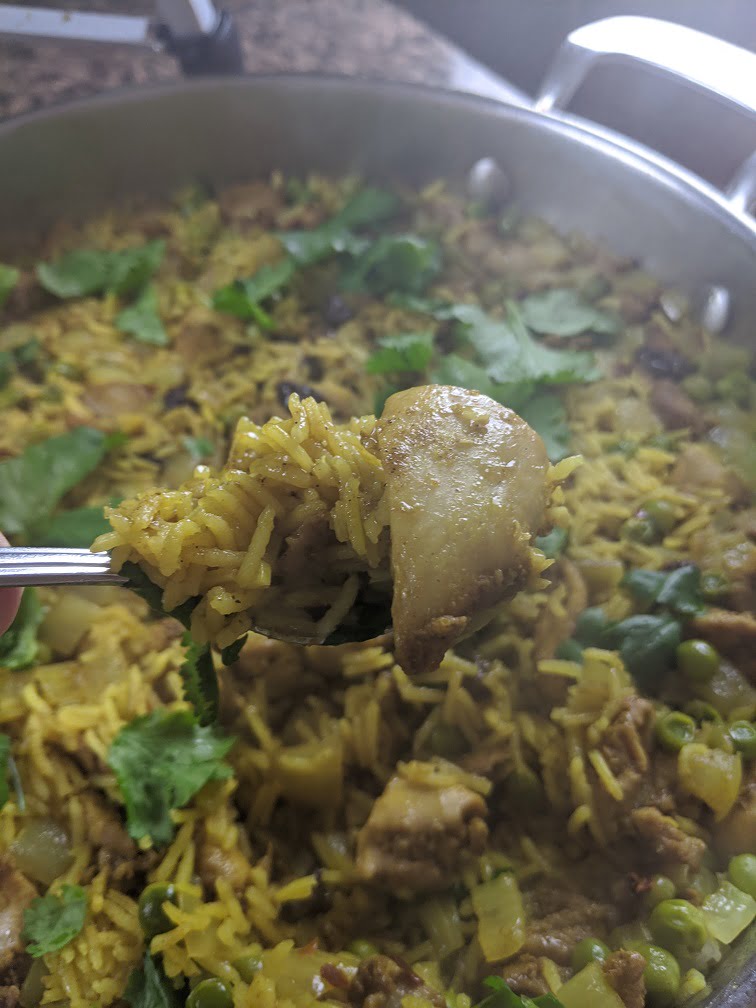
7:45 – Curry Chicken Pilaf
At 7:45 my timer went off and the curry chicken pilaf was ready. I finished it with the cilantro leaves and served it up.
Conclusion
First of all, I was a little concerned that I wasn’t going to have quite enough time to make this dish. My concern was misplaced. The timing worked out perfectly! The rice was cooked, the chicken stock was all absorbed, and the curry was incredible! It was flavourful, a little spicy, and actually pretty light.
Before I close this out I should say that I cheated a little. I bought bone-in chicken thighs but took the bones out to make the chicken stock for the curry. You can just use store-bought stock if you want. So, I had my chicken pre-diced. However, I think you can buy diced chicken thighs. If not you will need to dice some chicken, either thighs or breast. However, that really shouldn’t add more than a minute or two to the total cooking time.
I know that curry can be a daunting thing to make. I hope that I’ve described this in a way that you feel confident in making it. It really is worth the effort. Not only that, the actual active cooking time is only 15 minutes. The other 15 minutes is passive. You don’t have to do anything but wait. And yes, I do believe you could do this in a slow cooker.
If you have any questions about this recipe please feel free to ask me in the comments or on social media.
Have a great Monday and a great week everyone.
Curry Chicken Pilaf in 30 Minutes or Less
An incredably delicious Curry Chicken Pilaf that can be made in 30 minutes flat.
Hello and happy Monday, everyone! Today, we are going to kick the week off right with a quick recipe for Creamy Chicken Pesto Pasta. It’s so fast to make you can do it from start to finish in under 30 minutes. Oh, and it is delicious!
Some of you may remember that way back in March of last year; we did a 30 Minutes or Less Chicken Pesto. Though similar to what we are doing today, there are some apparent differences between the two. The Chicken pesto from last year was pretty much just chicken, cherry tomatoes, pesto, and pasta. Today our pasta has chicken, roasted red pepper, spinach, pesto, and cream. So again, it is similar but different. One other significant difference between the two posts is that in the one from last year, we made the pesto, this time we are using premade, though I did make it. You can make it or use store-bought stuff if that’s what you prefer.
Okay, let’s take a look at how to make…
Creamy Chicken Pesto Pasta in 30 Minutes or Less
7:05 pm – Getting Started
It was 7:05 pm when I started cooking last night. The first step was to get the pot on for the pasta. I filled a medium-sized pot with hot water, added some salt, and put it in the stove on high.
Once the pot was on the stove, I got to work on an onion and some garlic. The onion I used was pretty small, so if all you have are large onions, only use half. For whatever reason, I cut the onion as though I was going to dice it. At the last minute, I changed my mind and decided I want to slice it, so I went back after it was peeled and cut the root off. With the root cut off the onion, I proceeded to slice it. I also peeled and sliced one relatively large clove of garlic. Once the onion and garlic had been sliced, I put them on a plate and set them aside.
7:08 pm – Chicken
Once I was done with the onion and garlic, it was chicken time. But, before I got my hands all covered in chicken, I put a large, heavy-bottomed skillet on medium heat on the stove.
The chicken I bought was a chicken breast that still had a bit of the rib and wing bone attached. I bought this because it was cheaper than boneless chicken breast. I should also say I’m not generally a fan of chicken breast. However, on the rare occasion that I do buy it, I usually get it bone-in and skin-on. It is way cheaper and with a little practice takes next to no time to clean.
To clean the chicken, I found the bone and followed it with my knife to cut it away. I then took the tenders off the breast. The tender is the little flap of meat on the underside of the breast. If you’ve ever bought breaded chicken tenders, this is what they are made of. With the tender removed, I sliced the breast and tender into 1/2 cm pieces.
7:12 pm – Cooking the chicken
Now, that the chicken was all sliced, I added 1-2 tbsp of olive oil into my pre-heated pan along with the chicken. When I added the chicken in, I spread it out in a single layer to speed up the cooking process. I also turned the heat up a little on my pan as it wasn’t quite hot enough. You may not need to do this. The issue was that my pan is very thick and just wasn’t getting hot enough.
While the chicken was cooking I took a few minutes and thoroughly cleaned my knife, cutting board, and work area.
7:15 Cooking the pasta
Around 7:15 pm the water for my pasta was boiling, and my chicken was cooking. The pasta I used takes about 12 minutes to cook. I knew that if I started cooking it at this point it would line up pretty perfectly with when the sauce would be done. How did I know that? The chicken was almost cooked through and I knew that sauce wasn’t going to take that long. Also, even if the timing didn’t line up perfectly, there was only going to be a few minutes difference and I could compensate for that. So, I dropped the pasta in the water.
I also took this opportunity to season the chicken generously with salt and pepper then I flipped the chicken and finished cooking it through.
7:20 pm – Onions and Garlic In
At 7:20 I add the onion and garlic into the pan along with the chicken. I cooked, stirring for about 2 minutes before adding in the roasted red peppers.
The roasted red peppers I used were jarred. They came pre-roasted and sliced into thin strips. You can obviously roast your own peppers. However, I happened to have this on hand and wanted to use them up. They’re actually pretty good out of the jar so if you want to save some time I suggest going this route. I used about 1/2 a cup of peppers in total.
7:24 pm – Sauce It
At 7:24 pm I added in about 1/4 cup of pesto. Again, this was pesto that I had made a few days ago and had in the fridge. You can make it from scratch (link at the top of the post) or you can buy it. I prefer to make it because it tastes better and has no preservatives and stabilizers. But, if you want to save some time you can go that route. Once I added in the pesto I let it cook for about a minute before adding in the cream.
At first, I added in a 1/2 cup of heavy cream, but I ended up having to add in a bit more to loosen the sauce. In total, I used about 3/4 of a cup. If you don’t want to use the cream I suggest making a bechamel by cooking roux into milk to thicken it. You don’t want to add straight milk or anything less than heavy cream (whipping) because it will curdle when it hits the heat.
7:26 pm – Spinach
After adding the cream, which came to a boil very quickly I tasted the sauce and added a bit more salt and pepper as was needed. Then I added in 2 big handfuls of baby spinach and stirred until it was softened into the sauce.
7:28 pm – Drain Pasta
At 7:28 pm my pasta was done. I drained it and added it to my sauce.
7:29 pm – Turn off heat and finish
I grated about 1/4 cup of parmesan into the pasta, stirred everything together and served.
Conclusion
This is not a diet pasta recipe by any means but it also isn’t nearly as heavy as you may think it is. Recipes like this will often suggest multiple additions of cream, each one being reduced before the next is added. This makes the pasta very heavy. You don’t get that with this. Also, the roasted red pepper and spinach along with the pesto give this pasta an incredible flavour. I highly recommend you give this a shot. If you do, I’d love to hear what you think.
Thank you, everyone, and have a great Monday. And remember to tune into Dinner with Ben tonight at 6 pm Atlantic time on my Facebook page.
Creamy Chicken Pesto Pasta
What more is there to say? It's creamy, it's chicken, and it's pesto. Delicious!
Thank you for reading the post. If you liked it, remember to share it on Facebook, Pinterest, or Twitter by clicking the icon to the left of the right of the page. Did you know that Chefsnotes.com has almost 400 posts just like this one? Imagine all the great tips, tricks, and recipes you’ve missed. Don’t miss any more! Subscribe to Chef’s Notes by putting your email address in the subscription box at the top right of the sidebar. You will be notified of every new post. And if you would like to know more about me, click the link below to read my story.
Good morning everyone! Happy Monday, happy new year, and happy to be back! Today, in honour of the new year, and the fact that many of you are probably watching what you eat for the next few weeks, I thought I would make a recipe that is a little lighter than usual. And so today, we are going to make Sweet and Spicy Chicken lettuce wraps in 30 minutes or less.
Some of you more keen-eyed readers may remember that way back in June we made ginger beef lettuce wraps. The basic idea is the same; make a filling and wrap it in lettuce. Basically, I just want to show you that lettuce wraps don’t have to be one thing. They can be comprised of a multitude of ingredients and flavours. Today we are using ground chicken, last time it was beef, next time it might be pork or fish, or tofu! Who knows?
Alright, that’s more than enough of a set-up Let’s take a look at how to make…
12:30 pm – Rice
First things first, we need something to serve with the lettuce wraps. I thought sticky rice was a logical choice. You, of course, can serve whatever you would like with your lettuce wraps. Cauliflower rice would be a good option if you are currently anti-carb. Either way, the first thing I did was get the rice going.
I measured out 1 cup of sticky (or sushi) rice, 1 1/2 cups of water, and put it on the stove on high. Follow the direction on the package your rice comes in as they may be slightly different.
The rice, like most rice, starts on high until it comes to a boil, then it is covered and left to simmer on low heat. This particular rice only needs to simmer for 12 minutes and then rest for 5 minutes. This short cooking time makes it perfect for these quick 30 minute meals.
Along with getting the rice going I also turned a wok onto medium-high heat. You don’t have to use a wok for this, but I found it worked really well. Wok or not, your pan should be on and pre-heating.
12:32 – Getting Started
Now that the rice is on the stove and coming up to the boil, it’s time to get the other ingredients prepped. Up first is half an onion which should be diced nice and fine, minced even.
12:34 pm – Take the chicken for a wok
In the time it took to dice the onions, the wok has sufficiently heated, and the rice has started to boil. I added 2 tbsp of sesame oil to the wok along with 1 lb of ground chicken. Next, I gave the rice a little stir, put a lid on it, turned the heat down to low, and set a timer for 12 minutes.
The now diced white onion is not the only vegetables going in this dish, it isn’t even the only onion. That means, that it is time to get back to some knife work. I took 4 green onions, cut them in half and set the top half aside for later. I finely diced the bottom halves and added them to the white onions.
12:37 – More Knife Work
Once the green onions were chopped I took a second and gave the chicken a stir. Then I got right to work dicing half a red bell pepper.
12:39 pm – Garlic
With the bell pepper chopped I gave the chicken another stir and chopped up 3 cloves of garlic.
12:41 pm – Onions in
Okay, the chicken is nice and browned and the veg is all chopped and ready to go, let’s start cooking. First up, I added the white onion, green onion bottoms, and the garlic to the chicken and cooked for about a minute.
12:42 pm: Sweet pepper, hot pepper.
Next up, I added in the red bell pepper and 1/2 tsp of crushed red pepper (chilli ) flakes.
12:43 pm Ginger and five-spice
One minute after the peppers went in I added in 2 tsp Chinese 5 Spice and 1 tbsp grated ginger. I cooked all of these ingredients together for about three minutes.
12:46 pm- Liquids
Okay, time to add in the liquids. 1/4 cup water, 1 tbsp honey, 1 tsp rice vinegar (or white vinegar) and 3 tbsp soy sauce (gluten-free tamari).
I don’t have any pictures because this part happened pretty quick.
12:47 pm – Seasoning
At this point, I gave the mixture a taste and noticed it was missing three things. It needed a bit of salt, a bit more vinegar, and a bit more honey. So, I added about 1/2 tsp kosher salt, 1 tbsp honey, and 1 tsp vinegar.
It was right around now that the timer for the rice went off so I took it off the heat.
12:48 pm – Finishing touches
To finish the chicken I add in 1 tbsp sesame seeds and I chopped the tops of the green onions and added them in. I then took the wok off the heat.
12:49 pm – Wash lettuce
This is bibb lettuce also known as Boston Bibb or butter lettuce. It is my lettuce of choice for these types of things though iceberg or romaine would work too. The reason I like this particular lettuce is that it is very tender, and has a really great flavour. If you can find it, definitely try it.
One special thing about bibb lettuce is that it comes with the roots still attached. The reason for this is the lettuce dies very quickly so, leaving the roots on keeps the lettuce alive in the store.
To clean this lettuce simply cut the root off and discard. Rinse the leaves under slowly running water then gently pat them dry with a paper towel.
12:53 pm – Rice Done
Chicken, done. Lettuce, done. And now, rice, done. Give the rice a stir and start plating.
12:55 pm – Sweet and Spicy Chicken Lettuce Wraps
Finally, put the lettuce down, put the chicken on top of it taco-style. Serve the rice on the side or right in the lettuce wrap with the chicken.
Conclusion
If you are looking for something a little light and really quick to kick your new year’s diet into high gear, this may just be it. Give it a shot.
Sweet and Spicy Chicken Lettuce Wraps
A new year a new you! What better way to kick off that new years diet than with some deliciously sweet and spicy chicken lettuce wraps?
Keyword: 30 minute meals, 30 Minutes or less, Asian Food, Butter Chicken, Chicken, chicken recipes
Servings: 4servings
Author: Chef Ben Kelly
Ingredients
1lbGround Chicken
1/2lg White Onion, Minced
3clovesGarlic, Minced
1/2Red Bell Pepper, Minced
4eaGreen Onionswhites and greens separate and diced
1tbspGrated Ginger
2tspChinese 5 Spice
1/2 tspRed Chilli Flakes
2tbspSesame Oil
3tbspSoy Sauceor GF Tamari
2tspRice Vinegaror white vinegar
2tbsphoney
1headBibb Lettuceaka Boston Bibb Lettuce
Salt to taste
1tbspSesame Seeds
Instructions
Heat a wok over medium-high heat.
Add the sesame oil along with the chicken and cook until the chicken is browned, stirring occasionally.
Once the chicken is browned and cooked through add in the onion, green onion (whites), and the garlic. Cook for 1-2 minutes or until the onions start to soften.
Next up add in the red bell pepper and red chilli flakes, cook for 1 minute then add in the Chinese 5 spice.
cook the spices for 1-2 minutes before adding in 1/4 cup of water along with the honey, soy sauce, and vinegar.
Turn the heat down and simmer for 4-5 minutes.
Add in the sesame seeds and the tops (greens) of the green onions.
Season to taste with salt.
Wash and pat dry the lettuce and serve with sticky rice.
We use cookies on our website to give you the most relevant experience by remembering your preferences and repeat visits. By clicking “Accept”, you consent to the use of ALL the cookies.
This website uses cookies to improve your experience while you navigate through the website. Out of these, the cookies that are categorized as necessary are stored on your browser as they are essential for the working of basic functionalities of the website. We also use third-party cookies that help us analyze and understand how you use this website. These cookies will be stored in your browser only with your consent. You also have the option to opt-out of these cookies. But opting out of some of these cookies may affect your browsing experience.
Necessary cookies are absolutely essential for the website to function properly. This category only includes cookies that ensures basic functionalities and security features of the website. These cookies do not store any personal information.
Any cookies that may not be particularly necessary for the website to function and is used specifically to collect user personal data via analytics, ads, other embedded contents are termed as non-necessary cookies. It is mandatory to procure user consent prior to running these cookies on your website.