*This Hot and Sour Turkey Wing Soup post is sponsored by Turkey Farmers of Canada and ThinkTurkey.ca
It is my absolute pleasure to say that I have once again teamed up with Turkey Farmers of Canada and thinkturkey.ca to create a cool and unique turkey recipe. What did I come up with? How about Soy and Chili Sauce Roasted Turkey Wings in Classic Hot and Sour Soup. What could be better than that?
Why turkey wings?
The reason I chose turkey wings for this is that they are versatile, inexpensive, and big enough that one wing when split can feed two people. The two wings I used (two drums, two flats) was just over $4. You really can’t beat that price.
About the recipe.
In some ways, this is actually two recipes rather than one because the wings are amazing on their own with the soy and chili marinade. But, when added to the soup you won’t believe how good they can be.
The wings are paired with a classic Chinese hot and sour soup. This soup comes from the Sichuan Province in China which is famous for its spicy food. Before the introduction of chilies to China in the 15th or 16th century, all the spiciness came from the Sichuan Peppercorn. This Sichuan Peppercorn is not really hot like chilies or as strong as black pepper. Instead, they warm and numb the mouth which creates this really pleasant feeling. Because most people don’t have Sichuan Peppercorns in their cupboard I used black pepper and Sambal Chili sauce to create the same kind of experience.
Keep in mind that if you aren’t great with spice you can easily reduce the amount of Sambal in the recipe. This soup isn’t supposed to burn your face off with spice. It was originally created as a peasant dish to warm people up in the cold of winter. So, as long as there is enough heat to warm you, it’s perfect.
The Egg
One thing you may find odd about this soup if you have never had hot and sour soup before is the addition of the beaten egg. Admittedly, it makes the soup look kind of weird. But, the eggs add a very important textural and flavour element and the soup just wouldn’t be hot and sour soup without it.
Okay, enough preamble. This is…
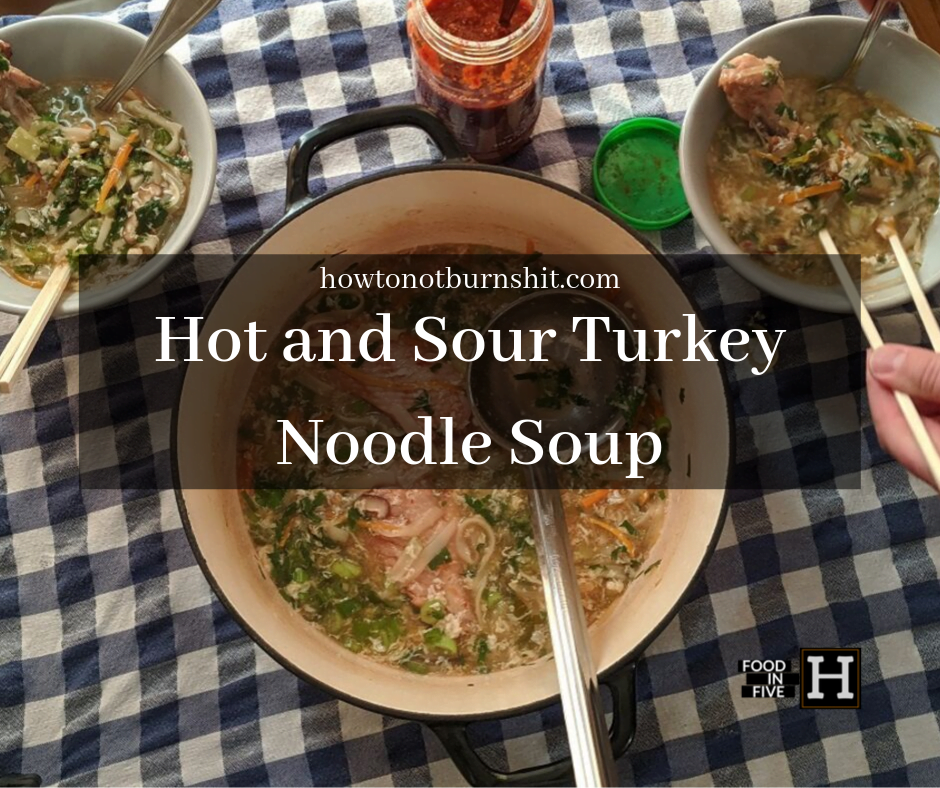
Hot and Sour Turkey Wing Soup
Step 1 – Turkey Wings
To make the soup we actually have to first make the turkey wings. Combine 2 tbsp of soy sauce and 2 tsp of Sambal Chili Sauce toss the wings with the sauce and let sit for 20 minutes. While the wings are marinating, pre-heat the oven to 400°f.
Once the oven is hot and the wings have marinated, roast them on a rack set over a roasting pan for 25 minutes.
While the turkey wings are marinating and cooking get all the other ingredients ready to go. That way when the turkey wings are done, the soup can come together very quickly.
Mushrooms
Generally, for hot and sour soup dried shitake mushrooms and dried black fungus are used. I couldn’t find either of those things, and you likely won’t be able to either so why try and use them in the recipe? Instead, I used fresh shitake mushrooms, which are in most big grocery stores.
For the shitakes, I removed and discarded the stems, then thinly sliced them. I marinated these for 20 minutes in a combination of 1 tbsp of soy sauce and 1/2 a cup of warm water. The mushrooms along with the liquid get added into the soup later to help flavour it.
Flavourings
Rather than just haphazardly adding flavourings into the soup, it is common to mix all the flavourings together beforehand. This gives you a bit more control.
Hot and sour soup is typically thickened just slightly with cornstarch or tapioca starch. I used 2 tbsp cornstarch mixed with 2 tbsp warm water. To the cornstarch and water, I added 1/4 cup of soy sauce, 1/4 cup rice vinegar (white vinegar will work), 1 tbsp Sambal Chili sauce, 1/4 tsp each black pepper, kosher salt, and sugar. I mixed this all together and set it aside until it was needed.
Remember to stir this mixture before adding it to the soup. Otherwise, all the cornstarch will be stuck to the bottom of the container and the soup won’t have the right consistency.
Vegetables
The vegetables I used for this soup are 1 small-ish carrot, 1 bunch of green onions, 1 small-ish onion, and 1 baby bok choy. I separated the green onions into whites and greens. The greens, which are softer than the whites will be used for garnishing the soup nearer the end of cooking. The whites will be cooked into the soup like regular onions for flavour.
To prep the vegetables I peeled and sliced the onion, and peeled and cut the carrot into match sticks. Then, I cut the bok choy in half and thinly sliced it. And, I cut the green onion whites into 1 cm pieces.
If you don’t have bok choy don’t worry about. I mostly just used it to add a bit more vegetables and because I had it in my fridge. You can leave it out completely or substitute it for another mildly flavoured green like Nappa Cabbage.
Ginger and Garlic
For the next step, I minced about 2 tbsp of garlic and grated about 2 tbsp of ginger.
Green Onion Tops and Cilantro
Next up are the green onion tops and some cilantro. I sliced all the green onion into thin slices then chopped about 1/4 cup of cilantro. This will be added to the soup at the last minute as a garnish and to add a nice fresh flavour.
Noodles
The second last element of the soup is rice noodles. This isn’t really that traditional but I like to add them because they add a nice texture and they make the soup a bit more filling. I used about 50 g of dried noodles, just about a handful. I soaked them in very hot tap water for 10 minutes and then just roughly chopped them into smaller pieces.
The noodles aren’t fully cooked, but once they get added into the hot soup, they will finish softening very quickly.
Beat the eggs
The final step before actually making the soup is to beat 2 eggs. That’s it. Now, you can leave the eggs out of this, again I know they make the soup look a little odd, but I highly recommend leaving them in. They really make the soup what it is.
Making Hot and Sour Turkey Soup
Okay, everything is ready to go and now it’s time to make the soup!
The first step is to heat a large, heavy-bottomed pot over medium heat. Once the pot is hot add in 2 tsp of sesame oil along with the carrot, onion, green onion, and bok choy. Cook this for 2-3 minutes before adding in the ginger and garlic. Cook for 1 more minute.
Mushrooms and Turkey wings
After the ginger and garlic have cooked for about a minute add in the soaked mushrooms along with the liquid. Bring this to a boil, add in the turkey wings and 3 cups of hot water. Bring the soup to a boil
Sauce, and Simmer
Stir the flavouring liquid to redistribute the cornstarch. Then stir it into the soup. Bring the soup back to the boil, cover the pot, reduce the heat to low and simmer for 10 minutes.
Noodles and Eggs
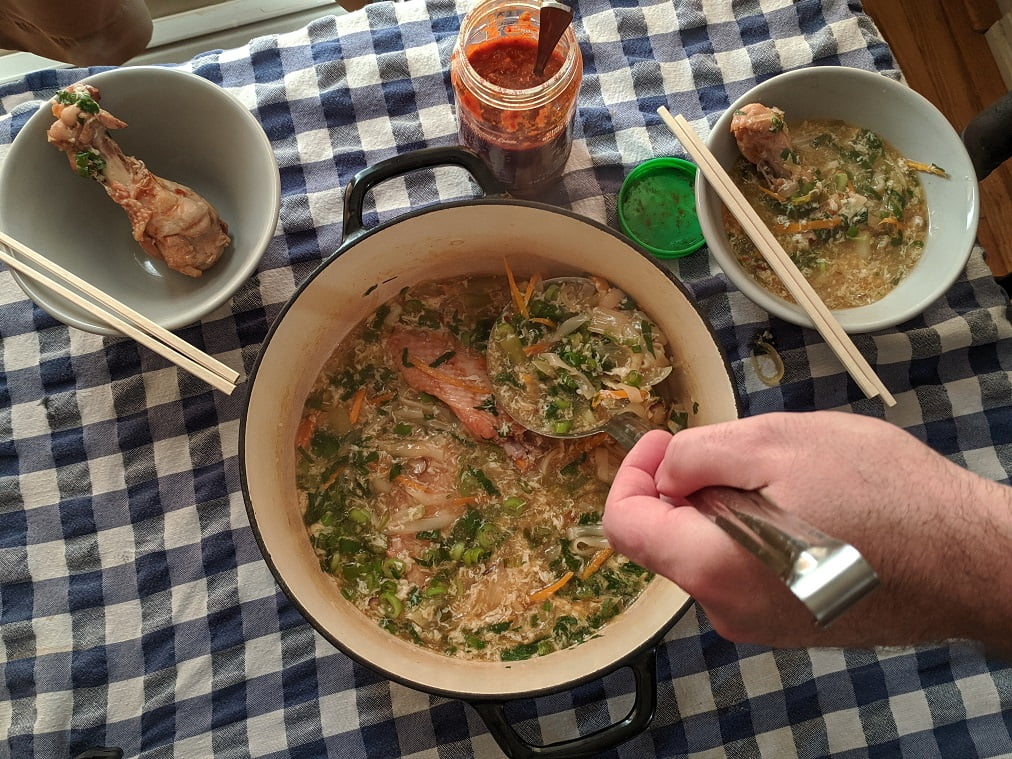
Once the soup has simmered for 10 minutes remove the lid from the pot and add in the rice noodles. Let the noodles heat for 2 minutes. Now, gently stir the soup as you pour in the beaten egg. Let the egg cook for about 1 minute then add in the green onion tops and cilantro and gently stir.
Let’s Eat
Just like that the soup is ready to serve.
Conclusion
With fall here and the days getting a bit colder a soup like this is exactly what we all need. I can not suggest strongly enough that you give this soup a try. The Turkey Wings and the Flavourful Soup are a perfect match that you are going to love.
Thank you to Turkey Farmers of Canada and Thinkturkey.ca for sponsoring this post. I would have never come up with this recipe otherwise and I am so happy that I did.
A few months ago I made Chipotle Lime Turkey Tacos which you can and should check out if you haven’t yet. They have become my go-to taco recipe. And for even more great turkey recipes remember to check out ThinkTurkey.ca
The other day I challenged myself to make pho in under 30 minutes. Generally, the broth alone takes at least a few hours so this was no small feat. What I came up with is a close approximation to pho, but I wouldn’t call it pho exactly. For that reason, and in the interest of avoiding a torrent of hellfire from a pho loving internet is why I am calling this a pho style soup. Like pho, but not quite pho. One may say it is a pho-ny.
Pho is a noodle soup from Vietnam which came out of the 1920s and became common around the country in the mid-1950s. Traditionally, it is composed of rice noodles, flavourful stock, herbs, meat, and vegetables. It is most often served as street food in Vietnam.
My version has all the traditional markings of pho, but again it isn’t exactly pho. Mine ended up with a little less liquid than it normally would have but that is easily fixed. So, if you are craving a bowl of pho, but you don’t know where to go, here is how you can make…
Pho Style Soup In 30 Minutes Or Less
To speed up the process I used Campbell’s Beef Stock rather than homemade. This cut my time down by hours. I know that some of you are thinking, “Oh. My. God! How could you do that, Ben?” Well, it was simple, I bought it at the store, and put it in my soup and it worked really well. Get over it! Just joking guys. But really, I have no problem buying stock when you don’t have time to make it, or in the case of chicken stock when you just can’t keep up with production. I use way more than I can make.
Anyway, I started cooking at 5:50 pm and the first thing I had to do was start building up flavours to bolster the store-bought stock.
Here we go!
5:50 pm – Turn up the heat
The absolute first thing I did was put a large pot on the stove and turn it on over medium heat. I also filled a medium pot with hot water and put that on the stove on high. The big pot is for the soup. The medium pot of water is for the noodles.
Getting the pots on only took about a minute. Once that was done, I jumped right into prep, starting with an onion.
I first cut the ends off, cut it in half, peeled it, and then thinly sliced it. I add one tablespoon each of sesame oil and canola oil to the large pot and put the onions in to begin to cook.
I’m pretty quick with an onion so at this point only two minutes had gone by. This may take you a little longer, but as you will see later, there is time to spare.
5:52 pm – Green onions
With the white onions cooking away in the pot I got down to business with some green onions. When cooking with green onions I usually separate them in two. The softer green tops are saved until later in the cooking process or for garnish as they take next to no time to cook. The firmer bottom white parts, are roughly diced and added to the white onions in the pot.
5:54 pm – Garlic
Stirred the onions a bit to make sure nothing was burning and then I got down with some garlic. I took three cloves, cut the ends off, crushed them to release the peels, and then thinly sliced them. And of course, I added the garlic to the pot as well.
5:55 pm – Celery
Next up was some celery. I took one celery stalk and sliced it nice and thin on a bias. That’s just a fancy chef word for cutting things on an angle. Into the pot, it went.
I stirred everything a bit more, and reduced the heat on the pot slightly as well.
5:56 pm – Mushrooms
After the celery, I quartered four cremini mushrooms. These help to add body to the flavour of the soup which is especially important when using store-bought stock.
5:58 pm – Ginger
Normally if I had fresh ginger I would have cut it up and added it with the garlic. Because I freeze and grate my ginger, I added it now, right before the stock. I did this because it is grated so fine that it would otherwise burn very quickly. If you are using fresh chopped ginger, add it earlier.
I grated the ginger into the pot, stirred it around for a few seconds, and then added the stock in and turned the heat up to high. I also added in one cinnamon stick and one mangled piece of star anise. That was the best piece I had. These won’t be in the soup long but will add a lot of flavour, and will make the plain beef stock taste a lot more like pho broth.
At this point my water was boiling for the noodles. I turned off the heat and put the rice noodles in the pot and stirred. The noodles only take about two minutes to soften. Once they were soft, I drained them and rinsed them under cold water and set them aside.
6:03 pm – Flavourings
Once the noodles were out of the way I added two tablespoons of soy sauce (gluten-free), one tablespoon of Sambal chili sauce, three to four drops of fish sauce, and one teaspoon of rice vinegar, along with salt and pepper to the soup pot. I tasted it and adjusted the seasoning.
6:05 pm – Bok Choy
With the flavour of the soup where I wanted it, it was time to get the rest of the ingredients together. I took two heads of baby bok choy, pulled them apart and washed them. I then thinly sliced them and add them to the soup pot. Then I thinly sliced the green onion tops and into the pot, they went as well.
At this point, I also fished around for the cinnamon and star anise and took those out of the pot as they had added enough flavour. And, I turned the pot down to a simmer.
6:09 pm – Slice Beef
The beef I used for this soup is a special cut of sirloin called fondu beef. I bought it from my butcher but you can obviously just slice it yourself if you want. This fondu beef is sliced very thin so you can cook it quickly in fondu. Traditionally, the beef in a bowl of pho would be added in raw, then the hot broth would be poured over it to cook it rare. That is essentially what I tried to emulate here.
The beef was in large slices so I cut them into strips and then added them into the barley simmering soup.
6:11 pm – Noodles
With the beef in, all that was left to finish my soup was noodles and bean sprouts. I added these in, and the soup was done.
I served it up with a squeeze of lime and fresh cilantro and finished with nine minutes to spare. Not too shabby?
Conclusion
Who says you can’t make pho quickly? This was absolutely delicious! I’m not going to say that it was the best pho I ever had or even made, it wasn’t. But, it was better than 75-80% of the pho I have bought and eaten in my life.
If you make this, you will be happy that you did.
Pho Style Soup
This pho style soup is delicious and takes only about 20 minutes to put together. What could be better than that?
There once was a hungry wanderer. One day this wanderer found himself in a small village in the northern mountains of Portugal. The wanderer wandered his way to the center of town and set up a small camp. He lit a small fire on top of which he set a large pot filled with water and one stone. He then sat back waited, and watched the villagers walk by.
Eventually one of the villagers stopped and asked him “What are you doing?” The wanderer replied “I’m making stone soup.” What’s stone soup?” asked the villager. “Well it’s only the best soup there is. I’d share it with you but its just missing some onions.” The villager wanting to try this stone soup ran off returning a few minutes later with a bunch of onions.
The wanderer continued to sit by his pot of water, stone and now onions, until he was approached by another villager. “What are you doing?” asked the local. “I’m making stone soup.” responded the wanderer. Again the villager asked what it was. “Well, it’s only the best soup there is.” replied the wandered. “I’d share it with you but it’s just missing some meat.” Off ran the villager to get the meat for the soup.
This continued until the whole village had contributed to what had become a very hearty pot of soup. The wanderer shared the soup with the villagers just like he said he would. Then he wandered off to the next town with a full belly a pot and a stone.
Our Soup
This story, or a variation of it, exists in lots of different places. I first heard it while travelling in Portugal with my wife a few years ago. The soup we had then, that went along with the story is very similar to the soup that I make in this post. It is a nice light yet hearty soup that is great both for warm summer evenings and cold winter nights. I love it and I hope you do to.
Let’s take a look at how to
White Bean and Chorizo Soup in 30 Minutes or Less
7:40 pm – Onions
I started cooking at 7:40 pm. Like in the story the first thing I had to do was get the onions cooking.
I first cut off the top and bottom of the onion and then cut it in half down the middle. Next up was to peel the onion and then thinly slice it along the grain.
While I was slicing the onion I had my pot preheating over medium heat. Once it was hot I added 2 tbsp olive oil along with the sliced onion.
7:44 pm – Chorizo
As the onion was cooking I went to work on the chorizo. I only used half a link which is about the equivalent of one standard sausage. Also, the chorizo I used was dry cured not fresh.
I cut the chorizo into quarters lengthwise and then diced those into pieces about 1 cm x 1 cm. I added this to the onions.
7:46 pm Red Pepper and Garlic
By 7:46 the onions were slightly softened and the chorizo had gone into the pot. It was time to take care of the garlic and red pepper.
I first cut the ends off the garlic. Then I gently crushed it under the side of my knife and pulled the peel off. All the was left was to thinly slice it.
For the red pepper I cut off the top and bottom. Then I sliced through one side of the pepper. I put my knife inside the pepper and cut the ribs free while unrolling the pepper. This allowed me to take the seed pod out in one piece without making a big mess. This also prevented me from wasting any pepper.
I set half the pepper aside and diced the other half along with the top and bottom.
7:50 pm Add Garlic and Chilis
Once I was done cutting the pepper I turned the heat down slightly on my pot and added in the sliced garlic and about 1/2 tsp of chili flakes.
7:51 pm Dice Tomatoes
Next up was to dice a tomato.
First, I cut it in half down the center, took out the stem, and then diced it. I add this to the pot.
7:54 Green Beans/Chicken Stock
At 7:54 pm I added the red peppers to the pot. While they were cooking I trimmed off the ends of about 20 green beans and then cut them into thirds. Once the beans were cut I added 1 L of chicken stock to the pot. I put the lid on the pot, cranked the heat up to high and waited for the soup to boil.
7:58 pm – Drain Beans
At 7:58 I opened up a can of white beans and drained them. I also chopped up some parsley.
8:00 pm Boiling Soup
At 8:00 the soup was boiling so I added in my green beans and white beans. I put the lid back on the pot and started cracking four eggs into a shallow bowl.
At 8:04 I lowered the heat on the soup to a simmer, removed the lid form the pot and gently poured the eggs in one at a time. I put the lid back on the pot and let the eggs cook for three minutes.
8:07 pm Finishing
At 8:07 I tasted and adjusted the seasoning of the soup with a bit of salt. I plated the soup with a poached egg in the middle and garnished it with a bit of chopped parsley. And that was that.
Conclusion
Being able to put a soup like this together in such a short amount of time is a great trick to have up your sleeve. You won’t believe how much flavour there is in that bowl. Most of that comes from the smoky chorizo and a little bit of sweetness from those peppers. This one is an absolute must try.
Thank you as always for reading. I’ll see you on Wednesday!
White bean and chorizo soup
A delicious and hearty soup that can be put together from start to finish in under 30 minutes.
It is spring, which means lots of rainy, dreary days spent waiting for warmer weather. What better way to perk up those spring blues then with a nice big bowl of soup?
Soup can be made of so many things, and made in so many ways. But there is an art to it. It does take some amount of knowledge and skill to make a really good bowl of soup.
In restaurants, soup is generally made of products that are reaching the end of their lives or leftovers from the day before. We use as few ingredients as possible and manipulate them to get as much flavour as we can. The goal of a restaurant chef is to maximize profit, and make the most out of very little.
Your goals probably aren’t based on balancing profit and loss. However, the same principles that we use in restaurants can be applied to make much tastier soup at home.
So, let’s get in to it. Here are…
Restaurant Secrets For Making Better Soups
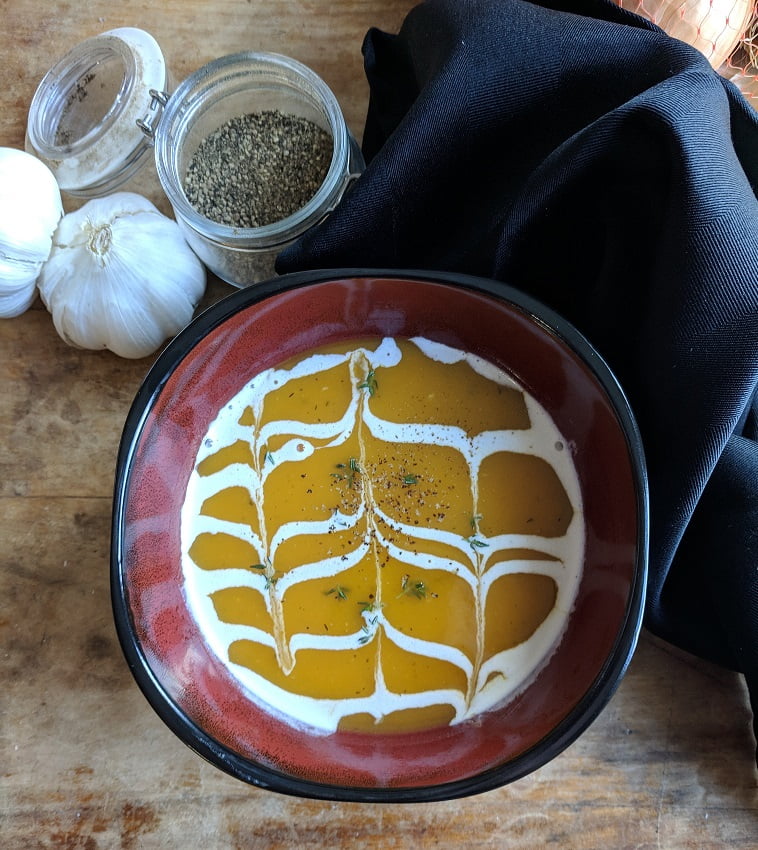
Puréed Soups – Maple Butternut Squash
Who doesn’t love butternut squash soup? Ideally it is smooth, creamy, a bit sweet, and oh so delicious. What’s not to love?
Butternut squash soup is usually made fairly simply. A butternut squash is peeled, the seeds are removed, and it is cut into cubes. Some onions and perhaps garlic will be cooked a little, and then the squash will be added. This will be covered with water and maybe some maple syrup, boiled until the squash is soft and then puréed. Finally, it will be seasoned with salt and pepper and that’s about it.
The soup I just described is the most basic version of a butternut squash soup. It’s not bad, in fact most people would probably be happy with that. But with just a little more effort, that good soup can be made extraordinary.
Roasting Squash
Try Roasting the squash on 425°f for 35- 45 minutes prior to adding it to the soup. This will draw the natural sweetness out of the squash and intensify it’s flavour.
Just cube the squash as described above. Toss it with a few tablespoons of olive oil, and a bit of salt and pepper. Spread the squash out on a sheet pan lined with parchment paper and bake. You want to develop a little colour on the squash, a little caramelization.
Once the squash is thoroughly roasted, add it to the soup pot as you normally would.
Caramelizing the onions
While the squash is cooking take the time to caramelize the onions. This is done by cooking the onions in a little oil, on low heat for a long period of time. All you have to do is stir the onions every once in a while and scrape the bottom of the pot from time to time.
Caramelizing onions, just like roasting the squash, draws out their natural sweetness and deepens their flavour. It makes the flavour of the finished soup richer and deeper.
Maple Syrup
A little maple syrup adds a nice pop to the flavour of the soup. Too much can quickly become over powering and make the soup sickeningly sweet. By roasting the squash and caramelizing the onions, you are already adding sweetness to the soup. This means that the maple syrup is just there for that maple flavour.
A little maple syrup can go a long way if you take the time to reduce it. Once the onions are cooked, add about half as much maple syrup as you think you should and cook it until it has almost completely evaporated. This will intensify that maple flavour meaning you can use less than you normally would.
Liquid
Use stock instead of water when making soup. The reason being that soup is usually made with only a few ingredients. Those ingredients have to provide as much flavour as possible. Otherwise, you may have to add other ingredients to compensate for the lack of flavour.
Stock is just flavoured water. It could be flavoured with vegetables to make vegetable stock. It could be flavoured with chicken bones and vegetables to make chicken stock. Beef bones and vegetables to make beef stock. You get the idea.
I generally recommend making your own stock. It is really straightforward and takes no effort at all. But, feel free to buy it at the grocery store if you prefer. Just, use stock instead of water.
Puréed soups
Maple butternut squash soup is generally a puréed soup. Often at home people will purée their soup in a blender and call it a day. A blender alone will never be able to give you that smooth, creamy texture that you get from soup in restaurants. That comes from passing the soup through a fine mesh sieve once it has been puréed.
Passing the soup through a fine mesh sieve is just what it sounds like. Pour the soup into the sieve, and using a spatula or the bowl of a ladle, push the soup through the tiny holes. You are trying to get as much of the solids through the sieve as possible. What comes out the other side is the smoothest, creamiest possible.
Conclusion
The principles I just described for making butternut squash soup can also be applied to pretty much an other puréed vegetable soup. Roast the main ingredient. Caramelize the onions. Use stock instead of water. Pass the final soup through a fine mesh sieve. Done and done.
Broth Based Soups – Chicken Noodle
Broth based soups like chicken noodle are one of the classic home remedies for whatever it is that ails you. But rarely does homemade chicken noodle soup taste as good as the stuff made in restaurants. So, what’s the secret?
It will likely come as no surprise to learn that the secret to a really flavourful and delicious broth based soup, is a really flavourful and delicious broth. This brings up the question, what exactly is a broth and is different from a stock?
Broth vs. Stock
There is one really big difference between broth and stock. Stock is made from bones. Broth is made from meat. Stock uses water as the base. Broth often uses stock as the base. That’s pretty much it. Other than that they are made the same way.
To make it a little clearer… to make stock you take chicken bones and simmer them with carrot, onion, and celery. To this some herbs might be added. To make broth you simmer the whole chicken with vegetable and herbs.
In terms of flavour, broth is much stronger than stock. It generally has a slightly higher fat content and so it has a richer mouth feel. Broth is also usually clearer than stock. This comes from clarification, which is a relatively complicated process that we don’t need to get into. One way to keep a broth fairly clear is to not add carrots to it as they will cloud it. And do not boil the broth while you are making it.
Cooking the ingredients
Another secret to flavourful broth based soups is to cook all the ingredients separately. This seems kind of counterintuitive but it’s true. Start with a hot flavourful broth and add cooked ingredients to it. This keeps the flavours clean and crisp as well as the broth clear.
If you are making the soup a day in advance, all of the ingredients can be combined the day before except any ingredients that will continue to absorb liquid like rice or pasta. Add these only at the last minute before serving otherwise they will suck up way too much liquid and become mushy and gross.
Conclusion
Again these same principles apply to most broth soups not just chicken noodle.
Start with a rich, flavourful broth. Add only cooked ingredients. Leave ingredients like rice and pasta out until the last minute so they don’t become soggy, mushy and gross.
Conclusion
Nothing beats a really good bowl of homemade soup. Hopefully, with these restaurant secrets you can now find yourself making better soup then you ever thought possible. I hope what you’ve realized is that with just a little more effort, the ordinary becomes extraordinary. That is true of all cooking, not just soup. It is always that little be extra that separates the good from the great.
The next time you make soup, even if you are following a recipe, take the time to roast the vegetables, or make a flavourful broth. You will be able to taste the difference, and so will everyone else.
When my mother was a child she was very sick. She spent a large part of her childhood in and out of the hospital. As I’m sure you can imagine, it was very hard on her. She a lot of bad memories from her early life. Because of this, she rarely talked about growing up.
One day, when I was twelve or thirteen, I was home sick from school with a cold. My mom asked me what I wanted for lunch and I said corn chowder. It was always one of my favourite things. Especially when I didn’t feel well.
Unsurprisingly, I ended up in the kitchen with her helping to make the chowder. As we put it together she told me about how when she was girl, when she was out of the hospital and going to school, she would come home at lunch. She didn’t have many friends because she was rarely at school so it was easier to come home than to sit alone.
She said she would often make corn chowder with a left over baked or boiled potato, a bit of onion, some creamed corn, and a bit of bacon. As my mom shared this story with me, she taught me how to make the chowder. I still to this day use her exact recipe almost every time I make it.
That recipe holds a very special place in my heart for a lot of reasons. None of which are more important, or meaningful to me than that afternoon when my mom taught me how to make it, and told me about when she was a kid.
It’s that recipe that I share with you today. I share it not just because you can make it in under 30 minutes. I share in hopes that one day you will it share with someone, and tell them a story that will bring you closer together.
This is…
Corn Chowder In 30 Minutes Or Less
5:45 pm
At 5:45 I started by peeling and dicing the potatoes. Then I rinsed them under cold water until the water ran clear. I covered the potatoes with hot tap water, seasoned it well with salt and put them on the burner over high heat.
5:50 pm
By 5:50 the potatoes were on and I was dicing the onion and bacon. Just before I start dicing the bacon I put a medium sized pot over medium heat. This way it will be ready to go once the bacon is cut up.
5:53 pm
The bacon goes into the pot. I always start with bacon, cook it for a few minutes, and then add the onions as I find this way I get well cooked bacon without burnt onions. An added bonus of this is that I don’t need to add any extra fat or oil to cook the onions in. Enough has rendered out of the bacon.
5:56 pm
After the bacon has had about 3 minutes to cook on its own, the onion go into the pot. I turned the heat down slightly as not to burn them. Now, just keep cooking the bacon and onions, stirring every once in a while until the bacon is cooked through and the onions are soft. It took about 10 minutes.
Also, right around this time, the potatoes started to boil. Because they are diced fairly small, they don’t take long to cook.
6:03 pm
The potatoes are cooked. I drained the water off of them and let them sit in the strainer until I was ready to add them to the chowder. This has the added benefit of allowing any excess moisture to evaporate while they sit. This will help prevent the chowder from getting watery.
I should say that you can use leftover boiled or baked potatoes for this. Just keep in mind that they are going to take a while to heat through.
6:06 pm
At 6:06 the bacon and onions were cooked. I strained them through a fine mesh sieve to remove any excess fat then returned them to the pot. I then added 1 can of creamed corn, 1 cup of heavy cream, 2 cups of 2% milk and a bit of salt and pepper.
6:10 pm
I decided to serve the corn chowder with some mixed salad greens tossed with a light vinaigrette. This a very common side dish in Quebec. It’s eaten with almost every meal. I find it to be a simple and delicious way to add some greens to a lunch or dinner.
At 6:10 I put together a quick vinaigrette using the following recipe.
Once the vinaigrette was done I gently tossed in the greens to lightly coat them. I served a big handful to each person with the chowder.
At this point the dairy in the chowder was pretty much hot. I added the still hot potatoes and turned the heat up slightly to give the chowder one final blast of heat.
6:14 pm
At 6:14 I seasoned the corn chowder to taste and then it was time to plate and serve it along with the greens.
Notes
As I’m sure you can understand this is the ultimate comfort food to me. It has a lot of sentiment attached to it. Beyond that, it is great for so many reasons. It works just as well on a rainy Sunday as it does on a busy Tuesday. Try it for yourself and share it with someone you love.
Also, for the more ambitious of you out there, this chowder goes really, really well with fresh tea biscuits.
Bacon and Corn Chowder
A classic comfort food that works just as well on a rainy Sunday as it does a busy Tuesday.
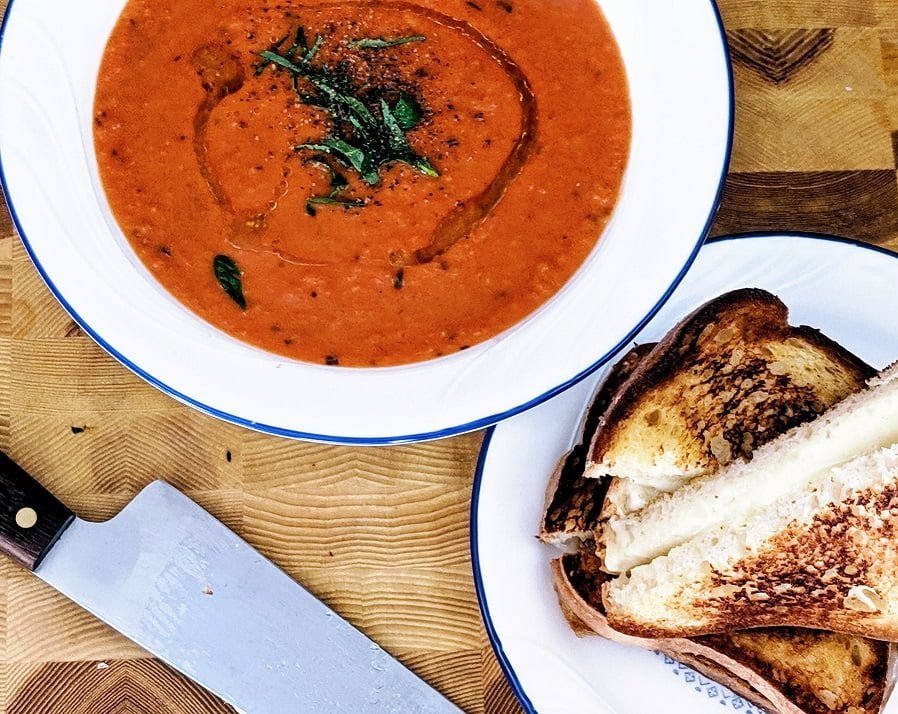
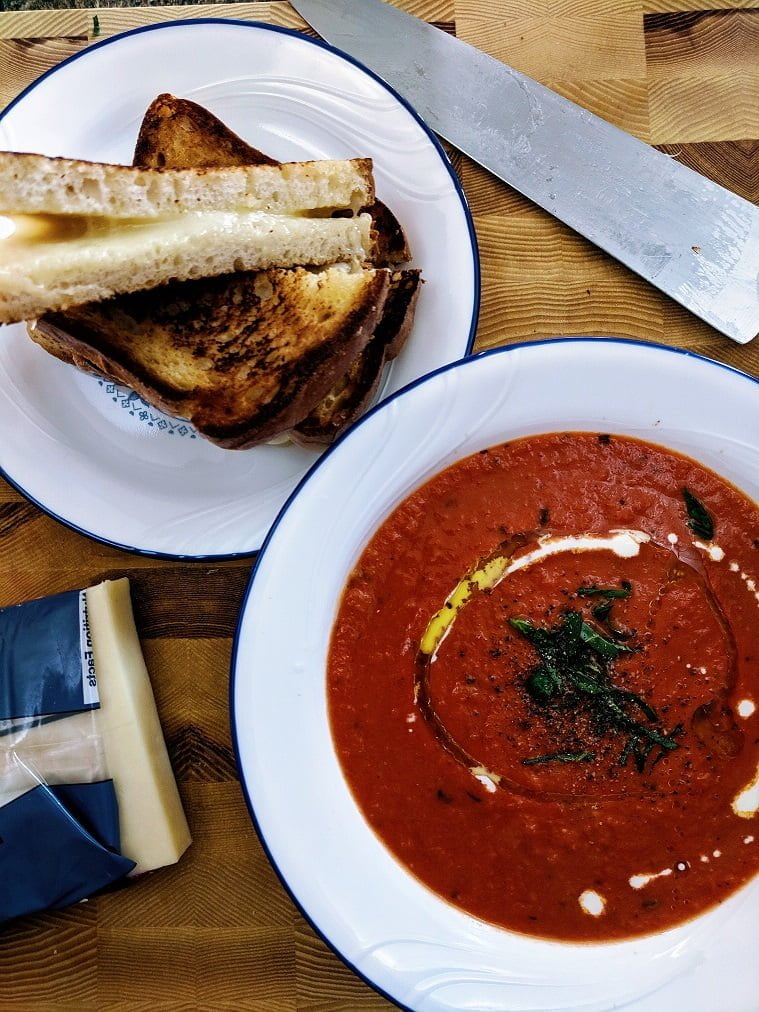
This week we walk through how to make the classic of all classics; Tomato Soup and Grilled Cheese. The kicker…we do it from scratch in 30 Minutes Or Less.
Let’s take a look!
There are few things in life that reach the height of perfection that you will find while dipping a crunchy, gooey grilled cheese into a bowl of creamy tomato soup. A staple of childhood lunches for generations, what’s not to love?
Although there are some decent canned tomato soups out there, nothing beats the homemade stuff. Today, we make the soup from scratch using only a small handful of ingredients. We speed up the process by using canned tomatoes instead of fresh ones. This makes a really delicious, quick soup.
It may not look it, but this meal is very filling. Having said, if you are serving it for dinner, feel free to add a salad to it as well.
A note about basil
I used fresh basil for this and highly recommend that you do the same. It adds a much fresher flavour than dried basil. If buy basil for this and have a bunch left over, simply purée it with a bit of olive oil and freeze it into shallow ice cubes. One or two cubes of basil purée would flavour this soup very nicely.
Okay, enough chit chat. Let’s get into this.
Ingredients
For the soup I used
1 can of whole reduced salt tomatoes
3 cloves of garlic
1 baseball sized onion
6-8 fresh basil leaves
1/2 cup whipping cream
1 tbsp sugar
salt and pepper to taste
For the grilled cheese I used
4 slices Schar Gluten Free Bread (use whatever bread you would like)
8 1/4 inch slices of aged Cheddar Cheese (a variety of cheese such as Swiss, Cheddar, and Jack Cheese work’s very well)
2-3 tbsp butter
Let’s get cooking
5:10 pm
At 5:10 I gathered all of my ingredients and diced my onion, garlic, and basil.
The size that you cut this stuff isn’t super important as it’s going to be puréed later one. However, it’s still important to cut it up fairly small so that it will cook quickly and evenly.
This all took me until about 5:15 pm.
The trick to dicing the onion is to first cut the top off. Next, cut the onion in half down through the root. Peel the onion. At this point you should have two peeled onion halves with the root still attached. The root holds the onion together.
The next step is to make a few horizontal cuts, making sure to keep your fingers flat and clear of the knife. Your horizontal cuts should be separated by about a quarter inch. Likely you will only need two in your onion. You still do not want to cut through the root.
Next, using the same principles as with the horizontal cuts, you want to make a few vertical cuts. These cuts should go all the way through the onion to the cutting board, but still not through the root. Use the tip of your knife to do this.
It’s easiest to make these vertical cuts with the root of the onion pointing away from you.
The root should still be intact so that your onion is mostly being held together.
Finally, you cut across the onion, and the slices you’ve made, leaving you with a perfectly diced onion.
For this we also have to peel and chop the garlic and basil. For the garlic, cut the root off, press down firmly on the garlic to crush it, pull the peel off and rough chop it.
Wash the basil and pat dry. Roll the leaves into a cigar shape and slice them evenly.
5:15 pm
By 5:15 the onion, garlic, and basil were ready. I added 1 tbsp of olive oil to a medium pot a long with the onion and garlic. I put the pot over medium heat and cooked until the onions were soft.
Usually, I am pretty adamant that the pot be preheated and the onion goes in long before the garlic. The reason it doesn’t matter here is because we are only cooking the onions long enough to soften them, and we didn’t cut the garlic very small. This just means that there isn’t going to time for the garlic to burn. And as we aren’t trying to colour the onions, a hot pot isn’t needed.
At this point I started cutting the cheese. All of this took me about 3 minutes.
5:18 pm
At 5:18 I buttered my bread, stacked them slices buttered side together, and topped one un-buttered side with the cheese. I stacked the bread like that just to keep everything neat and tidy.
By 5:22 the cheese was all cut, and the sandwiches were assembled.
5:23 pm
At 5:23 the onions were softened and just starting to brown. I opened the can of tomatoes and added them to the pot, whole. I added the basil, cream, sugar and some salt and pepper in as well.
Using an immersion blender, I puréed all these ingredients together until smooth.
A regular blender can be used but rather than adding all of the ingredients into the pot, add everything into the blended along with the cooked onion and garlic. Once everything is puréed add it back into the pot and heat.
Now that the soup was puréed, it went back over medium heat and was left to heat through and simmer while I made the grilled cheese.
5:28 pm
Now that the soup is all but done, I started heating my cast iron skillet over medium meat.
If you don’t have cast iron, use what you do have. Ideally, you should have a pan big enough to make multiple grilled cheeses at once. This will obviously save you time.
It took about 3 minutes for the pan to heat up. Once it was hot I separated my two slices of bread, and put the buttered side of the slice with the cheese on it down. I topped this with the second piece of bread with the butter side up. This might be written in a confusing way… Cheese in the middle of two pieces of bread with butter on the outside of both pieces. That feels like a much better explanation. I put the second sandwich in as well.
The key to an evenly cooked grilled cheese is to keep it moving. Every 45 seconds or so move it around the pan to make sure it isn’t sitting on a hot or cold spot. Once it’s golden brown on one side flip it and brown the other.
What you will probably notice is that both sides of the sandwich will be brown but the cheese won’t be melted. Once both sides are browned I keep flipping the sandwich every minute or so. This keeps both sides hot, heats the sandwich evenly throughout, and gives the cheese time to melt without burning the bread.
If you feel like the bread is going to burn even with all the flipping, turn the heat down a bit.
5:35 pm
By 5:35 the grilled cheese and the soup were both done, plated, and the final pictures had been taken. Within this time, I also made a non gluten-free grilled cheese for my wife, so three grilled cheese in total.
If you need to make a bunch of grilled cheese, cook them in the pan just enough to toast the bread on both side and then put them in a 350°f oven for 5-7 minutes, flipping them at least once. This should be enough to melt the cheese. And, you can make a lot of them this way.
I added a bit of olive oil, cream, basil and pepper to the top of the soup for garnish. The first picture doesn’t have cream on it, you see the difference in presentation a little contrast can make. You can thank my wife for that.
Conclusion
This meal took no time at all and is guaranteed to please. the best part is that it works just as well for a Saturday lunch as it does for a Tuesday dinner.
Once you try this and see how quickly it comes together and how delicious it is, I doubt you will want to go back to canned soup.
Tomato Soup
A quick and delicious soup that is guaranteed to please.
Pho is a soup and noodle dish originating in Vietnam in the early 20th century. Generally, it is made with beef, but chicken and vegetarian versions exist as well.
Pho consists of three main components. The broth. The noodles. And, the garnish.
The broth is a rich stock made of beef bones and meat. Spices such as cinnamon, and star anise are included along with deeply roasted vegetables like onion and ginger. If the pho is served with chicken, the broth is chicken based. Mushroom based versions exist for vegetarians.
The noodles are a specific type of medium wide rice noodle. These can be found in most grocery stores now.
Finally, there is the garnish. This includes sauces like sriracha, hoisin sauce, fish sauce, and soy sauce. Vegetables and herbs like Thai basil, bean sprouts, green onion, cilantro and lime. And meat like thin slices of beef or chicken, small meat balls, tripe, or pretty much anything else.
Pho is generally served with sriracha, hoisin, fish sauce, and soy sauce as the broth, though flavourful is fairly mild. These condiments allow the patron to add spice, sweetness, and umami to their own taste. This makes pho the perfect dish for anyone hesitant about bold Thai flavours, or South East Asian flavours in general.
Making The Broth
Because the base of pho and the main flavours are coming from the broth it is important that the broth be of really good quality. It is also important to note that the broth is not complicated to make. It does take time, however this is something you can put in your slow-cooker or instant pot and leave to cook while you’re at work.
Ingredients
The ingredients for pho broth can be broken down into three categories. Meat and bones. Spices. And vegetables. Let’s take a look at each.
Meat and Bones
Marrow bones or soup bones are used along with a few cuts of meat like shank or ox tail. Really, for the meat you want something tough and flavourful. You’re not going to be eating this meat. It is used to flavour the broth and for it’s fat.
Both the bones and meat can generally be found in the frozen section of your butcher shop, the butcher aisle at the grocery store, or just ask your butcher. Luckily, these bones, and pieces of meat are really cheap.
Though they can be used raw, it is best to roast the bone on 400°f for a while to develop a deep caramel colour on the surface. This will add depth to the flavour of the broth as well as colour.
Spices
Spices often used include star anise, cinnamon, clove, fennel seed, coriander seed, and sometimes black cardamom and dried chili.
When using these spices it is important to toast them in a hot dry pan (no oil) until they start to become aromatic (smell strongly) and release their natural oils (they start to shine). This enhances their flavour and thus, enhances the flavour of the broth.
Often the spices will be wrapped in cheese cloth but the broth will be strained through a sieve so it really isn’t necessary to do that.
Vegetables
The vegetables used to make pho broth are pretty straight forward. Onion and ginger. That’s generally it. However, like the beef bones, these are roasted.
Roasting the ginger and the onions until they develop a deep brown colour intensifies their flavour. There is a second purpose as well. The roasted onion helps to clarify the broth keeping it clear. The darker the onion, the more it will help to clarify. Often the onion will be roasted over direct flame to char it. But roasting it in the oven is fine.
Putting it all together
Once the bones, meat, and vegetables are roasted, and the spices are toasted they all go in a pot together. Cold water is added, enough to cover everything by at least one inch. It is very important that cold water be used to insure a clear broth.
Once everything is in the pot bring it up to a boil. As soon as the broth starts to boil, reduce the heat to low and simmer for an hour or two. If the broth is left to boil it will become cloudy.
While the broth is simmering it must be skimmed. You will notice a scum form on the surface. This is perfectly natural but if it is left to recirculate into the broth, it can cloud it. Do this every 20-30 minutes. Use a ladle, a spoon, or whatever and pull anything off the surface that looks like it shouldn’t be there.
Once the broth is flavourful (after about 2 hours) you want to strain it. You’re saving the liquid and discarding the solids. If you don’t have a fine mesh sieve you can use a colander lined with Measurements
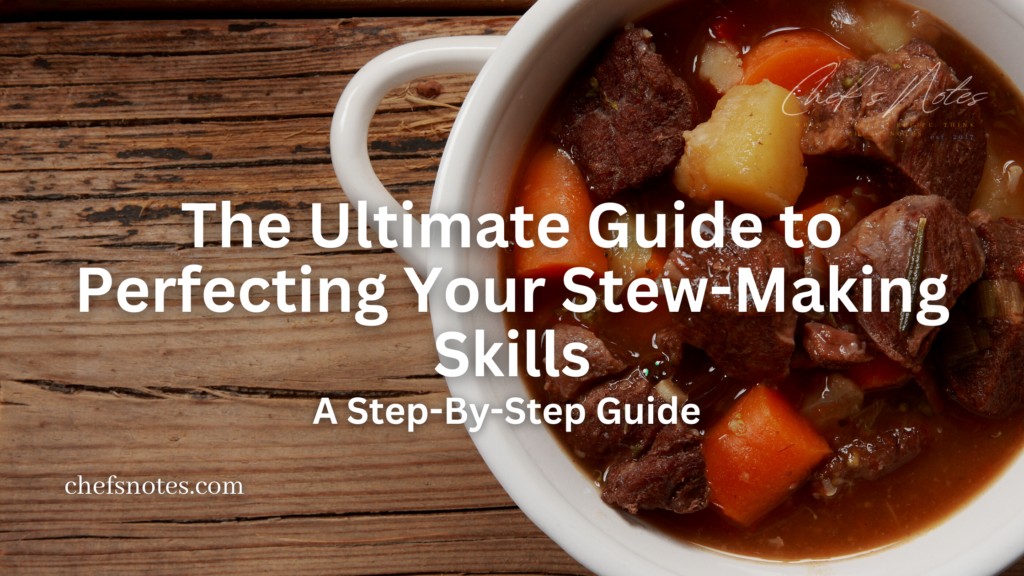
Warm up this winter with the ultimate comfort food – stew! Whether you prefer beef, chicken, pork, goat, lamb, or a hearty vegetarian version, there’s no denying that stew is the perfect dish for colder weather. But what exactly is a stew, and how do you make it? Fear not, because we’ve got you covered. From the best cuts of meat to use to the perfect seasoning, we’ve got everything you need to know to make the most delicious stew. So, grab a bowl and get ready to dive into the world of stew!
What is a stew?
Let’s start by defining what a stew is. While it may seem like a simple question, there is a fine line between soup and stew. To me, the key difference is the thickness of the liquid that the ingredients are cooked and served in. Stew has a gravy-like consistency, while soup is generally thinner. However, when we start looking at chowders and thick soups like split pea, things can get confusing. At the end of the day, I define stew as a soup with a thickened broth.
Stews can be made with any kind of meat or even fish and seafood. However, today we’re going to focus on meat-based stews to keep things simple. The best meats for stew are tough, cheaper cuts that have a lot of flavours. The long, moist cooking method used in stewing is perfect for breaking down tough muscle fibres, making these cheaper cuts tender and delicious. So, no matter what kind of meat you prefer, there’s a stew recipe out there that will be perfect for you.
Choosing The Right Meat For Your Stew
When it comes to making a stew, it’s important to choose the right cut of meat. The best cuts for stewing are the tougher, cheaper cuts of meat that have more flavour. These cuts benefit from the long, slow cooking process used in stewing, which breaks down the tough muscle fibres and results in tender, delicious meat. For beef, cuts like chuck, round, shank, and brisket are ideal, while pork shoulder, leg, and hock are great choices for pork stews. Lamb shank, shoulder, and neck are perfect for lamb stews, while chicken thighs and legs have more flavour than leaner cuts like chicken breast and are great for chicken stews. In general, avoid lean, tender cuts of meat as they won’t hold up well during the long cooking process. Instead, go for the cuts with more connective tissue and marbling, which will break down and add flavour to your stew.
When preparing the meat for your stew, it’s important to cut the pieces to a relatively uniform size to ensure even cooking. Cubes of meat about 1 inch by 1 inch are a good rule of thumb, although it doesn’t have to be exact. If you prefer larger chunks of meat in your stew, be aware that they will take longer to cook. If you decide to cut the meat in strips rather than cubes, be sure to cut across the grain of the meat. This shortens the muscle fibres and makes the meat easier to chew. No matter what type of cut you choose, be sure to select a tougher, cheaper cut of meat with more connective tissue and marbling. These cuts will hold up well during the long cooking process and will break down, adding flavor and richness to your stew.
Browing The Meat
Meat should be seared very well before going in a pot with any liquid. This searing can be done in the pot, in a separate pan, or even in the oven under the broiler.
As with anything that we want to get a nice sear on, a dry surface is best. You can pat the meat dry with a paper towel, or you can dredge it in flour prior to searing it. However, it’s not necessary to dredge the meat in flour, as it can burn in the oil and create a mess.
To get a deep, rich brown colour on all sides, season the meat with salt and pepper and sear it in small batches to avoid crowding the pan and cooling it down too quickly. Overcrowding will cause the meat to steam and release liquid, preventing it from getting a proper sear.
Searing the meat creates a flavorful crust on the outside, which enhances the overall taste of the stew. It also creates browned bits or fond at the bottom of the pan, which can be scraped up and used to flavour the stew.
Once the meat is browned, remove it from the pan and set it aside until ready to add it to the rest of the stew ingredients.
Building Flavor: Sauteing Vegetables for Your Stew
Now that you have seared the meat, it’s time to add depth and complexity to your stew by sauteing some vegetables. Start by removing the meat from the pot and setting it aside. Pour out any excess oil in the pot, leaving just enough to saute the vegetables.
Add diced onions and celery to the pot and saute them until they start to soften and become translucent. This will take about 5-7 minutes. As the vegetables cook, they will release flavours that will further enhance the taste of your stew.
The sauteing process will also help loosen the brown bits from the seared meat that are stuck to the bottom of the pot. These brown bits contain a lot of flavours and will add depth to your stew.
Once the onions and celery are cooked, you can add minced garlic and cook it for a minute or two before moving on to the next step, if your recipe calls for it. Garlic adds a rich, earthy flavour to your stew, and cooking it briefly will help to mellow its sharpness.
Remember that this step is crucial to building the foundation of flavour for your stew. Take your time, and make sure to scrape up all the brown bits from the bottom of the pot. This will add complexity and depth to your dish.
Thickening Your Stew with Roux or Cornstarch
Once you’ve sautéed the onions and celery and built the flavour foundation of your stew, it’s time to consider how to thicken it. Depending on the recipe, you may add a roux, which is a mixture of melted fat and flour in equal parts, or a slurry of cornstarch and water. While regular all-purpose flour can be used for making a roux, gluten-free flour is a great option too. To make a cornstarch slurry, mix about 1/4 cup of water with 2 to 3 tablespoons of cornstarch, then stir it into the stew about ten minutes before it’s ready to eat.
For roux, it’s best to make it separately and add it to the pan once the stock is hot and the pan is deglazed. Melt some butter or other fat in a separate pan, sprinkle the flour into the pot, and stir for a few minutes. It’s important not to add too much flour, as the stew will cook for a long time, and the liquid will evaporate, making it too thick. Otherwise, it may burn the bottom of the stew.
Determining the right time to add the roux depends on the recipe, but typically it’s added after the vegetables have been sautéed and before the meat and stock are added. This step will thicken the stew and provide a rich and flavorful gravy-like texture that will bring all the ingredients together.
Deglazing the pan for enhanced flavour
Once your onions and celery have softened, the next step is to deglaze the pan to lift any stuck bits of food (fond) from the surface. Deglazing helps to enhance the flavour of your stew, and it’s generally done using alcohol like wine or beer. However, stock or water can be used instead.
To deglaze, simply add liquid (preferably wine) to the pot and scrape the surface with a wooden spoon to lift all those bits up. If you’re using alcohol, it’s essential to cook it out to get rid of the harsh, bitter flavour that can result from uncooked alcohol. Cooking out alcohol is just another cooking term for cooking wine until all the alcohol has evaporated.
To cook out the alcohol, reduce the wine by half its volume. For example, if you add 1 cup of wine to the pot, cook it until only about 1/2 a cup is left. This should take care of the alcohol flavour while leaving you with subtle wine flavours.
It’s important to deglaze the pan before adding any liquid or roux, as leaving the stuck bits of food stuck to the pan can lead to clumping and burning. By deglazing, you’re also creating a flavour foundation for your stew that will make it more delicious.
What liquid should you a
When it comes to adding liquid to your stew, it’s recommended to use stock instead of water. Stock can add an extra layer of depth to the flavour that water can’t match. Even store-bought stock can be used if you don’t have homemade stock on hand.
Once you have your stock in the pot, bring it to a boil. That’s it for this step.
Thickening Your Stew for Optimal Texture
After you’ve added your cooking liquid, it’s time to thicken your stew to achieve the perfect texture. You have two main options: whisking in a premade roux or adding a mixture of cornstarch and water. It’s important to add the thickener at this point, before the stew is loaded with meat and vegetables, to ensure it blends in properly.
It’s also essential to avoid over-thickening your stew at this stage. Keep the liquid at a consistency that coats the back of a spoon, but isn’t too thick. Remember, the stew will continue to thicken as it cooks, so you may need to add more liquid later on.
If you’re using a roux, melt some butter or other fat in a separate pan, sprinkle in the flour, and whisk it until it’s smooth. Then, add it to the pot and whisk it into the liquid. If you’re using cornstarch and water, mix about 1/4 cup of water with 2 to 3 tablespoons of cornstarch and stir it into the stew about ten minutes before it’s ready to eat.
Throughout the cooking process, be sure to taste your stew and adjust the seasoning with salt and pepper as needed. And remember, less is often more when it comes to seasoning, so start with a light hand and add more gradually until the flavors are just right.
Cooking The Stew
Adding The Browned Meat
Return the meat to the pot, making sure to pour in any juices that have accumulated under the meat. This liquid is packed with flavour and will enhance the overall taste of the stew.
At this point, you can also add any dried herbs or bay leaf to the pot to infuse even more flavour into the stew. Popular herbs for stews include thyme, rosemary, and oregano.
After the meat and seasonings are added, bring the stew back to a boil before reducing the heat to low and covering the pot with a lid. While you can cook the stew on the stovetop, cooking it in the oven at 300°F provides more consistent and even heat.
Let the stew cook for about an hour and check for doneness and liquid levels. If the meat is almost fully cooked, it’s time to add in the vegetables. Remember that different vegetables take different amounts of time to cook, so it’s essential to add them in gradually based on their cooking time. Adding vegetables too early can result in mushy, overcooked vegetables.
Stew Vegetables
A stew is typically composed mostly of root vegetables like onion, carrot, potato, turnip, and parsnip. Other vegetables commonly added to stews include cabbage, peas, celery, and bell peppers.
These vegetables are common in stews in my area of the world, but they are not the only vegetables you can add. You can add any vegetables you want to your stew, just think about their cooking times.
Because the vegetables in a stew are generally cut fairly thick, they may need 45 minutes to an hour to cook. So add them in about that much time before the meat is done. You can also add chopped fresh herbs like rosemary, thyme, or parsley at this point to enhance the flavour.
Finishing Touches
About 20-30 minutes before the stew is finished, it’s time to add any soft vegetables like cabbage, peas, or parsnips. These won’t take long to cook, and you don’t want to overcook them. Mushy vegetables aren’t very much fun. Other vegetables like sweet potato, celery root, and rutabaga can also add great flavour and texture to your stew.
Once the stew is finished, you can add some chopped parsley or other fresh herbs like thyme, rosemary, or sage. This will add a burst of freshness and complexity to the flavour profile. Taste the stew and adjust the seasoning as needed. If you want to be really indulgent, you can add a tablespoon or two of butter and stir it in to add a really rich flavour and smooth texture.
At this point, you can also remove any bay leaves or herb sprigs that were added earlier in the cooking process. These can be tough and fibrous and are not pleasant to eat.
Finally, let the stew rest for a few minutes before serving to allow the flavours to meld together. Serve hot with some crusty bread, and enjoy the hearty, comforting goodness of a well-made stew.
How to Make a Delicious Stew: A Step-by-Step Guide
Start by choosing the right meat for your stew, which should be tough and cheaper cuts that are full of flavour.
Cut the meat into evenly sized pieces, about 1-inch by 1-inch cubes, for even cooking.
Sear the meat very well to a deep, rich brown colour to develop flavour and create a base for the stew.
Remove the meat from the pot and set it aside.
Saute onions and celery in the same pot to build a flavour foundation for the stew and pull the brown bits off the surface of the pan.
Deglaze the pan with alcohol or other liquid to lift any stuck bits of food from the surface and add depth of flavour to the stew.
Add cooking liquid, preferably stock, and bring it to a boil.
Thicken the stew with a premade roux or a mixture of cornstarch and water, being careful not to make it too thick at this stage.
Add the seared meat and any drippings that have accumulated under the meat, along with any dried herbs or bay leaf, to the pot.
Bring the stew back to a boil, reduce the heat to low, and put a lid on the pot or put it in the oven at 300°F for consistent and even heat.
Cook the stew for about an hour, checking for the doneness of the meat and adding any more liquid if needed.
About 45 minutes to an hour before the meat is done, add root vegetables like onion, carrot, potato, turnip, parsnip, and any other vegetables of your choice, being mindful of their cooking times.
About 20-30 minutes before the stew is finished, add any soft vegetables like cabbage or peas, being careful not to overcook them.
Once the stew is finished, adjust the seasoning as needed and add finishing touches like chopped parsley, thyme, rosemary, sage, or a little bit of butter for extra richness and flavour.
Conclusion
Congratulations! You now have all the knowledge you need to make a delicious, hearty stew. Don’t be intimidated by the process – once you break it down and follow the steps, you’ll find that it’s actually quite simple.
Remember to choose the right cut of meat, cut it into even-sized pieces, sear it well, and build the foundation of your stew with sautéed onions and celery. Adding the right vegetables at the right time, and thickening the stew with roux or cornstarch slurry, will result in a perfectly balanced dish.
And here’s a pro tip: make your stew a day in advance and let it rest in the fridge. The flavours will meld together and intensify, making it even more delicious the next day.
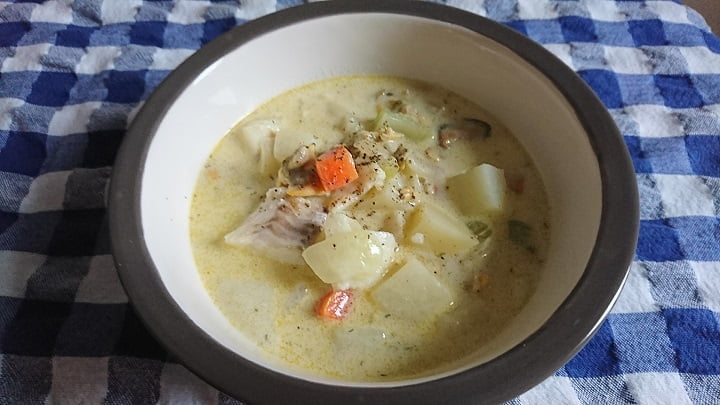
When I was a kid, most years at Christmas we would go to my Dad’s work party at the Bedford Institue Of Oceanography. There’s really only two things I remember about those parties. I remember the touch tanks, and how weird sea cucumbers and starfish felt. And I remember the chowder. For whatever reason, every year, there was seafood chowder. It was loaded with seafood, potatoes, and onions, and it was so smooth and so creamy. I loved it. I honestly, even at a young age, looked forward to it all year.
I’m telling you this because this afternoon I’m competing in a chowder cook-off. It’s not high stakes by any means. It’s really just a fun thing to do and a way to get my name out there some more. However, last year at this same competition I won peoples choice. And so, I want to win again. If I don’t it’s not the end of the world, but I would really like too. Anyway, that’s all beside the point. What I really want to talk about today is all the things I have learned about making a really good seafood chowder over the years. From that little boy dreaming all year of a small bowl of chowder at a work Christmas party, to the man hoping to win a chowder cook-off for the second year in a row. Here is everything I know about making a kick-ass seafood chowder.
The Foundation of a good Seafood Chowder
Like anything in life, a good chowder starts with a good foundation. You can just throw everything in a pot and hope for the best, but there’s a better way to do things. Why not make the best chowder you can.
Start with onions and celery (carrots are optional). Sweat those in a bit of butter, oil, or bacon fat over a medium-low heat. You are trying to draw moisture out of the vegetables which will start to build the first level of your foundation. After ten or fifteen minutes or so of sweating the vegetables turn the heat up to medium add a bit of wine, brandy, or sherry. Cook this until the liquid has almost completely evaporated.
When I make seafood chowder I usually cook the mussels separately. Then I add the liquid to the chowder. If you were to do this, add the liquid after the booze has reduced. Now, reduce the mussel liquid until it has almost completely evaporated as well. I also usually buy a bottle of clam juice which I add in the same way as the mussel liquid and then reduce it.
By reducing the liquid you are concentrating the flavour. The more times you do this, the more layers of concentrated flavour you have.
To roux or not to roux?
A roux is equal parts flour and butter by weight, combined and added to liquids to act as a thickener. There are lots of great chowders that contain a roux, and there are a lot of great chowders that don’t have a roux in them. It comes down to the consistency of the chowder you want.
I find using a roux allows for a lighter, creamier chowder. What I mean is that if I wasn’t going to use a roux to thicken my chowder I would use 35% cream as my liquid. When using a roux I can get away with using whole milk. So, it’s a bit lighter than a chowder made completely of heavy cream.
If you are going to use a roux, add it after all of your initial liquids have been reduced.
Dairy
For the purpose of this post, we are talking solely about dairy based chowders. There are some absolutely delicious tomato-based chowders out there but we’re not going there today.
You really only have three choices when it comes to dairy for your chowder. You can use whole milk (homo milk), you can use heavy cream, or you can use a combination of the two. Any milk with a fat content lower than 3.25% is likely to split when heat, salt, acid, or even the seafood is added. I mean you can take the risk, but I prefer not to ruin my chowder with split milk.
Generally, I thicken my chowder with a roux and then use a combination of whole milk and cream. Usually a three to one ratio. I find that this gives me a nice richness, a creamy texture, and I don’t want to die afterwards.
Vegetables
Other than onions, celery, and carrots, I am of the opinion that potato is the only other vegetable that has any place in seafood chowder. That’s all I have to say about that.
Seafood
Arguably, this is the most important part of any chowder. What seafood should you use?
Really, this comes down to personal preference. For example, I don’t use shrimp, lobster, or crab in my chowder because I’m allergic to it, but I’m not going to begrudge you if you want to use it. I prefer not to add salmon to my chowder because I find the flavour and texture unappealing. I generally stay with white fish like haddock, cod, or halibut. To this, I generally, add mussels, scallops and clams. That’s really my go-to chowder mix.
When to add the seafood?
Oddly enough, the seafood is the last thing that should be added to seafood chowder. Seafood is delicate and overcooks quickly which gives it a shitty texture and flavour. Generally, I actually cook my seafood separately. I’ll cook the haddock either baked in the oven or poached in milk. I sear the scallops. Steam the mussels and clams. Really, what I’m trying to do is get the best out of my seafood. By just throwing it all in the pot and essentially boiling it, I’d be destroying those subtle flavours that make seafood so great.
Other flavourings
There are some surprising flavours that go really well with seafood. For example, I like adding a bit of tarragon to my chowder. Not too much. Just enough so you get a hint of tarragon flavour. I actually used tarragon in my winning chowder last year.
Obviously, parsley is always a good addition to seafood chowder, but thyme and dill can be as well. I also really like adding a mild smokey element. It could be bacon or smoked seafood. That little bit of smoke does something really magical to the chowder.
Really, just try thinking outside the box a bit. If you’re unsure whether or not an ingredient is going to work try it in a little sample portion of the chowder. Spoon a little out into a dish, add some of the mystery ingredient and taste. If it works, add it to the rest of the batch. If it doesn’t, don’t use it.
Conclusion
I can’t stress enough that you are the person eating your chowder. Do what you like. This post is really about what I like and what I’ve learned over the years. You may know something I don’t, or you may love your chowder the way it is. That’s perfectly okay. Taste is a completely subjective experience. Do what tastes good to you.
A first-rate soup is more creative than a second-rate painting.
Abraham Maslow
The first day of fall has come and gone. The temperature outside has been cut in half in the last week and the autumn winds are howling. That can only mean one thing. It’s mother flippin’ soup time.
Everyone can make soup. Put water in a pot, add some vegetables, cook them, and eat the vegetables with the water. That’s soup. Not very good soup, but it is soup. Today, we don’t want to talk about mediocre soup. We want to talk about how you can make kick-ass soup. How you can make the kind of soup that people crave and dream about. The kind of soup that keeps people coming back for more. So, without further ado, let’s get into it.
Soup Foundations
Like literally everything else in life good soup starts with a solid foundation. If the base sucks, it’s going to be hard to compensate for that later. So, what then should you use as the base of your soup? Well, I think it’s obvious that it depends on the soup you’re making. But, let’s look at a few options.
Water
The use of water as a base for soups should be fairly limited. Generally, I only use water for pureed soups like butternut squash or curried carrot. It’s not the end of the world if you use water as the base of other soups but why wouldn’t you take the opportunity to add flavour as soon as possible by using stock.
Stock
Stock is essentially flavoured water. It is made by simmering bones with vegetables in water to extract flavour compounds. Alternatively, vegetable and mushroom stock can be made by simmering just vegetables or mushrooms and vegetables. A stock can be made out of just about anything and makes a great soup base. For a lighter stock simmer the raw or lightly cooked bones. For a stock with a deeper more intense flavour and a darker colour roast the bones until browned prior to making the stock.
Match the stock to your main ingredient. If you are making vegetable soup, start with a vegetable stock. Beef and barley soup, start with beef stock. Chicken noodle… you should be getting this by now.
Chicken stock makes a great all-purpose stock. It can be used for almost any soup as long as it isn’t vegetarian or vegan.
Broth
Broth is like stock but even more flavourful. Broth is even made in pretty much the exact same way as stock. Pretty much the only difference between stock and broth is that stock is made from bones, and broth is made from meat. So, to make chicken stock you would simmer the chicken bones. To make chicken broth you would simmer the whole chicken.
Brother is richer as well as more flavourful than stock. It generally has a higher fat and gelatin content and so feels more impactful on the palate.
Broth is what something like consomee would be made from.
Milk or Cream
Okay, it’s actually fairly rare to make a soup from straight milk or cream. Generally, a milk would be thickened and stabilized with a roux (equal parts flour and butter). However, whole milk or cream are sometimes used without a thickener in some chowders.
More often than not, a cream soup would be made with a veloute which is stock thickened with a roux. The soup would be made this way and then just prior to being served a bit of cream or whole milk would be added to the soup to give the appearance of a cream based soup. The benefit of this is that the soup made with the veloute is generally lighter and more flavourful than one made with straight milk or cream. There is an added benefit in reduced cost to prepare the soup as well. Dairy can be expensive so using as little as possible is easier on the bank account.
Soup Ingredients
Once you have your base it is time to figure out what other ingredients you would like to add. Start with vegetables and work your way up from there.
Vegetables
In French cooking, it is common to start most soups with what is known as mirepoix. This is two parts onion, one part celery and one part carrot. This combination creates a base flavour that other flavours can easily be built upon.
The other vegetables you add depends on the type of soup your making but there aren’t really any rules here. However, depending on what you are making you may want to roast some or all of your vegetables to get a more intense flavour. This can be true of most soups but is best used when making a pureed vegetable soup. Roasted butternut squash soup sounds and tastes better than butternut squash soup. As does roasted tomato soup.
Starchy Ingredients
When it comes to starchy ingredients like rice, pasta, lentils and things like that it is often best to leave them out of the soup until the last minute. This is especially true if you are planning on storing the soup for any length of time. These ingredients will continue to absorb liquid as they sit in the soup eventually just turning to mush. Cook them separately and add them only to the portion of soup that you will be eating. This will keep your soup consistent over the few days it sits in the fridge or when you pull it out of the freezer.
When to add ingredients
There is such a thing as cooking the flavour out of your ingredients and you don’t want to do that. You also want ingredients to have structure. Unless it’s pureed you don’t want to be eating mush. Some ingredients take longer to cook than others like onions and celery. Carrots, potatoes, and turnips all take about the same amount of time to cook so add them together. Dried and soaked beans take a lot longer to cook than canned beans or pretty much anything else. Green vegetables like green beans or peas should be added as close to the end of cooking as possible to avoid overcooking and discolouration.
Meats that are cooked should be added at the last minute as should grains and most legumes. This will prevent these ingredients from falling apart and affecting the texture of the soup.
Herbs and Spices
When it comes to herbs and spices the general rule is that dried ingredients go in near the beginning of cooking and fresh ingredients go in nearer the end. This is not a firm rule but is common practice. I generally will add whole herbs tied in bunches near the beginning of cooking and chopped herbs near the end. Again, you don’t want to cook the flavour out of your ingredients.
Temperature
Believe it or not, the temperature at which you cook your soup effects the flavour and appearance of your soup. You don’t want to boil your soup. The high temperature can destroy flavour compounds and render your ingredients all but tasteless. Also, the agitating effect of boiling can cause broth soups to turn cloudy and vegetables to break down.
Conclusion
I hope that this didn’t over complicate soup for you. It really is not that complicated and most of the effort is simply in conceptualizing your soup. Once you get the basics down you can make a truly delicious soup out of almost anything and in very little time.
This is the time of year that we all can finally start to experiment with soups again. I know I’m looking forward to it.
We use cookies on our website to give you the most relevant experience by remembering your preferences and repeat visits. By clicking “Accept”, you consent to the use of ALL the cookies.
This website uses cookies to improve your experience while you navigate through the website. Out of these, the cookies that are categorized as necessary are stored on your browser as they are essential for the working of basic functionalities of the website. We also use third-party cookies that help us analyze and understand how you use this website. These cookies will be stored in your browser only with your consent. You also have the option to opt-out of these cookies. But opting out of some of these cookies may affect your browsing experience.
Necessary cookies are absolutely essential for the website to function properly. This category only includes cookies that ensures basic functionalities and security features of the website. These cookies do not store any personal information.
Any cookies that may not be particularly necessary for the website to function and is used specifically to collect user personal data via analytics, ads, other embedded contents are termed as non-necessary cookies. It is mandatory to procure user consent prior to running these cookies on your website.