When you’re craving steak but also want something a little different, look no further than this Grilled Teriyaki Steak. The homemade teriyaki marinade, which doubles as a glaze, perfectly pairs with the flavour of the steak to give you something you’ll be happy to throw on the grill again and again. As always, you can find the recipe directly below, but you can keep reading after that for a more detailed explanation.
Grilled Teriyaki Steak
Homemade Teriyaki sauce is much different than what you get at the grocery store. It is less sweet, often doesn't have any ginger or garlic. This version does have some ginger and garlic, which really compliments the flavour of the beef.
In a medium mixing bowl, combine the brown sugar, ground ginger, crushed red pepper flakes, garlic, vinegar, soy sauce, and scallions. Stir until the sugar has dissolved.
Put the steaks in a large ziptop bag and pour in the marinade.
Seal the bag and shake it to coat the steaks.
Open the bag a little and squeeze out all the excess air. Then reseal the bag.
Put the steak in the fridge to marinate for 1 hour or up to 6 hours.
Remove the steak from the marinade and pour the marinade into a small pot. Bring the marinade to a boil over high heat and boil for 1 minute.
Heat your grill on high for 10 minutes. Grill the steak for 2 minutes then flip it and brush on half the boiled marinade.
Cook the steak for 1 minute 30 seconds, then rotate by 90°. Cook the steak for another 1 minute 30 seconds, then flip and pour over the remaining marinade. Cook for another two minutes, then remove the steak from the grill, let it rest for 4 minutes then serve.
To start, we will make the marinade for the Teriyaki Steak. To make the marinade combine brown sugar, ground ginger, crushed red pepper flakes, minced garlic, rice wine vinegar, soy sauce, and green onions. You can find all the measurements in the recipe above. Mix all the ingredients until the sugar dissolves. At this point, you could boil the sauce for a minute or two and make a delicious teriyaki glaze for chicken, fish, or anything else, but we will use it as-is for a marinade.
Marinating The Teriyaki Sauce
Take two New York Striploin about 200g each or a comparable steak, and put them in a ziptop bag with the marinade. Seal it and give the bag a shake to ensure the steaks are completely coated in the marinade. Open the bag a little bit and squeeze out all the excess air. Reseal the bag and put it in the fridge for at least an hour. You can marinate the steak in the Teriyaki marinade for up to 12 hours.
Boil the Marinade
Once the steaks have been in the marinade for at least an hour, take them out and set them aside. Pour the marinade into a small pot and bring it to a boil. Boil for at least 1 minute. The marinade is now safe to use as a glaze.
Grilling The Teriyaki Steak
Heat your grill on high for at least 10 minutes. You want to make sure the grate has enough time to absorb the heat so that you get the nice grill marks on your steak and so your steak doesn’t stick. Put the steak on the grill at an angle, shut the lid and cook for 2 1/2 to 3 minutes. Flip the steak and brush with half the marinade. Shut the lid, cook the steak for 1 1/2 minutes, rotate it by 90°, shut the lid, and cook it for another 1 1/2 minutes. Finally, flip the steak, brush it with the remaining marinade and cook, lid down, for another minute. Remove the steak from the grill and allow it to rest for 4 to 5 minutes before serving.
Serving the Grilled Teriyaki Steak
You can serve your steak with whatever you’d like, but I went for brown rice with nori and soy glazed bok choy and carrots. Of course, mashed potatoes and other vegetables will be just as good and go just as well with the steak.
The Wrap Up
It is a rare occasion that I marinate a steak. I’m generally more of a purist and prefer the flavour of the meat with a little salt and pepper. Having said that, I will be using this marinade again to marinate steaks. Also, I think it would work just as well on chicken, salmon or pork chops. I’ll have to try those next.
Thank you, everyone, for reading, and have a great week!
Tired Of Missing Chef’s Notes Recipes? Put your email address in below and get every post in your inbox.
In the early part of my career, I worked in a few pubs. For whatever reason, all of these pubs served a version of steak fajitas. The steak was tossed with bell peppers, red onion, and cajun seasoning then cooked in a pan or on a flat-top. To accompany the fajita mix would be tomatoes, lettuce, salsa, sour cream, cheese, and guacamole (for an extra charge). More often than not, the meat and vegetables would be brought to the table in a hot skillet, so it was sizzling when it came out of the kitchen. We always splashed water on the skillet to make the sizzle more impressive for the customer. The steak fajita recipe I will share with you today doesn’t stray far from the version I made so many times in those early years. However, I did my best to elevate it. To make it something even more than it already was. I hope you enjoy it.
Want to see how to make them? Find the recipe directly below, but keep reading for more detailed instructions.
Grilled Steak Fajitas
Steak fajitas are good, grilled steak fajitas are even better. Fire up the barbecue, take an afternoon and make this truly delicious family recipe. It's the perfect thing for family get togethers to parties.
Combine all the marinade ingredients in a medium glass or plastic bowl.
Add the meat, cover tightly with plastic wrap and put it in the fridge for at least 2 hours or up to 24 hours.
Remove the steak from the marinade and grill on high heat for about 3 minutes per side.
Allow the meat to rest for 5 minutes, then thinly slice it against the grain and serve.
Tortillas
Pour the water into a large mixing bowl and stir in the salt.
Slowly mix in the masa and knead until the mixture forms a firm dough.
Divide the dough into tablespoon-sized pieces and roll into balls.
Press the dough balls between two sheets of waxed paper on a tortilla press or use a heavy pot.
Grill the tortillas on high heat for about 90 seconds per side.
Keep the cooked tortillas in a tortilla warmer, or wrap them in a clean kitchen towel until you are ready to serve them. If the tortillas cool down too much, reheat them for 20 seconds in the microwave.
Vegetables
Cut the red onion in half through the root and stem.
Grill the onion, cut-side down for about 20 minutes on moderate heat. Flip the onion and cook on high heat for another 10 minutes.
Remove the onion from the grill and allow it to cool for 5 to 10 minutes.
Cut the ends off the onion and remove the peel.
Thinly slice the onion and put it in a medium mixing bowl to be tossed with the other grilled vegetables.
Cut the sides off of the red and green bell peppers discarding the seed pods.
Cut the ends off the zucchini and discard. Slice the zucchini into long thin slices.
Put the peppers and zucchini in a large mixing bowl, drizzle with the olive oil, then season with the cajun seasoning.
Grill the peppers and zucchini on medium-high heat for about 6 minutes per side.
Remove the vegetbles from the grill and allow them to cool just long enough that you can handle them. Thinly slice the vegetables, mix with the sliced onions and serve.
Serving
Serve the steak, vegetables, and tortillas with grated cheddar cheese, thinly sliced lettuce, diced tomatoes, salsa and sour cream. Avocados or guacamole and fresh lime are also great additions.
At their core, fajitas are like a DIY Taco, though they are about as Mexican as I am. They originate in Texas (I know, it used to be part of Mexico, but that was long before Fajitas existed). Rather than being Mexican, Fajitas are part of a strange but delicious sub-sect of food known as Tex-Mex. AKA Americanized Mexican food. Of course, none of this really matters because Steak Fajitas are delicious and make a perfect family meal.
Steak Fajita Marinade
The first step to making my version of Steak Fajitas is to marinate the steak. To do that, we need to make a marinade. You can find all the measurements above, so I won’t list them here. But, the ingredients for the marinade are oregano, paprika, cayenne, ancho chili powder (optional), cumin, garlic, onion, pickled jalapeno, kosher salt, olive oil, and red wine vinegar. Put all the ingredients in a mixing bowl and mix it up.
The Steak
The steak I used was fast fry sirloin tip. These are just very thin sirloin tip steaks. You can use any thin cut of steak. You could also take a thicker steak and pound it out with a meat mallet if you’d like. That’s just more work, though. I’ll leave it up to you. Either way, put the meat in the marinade, mix it up to ensure all the meat is coated, then cover the meat with plastic wrap, making sure to push the wrap down to the surface of the meat rather than just covering the bowl. This will help prevent the meat from discolouring. Put the bowl in the fridge for a minimum of two hours and a maximum of twenty-four hours.
Fajita Vegetables
The traditional fajita vegetables are bell peppers and red onion. When I pulled the peppers out of the fridge, I noticed this beautiful yellow zucchini and thought it would make a great addition to the vegetable mixture. I was right. You can leave it out if you’d prefer.
Prepare the vegetables
To prepare the peppers, stand them straight up on your cutting board and cut the lobes away from the core. Then, discard the seed pod. Cut the ends off the zucchini, then cut it into long thin slices. Toss the peppers and zucchini with olive oil and the mandatory fajita spice, Cajun seasoning. Cut the red onion in half down through the root and stem. That’s all you have to do to the onion right now. And yes, before you ask, leave the peel on.
Homemade Corn Tortillas
Okay, you can totally skip this step and just buy tortillas. You don’t have to make them yourself, but they are way better when you do. Having said that, it is a lot of work—your choice. If you do want to make them, here is how you do it. Go to the store and buy a bag of masa. I like PAN yellow or white masa. Masa is corn that has been treated with an alkaline solution, rinsed, cooked, ground, and dried. Treating the corn with an alkaline solution makes the corn’s nutrients more accessible to your body and makes the corn earlier to digest. It is a process that the ancient Mayans and Aztecs perfected over 2000 years ago.
Anyway, once you get your masa home, just follow the instructions on the bag. This particular brand suggests 2 cups of masa flour to 2 1/2 cups of water along with a teaspoon of salt. I halved the recipe. To make the dough mix the water and salt, then stir in the cornflour. Mix it and knead it until it forms a soft dough. Divide the dough into 1 tablespoon-sized piece and roll them into balls. Using a tortilla press and two sheets of waxed paper, press the dough balls to flatten them into tortillas. Leave them wrapped in plastic or waxed paper until you are ready to cook them.
Get Grilling!
Grilled Red Onion
All your prep is done. Now, it’s time to cook. Get your grill nice and hot, then put your red onion on the cut side down. On my grill, the front is the hottest part, and the back is cooler. So, I put the onion on the back and grilled it for about 20 minutes. Then, I flipped it, brought it to the front and cooked it for another 10 minutes.
Grilling the Tortillas
While the onion is grilling, cook up the tortillas. Grill them on the hottest part of your grill. They should take about 90 seconds per side. Once grilled, put the tortillas in a tortilla warmer, or wrap them in a clean kitchen towel or foil.
Grilled Peppers and Zucchini
Once the tortillas come off the grill, you can put the peppers and zucchini on. Cook them for about 8 to 10 minutes per side over moderate heat. You want them still to have a small bit of crunch to them but not be raw.
Grilling The Steak
Finally, you can grill the steak. Take it out of the marinade and grill it on the hottest part of your grill for about 3 minutes per side.
Cut it up!
Now that all your ingredients are cooked, it’s time to cut them up! Let the vegetables cool for 5 to 10 minutes or just until you can handle them comfortably. Thinly slice the peppers and zucchini, then put them in a medium mixing bowl. Cut the ends off the onion and remove the skin. Cut the onion into slices the same width as the peppers and zucchini. Add the onion to the other vegetables and mix. Put in a serving dish and serve. Let the steak rest for 5 minutes, then thinly slice it across the grain. Put the meat on a serving platter and serve.
Serving The Grilled Steak Fajitas
Serve the fajitas as a family-style meal, meaning everyone serves themselves along with the fajitas, put some salsa, sour cream, sliced lettuce, tomatoes, and avocado on the table. Enjoy!
The Wrap Up
There is something special about sitting down to a nice meal with your family and having everyone reaching around the table and food being passed back and forth. It takes attention. You can’t have a cell phone in your hand if you have to pass the peppers or the meat. This kind of meal gives a family time to talk and enjoy each other’s company. Couldn’t we all use a little more of that? Couldn’t we all use a few more steak fajitas in our life? I thought so. So, what are you waiting for. Fire up the grill and get cooking!
Get chef’s notes in your inbox. Put your email address in the box below to subscribe and never miss a post.
One of my first food memories, actually just one of my first memories, is of a small pizza place under the MacDonald bridge in Dartmouth. It was only about two or three blocks from my family home, and I have a memory of trying my first bite of donair from there. We moved from Dartmouth when I was almost four, so that first donair experience would have been when I was about three. I have loved them ever since. Over the years, I have done my fair share of experimenting with donair flavours. I even once put a donair-spiced scallop dish on a menu. And so, I wanted to make a donair, without making a donair. I wanted the same flavours but in a different package. To do that, I went back to the origins of the donair but kept the flavours that I’ve loved for my whole life. And so, I present to you my Halifax-Style Donair Kabobs with tomato salad and yogurt sauce.
The Recipes
Halifax-Style Donair Kabob
Donair Kabobs seasoned in the Halifax Style. The perfect dish to add to your barbecue menu.
Place all the ingredients in a medium mixing bowl and mix well. Knead the meat mixture for five minutes or until it develops a tacky texture and appearance.
Divide the meat in four and form each fourth of meat around a 12-inch skewer. If you are using wooden or bamboo skewers, soak them in water for 1 hour before skewering the meat.
Wrap the meat around the skewer and gently squeeze it to spread it out in an even layer around the length of the skewer.
Heat your grill to 400°f.
Grill the skewers on the hottest part of your grill for 10 to 12 minutes or until cooked through. Flip them every 2 to 3 minutes.
Take the skewers off the grill and serve immediately.
Notes
These Donair Kabobs are great with tomato and onion salad and garlicky yogurt sauce, but they also work very well in the traditional pita, with donair sauce, tomato and onion, or in a salad bowl with garlic mayo.
If you aren’t from Nova Scotia, you may be wondering to yourself, “What is a Halifax Donair?”. Let me enlighten you. A Halifax Donair is made from spiced beef that is cooked on a verticle spit. Thinly shaved and wrapped in a soft Lebanese-style pita with fresh diced white onion and tomato, and finished with a sweet and tangy sauce made of sweet and condensed milk, vinegar, garlic powder, and onion powder. It is the kind of thing you usually only eat after a long night of drinking, or on a Friday night in with friends. Every Pizza Place in the province, except for some of the big national chains, sells donairs. And just about every Nova Scotian, at least from a certain generation forward, has a deep-seated love for them. I happily include myself in this group.
Other places in the world have Donair, often spelled doner kebab, or gyros, which are similar. But none are quite like the Halifax Donair, which was introduced to the region by Greek immigrants in the 1970s. It was originally served as a lamb gyro with tzatziki sauce, but the recipe was changed to what it is now to suit local tastes. Since then, it has been a local favourite and has now begun to spread across the country. However, only one city can truly claim it as their own. It is, after all, the official food of Halifax.
Making The Donair Kabob Meat Mixture
Okay, let’s get cooking. Start with a pound of lean ground beef. Add some flour (I used gluten-free all-purpose flour), Italian seasoning, garlic powder, dried onion or onion powder, cayenne, oregano, salt, and pepper. See the recipe above for all the measurements.
Mixing and Tasting The Donair Meat
Mix the meat well. I mean really well. You want to knead it for about five minutes or until it develops a tacky look and texture. This will give the meat the right texture when cooked. Break off a little piece of the meat and cook it in a small frying pan over medium-high heat. Taste it, and adjust the seasoning as needed. This is a good habit to get into whenever making anything with ground meat like meatloaf or burger. Season the meat, cook off a little piece and taste it.
Making Donair Kabobs
The picture below shows six skewers, but the recipe above only makes four. I apologize for the confusion. I adjust the recipe because the salad and the sauce were only enough for four.
Divide the meat into four evenly sized balls. Wrap each ball around a metal or pre-soaked wooden or bamboo skewer. Gently squeeze the meat to spread it out the length of the skewer in an even layer.
Grilling The Donair Kabobs
Heat your grill to 400°f and let it sit for about 10 minutes to get the grates nice and hot. Cook the skewers for 10 to 12 minutes, rotating every 2 to 3 minutes until cooked. The meat should be firm to the touch with a little spring back when fully cooked. Take the Donair Kabobs off the grill and serve immediately.
Garlicky Yogurt Sauce
Traditional Donair Sauce is made with sweet and condensed milk, onion powder, and garlic powder. It is delicious but not great if you are trying to watch your waistline. So, I wanted to make a slightly healthier sauce. I made a version with non-fat Greek yogurt as the base. It is sweetened with honey, soured with lemon juice, has plenty of garlic, a bit of onion powder, and tastes delicious. Mix all the ingredients, cover the bowl and put it in the fridge for an hour to let the flavours develop. This sauce works with any spiced meat and goes great on salad bowls too.
Tomato and Onion Salad
I have to tell you, the surprise breakout star of this meal is by far this really simple tomato and onion salad. I loved the Donair Kabobs, the Garlicky Yogurt sauce was fantastic, but this salad was amazing! Fresh vine-ripened tomatoes with garlic, red onion, parsley, white wine vinegar, olive oil, sugar, salt and pepper. That’s all there is to it, and I wouldn’t be surprised if this becomes one of your new favourite summer side dishes. It has become one of mine. Just like with the sauce, mix all the salad ingredients, cover the bowl, and let it sit in the fridge for an hour before serving for best results.
Putting It All Together
All the components of this meal are good on their own, but when you take a bite with a bit of the meat, some of the salad, and a touch of the sauce, that is when the magic happens. The flavours come alive, and you really get that Halifax Donair experience. Minus the hangover and sauce dripping all over your hands, arms, and clothes.
The Warp Up
I’ve wanted to make this for a long time, and I am so happy that I finally got the opportunity. It was well worth the wait. I think you’ll be happy if you make any of the components of this meal, but I think if you make them all and serve it all together, you will be over the moon. Try it for yourself. You’ll be happy you did.
Thanks for reading, and remember to check out my brand new cookbook, “The How-To Cookbook For Men” It comes out on August 10th and is available for preorder here.
Never miss a post again. Put your email address in below and receive chef’s notes in your inbox.
Here on the east coast of Canada, the grilling season is short. You have to make the most of it while you can. Becasue of that, it is easy to get stuck in a rut grilling the same things repeatedly. I hope to help you break free from that rut with this delicious and surprisingly simple Grilled Tandoori Chicken Skewer recipe. Tandoori Chicken is an Indian dish of chicken marinated in yogurt and spices and then cooked in a very hot clay oven known as a Tandoor. You don’t have a Tandoor oven. Neither do I. But, using a hot grill, we can create a very similar dish to what you’d find in an Indian restaurant.
Directly below you will find the written recipe. So, if all you want is the recipe, it is easy to find. If you want more detail, keep reading beyond the recipe for the full walkthrough. Either way, enjoy the post. Let’s get to it!
Grilled Tandoori Chicken Skewers
A staple of Indian restaurants the world over. Now you can make delicious Tandoori Chicken at home with this surprisingly simple recipe. Who knew it could be so easy?
The first step to making Tandoori Chicken is to make a marinade. This marinade is yogurt-based. The yogurt is seasoned with spices, ginger, garlic, and lemon juice. We’ll talk in a little more detail in a minute about the benefit of marinating in yogurt, but for now, let’s get to making the marinade.
Ginger and Garlic
The marinade starts with ginger and garlic. These two ingredients are part of a quartet of ingredients that comprise the base of countless Indian dishes. The other two ingredients in the group are onion and chilli. If, for example, you want to make a curry, but you aren’t sure where to start. Purée an onion, a few garlic cloves, an equal amount of ginger, and green chilli. Sauté that mixture in a bit of oil or clarified butter, and you’ve got the base of your curry. From there, it’s just deciding what spices to use. You can read more about that in my post, The Basics of Curry. But I digress. For this Tandoori Chicken marinade, you will need two teaspoons each grated ginger and minced garlic.
Tandoori Spices
Garam Masala
Ginger and garlic make a great starting point for our Tandoori chicken marinade, but they need some help. That’s where the spices come in. The first spice is actually a spice blend known as Garam Masala. I’ve talked about Garam Masala a lot in the past. So, I’m going to go deep on it now. To learn more about it and make it yourself take a look at this post about 5 Essential Spice Blends You Should Master.
Other Spices
The second spice is Kashmiri Chili Powder. This is a powder made from ground Kashmiri Chilies. Go figure. If you don’t have Kashmiri Chili powder, you can use half as much cayenne for the heat and the same amount of paprika for the colour. Rounding out the spices, we have cumin and coriander. These spices are found in Garam Masala, but I like to add a little more for a bit more flavour. Finally, add a bit of salt.
Yogurt and Lemon Juice
The two remaining marinade ingredients are yogurt and lemon juice. The lemon juice adds a little extra acidity and a fresh flavour. The yogurt is what really does the heavy lifting. I’m not really sure of its science, but there is an enzyme in the yogurt that helps keep the meat moist, and that adds a lot of flavour. Mix the yogurt and lemon juice with the other marinade ingredients, and you’re good to go.
What yogurt to use for your marinade?
Normally, I would recommend using a full-fat Greek yogurt, obviously with no flavourings added. However, I used a 0% fat Greek yogurt, and it worked very well. For any other cooking application, go with full fat. For this, it’s up to you.
Prepping the Chicken
Despite what I said in my post about how to grill chicken breast a few weeks ago, I used chicken breast for this recipe. Why? Because of the yogurt. The yogurt will help keep the chicken breast moist and tender. Plus, between the yogurt and spices, there is going to be loads of flavour. Having said that, if you want to use chicken thighs, go for it. You’ll be happy you did.
Cutting The Chicken Breast
To prep, the chicken breast, cut it into evenly sized pieces. People often make a big deal about what size the chicken has to be cut to go on skewers. I’ll tell you right now that it doesn’t matter. The only thing that matters is that the chicken is all cut about the same size so that it cooks evenly. So, if you want to cut your chicken breast in strips, go for it. If you want to make really small cubes, so the skewers cook quickly, again, go for it. I went for cubes about 1-inch square, but you do you.
Marinate The Tandoori Chicken
Once the chicken is all cut, add it to the marinade. Make sure to stir the chicken well to ensure that every piece is evenly coated in the marinade. Cover the bowl with plastic wrap and put it in the fridge for at least two hours. You can let this marinate overnight, but you don’t really want to go much longer than that. The yogurt will start to break the chicken down, and the lemon juice will start to cure it, making it tough on the outside and mushy inside.
Put It On A Skewer
Once the chicken has had enough time to marinate, put it on a skewer. I’ve been making a lot of skewered foods lately, so I went out and bought these nice metal skewers. If you are using wooden ones, make sure to soak them in water for an hour before skewering the chicken. My skewers are 12-inches long, which made them big enough to hold one chicken breast each. If you use smaller skewers, you will have more skewers. That’s math.
How To Grill Tandoori Chicken Skewers
Before you start skewering your chicken, turn on your grill and get it hot. Essentially, put it on high, and leave it alone while you skewer the chicken. When I talked about grilling chicken breast a few weeks ago, I said that as long as you let your grill get hot and give the chicken time to cook before you flip it, you don’t need to oil your grill or chicken. I stand by this, but it is essential to let the grill get hot and give the chicken enough time to cook and release from the grill naturally when cooking with yogurt. What I’m trying to say is that the yogurt will make the chicken stick unless you are very diligent. So, if ever there was a time to oil your grill a little bit, this might be it.
How long do you cook the Tandoori Chicken Skewers?
How long you cook your skewers really depends on how thick you cut your chicken. For me, it took about 6 minutes per side. However, it was really windy, which lowered the temperature of my grill. But, for 1-inch cubes of chicken on a hot grill, 5 to 6 minutes per side seems about right. When in doubt, use a probe thermometer to check the temperature of the chicken to ensure it is cooked (165°f).
Serving The Tandoori Chicken Skewers
You can serve the chicken skewers right off the grill, or you can drizzle them with some yogurt thinned with lemon juice and some cilantro leaves. This is especially helpful if you take pictures of them for social media (tag me! @chefbenkelly). When I finally got around to eating my Tandoori Chicken, after all the pictures had been taken, I served it with basmati rice cooked with onion, ginger, garlic, chilli (call back to earlier there) and madras curry powder. I also made some vegetable skewers to go along with the rice and chicken.
The Wrap Up
If you’re looking for something a little different to throw on your grill this weekend, look no further. And before you say to yourself, “But they look spicy.” remember that you are making them. You’re in control of how hot they are. A little heat isn’t a bad thing (I actually like a lot of heat), but more than heat these Tandoori Chicken Skewers have loads of flavour. I think that this is a recipe that you will come back to over and over. But, as always, don’t take my word for it. Try them for yourself. And, if you have any leftover Tandoori Chicken you can use it to make this delicious Butter Chicken Soup.
Thank you for reading, and have a great week. Remember to subscribe below, so you never miss a post and share this on Facebook or Pinterest if you enjoyed it.
People love chicken breast. I don’t really know why. It is the fifth-best part of a chicken, and chickens don’t really have more than five parts. But, despite how I feel about them, you will probably be throwing them on your grill this year. Since you’ll be grilling them anyway, why not grill them as well as possible? What I’m about to share with you is a foolproof method for cooking chicken breast, or anything for that matter, perfectly on the grill. You don’t even need to read the whole post. I’ll tell you the secret right now. Are you ready? Okay, here it is. Don’t overcook it. I know. Mind blown. That really is basically what I’m about to tell you. Of course, there’s more to it, but that’s the short version. If you love chicken breast and are planning on grilling some, keep reading. Let’s get to it.
Why Chicken Breast Sucks
Chicken breast sucks and is easy to ruin for the same reason that so many people like it. It is extremely lean. In a 3 oz (85 g) portion of skinless chicken breast, there are 140 calories. Of those 140 calories, only 3 grams are fat. That’s a pretty good ratio if your only focus is eating lean. However, whether you like it or not, fat equals flavour and juiciness. Lean meat tends to be dry and flavourless. They are also much less forgiving when even slightly overcooked. So, the two big questions that we need to answer are; How do you keep your chicken breast juicy? And, how do you impart as much flavour as possible?
Prepping The Chicken
I’ve seen a lot of people standing in front of their grill with a package of boneless, skinless chicken breast. They take the chicken right from the package to the grill. No seasoning, no nothing. I’m here to tell you, if you don’t already know, don’t do that. First of all, where is the flavour? Secondly, there is a little prep that you should do to help your chicken breast cook evenly.
Removing the tender
If you flip over a chicken breast, you will see what is known as the “tender.” The tender (yes, that’s what breaded chicken tenders are made of) is a little flap of meat that hangs off the bottom of the chicken breast. You don’t have to go hunting for it; it’ll be pretty obvious. Using a sharp knife, cut the tender off. Why? Because the tender will create a little pocket between itself and the rest of the breast that will take a long time to cook. By the time this pocket is cooked, the rest of the breast will be overcooked.
What do you do with the tender?
Don’t throw the tender away! If you want to, you can throw it on the grill and cook it alongside your breasts. They only take a few minutes to cook and make a great addition to salads. You can also freeze them. Once you get a stockpile in your freezer, thaw them and make a big batch of homemade chicken fingers. You can substitute the turkey in the Turkey Tender Recipe below with the chicken tenders. Chicken tenders also make a great ingredient for a stir-fry or soup.
Oven-Baked Turkey Tenders
These Turkey Tenders will not only become an entertaining staple but you will want to eat them every day of the week. Pair them with the cranberry sweet and sour sauce and you have a real winner.
Taking the tender off will help the breast cook more evenly. But, if you have an especially thick chicken breast, you may want to butterfly it. Butterflying will give you a thinner chicken breast with a larger overall surface area. This means that the breast will cook much quicker than if it was left whole, and it will have more of that delicious grilled flavour and more room for seasoning.
How to butterfly a chicken breast
To butterfly a chicken breast, remove the tender as described above, then place the chicken breast flat on your cutting board. Using a sharp knife, cut halfway up the height of the breast. Keep cutting in long even strokes until you’ve cut about 80% of the way through the chicken breast. You should no be able to open the the breast like a book. That’s all there is to it. Just try your best to keep your knife as even as possible otherwise, you may cut through the top or bottom of the breast. This won’t hurt it, but it won’t be as pretty.
Note: I did not do a very good job butterflying my breast. I was too preoccupied with taking pictures. I should have grabbed a better knife. But never fear; I make mistakes, so you don’t have to. Yeah, that’s why I do it.
Seasoning the chicken breast
Okay, your chicken breast has had the tender removed, and the larger ones have been butterflied. It’s time to go to the grill, right? That was a test. If you said yes, you failed. It’s flavour time, not grill time. At this point, you can marinate your chicken breasts if you want, or you can season them with any number of seasonings. To make my point about seasoning, I flavoured all four of my chicken breasts differently. One is seasoned with a store-bought BBQ chicken seasoning. One has Italian seasoning. Another has Cajun seasoning. The final breast just has salt and pepper on it.
To oil or not to oil?
You may have noticed in the images above that I only oiled one breast. I know that many people, when grilling, tend to oil their food and their grill. If you are eating chicken breast becasue it is lean meat, adding a pile of oil to it kind of defeats the purpose. It is also unnecessary and is likely to cause flareups. Don’t believe me? It’s okay, you’ll see in a few minutes. If you want to add all that extra oil, go for it. I’m not going to tell you how to live your life, but again, it is not needed.
Prepping Your Grill
Do you want to know the big secret to grilling? Here it is. Turn your grill on high. Leave it alone with the lid down for 10 to 15 minutes. Next, clean your grill with a grill brush or whatever new fangled grill cleaning tool you have. Put the lid back down, and leave it alone for another 5 minutes. Then, and only then, grill your food.
The secret to a non-stick grill
No matter what your grill is made of, it has the capacity to be non-stick. But, it comes down to you. The hotter your grill is when you add food to it, the less likely it is that food will stick. Also, the more you use your grill, the more grease from your food will build up and bake onto it. This will “season” your grill, just like a castiron pan. Seasoning the grill will also help it be nonstick. So don’t wipe the grill down with soap and water. Just get it hot and brush it off with your grill cleaning tool of preference.
Why your food sticks
Maybe you’re saying to yourself, “But Ben, come on. I use my grill all the time. I let it heat up and I clean it with a grill brush. But everything still sticks.” Well, to that I have to say, it’s your fault. Harsh, I know, but hear me out. There are three main reasons your food, chicken breast or otherwise, is sticking to your grill.
You didn’t let your grill get hot enough, or you keep opening the lid and cooling the grill down too much. Or, you let your grill heat up but then turned the heat way down before you put your food on. We’ll talk about this in a minute.
You didn’t brush your grill off well enough, so the food you’re cooking is sticking to old bits of dried-on food.
Or, the most common reason, you are trying to flip your food before it’s ready to be flipped.
The Maillard Reaction and Grilling
We’ve talked before about the Maillard reaction in other posts. I’m not going to get too deep into the science here, but you can check out this Wikipedia article about it if you are interested. The short version is that the Maillard reaction is the process that causes food to brown. Think about the cheese and crust of a pizza. The Maillard reaction causes the golden brown colour. It’s the same with a perfect brown crust on a nicely seared steak. Well, that browning, the Maillard reaction, is vitally important when cooking on a grill.
When to flip your food
When your food hits the grill, it is being cooked by the heat transfer from the flames, the heat in the air, and the heat stored in the grill’s metal. Metal is a better conductor of heat than air, but it takes a while to absorb enough heat to maintain its temperature. So, the metal will be much hotter than the air, ideally. That’s why you get grill marks on your food. Those grill marks are more than just pretty. They are the key to your food not sticking. As the Maillard reaction happens, the food touching the grill will brown. As the food browns, it will release from the grill. But, this takes time. So, if you are concerned about your chicken breast, or other foods, burning, turn down the flames a little bit, but don’t force the food to flip. Once it is ready to flip, it will release from the grill easily. That’s why it is so important to pre-heat your grill.
How to grill chicken breast
Okay, we’ve covered a lot. But I think it’s important to know all of this before we get to actually cooking. At this point, your breasts should have the tenders removed. The larger breasts should be butterflied. All the chicken should be seasoned on both sides, and your grill should be nice and hot. Now, put the chicken breast on the grill, close the lid, and leave it alone for about 5 to 6 minutes. Before the chicken goes on the grill, the gas should be on a high. Once the chicken goes on and the lid is closed, wait until the thermometer comes back to about 400°f then turn the gas to medium. If you leave the gas on high, you risk burning the chicken. If you turn the gas down before the chicken is on the grill or before the grill comes back to temperature, you risk the metal cooling down too much and the chicken sticking.
How do you know when to flip the chicken?
After 5 minutes, open the lid and gently lift the chicken breasts. If they are sticking, close the lid and leave them alone for another minute or two. Once the breasts easily pull away from the grill (notice I said pull away and not lift away), flip them, close the lid and leave them alone for another 4 to 5 minutes.
Even though the breasts shouldn’t stick to the grill, they likely aren’t going to lift off like they are being cooked in a non-stick pan, either. So you may need to pull them a little bit, but there should be no tearing, and there shouldn’t be any chicken left on the grill either.
How to tell when the chicken is cooked?
There is only really one foolproof way to ensure that your chicken breast has reached a safe temperature but isn’t overcooked. That is to use an instant-read probe thermometer. These cost between $10 and $30 and are worth every penny. You can find them on amazon, at most grocery stores, and all kitchen supply stores. If you’re the type of person that cuts into your chicken breast to see if it is cooked, stop. Two things. Colour is not a reliable indicator of whether or not chicken has reached a safe temperature (165°f for breast 170°f for thighs and whole birds). Secondly, when you cut into a piece of meat straight after cooking or while cooking, all the juice runs out, leaving it dry and flavourless. So, stop cutting into your chicken to see if it’s cooked. Spen the $20 and get a thermometer.
How Long Should I Cook The Chicken Breast Per Side?
A minute ago, I said to cook your breast for 5 to 6 minutes, then flip and cook for another 4 to 5 minutes. This is a good rough guide, but many factors determine how long it will take to grill your chicken breasts. Things like how thick your chicken is, the temperature of the chicken when it goes on the grill. How far away from the flames your grill is, how much air circulation does your barbecue have, what the temperature outside is and if it is windy or not? So, don’t try to tell the chicken breast when it is ready to flip or when it’s cooked. Let it tell you.
To keep it juicy let it rest.
The final step in ensuring your chicken is juicy and tender is to let it rest for at least 5 minutes before cutting it or serving it. We all know that we have to let steaks rest, but most people don’t think about resting chicken or pork. All meat needs to rest after cooking to allow the internal juices time to redistribute throughout the meat after being superheated. I know it can be hard to wait—your hungry. You’ve been working hard for this meal, but don’t ruin it by rushing. Take 5 minutes, set the table, pour yourself a drink, give your partner a few shoulder squeezes. Whatever it takes, don’t touch that chicken for 5 minutes.
Grilled Chicken Breast
The finished chicken should have grill marks but not be burnt. When you cut into it (after waiting 5 minutes), you should be able to see how juicy it is. If you cut a piece and squeeze it, juice should run out, and it should feel tender. Congratulations! You just grilled the perfect chicken breast, and you didn’t even oil it. Oh, and I should mention, the breast I did oil, cooked just as well as the others and came off the grill just as well. There really wasn’t a difference. So, why add the oil at all?
The Wrap Up
Okay, I know that this was a lot of information. This post is quite a bit longer than I intended it to be, but I think it is important to understand the why just as much as the how. If you enjoyed this post, please share it on Facebook, Pinterest, or Twitter. Also, remember to subscribe to Chef’s Notes below, so you never miss a post. And, if you want to help support the site, hit the donate button at the bottom of the page.
Thank you everyone, have a great week! I’ll see you right back here next Wednesday.
Tender grilled pork seasoned with homemade shawarma spice served with quinoa tabouleh, homemade pickled turnip and tahini dressing. Is this the exact meal you need? I think we both know the answer to that. So, fire up the grill, sharpen those knives and let’s get cooking. This is my grilled pork shawarma bowl with homemade pickled turnip.
Where have I been?
Before we get too deep into today’s post, I want to talk a little about where I’ve been and why there haven’t been any new posts on Chefsnotes.com in over a month. Near the end of April, I decided to take a week off to spend some time with my family, rest and reset. The day before I was supposed to get back to work, I hurt my shoulder, neck, and back. More accurately, I aggravated an old injury. Since then, the pain has ebbed and flowed but has mostly been bad enough that I could not cook or even type. The few times it’s felt okay, it was set off again by something simple like opening the fridge. I’m sure you can imagine my frustration. I’ve been doing everything I’m supposed to be doing and have been seeing some minor improvements. But enough is enough. I am dying to work, so that’s what I’m going to do. I am getting back to work, however, on a limited schedule. Rather than posting three days a week, I’m only posting once, which should be manageable. I want to thank you all for sticking by me and for your understanding. This is an incredibly frustrating time, and I am happy to be back to work.
What’s to come?
When I had to stop working, I had two series that I was working on. The casserole series and the bowl series. This post is the last in the bowl series and was supposed to be posted about a month ago. I am also ending the casserole series early. If I’m only posting once a week, I want to make sure that the one post really counts. So, all the upcoming posts will be one-offs, and when I’m able to get back to work full time, I’ll jump back into some different series.
Pickled Turnip
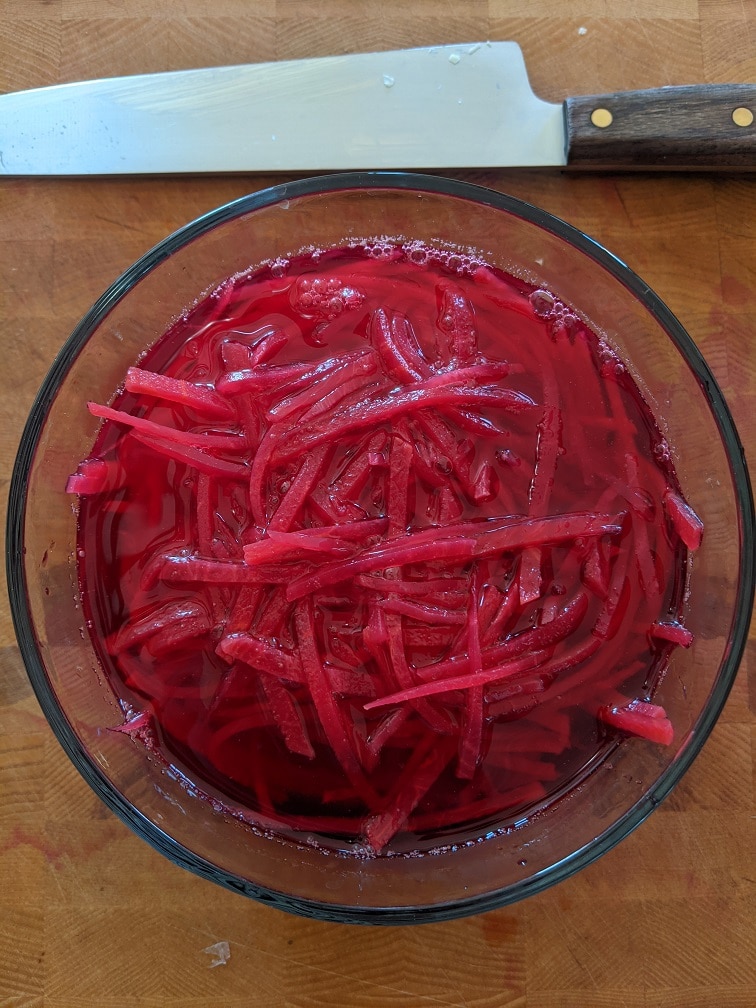
Pickled turnip is a classic topping for shawarma and falafel, but it works just as well on pork chops or a grilled chicken sandwich. And, because it is pickled, it will last in the fridge for about a month. To make it first, julienne about one cup of turnip. You can do this by hand or use a julienne peeler. Then do the same thing to one beet until you have about half a cup of julienne beet. Put the beets and turnip in a medium pot with two cups of water, half a cup of red wine vinegar, two tablespoons of sugar and one teaspoon of kosher salt. Bring the contents of the pot to a boil and cook for five minutes. Take it off the heat and cool it to room temperature before using or storing it in the fridge.
Pickled Turnip
Pickled turnip is a classic topping for shawarma or falafel and its easy to make. Serve it with pork chops, or grilled chicken breast too.
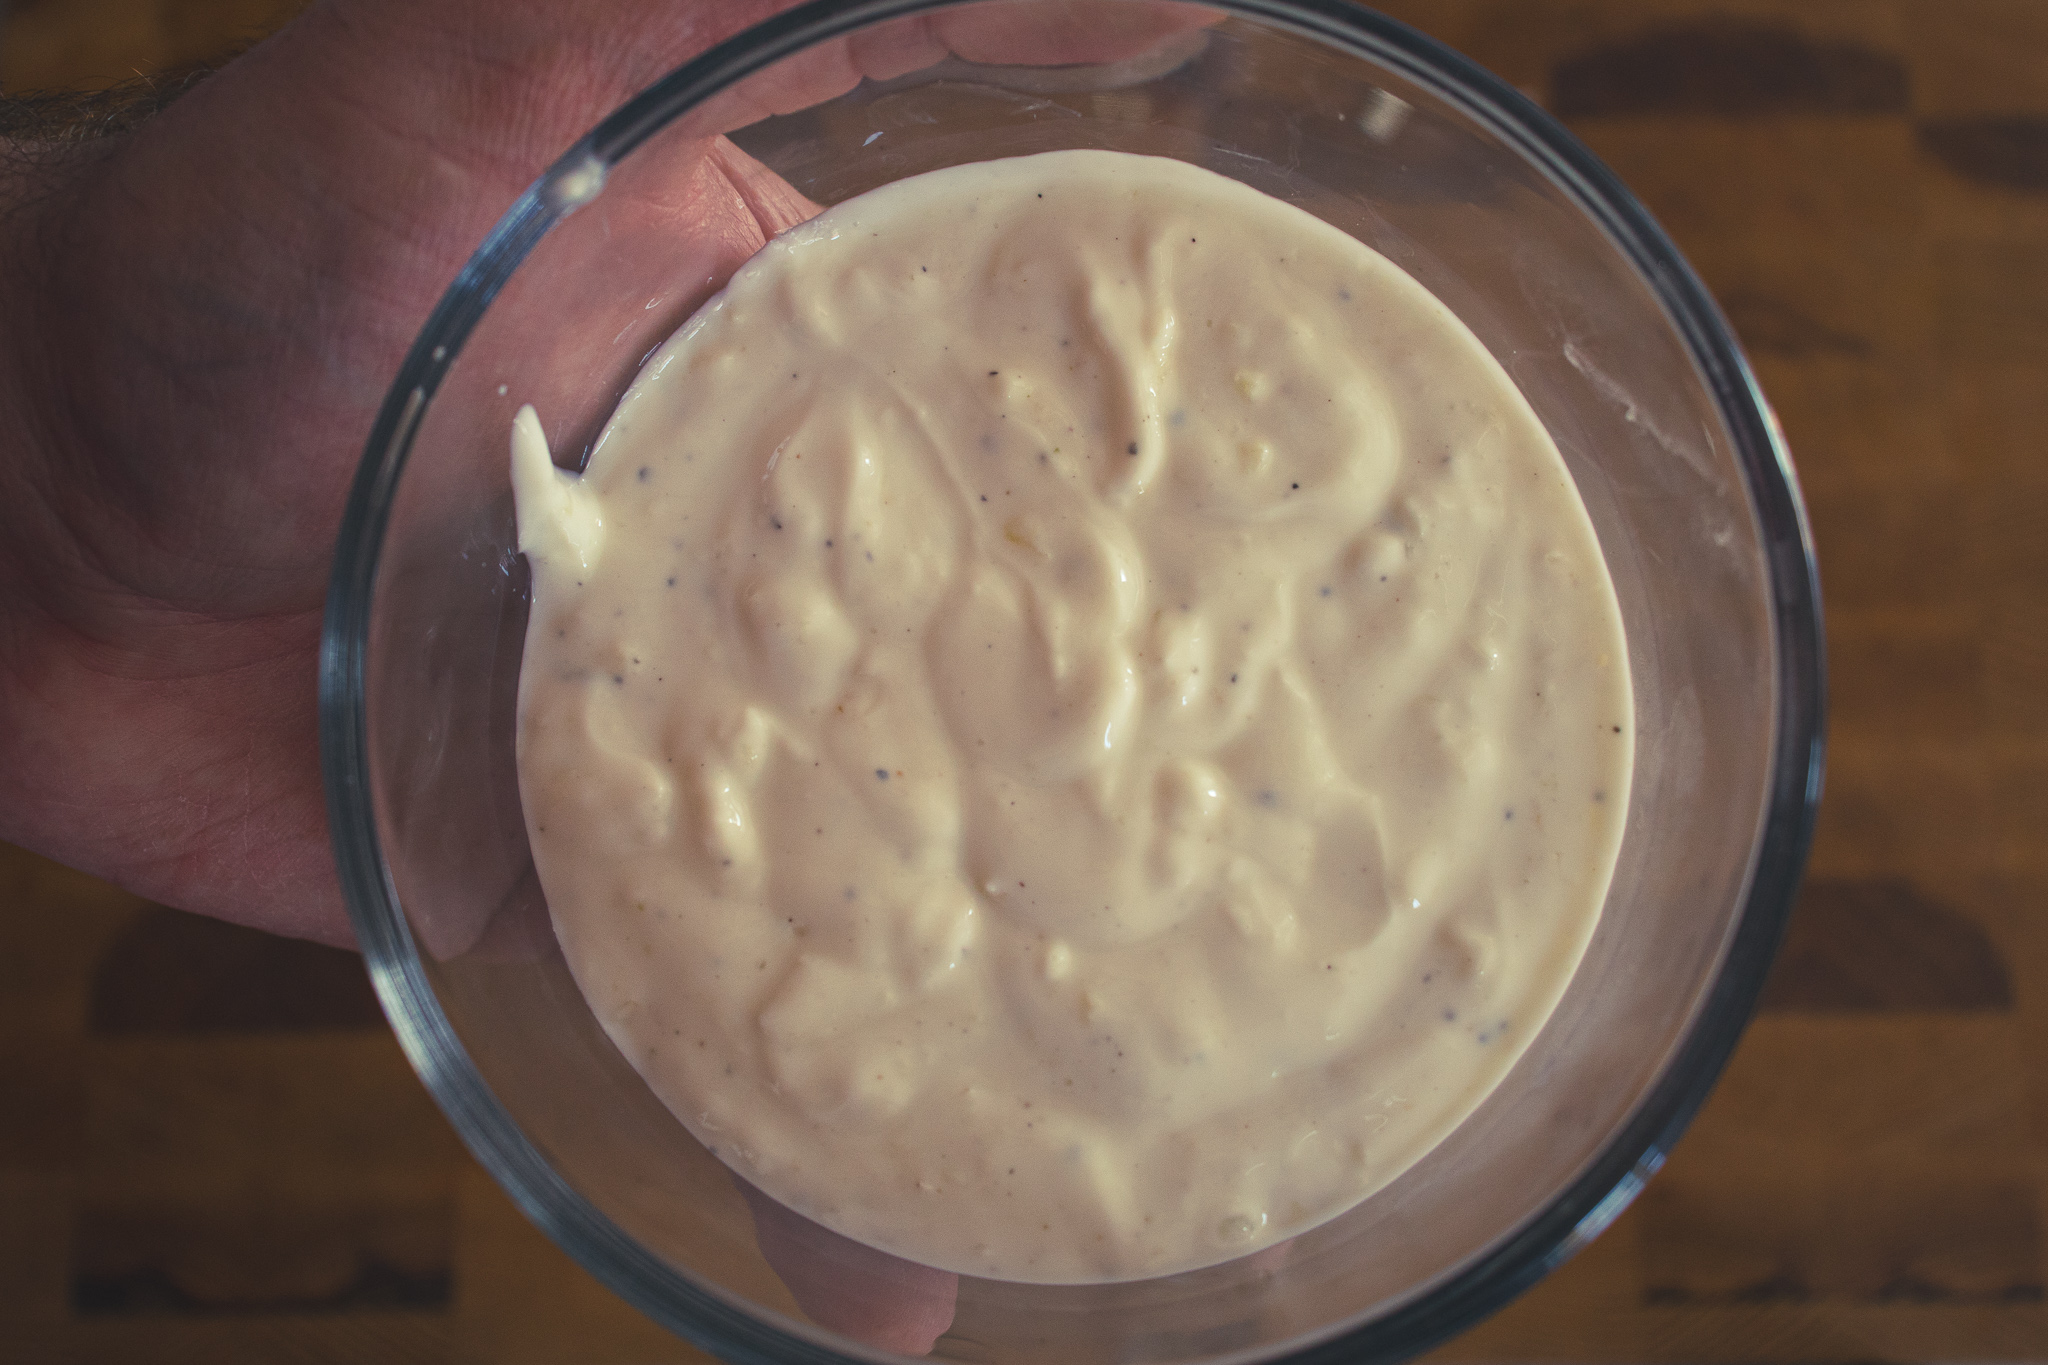
Tahini is a spread made of sesame seeds. Essentially, tahini is sesame butter (like peanut butter), and you can find it in the health food section of most grocery stores. It has a great flavour that makes the perfect sauce for our pork shawarma bowl. To make it combine half a cup of tahini with half a cup of hot water, one tablespoon of minced garlic, the juice of one lemon, a quarter teaspoon of cumin, three-quarters of a teaspoon of kosher salt and half a teaspoon of honey. Mix until smooth. You can use the tahini dressing right away or store it in the fridge in an airtight container for up to a week.
Tahini Dessing Recipe
A simple and delicious tahini dressing recipe that works as well on a salad as it does a pita sandwich, a shawarma or a falafel.
Tabouleh is a salad from the Levantine region of the world. It is traditionally made of parsley, tomatoes, mint, onion, bulgur wheat, olive oil and lemon juice. This simpler version substitutes the bulgur wheat with quinoa to make the salad gluten-free and a little more nutritious. Quinta Quinoa gave me this bag of quinoa to try. What interested me about this specific brand is that it is produced in Canada. I didn’t even know that we produced quinoa in Canada. And I have to say, as far as quinoa goes, this was an excellent quality one. Worth checking out for sure.
How to make quinoa tabouleh
To make the quinoa tabouleh, we first have to cook the quinoa. Start by measuring out one cup of quinoa. Rince it and drain it well. Combine the one cup of rinsed quinoa with one and a quarter cup of water. Bring the quinoa and water to a boil over high heat, turn the heat down to low, cover the pot and let it simmer for fourteen minutes. Take the pot off the heat and let it sit, covered for five minutes. Put the cooked quinoa in a medium mixing bowl and combine it with one cup of chopped parsley, one tablespoon minced garlic, the zest and juice of one lemon, one tablespoon olive oil, and a quarter teaspoon of kosher salt. Mix well and serve.
Quinoa Tabbouleh
A great side dish or base of a salad bowl. Also works well as a garnish inside a pita wrap sandwish.
Put the quinoa in a medium pot and cover with 1 1/4 cup of water. Stir and slosh the quinoa around, then drain it very well.
Return the quinoa to the pot and add the remaining 1 1/4 cup of water. Put the pot on the stove and bring to a boil on high heat. Once the pot starts to boil, turn the heat to low, cover the pot and let it sit for 14 minutes.
Take the pot off the heat, leaving the lid on and let it sit for 5 minutes before fluffing it with a fork.
In a medium mixing bowl, combine the cooked quinoa, parsley, lemon zest and juice, olive oil and salt. Mix well.
Taste the tabouleh and season with additional salt as needed.
Shawarma spice is something I’ve used before on this blog because I love it. You can buy it in most grocery stores now, but I find no comparison to homemade. The full recipe is below.
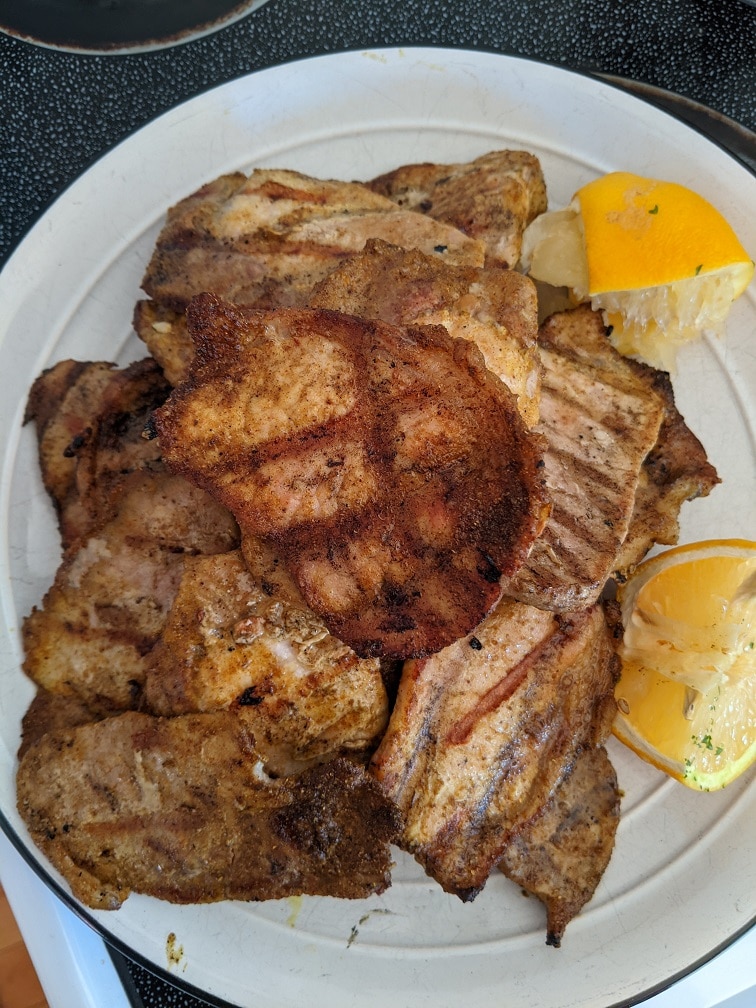
For the pork shawarma, I used pork loin (1 kg). You could use pork shoulder or tenderloin if you’d prefer. If you do use tenderloin, cut it after it is cooked, not before. Start by slicing the pork loin into thin pieces (about 1/8 inch). It helps if the meat is partially frozen while you are cutting it. Then, in a medium mixing bowl, combine the meat with the shawarma spice and a few tablespoons of olive oil. Mix well. At this point, you can grill the pork right away or put it in the fridge to marinate for up to a day.
How to cook pork shawarma
Traditionally, shawarma is cooked on a vertical spit. I’m guessing you don’t have one of those, and neither do I, so our shawarma is going to be grilled. If you don’t have a grill, you can cook it in a hot pan with a bit of oil or in a 400°f oven for 12 to 15 minutes. To grill the pork, preheat your grill to 400°f, lay each piece of pork down in a single layer and grill for 2 to 3 minutes per side or until it is cooked. Finish the pork by squeezing some lemon juice over it and serve.
Pork Shawarma
Serve the pork shawarma as is with rice and vegetables, wrap it up in a pita with vegetables and sauce, or serve it in a shawarma bowl.
In a medium mixing bowl, combine the shawarma spice and olive oil, then add the meat and stir to coat it.
You can let the meat marinate in the fridge for up to 24 hours or grill it right away.
Heat your grill to 400°f for 10 minutes. Lay the pieces of pork loin on the grill and cook for 2 to 3 minutes per side with the lid down. Once the pork is cooked, squeeze the juice out of the lemon over the pork and serve.
First things first, grab the biggest bowl you have. Put about half a cup of the quinoa tabouleh in the bottom of the bowl and top with a little bit of sliced iceberg lettuce. Besides the lettuce, add a few tomato slices. Take a few pieces of the pork shawarma, thinly slice them and put them beside the lettuce. Top meat and vegetables with a tablespoon or two of the tahini dressing and finish with the pickled turnip and a lemon wedge. It is absolutely delicious and actually pretty healthy.
The Wrap-Up
There are obviously many components to this shawarma bowl, but it is well worth the effort. If you do want to cut down on prep, you can substitute the picked turnip for some sliced dill pickle if you’d prefer. It won’t have the same flavour, but it will be delicious nonetheless. Thanks for reading, and man, is it good to be back. See you next Wednesday.
Remember to share this post on Facebook or Pinterest if you enjoyed it. Thank you for reading, and have a great day! Remember, there are new Chef’s Notes posts every Monday, Wednesday, and Friday, and you can subscribe below, so you never miss one.
Today marks the end of my Summer Grilling and Smoke Series. In honour of that, I thought I would share with you my 5 Favourite Barbecued Side Dishes. Although I love potato salad and coleslaw, you aren’t going to see either of those things on this list. The key to this list is that all the items are cooked on the grill right alongside the main course. If you are stuck eating the same old side dishes and want some new ideas, or if you just love to see what I eat for some strange reason, this post has you covered. Keep reading to see My 5 Favourite Barbecued Side Dishes.
1 – Paprika Green Beans
I know that a lot of people are tentative about grilling vegetables like green beans and asparagus. The thought is that they are going to fall through the grill. Yeah, that will happen. Barbecuing green beans, you may lose a few to the gods of fire but, it is worth the loss. The flavour of grilled green beans is outstanding. Barbecued green beans are great, barbecued green beans tossed in smoked paprika vinaigrette before and after cooking are much better.
To make these green beans, you first have to make the smoked paprika vinaigrette. You can find the recipe below, but it is mainly smoked paprika, maple syrup (or honey), mustard, vinegar, and oil. Toss the green beans in the vinaigrette, grill them for ten to twelve minutes, flipping them once, then toss them in the remaining vinaigrette. You can do this with asparagus too, but I prefer it done with the green beans.
Grilled Green Beans With Paprika Vinaigrette
A delicious barbecued side dish of grilled green beans tossed in Paprika Vinaigrette.
Keyword: Barbecue, Side Dish, Summer Barbecue, Vegetables
Servings: 4servings
Author: Chef’s Notes
Ingredients
1lbCleaned Green Beans
1tspsmoked paprika
1tbspMaple syrupor honey
1tspDijon mustard
2tbspred wine vinegar
1/4cupolive oil
Salt and pepper to taste
Instructions
In a medium-sized mixing bowl whisk together the paprika, maple syrup, mustard, and vinegar.
While whisking, slowly add the oil a few drops at a time until it is all incorporated. Season the dressing to taste with salt and pepper.
Toss the green beans in the vinaigrette, then take the beans out of the bowl reserving any remaining vinaigrette. Grill the green beans over medium heat for about 10 minutes flipping once.
Put the cooked green beans back in the bowl with the remaining vinaigrette, toss to coat and serve.
I did a whole post on corn on the cob, which you can find here. Corn on the cob is one of the great all-time barbecued side dishes. One of the many things I love about grilling corn on the cob is that there are a few different ways you can make it. You can cook the corn in the husk, right over the flames for about thirty minutes to get really sweet tasting corn. You can husk the corn, brush it with oil, season it with salt and pepper, and grill it on high for about twelve minutes for a roasted corn flavour. Or, you can cut it into pieces, and put it in a vegetable pouch, which we will look at in a minute. Of course, I haven’t even mentioned all the things you can put on the corn once it’s cooked. Check out this post from The Kitchn about six toppings you can add to your corn.
3 – Grilled Vegetable Salad
Grilled vegetables of any kind are amazing. I could easily have added mixed grilled veggies to this list, but this salad takes those vegetables to a whole other level. It is a mix of grilled vegetables tossed with arugula and balsamic vinaigrette then finished with goat cheese. What could be better than that on a beautiful summer’s day?
To make this salad for four people slice the following vegetables about a quarter-inch thick: one zucchini, one eggplant, one red onion, one red bell pepper. Also, skewer twenty cherry tomatoes. Toss all the vegetables with olive oil, salt and pepper. Grill the veggies on medium-high for about five to six minutes per side or until they are soft. Cut all the vegetables except the tomatoes into bite-sized pieces then put them in a large bowl with the balsamic vinaigrette (recipe below). Stir the vegetables to coat them all in the dressing, then let them sit and cool for ten minutes. Letting the vegetables sit will help them to absorb some of the dressing. Toss in four to five big handfuls of arugula and toss. Top the salad with goat cheese and serve.
I love this salad any time of the year. In the winter, I will add squash or sweet potato to the mix rather than the eggplant and zucchini. The only other difference between the summer and winter versions of this salad is that in the winter, I roast the vegetables in the oven as opposed to on the barbecue.
Maple Balsamic Vinaigrette
This basic recipe can be used to make thousands of kinds of salad dressings. Change the vinegar and add different ingredients like herbs and garlic to make whatever vinaigrette you would like.
I get asked a lot about foil vegetable packets. My response is that the question isn’t what can you put in a vegetable packet. The question is, what can’t you put in them? Foil vegetable packets are the most versatile barbecued side dish because you can put just about anything in them. Really, I can’t think of anything that you wouldn’t want to put in them.
The only real tip I have about vegetable packets is to add in some fresh herbs and use garlic butter as much as possible. These two small things will have a significant impact on the flavour of the vegetables. Actually, I have one other tip. If you use a vegetable that cooks quickly like zucchini and a vegetable that takes a while to cook like sweet potato, cut the zucchini two to three times larger than the sweet potato. That size difference should make up for the difference in cooking time.
5 – Charred Onions
Onions, so simple, so unassuming, so delicious. The final item on this list of my 5 favourite barbecued side dishes is also the most simple; charred onions. All you have to do is cut an onion in half, drizzle it with olive oil, season it with salt and pepper and put it on the grill for forty-five minutes to an hour. Put them on and forget about them. You may want to flip them for the last fifteen minutes of cooking, but you probably won’t have to. As the onions sit on the grill, the surface of the onions goes black and takes on a nice charred flavour. The inside of the onion steams in its juices and takes on a sweet taste as it cooks and softens. To serve the onion, just cut the ends off and remove the skin. Charred onions go very well with steak, pork chops, grilled chicken, or just about anything. You can’t believe how good these onions are until you try them, seriously.
Conclusion
These are my 5 favourite barbecued side dishes, but I would love to hear what yours are. Tell me about them in the comments section below. I hope that this post has given you some ideas and some things to try. That’s kind of the point of it after all. Happy grilling, everyone!
Thank you for reading the post. If you liked it, remember to share it on Facebook, Pinterest, or Twitter by clicking the icon to the left of the right of the page. Did you know that Chefsnotes.com has almost 400 posts just like this one? Imagine all the great tips, tricks, and recipes you’ve missed. Don’t miss any more! Subscribe to Chef’s Notes by putting your email address in the subscription box at the top right of the sidebar. You will be notified of every new post. And if you would like to know more about me, click the link below to read my story.
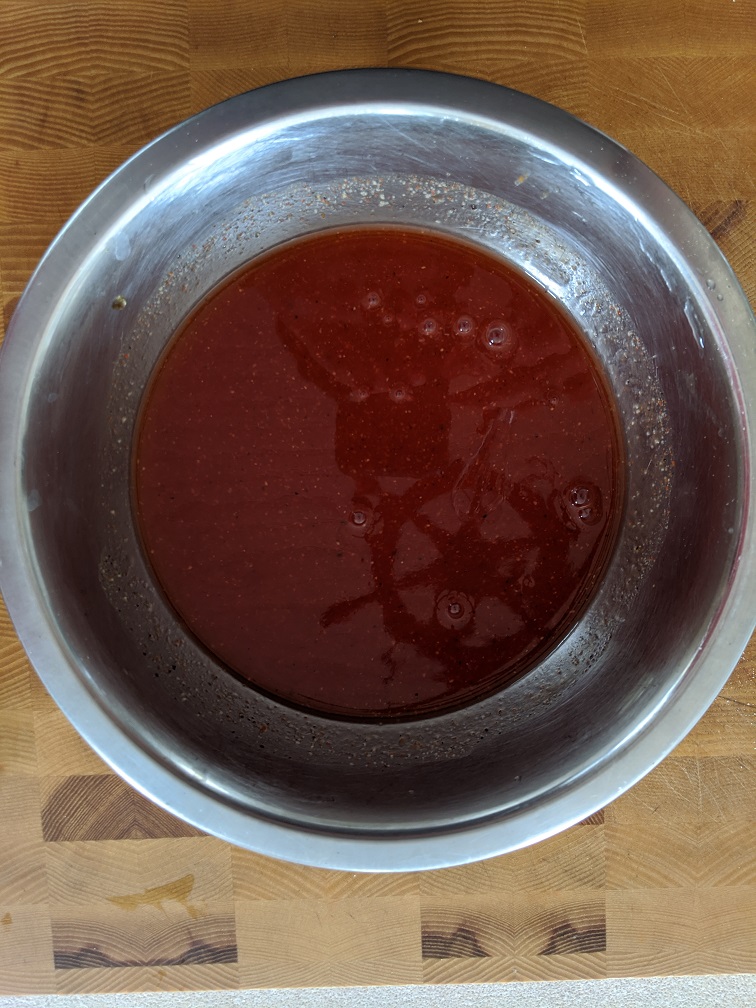
Walking around the grocery store, you will see dozens of different types of Barbecue sauce. Many of those sauces are delicious and make great options for whatever you are cooking. If you are happy with your store-bought sauce, then, of course, keep using it. However, if you want something a little different, it may be time to start making your own homemade barbecue sauce. To be clear, this is not about convincing you to stop buying barbecue sauce. This is for people who want something a little different and are ready to level up to make their own homemade barbecue sauce. Let’s take a look.
What is Barbecue Sauce?
Before you can make homemade barbecue sauce, you first need to understand what it is. The Merriam-Webster dictionary defines barbecue sauce as “: a spicy sauce usually eaten with barbecued food.”. That’s a pretty loose, but also a standard definition. As I’m sure you are fully aware, most barbecue sauces on the market today would never be classified as “spicy.”. Does that mean they aren’t barbecue sauce? No, of course not. For our purposes here today, we are going to define barbecue sauce as an acidic/sweet/occasionally spicy sauce eaten with barbecued food.
In all honesty, there are a lot of different types of barbecue sauces from Carolina Gold mustard-based sauce, to Kansas City White Sauce which is mayonnaise-based, to Texas Vinegar Sauces. However, today, our focus is going to be on the classic tomato-based sauces that most of us use most often. If you would like more information on those other sauces, check out this post I did last year.
The Base of the Sauce
When making homemade barbecue sauce, there are two main starting points. You can begin with fresh tomatoes, or you can begin with ketchup. Both of these bases have their benefits and their drawbacks, let’s take a quick look at each.
Starting with Fresh Tomatoes to Make Your Barbecue Sauce
When using fresh tomatoes to make your homemade barbecue sauce, you typically have to roast or bake the tomatoes first. You can also smoke the tomatoes to get a more “authentic” barbecue sauce taste. This roasting removes the sharp acidity of the tomato and intensifies their natural sweetness. To cook the tomatoes start by slicing them in half, drizzling them with olive oil, and seasoning them lightly with salt and pepper. Put them in a 400°f oven for 30-45 minutes or until they soften and start to brown around the edges. Once the tomatoes are roasted, combine them with the other ingredients, then purée the sauce and pass it through a fine-mesh sieve to ensure a smooth consistency. Tomato paste is often added to sauces made from fresh tomatoes to ensure the texture of the final sauce is that of a typical barbecue sauce.
Benefits
You have complete control over the flavour of the sauce.
You know exactly what is in the sauce.
Usually, tastes better than ketchup-based sauces.
Drawbacks
More preparation is required.
More effort is required to perfect the flavour of the sauce.
The sauce must be puréed and strained to ensure a smooth consistency.
Mush more time is required to make this type of sauce.
Starting with Ketchup as the base of your Homemade Barbecue Sauce
In truth, either way, you are basically starting with ketchup. The difference is that you are either making the ketchup from scratch and adding the ingredients to make it a barbecue sauce as you go. Or, you are using store-bought ketchup and adding the elements to make it a barbecue sauce. The benefit of using store-bought ketchup is that you are removing five or six steps from your sauce-making process.
Typically, when store-bought ketchup is the base of a barbecue sauce, there are only a handful of ingredients used in the sauce. These are vinegar, sugar (could be white or brown sugar, molasses, honey, or maple syrup), and spices (commonly onion powder, garlic powder, cayenne, etc.). For a more “authentic” barbecue sauce taste, liquid smoke or smoked salt are sometimes added. Making barbecue sauce in this way takes only a few minutes and requires no cooking. However, some people prefer to use ketchup as the base but to use fresh onions and garlic, which they sauté until soft. The other ingredients are added to the onion and garlic, puréed and passed through a fine-mesh sieve.
Benefits
Quick to make.
Less effort.
Fewer ingredients are required.
Don’t have to cook.
Drawbacks
You have slightly less control over the flavour.
There may be hidden ingredients in the ketchup.
Most often, I use store-bought ketchup as the base of my sauce, it is much more convienteant and much quicker than using fresh tomatoes. However, I do prefer the flavour and the control I have over the flavour more when making a sauce with fresh tomatoes.
Acid
The standard barbecue sauces that we are talking about today have four main elements. The first, which we’ve already talked about, is the tomato element. The second is acid, more specifically, vinegar. The type of vinegar you chose to make your sauce will affect its final flavour and appearance. The three most common options are white distilled vinegar, apple cider vinegar, and balsamic vinegar. I find that apple cider vinegar is the best all-around, go-to vinegar for barbecue sauce. However, that is not to discount either white or balsamic vinegar, which both have their place. Balsamic adds a deeper, more complex acidic taste to the sauce. White vinegar, on the other hand, has a much more upfront, punch you in the face, kind of flavour. Apple cider vinegar is somewhere in between these two. Balsamic will also give your sauce a much darker appearance.
Sweet
The third element of these sauces is something sweet. Now, some barbecue sauces are very sweet, and some are not, but most, if not all, have some sweet element to them. Like the vinegar, the sweetener you choose to use will affect the flavour and appearance of the sauce. Most commonly, brown sugar, molasses, and maple syrup are used to sweeten barbecue sauces. Molasses will add the most depth to the flavour of the sauce, and will also have the most significant impact on the appearance of the sauce. Brown sugar adds depth to the sauce, though not as much as molasses. Sauces with solid sugars like brown sugar or white sugar, usually have to be cooked to ensure that the sugar dissolves into the sauce. Maple syrup adds that earthy, maple flavour to a sauce though it is more expensive than both molasses and brown sugar.
Flavourings
Flavourings are the final element to a barbecue sauce. Depending on how you are making your sauce, these may include either onion, or onion powder, garlic or garlic powder, and chilli or chilli powder. Black pepper is commonly used in relatively large amounts in barbecue sauce as well. If you are making the sauce from scratch, you may include spices like cinnamon, clove, and nutmeg, which are found in most ketchup. As I mentioned earlier, you may choose to use liquid smoke or smoked salt to achieve a more “authentic” barbecue sauce flavour. All that means is that the smokey element will make your sauce taste more like bottled sauces.
Typically, if I am making a quick sauce, I will use ketchup as the base, add to it cider vinegar, molasses, onion powder, garlic powder, cayenne pepper, black pepper, and sometimes liquid smoke. I stir all of these ingredients together and have a useable and tasty sauce in minutes. When making the sauce from scratch, I use my roasted or smoked tomatoes, along with sautéd onions and garlic. To that, I add in some tomato paste, brown sugar, cider vinegar, a cinnamon stick, some chilli flakes, a few cloves, and maybe some thyme and mustard powder. I simmer all of these ingredients with a bit of water for about an hour, then purée it in a blender, and pass it through a food mill or a fine-mesh sieve.
Conclusion
You can make a delicious sauce from scratch, and you can make a delicious sauce using ketchup as the base. It just comes down to what you prefer. I do recommend that you make barbecue sacue from scratch at least once. It is a fair amont of effort, but you will gain an appreciation for the sauce, that you didn’t have before, and you may even find that you love it much more then ketchup based sauces.
Below I have included three recipes for barbecue sauce made with store-bought kethcup as the base. Take a look at them and you will immediately notice how similare, yet different they are. I hope what you take away from this is that even though the ingredients are mostly the same, small variations in ratios, and a few additional ingredients can make a world of difference.
Thank you for reading. If you enjoyed this post remember to share it on Facebook or Pinterest because that will help the blog continue to grow. And, remember to subscribe by entering your email address in the top right of the sidebar so you never miss a post again.
Standard Barbecue Sauce
A very basic barbecue sauce that can be used on almost anything.
This Barbecue sauce is pack with flavour from ingredients from South East Asia. It is the perfect sauce to marinade your pork tenderloin for your Banh Mi.
Barbecue Pork Banh Mi. Right now, you may be thinking, “Mmm, that sounds good! But Ben, what is a “banh mi”?” That is a great question. What if I told you that a Banh Mi was the most delicious sandwich in the whole wide world? What if I told you that every bite of a Banh Mi is like a tickle on the tongue for a thousand little angel wings? More than that, what if I told you that a Banh Mi was a Vietnamese Sandwich made from the remnants of French colonization using local ingredients? Well, that’s what it is, and it is, in my humblest of opinions, one of the world’s best combinations of two cultures.
Today I am going to show you how to make my version of this sandwich that isn’t strictly classical but is damn delicious none the less. We are going to look at a recipe for barbecue pork tenderloin along with our trusty stand by, sriracha mayo, and quick homemade pickles. Let’s get to it.
The Barbecue Sauce
This sauce is not anywhere near close to authentic Vietnamese, or authentic anything for that matter. But, it is really tasty and worked perfectly on the pork tenderloin. It is a combination of classic barbecue sauce ingredients like ketchup, vinegar, and molasses, but with the addition of elements from South East Asia like fish sauce, Sambal, soy sauce, and Chinese 5 Spice. See the full recipe below.
Barbecue Sauce For Pork Tenderloin
This Barbecue sauce is pack with flavour from ingredients from South East Asia. It is the perfect sauce to marinade your pork tenderloin for your Banh Mi.
When using pork tenderloin, it is always best to take a minute or two to remove the long strip of silverskin that runs about 2/3 of the length of the tenderloin. You can see this silverskin very clearly on the second pork tenderloin in the first picture below. Use a small sharp knife to make an incision directly under the silver skin as close to the surface of the pork as possible. With the blade of your knife tilted slightly upwards, run your knife the length of the silver skin until it breaks free. Go back and clean up any other bits you see. Removing the silverskin from the tenderloin may seem like a waste, but it isn’t going to breakdown during cooking, which will give the pork a chewy texture. A chewy texture is the last thing anyone wants from something with the word “tender” right in its name.
Once the tenderloin is clean, go back over it with your knife and make a few shallow crisscross slashes on the top and bottom. This pattern will help the barbecue sauce more deeply penetrate the meat during the marination and will help the tenderloin to cook more evenly. Put the pork in a ziplock bag and pour half of the barbecue sauce over it. Seal it, and put it in the fridge for at least 2 hours.
Cooking the pork
Preheat your grill, then cook the pork over medium heat for about 15-20 minutes or until a thermometer takes an internal temperature reading of 160°f. Brush the pork with the remaining barbecue sauce as it is cooking.
A Banh Mi is typically a cold sandwich, so I put one of my pork tenerdloins in the fridge for the night to have in a Banh Mi the next day. The other pork tenderloin became dinner with some grilled vegetables.
Pickled Vegetables and Sriracha Mayo
Sriracha Mayo
For this Banh Mi, I recommend making a batch of Sriracha mayo. It’s my condiment of choice, and it is easy to make. I’ve made this a few times on the blog now, so rather than showing how to make it again, I’m going to share a link to my Ginger Beef Lettuce Rolls – 30 Minutes or Less Post which has the Sriracha Mayo Recipe.
Quick Pickles
Pickled vegetables are a common ingredient on a traditional Banh Mi. The acidity and the crunch from the pickles is one of the things that makes this sandwich truly special. The pickles can be made in only a few minutes and will last in your fridge for a few weeks. A lot of people that I’ve shared this recipe with in the past have told me that they always have a batch of these quick pickles in their fridge becasue they love them so much. Maybe you’ll love them that much too.
Typically, on a Banh Mi, the pickles are made of carrot and daikon radish. I didn’t have any daikon, so opted for something a little different. The vegetables I used to make these pickles are carrot, red onion, jalapeno, and cucumber, but you can use any vegetables you’d like. See the full recipe below.
Quick Pickles
This is a quick pickle recipe that can be made in just a few minutes. These pickles are fantastic on a Banh Mi sandwich, or just as a snack.
The traditional bread for a Banh Mi sandwich is a Vietnamese version of a French Baguette. If you live in Canada, Superstore, or Loblaws sells small baguettes (Demi Baguettes) that are perfect for this. However, you have been following this blog for any amount of time (I hope you have been) you know that I can’t eat gluten at all. So, I had to go for a gluten-free alternative to the classic baguette. I used Udi’s gluten-free baguettes. I’m going to be completely honest here, Udi’s baguettes are good for what they are, but I think they are meant more like a dinner bread, something you dip in a sauce with your meal, rather than a sandwich bread. The crust is too crunchy and crumbly, and the baguette itself is just too big. It really took away from the sandwich. Having said that, it was better than nothing. In the future, I will probably use a gluten-free hotdog bun or something like that.
Putting The Banh Mi Together
Putting the Banh Mi together once all the components are ready is pretty straight forward. Slice the pork nice and thin, cut up some fresh cucumbers and put it all together.
Conclusion
If you are thinking that this sandwich seems a bit out of your comfort zone, good! Try it anyway! What I always say is that trying new things, as scary as they may seem, is the quickest (and only) way to find new things that you love. Life is short. Don’t deny yourself the oportunity to enjoy something that I honestly think will knock your socks off.
Thanks for reading, share this post, and rememeber to subscribe to the blog to get Chef’s Notes in your inbox.
As I said in the intro, this Banh Mi isn’t strictly classical. However, if you would like to learn more about what a traditional Banh Mi is, along with its history, you can check out this article from Saveur Magazine.
I have very strong opinions about what sauces should and shouldn’t go on steak. I firmly believe that ketchup and barbecue sauce have their place, but that place is nowhere near my perfectly grilled rib-eye, striploin, or tenderloin. Instead of ketchup *cringe* or barbecue sauce, I prefer a light, herbaceous sauce like the one I am going to describe to you today. This sauce is better known as chimichurri.
Chimichurri originates in Argentina and Uruguay and is used as a common table sauce and marinade for beef. According to Wikipedia, the name means “a mixture of several things in no particular order” kind of like a hodgepodge. The version that we are going to look at today is my version, and probably not the most classic example of a chimichurri sauce. Despite that, it is no less delicious. I’m willing to bet that if you give this sauce a shot, it will quickly replace those bottles of barbecue sauce and ketchup once and for all.
This is..
A Simple Delicious Steak Sauce To Kick Your Weekend Grill Into High Gear
Getting Started
Before I get into this, I want to make it clear that despite the fact that there are measurements in the recipe at the bottom of this page I wouldn’t worry about them too much. This sauce is very much just about eyeballing and tasting. That’s what makes it so quick to come together. Of course, you can measure everything if you’d like, and I would actually encourage you to do that the first few times you make this. After that though, ditch the recipe and make it to suit your taste. This can also be made in a blender, but I prefer it to have some texture so I do it by hand.
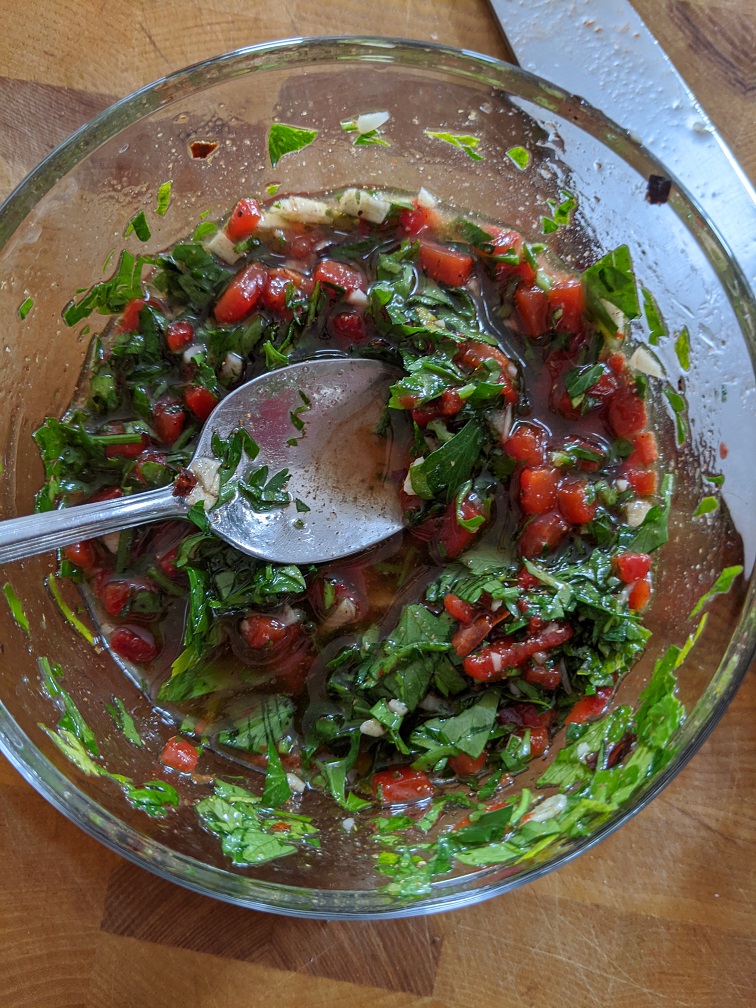
The sauce starts with a big handful of parsley that gets chopped fairly fine. Next up, a few cloves of garlic and roasted red pepper. The roasted pepper is best if homemade, but you can use a jar if you’d prefer. If you would like to roast the pepper at home, toss a whole red pepper with a teaspoon of oil and put it on the hottest part of your grill on high. Cook it, flipping and rotating every few minutes until the pepper is completely black on all sides. Yes, black. Put the pepper in a metal bowl, seal tightly with plastic wrap and let it sit for 10 minutes. Remove the pepper from the bowl and using a kitchen towel, rub the pepper until all the skin comes off. Now, cut the pepper open, remove the seeds and stems, and the pepper is ready to go.
Spices
The spices I use in my chimichurri are crushed red pepper flakes, cumin, cinnamon, brown sugar, salt, and pepper. You can find measurements in the recipe below. The cumin and the cinnamon or both optional, and I don’t either are traditional. I do find that they add a nice warmth to the flavour of the chimichurri steak sauce.
Oil and Acid
The final step in making this steak sauce is to add a bit of oil to loosen it up and a little acid to brighten the flavours. I use olive oil and red wine vinegar. I would keep the olive oil, but the acid could be substituted with balsamic vinegar, lime juice, or even orange and lime juice. Play with it and see what you like.
Sauce, marinade, or both?
One thing that I love about this steak sauce is that it also works as a marinade. Not only that, but it is great on seafood, pork, or chicken too! Give it a shot, you’ll be happy that you did.
Thank you for reading and remember to share this because that helps me grow the blog. And remember to subscribe to the blog because you don’t want to miss any more posts! Have a great weekend everyone, safe grilling!.
Simple Steak Sauce (Chimichurri)
A quick and delicious all-purpose steak sauce/marinade.
We use cookies on our website to give you the most relevant experience by remembering your preferences and repeat visits. By clicking “Accept”, you consent to the use of ALL the cookies.
This website uses cookies to improve your experience while you navigate through the website. Out of these, the cookies that are categorized as necessary are stored on your browser as they are essential for the working of basic functionalities of the website. We also use third-party cookies that help us analyze and understand how you use this website. These cookies will be stored in your browser only with your consent. You also have the option to opt-out of these cookies. But opting out of some of these cookies may affect your browsing experience.
Necessary cookies are absolutely essential for the website to function properly. This category only includes cookies that ensures basic functionalities and security features of the website. These cookies do not store any personal information.
Any cookies that may not be particularly necessary for the website to function and is used specifically to collect user personal data via analytics, ads, other embedded contents are termed as non-necessary cookies. It is mandatory to procure user consent prior to running these cookies on your website.