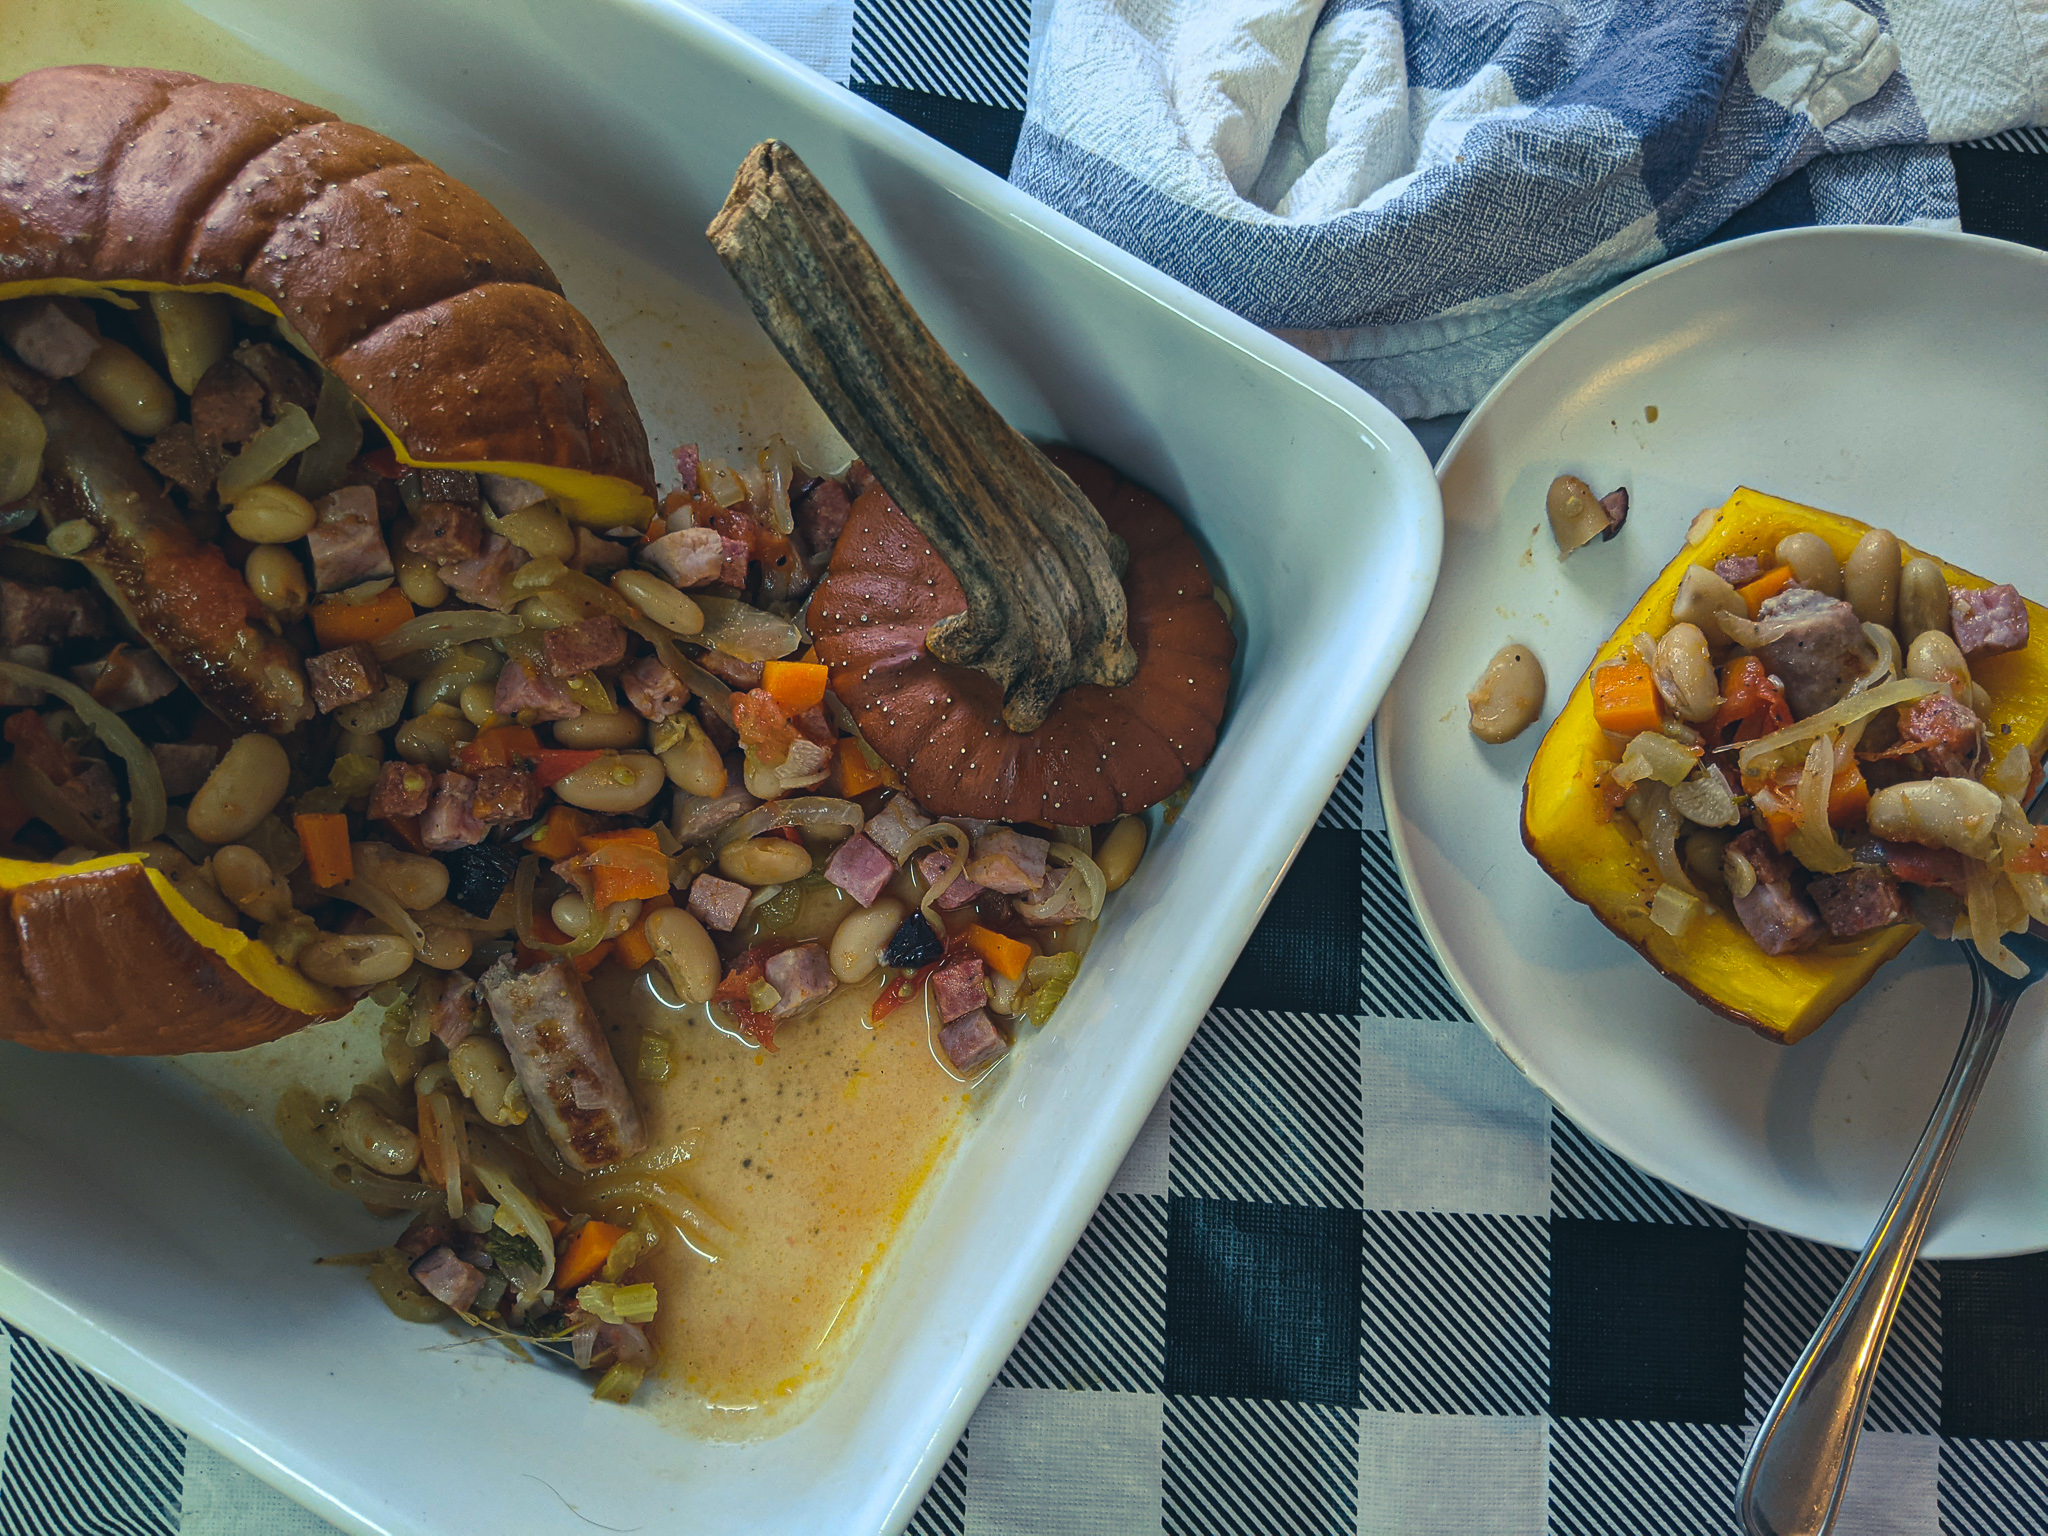
Whether you are throwing a grownup Halloween party, having a pre trick-or-treat family dinner, or just want something cool for you and your partner, this Halloween Cassoulet Stuffed Pumpkin is exactly what you’re looking for. Cassoulet is a French white bean and meat stew cooked in a casserole dish. This version is cooked inside a pumpkin and uses a combination of ham and sausage to mimic the intestines and guts. When you cut the pumpkin open tableside, all the insides come out in a gory but delicious display. You can find the recipe directly below but keep reading for a more detailed explanation.
Preparing The Pumpkin
Buying the right type of pumpkin
The pumpkin you want to use for this recipe isn’t your typical jack-o-lantern pumpkin. These are smaller, more tender, and will likely be sold as pie pumpkins. Essentially, these are eating pumpkins. If you can’t find one, a large buttercup squash will work as well.
Wash and clean the pumpkin
To start, wash the outside of the pumpkin with hot water and a scrub brush. Make sure to remove any dirt. Next, cut the top off the pumpkin like you would when making a jack-o-lantern. Make sure to angle your knife slightly, so the lid fits back on the pumpkin rather than falling in. Cut the seeds and pith off the top and set it aside. Use a spoon to scrape the inside of the pumpkin. Remove all the seeds and loose bits. Put the pumpkin in a casserole dish and move on to the filling.
Preparing The Cassoulet
Vegetables
Start the cassoulet by preparing the vegetables. You will need 1 cup of sliced onion, 2 cloves of sliced garlic, 1/4 cup of diced celery, a 1/4 cup of diced carrots, and 1 diced Roma tomato.
The Cassoulet Meat
For the meat element of the cassoulet, I used summer sausage, ham and plain breakfast sausages. If you can’t find summer sausage, a good quality salami would work well. In total, you want about 1/2 a cup of diced ham and 1/2 a cup of diced summer sausage or salami.
Sausage
As I said, I used plain breakfast sausages for this. These are not a traditional ingredient, but in keeping with the Halloween theme, I wanted the sausage to be whole to mimic intestines when it all comes spewing out of the pumpkin. You can use a different variety of sausage you’d like, but these work very well for the presentation. And, the flavour works well with the overall taste of the cassoulet. Roast the sausages for 15 minutes in a 350°f oven, flipping them halfway through.
Other Ingredients
The other cassoulet ingredients are 1 cup of canned white kidney beans, 1/4 cup white wine, 3/4 cup chicken stock, and 1 tsp chopped thyme.
Preparing The Halloween Cassoulet
Heat a large skillet over medium-high heat. Add 1 to 2 tablespoons of olive oil along with the onion, carrot, celery, and garlic. Cook the mixture for 3 to 4 minutes or until the onions soften. Next, add the diced meat and tomatoes. Cook for another 3 minutes before adding the thyme and white wine. Continue to cook the mixture until the wine has all but evaporated. Add the sausages and chicken stock along with a big pinch of pepper. Don’t add any salt as enough will come out of the sausage and ham. Bring the mixture to a boil, add the beans and give it a taste.
Stuffing the Pumpkin
Carefully transfer the cassoulet mixture into the pumpkin. Put the lid on the pumpkin and bake at 350°f for 1 hour and 30 minutes or until the pumpkin is soft to the touch but not falling apart. Take the Halloween Cassoulet Stuffed Pumpkin out of the oven, let it rest for 10 minutes, then serve. To serve, you can scoop the stew out of the pumpkin then cut the pumpkin into pieces, or you can cut the pumpkin with the stew still in it and watch it come pouring out for a delightfully disgusting Halloween display.
The Wrap-Up
A few days ago, I was asked to prepare a Halloween recipe on local morning television. I had no idea what I was going to make, but after some thought, this Halloween Cassouelt Stuffed Pumpkin was what I came up with, and I have to tell you, I am pretty pleased with myself. Not only does it taste great and look amazing, but it is also the perfect Halloween-themed dinner though I can see myself making this a few more times this year. Enjoy and Happy Halloween!
Cassoulet Stuffed Pumpkin
A delicious tasting Halloween-themed dinner. French white bean and sausage stew cooked inside a pumpkin. To give your guests that authentic Halloween scare, cut the pumpkin open tableside and watch all the insides become outsides.
1med.Pumpkinmake sure to buy one that says "pie" pumpkin or use a large butercup squash
1tbspolive oil
1cupsliced onion
2clovesgarlic, sliced
1/2cupdiced carrot
1/2cupdiced celery
1Roma tomat, diced
1cupwhite kidney beans, soaked and boiledor just use canned ones.
1/2cupham, diced
1/2cupsummer sausage, dicedor another smoked or cured sausage or salami
6linksof breakfast sausagedon't use maple or apple breakfast sausages.
1tspthyme, chopped
2bay leaves
1/4cupwhite wine
3/4cup chicken stock
salt and pepper to taste
Instructions
Pre-heat you're oven to 350°f
Cook the sausages in the oven for 15 minutes, flipping halfway through.
Cut the top off the pumpkin like you would when making a jack-o-lantern. Then scrape and scoop out all the seeds and loose bits.
Heat a large skillet over medium-high heat. Add in the olive oil, then the onion, garlic, carrot, and celery. Cook the vegetables for about 4 minutes or until the onions start to soften.
Add the diced ham and summer sausage, along with the diced tomatoes and cook for another 3 to 4 minutes.
Add the thyme, a pinch of pepper, and the white wine. Cook until the wine has almost all evaporated.
Pour in the chicken stock and bring to a boil.
Add in the cooked sausages and white beans. Bring the pan back to a boil.
Put the pumpkin into a high-sided casserole dish and spoon the meat and bean mixture into it. Put the lid on the pumpkin and bake in the oven for 1 1/2 hours or until the pumpkin is soft to the touch but not falling apart.
Serve the stew directly out of the pumpkin, then cut the pumpkin and serve slices along with the stew. Or for a more Holloween themed presentation, cut the pumpkin open at the table and let all the sausages and beans and everything come pouring out. Make sure do to this in a casserole dish so as not to make a big mess.
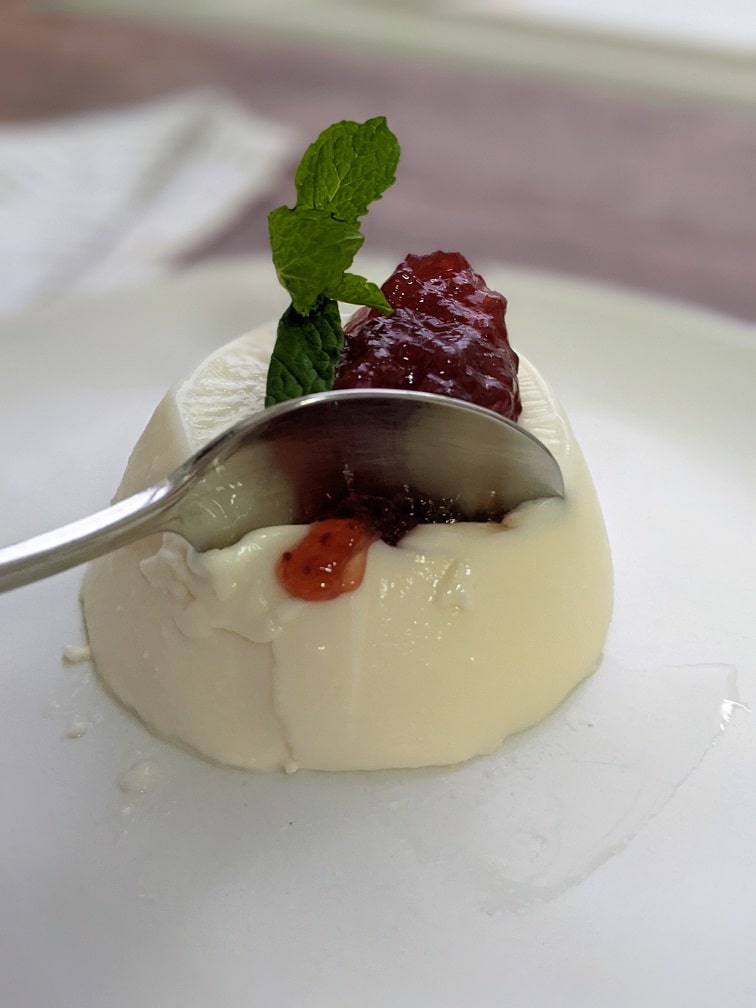
When you look at a panna cotta, it seems like it should be hard to make. It gives off the impression of being this super elegant dessert that you can only get in fancy restaurants. But, it isn’t that at all. It’s actually a really simple dessert. Milk, cream, sugar, vanilla and gelatine, that’s all there is to it. It’s like a very light and elegant pudding. You can make it in under twenty minutes, then throw it in the fridge for a few hours to set. It is a great make-ahead dessert that anyone can put together. It also is a great way to finish the Chef’s Notes Valentine’s Day meal series, which is a three-course meal I’ve been sharing over the past week. You can check out the appetizer and the main course here. If you are looking for a simple dessert to end a romantic meal or something quick you can make for a nice family dinner, panna cotta is the answer. Let’s get to it.
Working With Gelatine
To make panna cotta, you have to use gelatine, something you may or may not be familiar with. Don’t worry, it’s not hard to work with, but there are some things you need to know. First of all, you can find gelatine in any grocery store. It most often comes in powdered form and is usually found in the baking aisle. When working with gelatine, you have to bloom it first. All that means is that you mix the powdered gelatine with cold water and let it sit for a few minutes to hydrate. Then, you have to heat the gelatine until it melts and turns from opaque to translucent. It’s easiest to do this by setting the bowl containing the gelatine over a pot of boiling or simmering water. The gelatine will turn to a liquid in a minute or two and turn clear in another minute or so. Now your gelatine is ready to use.
Making Panna Cotta
To make your panna cotta pour one cup of whole milk (you can also use 2%) and one cup of whipping cream into a 2 qt pot. Add half a cup of sugar and half a teaspoon of vanilla extract. Put the pot on the stove on medium-high heat and stir until the sugar is dissolved and the dairy is just about to boil. Take the pot off the heat and whisk the mixture into the bloomed gelatine.
Cooling The Panna Cotta
The traditional way to serve panna cotta is to let it set in a ramekin, then unmold it, so you have this nice white jiggly dessert on your plate. You can do this, it’s not difficult, and it looks nice. You can also leave it in the ramekin if you’d prefer. If you’re not going to unmold the panna cotta, I suggest setting it in clear glasses. It will look amazing. To cool and set the panna cotta, pour it into four dishes, whatever you’d like. Cover the dish with plastic wrap, making sure to push the plastic right down onto the surface of the panna cotta to prevent a film from forming. Put the dishes in the fridge for at least three hours to set.
Unmolding The Panna Cotta
Again, unmolding the panna cotta is optional, but it really does add a bit of WOW! to the dessert. To unmold the panna cotta, place the ramekin in a bowl of hot water and let it sit for about fifteen seconds. Take it out of the water, run a knife around the inside of the ramekin, put a plate on top of the ramekin and flip it over. You will likely have to jiggle the ramekin a little to get the panna cotta to let go.
What to serve with your panna cotta.
Serve the panna cotta with fresh berries, a fruit compote or a bit of jam. Whatever you’d prefer will be just fine. I opted for jam, but I will share my blueberry compote recipe at the end of the post.
Vanilla Panna Cotta
Panna Cotta is a surprisingly simple dessert that is the perfect way to cap off a romantic meal or even a family dinner.
Keyword: Dessert, No-bake dessert, Panna Cotta, Valentine’s Day
Servings: 4servings
Author: Chef’s Notes
Ingredients
1cupwhipping cream
1cupmilk
1/2cupsugar
1/2teaspoonvanilla extract
1packagepowdered gelatin
1/4cupwater
Instructions
In a 2 qt pot, combine the cream, milk, sugar, and vanilla. Put the pot on the stove on medium heat. Heat the mixture, stirring until the sugar has dissolved and the milk is just on the verge of boiling.
Pour the water into a medium-sized, heatproof bowl. Sprinkle the powdered gelatin of the water and stir it in. Let the gelatine sit for 3 to 4 minutes.
Put a medium pot on the stove with an inch of water in the bottom. Turn the burner on high and bring the water to a boil.
Set the bowl with the gelatine and water over the boiling water and heat until the mixture is liquid and clear.
Pour the hot milk mixture into the gelatin and whisk to combine.
Pour the milk mixture into four ramekins, cover with plastic wrap, making sure to push the wrap down on the surface of the panna cotta to prevent a film from forming on the surface. Put the dishes in the fridge for at least 3 hours to cool and set.
Serve the panna cotta either in the ramekin or unmold it by dipping the ramekin in hot water for 15 seconds, then flipping it over onto a plate and giving it a little shake until the panna cotta breaks free. Serve it with fresh berries, a fruit compote or a bit of jam.
If you really want to impress someone or just want something delicious to finish a meal, look no further. Panna cotta is what you’ve been looking for. I hope that you’ve enjoyed this Chef’s Notes Valentine’s Day mini-series and that you make one or all the parts of this meal. If you do, I’d love to hear about it. You can tell me the comments below or on social media @chefbenkelly. Thank you, everyone, and have a great weekend. Oh, and you can find the other two courses to this meal here and here.
Thank you for reading this post. Please share it on Facebook, Pinterest, or Twitter to help Chef’s Notes grow. Subscribe to Chef’s Notes below, and you will never miss a post again.
Heat a small pot over medium heat. Add the canola oil and shallot. Cook for 2 to 3 minutes or until the shallots start to soften.
Add the remaining ingredients, bring to a boil, reduce the heat to low and simmer for 10 minutes or until a spoon dragged across the bottom of the pot, leaves a line for at least one second.
This week at Chef’s Notes is all about helping you craft a perfect Valentine’s day meal at home. Let’s face it, you probably aren’t going to a restaurant this year. Today, we’ll make a delicious Roasted Squash and Goat Cheese Salad with homemade balsamic vinaigrette and almonds. This salad makes the perfect starter for your Valentine’s Day meal. On Wednesday, we’ll make the main course, and on Friday we will make dessert. By the end of the week, you’ll have all the knowledge and skill to make a delicious three-course Valentine’s Day meal for two. Let’s get to it.
Roasted Butternut Squash
For two people, you’ll need half of a butternut squash. I prefer the bottom half for this salad, you’ll see why in a little bit. Cut the top half off your squash, use it to make soup, or roast it for a side dish. Cut the bottom part of the squash in half and remove the seeds. I recommend peeling the squash even though I didn’t. It’s easier to eat if you do. Once you have the bottom of the squash freed of seeds and skin, slice it into one-centimetre slices. Put the squash on a sheet pan lined with parchment paper and drizzle with olive oil, salt and pepper. Roast in a 400°f oven for 35 minutes or until the squash is tender and slightly brown. Take the squash out of the oven and let it cool to room temperature.
Balsamic Dressing
While the squash is roasting, make the balsamic vinaigrette. You can find the full measurements in the recipe below. Start with mustard powder, salt, pepper, and honey. Then add in your balsamic vinegar. Slowly whisk in your oil, perferrably canola or vegetable oil. The dressing should be thick enough to coat the back of a spoon. Put the finished dressing in a jar and store it in the fridge until you are ready to use it.
Putting The Squash Salad Together
The salad ingredients are the roasted squash, the balsamic vinaigrette, arugula, sliced almonds, and goat cheese. If you aren’t a fan of arugula, you can substitute it for baby spinach or mesclun if you’d like. I really like arugula and I find the peppery nuttiness of it balances the tartness of the dressing with the sweetness of the squash. The goat cheese can be substituted for blue cheese, parmesan, or old cheddar. You can also substitute the almonds for hazelnuts, cashews, or pecans.
Dressing The Arugula
For two people put three to four cups of greens in a mixing bowl and toss with two to three tablespoons of the dressing. You want just enough dressing to coat the greens, but not drown them.
Plating The Squash Salad
Get two small round plates, and plate the roasted squash in a circle around the middle of the plate. Put the dressed greens in the middle of the squash, then top with a few tablespoons of the cheese and the nuts. If you’d like, you can finish the salad with a little bit of fresh cracked pepper and a pinch of salt.
Squash Salad
Roasted butternut squash salad with balsamic vinaigrette, arugula, almonds and goat cheese. This makes the perfect start for a dinner party, or a romantic dinner for two.
Keyword: Butternut Squash, Starter, Valentine’s Day
Servings: 2servings
Author: Chef’s Notes
Ingredients
Roasted Butternut Squash
The bulb of a butternut squash
2tbspolive oil
Salt and Pepper
Balsamic Vinaigrette
2tbspBalsamic vinegar
1/2tspmustard powder
1tsphoney
1/4tspsalt
Pinchof pepper
1/2cupcanola oil
Roasted Squash Salad
4cupsof arugula
1/4cupssliced almonds
1/4cupof goat cheese
Instructions
Roasted Butternut Squash
Cut the squash bulb in half through the middle. Remove the seeds and peel it. Slice the squash into 1 cm slices.
Put the squash slices on a sheet pan lined with parchment paper and drizzle with olive oil, salt and pepper.
Roast the squash in a 400°f oven for 35 minutes of until the squash is soft and slighty brown around the edges. Take the sqaush out of the oven and let it cool to room temperature.
Balsamic Vinaigrette
In a medium mixing bowl combine the mustard powder, salt, pepper, honey, and balsamic vinegar.
Whisk in the canola oil in a slow steady stream. If you notice that the oil isn't mixing in, stop adding oil, and whisk until it has been incorporated then continue to whisk in more oil.
The finished dressing should be thick enough to coat the back of a spoon.
Once the dressing is made, transfer it to a jar and put it in the fridge until you are ready to use it.
Roasted Squash Salad
Put the arugula in a large mixing bowl and toss with 2 to 3 tablespoons of the balsamic vinaigrette. You want just enough dressing to goat the arugula, but not so much that it is drowning.
Get to small round plates and palce the roasted squash in a circle around the center of the plates. Put the dressed arugual in a pile in the center of the squash circle.
Divide the almonds and goat cheese among the two salads. Season with salt and pepper, and serve.
The hardest part of making this salad is the dressing. If you are that intimidated by it, you can buy balsamic vinaigrette at the grocery store instead. The fact is that this a very simple salad that looks beautiful and tastes amazing. Whoever you are making this salad for is going to be blown away because it is exaclty the type of thing you would get in a nice restaurant on Valentine’s Day. The difference is that you made it yourself for a fraction of the price. You can’t beat that. Remember to come back on Wednesday for your Valnetine’s Day main course.
Thank you for reading this post. Please share it on Facebook, Pinterest, or Twitter to help Chef’s Notes grow. Subscribe to Chef’s Notes below, and you will never miss a post again.
Whether you are having a big party (in any other year) or a small intimate evening in, nothing can beat a well presented Charcuterie Board. The key is that it has to be well presented. Otherwise, it’s just some meat and cheese on a plate. Today, I’ll share some tips and tricks with you so that you can make your next Charcuterie Board look just like the pros. Let’s get to it.
Getting Started
First things first, let’s talk about ingredients. There is no point in putting in the effort to make a beautiful charcuterie board using low-end ingredients. Now, to be clear, I’m not saying you need to spend loads of money here. But, we’re not making a supermarket deli tray either. Splurge and get a few nice cheeses and a few nice types of meat. That’s all you really need. Let’s look at some specifics.
Choosing The Right Cheese
There are three things that I think about when I choose the cheese for any charcuterie board. First and foremost, it has to taste good. If it doesn’t, why would you use it? Next, I think about shape and texture. If all of the cheese on the board is the same shape and texture, it will look boring, and it will be boring to eat. Yes, you can control the shape to some degree with how you cut and present the cheese, but there is only so much you can do. Finally, I think about variety and the style, and the taste of the cheese. Usually, I try to have one soft cheese like brie or camembert. I like blue cheese, so I pretty much always include one such as gorgonzola or stilton. And, I usually use a semi-firm to firm cheese. This can be anything from a really nice aged cheddar to asiago, to manchego, or Beemster.
If you want to really get into it, you can use cheese that comes from the same places as your meats. So, if you are using Italian meats, or Spanish meats, you would use Italian cheese, or Spanish cheese. I don’t generally worry about this too much unless the board itself is themed to a specific place. Using French cheese with Italian meat isn’t going to ruin your board or your experience.
One other tip when it come to the cheese is to avoid novelty cheese like beer-veined ones, or holiday shaped ones. For the most part, they aren’t going to taste good. They aren’t going to pair well with the other things on your board. And they are going to make your charcuterie board look kind of hokey.
Charcuterie Meats
When it comes to the meat on a Charcuterie Board, I actually really like the three packs of Italian meats you can get at most grocery stores. Please don’t buy the cheapest one. It will likely taste cheap. Having said that, you don’t have to buy the most expensive one either. These packs work best when making a board for two to six people, but any more than that, and you are going to want to go to the deli counter and get them to cut the meats fresh for you. This will save you a considerable amount of money.
If you have a specialty charcuterie store in your city, go there. It is going to be exponentially better than what you get at the grocery store. They will likely have some delicious paté, terrines and lots of other items that you can use on your Charcuterie Board as well. Speaking of paté, I don’t typically recommend grocery store paté, but if you like them, go for them.
Sauce
It’s always nice to serve at least one kind of sauce with your Charcuterie Board. This could be as simple as nice mustard to pair with the meat or a high-end jam to go with the cheese. I really like a savoury blueberry compote paired with cheese, especially brie and blue cheese. If you’d like to make my blueberry compote, you can find the recipe at the end of this post.
Bread
Every Charcuterie Board needs some type of bread item. This could be as simple as some torn up baguette or store-bought crackers. But, I find that toasting some bread (this is gluten-free sourdough from Promise Gluten-Free) with olive oil and aged balsamic or balsamic reduction not only tastes great but looks great too. It really adds that extra wow factor to the board. To make these, cut some bread into 5 cm x 5 cm squares, put them on a lined sheet pan, drizzle with olive oil and thick balsamic vinegar (reduction or aged), then bake on 400°f for ten to twelve minutes.
Assembling Your Charcuterie Board
Now that we have the main components of our Charcuterie Board mapped out, let’s look at how to put it all togehter.
The Board
Obviously, you are going to need a plate or board to put your ingredients on. For two to six people, I use a twelve to sixteen-inch board. For two people, this would be a meal, not an appetizer. The board can be a cutting board, a sanded and oiled piece of maple, or even a long narrow plate. You can plate your charcuterie on a round plate, but that’s not what we are doing today. The board I’m using is from Ashwurks Cutting Boards.
The Cheese
I always start with the cheese becasue it helps shape the rest of the board and becasue the cheese is best served at room temperature. So, as I’m putting the rest of the board together, the cheese is coming up to the perfect eating temperature. I always put cheese on opposite corners when using a square or rectangular board, then one cheese in the middle. This helps to break the board up and gives me lots of room for everything else.
Brie and other wheels of cheese can be served as either a whole wheel or a half wheel. Obviously, you can buy bigger pieces of brie, in which case, you would not use a full or even half wheel. But, when buying small wheels, I will put a half wheel in a corner or put a full wheel right to the center of the board. I also like to pre-cut brie and other soft cheese becasue it is easier to cut when it’s cold, which prevents a large mess later on.
Blue cheese I don’t cut becasue it is typically pretty crumbly. I put a wedge of it in one corner and make sure to serve a cheese knife with it. Whatever it may be, the third cheese is what I use to break up the board visually. I avoid cutting the cheese into cubes like the plague. There is nothing that is going to make your board look cheaper than cubed cheese. Suppose the cheese comes in a wedge, cut across it to get thin triangles. If the cheese is rectangular, slice it, cut the slices into triangles if you can, or use the thin rectangles. Fan the third cheese out. This looks great and makes the cheese easy to grab.
How much meat and cheese to serve?
If the charcuterie board is served before a meal, aim to have about 56 grams or 2 ounces of cheese per person and the same amount of meat. If the board is the meal, aim for about 150 g or just over 5 ounces per person. That is cheese in total, not of each kind of cheese and the same with the meat.
Cups and bowls
After the cheese, I like to add any cups or ramekins that I may be using. On my example board, I use one small cup of blueberry compote. But you may have cups of mustard, pickles, olives, anything like that. Essentially, anything rigid should be added to the board, right after the cheese.
Your Charcuterie Meats
Next up, the meat gets added. Just as with cheese, you want to create different textures with the meats. Again, this isn’t a meat and cheese tray from your local grocery store’s deli section. Avoid rolling meats into tubes and stuff like that. How you present the meat really depends on what meat you have. With my example board, I have coppa, salami, and prosciutto. The coppa and salami are both round, and the prosciutto is prosciutto shaped. Generally, I fold salami into quarters. It holds well and looks nice enough. With the coppa, I pinch it gently in the middle and form it into a loose bunch.
There is a common mistake when it comes to preparing slices of prosciutto for a charcuterie board. People tend to roll it or fold it up, but it makes eating very unpleasant. Eating rolled prosciutto feels very similar to eating raw meat, which is not usually very much fun. Instead of rolling, gently fold the prosciutto into ribbons. When your guests eat it, they should be eating only one-two to layers at a time. This makes the prosciutto much more enjoyable to eat.
Position of the meats
As for where to place the meats on your board, I like to bunch them up with the cheese. You don’t have to do this, but I find it helps keep everything looking nice and tidy, and saves room for bread or crackers, and other garnishes.
Bread and Crackers
The next elements to be added to the board are the crackers or bread. I like to use these items as borders or dividers between the different sections of my board. There are salami and blue cheese at the top, then a bread border. At the bottom, coppa and brie, and a bread border. Again, this helps with the visual appeal, but it also puts the bread or crackers exactly where you want them next to the spreadable cheese.
Garnishing Your Charcuterie Board
The final step, and visually the most important, is to garnish your charcuterie board. For the best visual appeal and variety in eating, use a few different garnishes. I have grapes, cranberries, dried figs, pistachios, gherkins, olives, dried orange slices, and a few sprigs of fresh thyme on my board. So that you know, most of these items I had on hand already. Don’t spend more on garnish than your main items. Buy one or two things, then use whatever you have around the kitchen.
You don’t have to use the exact garnishes that I did, but the idea is to fill the blank space with pops of colour and different textures. Of course, you want most, if not all, of your garnish to be things that you actually want to eat. Also, don’t go overboard here. There is such a thing as too much garnish. A few pieces of each item is more than enough.
The Finished Charcuterie Board
Your finished charcuterie board should be visually stunning and easy and enjoyable to eat. This is food, after all. Ideally, your guests or partner will literally say, “Wow!” when they see it. If someone says, “I don’t want to eat it because it is too beautiful.” you know you’ve done your job.
Conclusion
There isn’t much difference between a professionally prepared Charcuterie Board and an amateur one. It’s mostly the same meats and the same cheese. Like with most things, it is the little extras that separate the two. Pay attention to the placement of things. Think about colour and texture. And use garnish to fill up the board and add pops of colour. Just like that, your amateur looking Charcuterie Board has become a masterpiece that any pro would be happy to serve.
You can find the Blueberry compote recipe below.
Thank you for reading the post. If you liked it, remember to share it on Facebook, Pinterest, or Twitter. Did you know that Chefsnotes.com has over 400 posts just like this one? Subscribe to the blog below, and you will be notified of every new post so you will never a helpful tip or recipe again. And if you would like to know more about me, click the picture of me below to read my story “Life on the line.”
Heat a small pot over medium heat. Add the canola oil and shallot. Cook for 2 to 3 minutes or until the shallots start to soften.
Add the remaining ingredients, bring to a boil, reduce the heat to low and simmer for 10 minutes or until a spoon dragged across the bottom of the pot, leaves a line for at least one second.
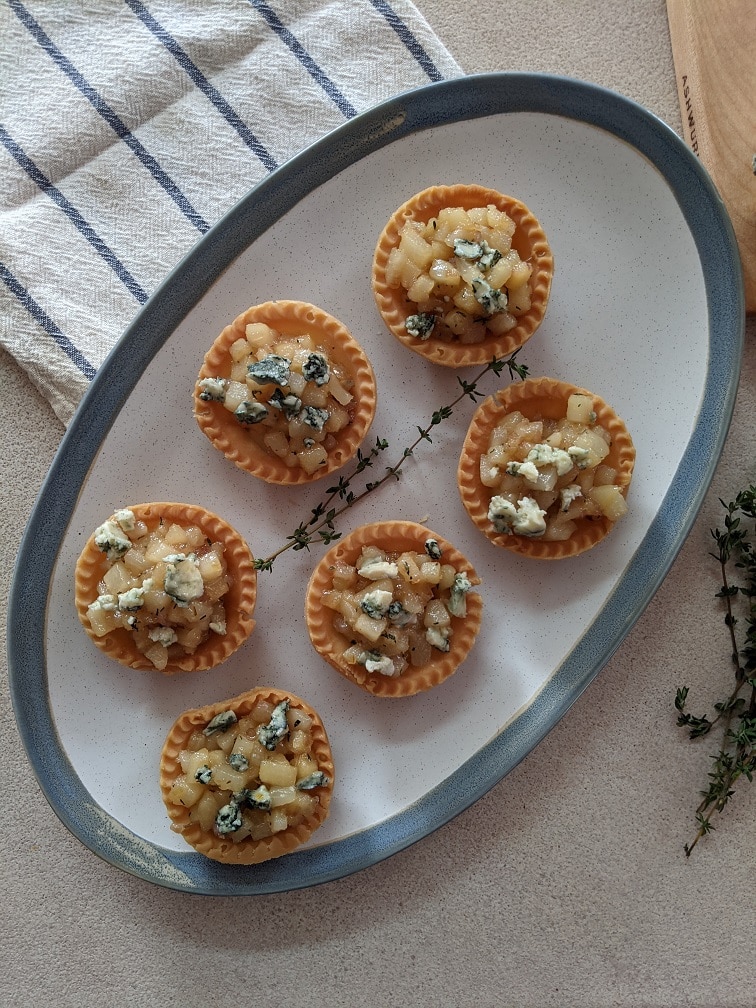
Last week I shared My Mom’s Cheese Ball Recipe, and it got me thinking that it would probably be a good idea to share some other holiday or Christmas hors d’oeuvre recipes. So, for the next few Fridays until Christmas, I am going to do exactly that. This week I will share my recipe for Caramelized Pear and Blue Cheese Tarts. Don’t let the name scare you. These are not complicated to make at all. I promise. I feature an item very similar to this on my hors d’oeuvres menu, and it is always popular, so I’m excited to share it with you. Obviously, most of us won’t be getting together in big groups this Christmas, so I’ve cut back all the recipes in this mini-series to suit two to four people, which should be ideal. Let’s get to it!
Tart Shells
When it comes to entertaining during the holidays, premade tart shells, puff pastry, and phyllo dough are your best friends. You can do so much with those three items as the base. I’ve never seen gluten-free puff pastry or phyllo here, but I did manage to get a hold of some gluten-free tart shells. I found them at Sobeys if anyone is looking for them.
To prepare the tart shells, I first defrosted them then poked them, or docked them, which is the technical term, with a fork and baked them at 375°f for fourteen minutes. The cooking time and temperature may vary depending on the tart shells you use, so always make sure to read the package’s instructions.
Caramelizing the pears
While the tart shells are baking get to work on the caramelized pears. Peel, core, and dice (1 cm x 1 cm) three bosc pears. Set them aside.
Additional Ingredients
Next up, peel and mince two shallots. You want about half a cup of minced shallot in total. If you don’t have or don’t want to buy shallots, you can use an equal amount of yellow onion, make sure to cut them as small as you can. Also, chop about one teaspoon of fresh thyme. You can use dried thyme for this, but fresh is much better. If you use dried thyme, use half as much and add into the pan with shallots, right in the beginning. You will need one tablespoon of cider vinegar, two tablespoons of sugar, two tablespoons of hot water, and a pinch of salt along with the shallots and thyme.
Cooking the pears
Heat a medium frying pan over medium heat. Put one tablespoon of butter in the pan and wait for it to melt and start to foam. Add the shallots and cook for two to three minutes or until they soften. If you are using dried thyme, add that in as well. Once the shallots have softened, add in the diced pears and cook for another three minutes or until they start to soften. Add in the sugar, vinegar, water, salt, and fresh thyme if you are using it. Cook the mixture, stirring, until all the liquid has evaporated. Take the pan off the heat.
Making the Pear and Blue Cheese Tarts
Assemble the pear and blue cheese tarts by spooning the pear mixture into the cooked tart shells. Top each tart with a few crumbled blue cheese pieces. Serve with dry white wine and enjoy. For lunch, you can also serve two of these tarts with a small green salad.
Pear and Blue Cheese Tarts
Things are going to be different this year, but they don't have to be THAT different. Enjoy pear and blue cheese tarts with the ones you love.
Cook the tart shells according to the package instructions.
Heat a medium skillet over medium-high heat. Add in the butter, wait for it to melt and foam, then add in the shallots and cook for two to three minutes or until they soften.
Add the pears to the pan and cook for three more minutes or until the pears start to soften as well.
Add the sugar, vinegar, and hot water. Cook for two minutes, then add in the thyme and a pinch of salt.
Cook until all the moisture has evaporated.
Remove the pan from the heat, spoon the pears into the pre-baked tart shells, and top with the crumbled blue cheese.
These Caramelized Pear and Blue Cheese Tarts are super simple, delicious and they look great. All the components can be prepared ahead and then assembled at the last minute, or you can make them all at once, as I did. Any guest, husband or wife, will be thrilled that you made these for them. They are the perfect thing for Christmas eve or New Years.
Thank you for reading the post. If you liked it, remember to share it on Facebook, Pinterest, or Twitter. Did you know that Chefsnotes.com has over 400 posts just like this one? Subscribe to the blog below, and you will be notified of every new post so you will never a helpful tip or recipe again. And if you would like to know more about me, click the picture of me below to read my story “Life on the line.”
Anyone who has lost someone knows how hard the holidays can be. It doesn’t matter how much time has passed; there’s always going to be a bit of sadness. My mom passed away almost eight years ago, and though it is easier, it is never easy. A long time ago, my mom, whether she knew it or not, gave me a gift that helps me feel that she is with me during the holidays. The gift she gave me is her recipes and the skills and know-how to cook them. This cheese ball is one of those recipes. This has been a staple of my family’s Christmas since before I was born. Even though my mom is gone, I still enjoy her cooking, which feels like a big hug through time and space. Each bite takes me back to every Christmas I did get to spend with her. And even though my son never got a chance to meet his grandmother, he will get to know her, in some way through these recipes. What an amazing gift she gave me.
Cheese Ball Ingredients
You obviously can’t have a cheese ball without cheese, so we’ll start there. For this recipe, use two cups of old or extra old cheddar cheese. Along with the cheese, there is one hard-boiled egg, some green bell pepper, sweet gherkins, pimento-stuffed olives, cracker crumbs, minced onion, mayonnaise, and salt. It is important to cut everything as small as possible; otherwise, the cheese ball will fall apart. For the egg, it is easiest to grate on a cheese grater. You can find the full list of measurements in the printable recipe at the end of the post.
Putting The Cheese Ball Together
To make the cheese ball put the cheese in a medium mixing bowl, grate the egg into the bowl, then add the remaining ingredients and mix well.
Forming and Resting The Cheese Ball
Once the ingredients have been mixed, divide the mixture into two and form into two balls. Then, wrap the balls tightly in plastic wrap. Put the cheese ball in the fridge for at least two hours to rest. It’s best if you let it sit in the fridge overnight. This time allows all the flavours to combine and is crucial in getting the right taste.
Serving The Cheese Ball
Take the cheese ball out of the fridge, unwrap it and serve it with assorted crackers, sweet gherkins, and olives. You may want to make a double batch becasue it isn’t going to last long.
Mom’s Cheese Ball
My Mom made this every year as part of our Christmas spread. It was always one of my favourite parts of the holiday. I still make it every Christmas and probably always will.
Combine and mix all ingredients in a medium mixing bowl. Mix well.
Divide the mixture into two and form into two balls.
Wrap the balls in plastic and store in the fridge for two hours before serving with crackers, olives, and pickles. It is best to rest the cheese ball in the fridge overnight to allow the flavours to come togehter.
This cheese ball, more than almost anything else, is Christmas to me. I can do without the presents or decorations, but not without this. I hope you enjoy the recipe, and I hope that it brings you a little cheer even if you can’t be with the ones you love. And, if you’re feeling a little extra lonely this year, know that every bite you take of this cheese ball is like a big hug from my mom and me. Enjoy.
Thank you for reading the post. If you liked it, remember to share it on Facebook, Pinterest, or Twitter. Did you know that Chefsnotes.com has over 400 posts just like this one? Subscribe to the blog below, and you will be notified of every new post so you will never a helpful tip or recipe again. And if you would like to know more about me, click the picture of me below to read my story “Life on the line.”
It can be hard to figure out what Christmas gifts to get that foodie on your Christmas list. They’ve probably already got at least one drawer full of little gadgets and tools that they never use (cherry pitter anyone?). But, luckily for you, I’ve taken the time to put a list together of 20 Christmas Gifts Under $20 For The Foodie In Your Life. You’re probably thinking, “yeah, but won’t these just end up in the junk drawer?” Come on, you know me better than that. All the items on this list are useful. I know because I have versions of all of these, and I use them, or I don’t have them but really want them. Some will get more use than others, sure. But none will sit in that dreaded drawer collecting dust, never to be seen again. Alright, without further ado, let’s get to it.
Disclaimer:
This is not a sponsored post. I have chosen every item on this list because I believe that it is a useful item. However, each item does have an amazon.ca affiliate link attached to it. Meaning, if you click on any of the pictures, you will be taken to their amazon.ca page to buy them. If you buy one of the items on this list after clicking on it on this page, amazon pays me a small affiliate fee. But, you can also find most of these items in your local kitchen supply store, and I recommend buying them there if you can becasue that local store is probably struggling pretty hard right now.
1. Swissmar Peeler
The first item on this list is a Swissmar Vegetable Peeler. These will cost you anywhere from $8 to $18, depending on where you buy them. You may think that $18 is an awful lot to spend on a little piece of plastic with a metal blade. I mean, those fancy old school metal peelers with rubber grips don’t even cost that much. But, this peeler is different for a lot of reasons. First of all, you can take the blade off to clean it, which is a big deal. Second of all, it makes peeling vegetables very quick compared to other peelers. And finally, it will last a lifetime. Every professional Chef I know has at least one of these peelers. I have two, one for work and one for home. The peeler I use at home is my old work peeler. I’ve had it for at least eight years, probably longer, and it has never let me down. If these peelers can last essentially forever in a professional kitchen, they will last forever for the foodie you’re buying them for.
2. Microplane
A good Microplane is a precious tool in any kitchen. They are used for finely grating hard cheese, grating spices like cinnamon and nutmeg, and zesting citrus. A Microplane will cost you anywhere from $12 to $40. But, you don’t need to spend a lot of money to get a quality one. The important thing to look for is a sturdy handle and firm teeth that won’t bend. Any foodie will be happy to open one up one of these on Christmas morning. And, you may end up with a little cinnamon or nutmeg grated over your coffee.
3. Probe Thermometer
When it comes to Foodie Christmas Gifts, a probe thermometer is almost always at the top of the wish list. These range in price from $10 to over $100. But, a $20 thermometer will last a couple of years and will give an accurate reading. These are great for foodies that cook a lot of meat, especially roasts and barbecues.
4. Paring Knife
There is almost nothing more useful to a cook than a good paring knife. They have a million uses, from cutting small items to peeling vegetables, you name it. The Victorinox paring knife listed below costs $10 and will stay sharp for a long time. What’s more, the thin ergonomic handle is easy and comfortable to hold no matter the size of the person’s hand.
5. Silicone Baking Mats
If your foodie likes to bake, silicone baking mats are a must. They are completely reusable and save money becasue they remove the need for parchment paper when baking. These cost about $20 even and are worth every single penny. Any baker will be thrilled to see these under the tree.
6. Apple Corer
This may seem like an odd item for me to include on this list. Anyone who knows me well knows that I’m not a fan of single-purpose items, and what could be more single-purpose than an apple corer? But I have one, and I love it. I use it all the time for coring apples and pears for tarts and galettes. They also work well for cutting little cylinders out of a pound of butter, if you’re into that kind of thing. We used to do that for our bread service at a restaurant I worked at years ago. An apple corer will cost about $11 and may even take that foodie by surprise, but they will use it more than they think they will.
7. Bench Scraper
A good bench scraper can be used to clean bits of stuck flour off a countertop, for cutting dough, for picking up ingredients off a cutting board, and for many other purposes. They run about $13 and are a work horse for anyone who knows how to use them. If your foodie friend is a foodie indeed, a good bench scraper may be just what they need. (see what I did there?)
8. Meat Mallet
Not only is a meat mallet useful for tenderizing tough cuts of meat and for making scallopini and schnitzel, but it will also lead to countless meat beating jokes, which are just delightful. A decent meat mallet will cost about $16 and will likely last a lifetime. If your foodie likes flattened meat and dirty jokes, this is the Christmas gift for them.
9. Kitchen Towel Push Hooks
Full disclosure, these Kitchen Towel Push Hooks are the only item on this list that I don’t have. But they look really cool and handy. What I’m saying is that I want them. If my wife is reading this (just joking. I know she isn’t), I would like these for Christmas, please. These will run you about $10 on amazon.ca.
10. Digital Kitchen Scale
A digital scale can be used for weighing ingredients (especially when baking) and for portion control. I don’t use my kitchen scale every day, but I’m glad it’s there when I need it. The price range on kitchen scales varies greatly, but the one pictured below will cost you about $20 on the dot.
11. Kitchen Shears
No kitchen is complete without a good set of kitchen shears, which are just heavy-duty scissors. They can be used for cutting chives, cooked chicken or even pizza (which is the actual Italian way). Really, they are scissors. They have a million uses. Kitchen Shears will cost you anywhere from $20 to $60, but there is no need to go top of the line with them. A $20 set will do the same jobs as a $60 set.
12. Ove Glove
I remember seeing the commercials for these years ago and thinking how stupid the “chef” in them looked. “I would never use that,” I told myself every time I saw them. But then, about ten years ago, or more now, my mom got me one for Christmas. It turns out I love it. The Ove Glove works really well and is by far the best oven mitt I’ve ever owned. I still have the one my mom got me all those years ago, though I am probably due for a new one. The Ove Glove will cost you about $18, but it will last a long time and save you from many potential burns.
13. Cork Trivets
Trivets are what you put hot pots and pans on to protect your countertop and table. They are not a fancy gift by any means, but they are incredibly useful. You can buy all kinds of different trivets, from cork to castiron, but I find for the money and usefulness, cork trivets are the way to go. You can get these at Ikea really cheap. Even the dollar store usually has them. The ones pictured below from amazon are actually pretty expensive at $19. Get them somewhere else if you can.
14. Fine Mesh Sieve
If the foodie on your Christmas list likes making sauces, stocks, or puréed soups, then a sturdy fine-mesh sieve is just the thing to get them. I use mine at least a couple of times a week and highly recommend having one on hand for straining sauces or passing soups. A decent Fine Mesh Sieve will cost about $20 bucks but is worth the price.
15. Gnocchi Board
A Gnocchi Board is probably the most specialized item on this list. And it’s not for everyone. But, if your foodie loves Italian food or making pasta, this may be the thing they’ve always wanted. It’s really just a block of wood with grooves cut into it. When you make gnocchi, you roll them on the board to create grooves that will hold on to the sauce. A Gnocchi Board costs about $16 and, again, isn’t for everyone. But for the right person, the Italian food lover, the foodie that loves to make pasta, this will be their favourite gift of the year.
16. Fish Spatula
A Fish Spatula is a thin, flexible metal spatula used mostly for delicate things like flipping fish. However, there are a million uses for a thin, flexible spatula. Whether or not your foodie likes cooking fish, this is the right gift for them. The Fish Spatula pictured below is the exact one that I have, and I absolutely love it. It costs about $19.
17. Candy/Deep-Frying Thermometer
A candy thermometer (which doubles as a deep-frying thermometer) is a great Christmas Gift for anyone who likes to make candy, caramel, or likes to deep fry but doesn’t have a deep fryer. Like the gnocchi board, this isn’t a gift for everyone but for the right person, it is perfect. The one pictured below is the one I have, and it works great. It costs about $17.
18. Sushi Rolling Kit
Every foodie dreams of making sushi. But, to make sushi, you need the right tools. The right tools are a sushi mat and a rice paddle. That’s it. The one pictured below comes with a set of chopsticks as well. This kit costs $18, though you can find cheaper sushi mats in most places. If your foodie loves sushi, get them this, because whether they’ve said so or not, they’ve been dying to try their hand at making sushi at home.
19. French Dowel Rolling Pin
French Dowel Rolling Pins are all the rage right now. Personally, I don’t see what all the fuss is about, but I know for a fact that if your foodie likes to bake, they’ve had their eye on this for the last year or so. I’m positive that there are a few local artisans in your area making these, and you should buy one from them though it will likely set you back more than $20. On Amazon, they are $18.
20. Ring Molds
These ring molds are $18, which kind of pisses me off becasue I spent $60 on mine. They are used for many things, from cutting out biscuits and cookies to forming perfectly even fish and crab cakes, to stacking food in that old school way. Whatever skill level your foodie is at, they will find many uses for ring molds.
Conclusion
There you have it—my list of 20 Christmas Gifts under $20 for that foodie on your Christmas list. I hope you found this useful, and if you did, share it becasue you may help a friend struggling to know what to get their foodie for Christmas. And, if you have a foodie gift idea under $20 that I didn’t mention, I’d love to hear about it in the comments section below or on social media. Thank you, have a great day and a great weekend.
Thank you for reading the post. If you liked it, remember to share it on Facebook, Pinterest, or Twitter. Did you know that Chefsnotes.com has over 400 posts just like this one? Subscribe to the blog below, and you will be notified of every new post so you will never a helpful tip or recipe again. And if you would like to know more about me, click the picture of me below to read my story “Life on the line.”
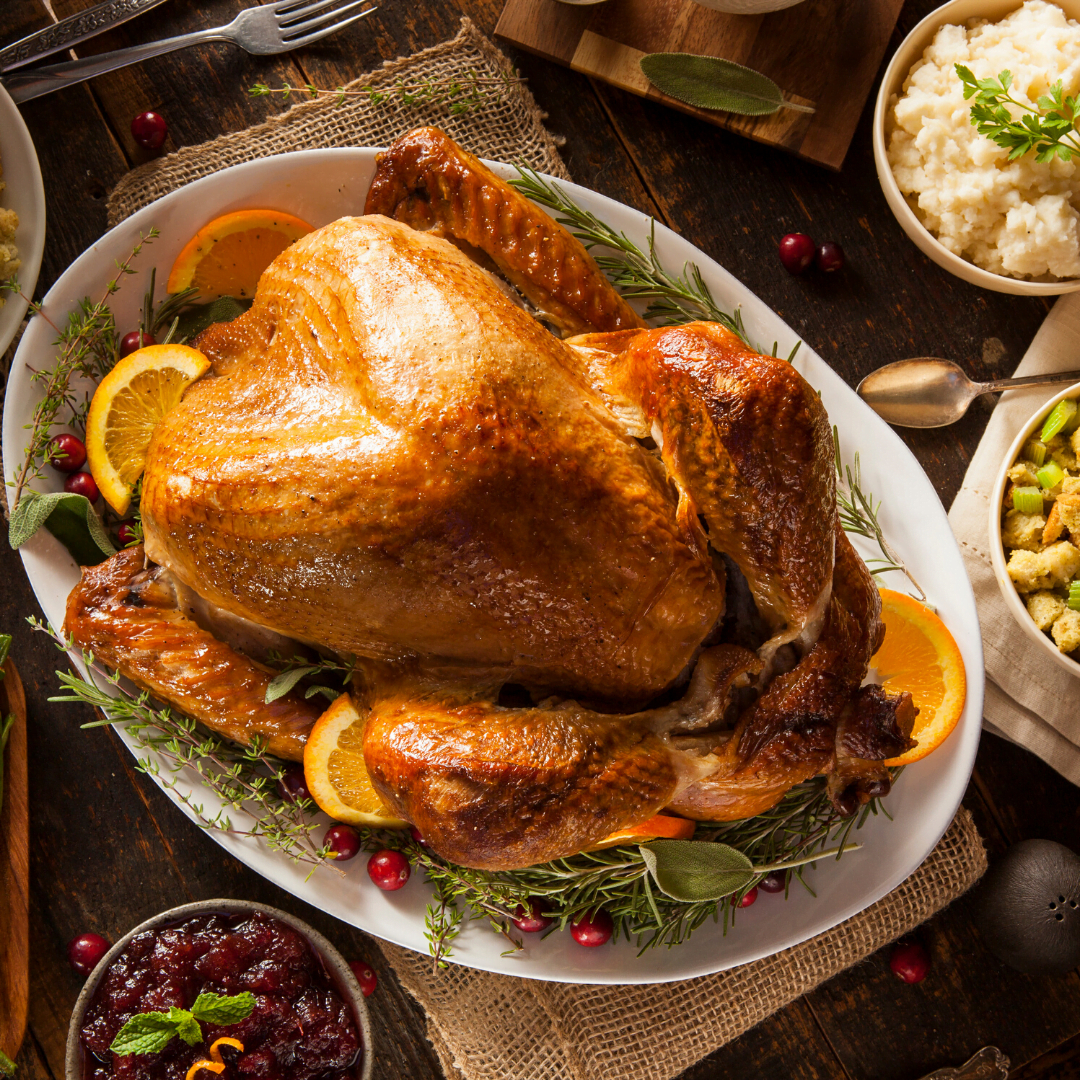
Good morning everyone and happy Friday! With Christmas right around the corner, only five short days away, I thought it was about time I acknowledged it here on the blog. Usually, around holidays like Christmas and Thanksgiving, I share tips and tricks to get you through the holiday. Well, been there, done that. Rather than just keep repeating myself year after year I thought this time I would do something different. This year, I wanted to give you a gift like no other, so I wrote an entire Christmas Dinner worth of recipes, and today I am going to share them with you.
Below you will find recipes for homemade Cranberry Sauce, Gravy, Glazed Carrots, Maple Pecan Roasted Brussel Sprouts, Garlic Mashed Potatoes, Stuffing, and of course, Turkey. There are seven recipes in total just for you as my way of saying thank you for your support throughout the year and for making this year so great here at How To Not Burn Shit.
Before I jump into this, this is my last post of the year. I’m going to take a little bit of well deserved time off to spend with my 10-week old baby and my lovely wife. I hope that you all have a great Christmas and a Happy New Year. I will see you all right back here on January 6th, 2020!
In the meantime…
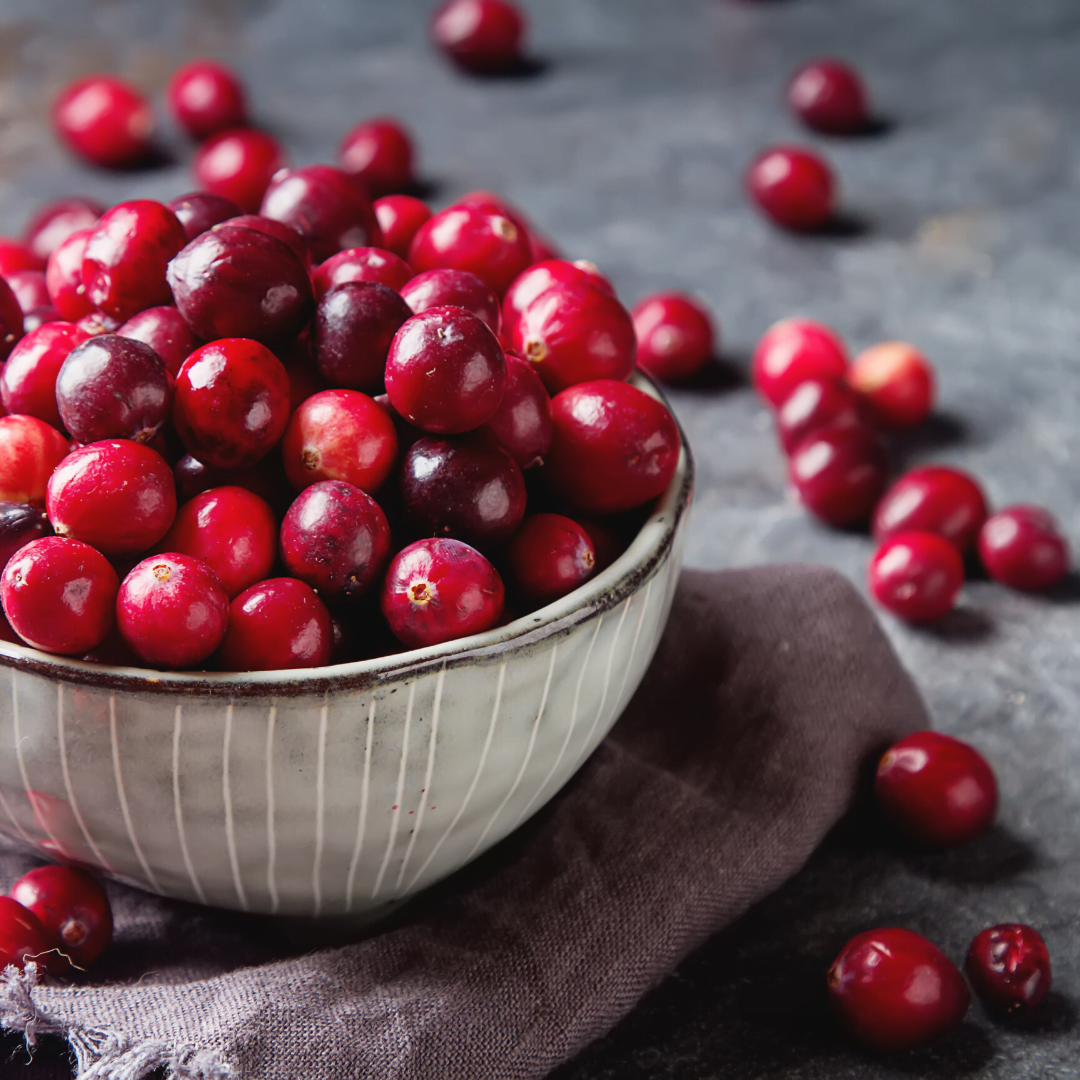
Cranberry Sauce
Way back in 1941, there was a former Lawer turned cranberry bog owner who was looking for a way to extend the short selling season for his Cranberries. He decided to make a cranberry jelly, can it and sell it year-round. He did this, though it mostly only sold at Christmas and Thanksgiving. Since its invention in 1941 canned cranberry sauce (jelly) has been a staple on holiday tables across North America. Well, I say 78 years is long enough.
It is only 11 days away from 2020 and if you haven’t already started, it is time to start making your own cranberry sauce. It isn’t hard, it doesn’t take a lot of effort, it’s not expensive, and it tastes way better. What have you got to lose?
Easy Homemade Cranberry Sauce
Why are you still buying cranberry sauce in a can? It is so easy to make and way better when made fresh.
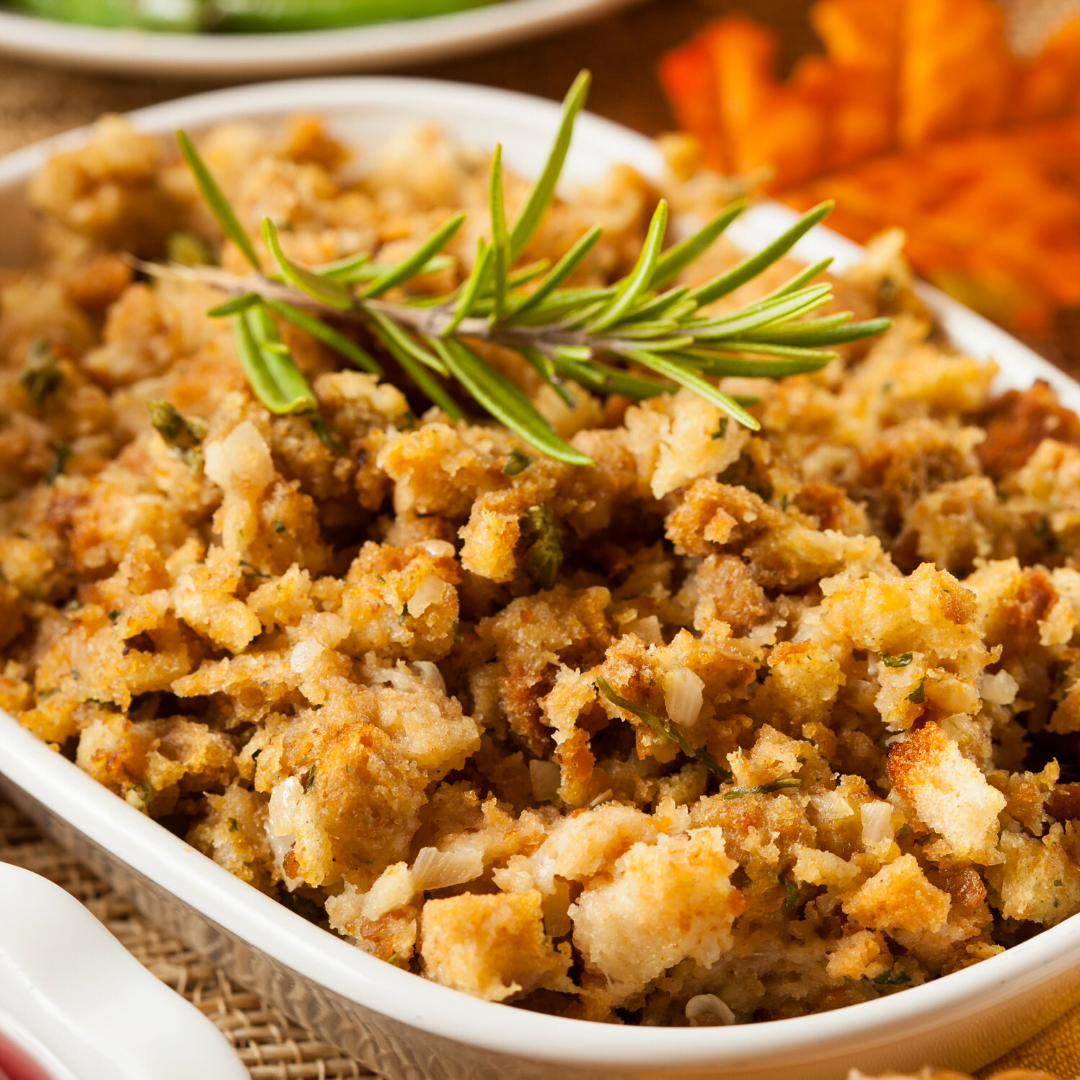
First of all, what’s the difference between stuffing and dressing? Stuffing is cooked inside a turkey, dressing is cooked outside the turkey. That’s it.
You may have grown up having stovetop stuffing every Christmas and you may even love it. But, I implore you to just this once make your own stuffing if you’re not already doing so. The recipe below is a straightforward no BS stuffing recipe that you will be happy you tried.
Add 2 tbsp of butter along with the onions into the pan.
Cook the onions for 10-12 minutes or until soft.
Put in a large bowl and allow to cool for 10 minutes.
Add the remaining ingredients and mix.
Stuff inside a turkey and cook the turkey as desired.
Notes
If you are cooking the stuffing outside the turkey (which makes it dressing) add 2 cups of chicken or turkey stock to it. Cover with foil and bake on 375°F for 35-40 minutes.
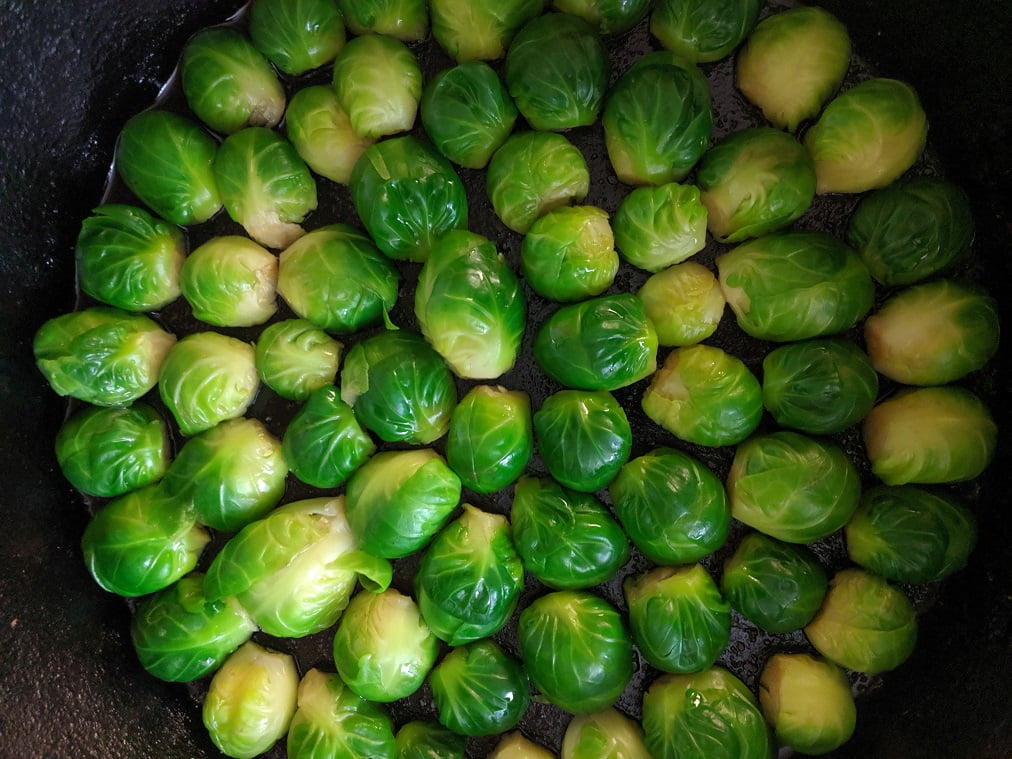
If you don’t like Brussel Sprouts, it’s probably because you’ve only ever had them when they’ve been boiled to death. When they are overcooked in that way they are mushy and taste like farts. However, when they are roasted, they get crispy, and not at all fart like. The touch of sweetness from the maple syrup in the recipe below really makes the flavour of the sprouts come to life. If you’ve never had roasted Brussel Sprouts, you are in for a very serious treat.
Maple Pecan Brussel Sprouts
A delicious alternative to your regular Brussel sprouts recipe
Cut the sprouts in half and place in a medium mixing bowl.
Pour the olive oil and maple syrup into the bowl along with the salt and pepper.
Spread the sprouts out onto a sheet pan lined with parchment paper and bake for 20 minutes on 400°F.
Remove the sprouts from the oven, sprinkle over the pecans, stir, and return to the oven for an additional 10-15 minutes or until the sprouts are tender and dark around the edges.
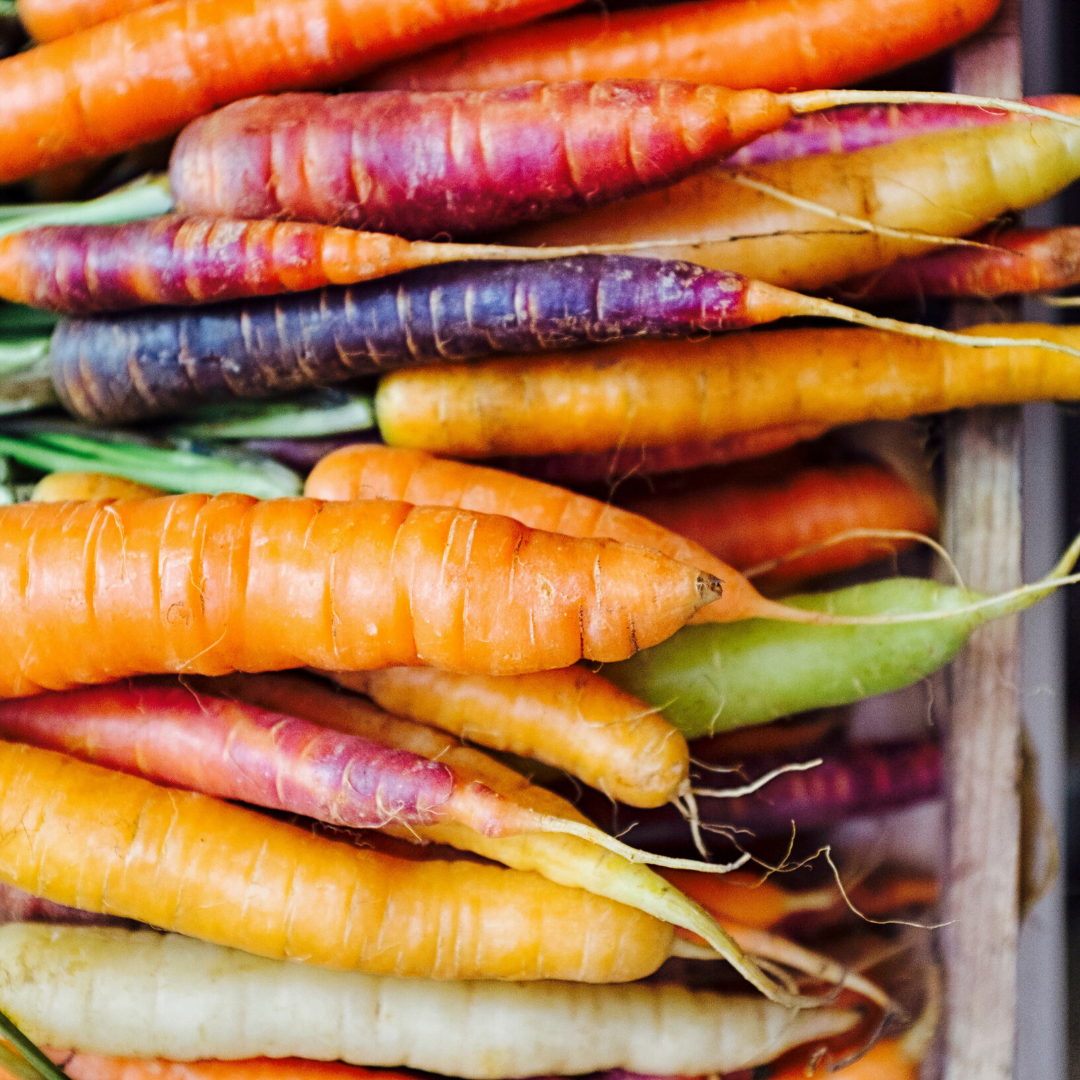
Let’s face it, those regular old boiled carrots are getting a little boring. Jazz up your carrots this year by making a glaze for them. Sound complicated? It isn’t. To make this recipe you just need to be able to use measuring spoons and a pot. All kidding aside, this is one of my favourite ways to make carrots. You put everything in the pot, and cook the carrots until the liquid has mostly evaporated. What you end up with are perfectly cooked carrots, with a flavorful glaze.
Glazed Carrots
Carrots cooked with honey, cider vinegar, thyme, and butter…what's not to love?
Put the sliced carrots in a pot along with the other ingredients.
Add enough water to just cover the carrots.
Bring to a boil and cook for 5 minutes.
Reduce the heat to simmer and cook for 5-10 more minutes or until the water has mostly evaporated and all that is left is the glaze at the bottom of the pot.
Stir the carrots, coating them in the glaze and serve.
Notes
Keep an eye on the carrots once the water starts to get low because you don’t want to burn them
We all have our own special way to cook our turkey for Christmas. But, there are some of us out there who might be making Christmas dinner for the first time. The recipe below is a very basic, intro to turkey type recipe. Having said that, it is still really delicious and I’m sure no matter how many turkeys you’ve cooked in your life you would be happy with it.
If you are looking for something a little different to do with your turkey check out this post I did back around Thanksgiving.
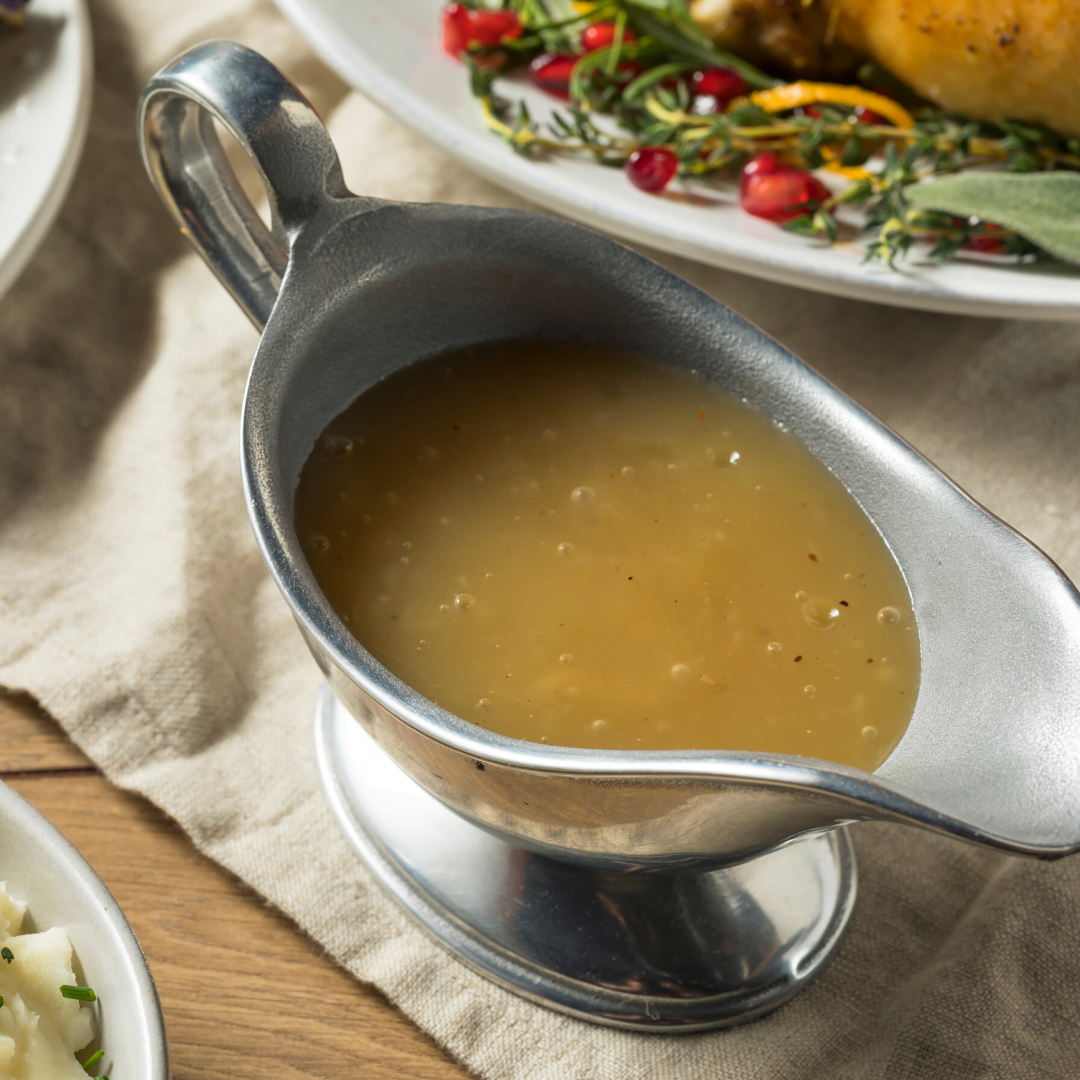
When I was a kid, one of my main jobs for Christmas Dinner was to stir the gravy. It had to be stirred while it cooked so that it didn’t scorch on the bottom. It was an important job and I took it very seriously.
The recipe below is not complicated but it does involve a lot of stirring. This is the perfect job for a child or that pesky inlaw who keeps asking if there is anything they can do.
Christmas Gravy
Wet your whistle with this delicious gravy recipe.
Cooking Christmas dinner can be stressful. It is usually the largest and most complex meal you will cook all year. The key to it being a success is to make everything the best it can be while at the same time not over complicating things. All the recipes above will add a little extra to the meal without adding much in the way of prep or cooking time. Elevation without complication.
And with that, I bid you ado. I hope that you have the Merriest of Christmases!
Oh and if you feel like you need to get me something this Christmas, the best gift you can give to me is to share this post around so that anyone who needs it can find it.
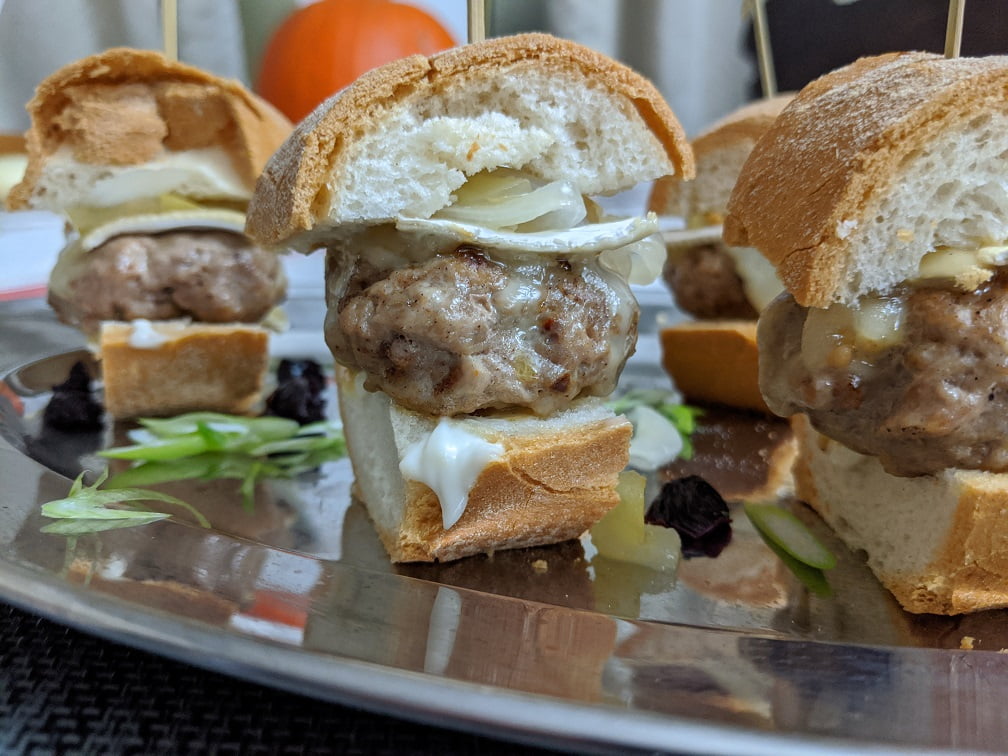
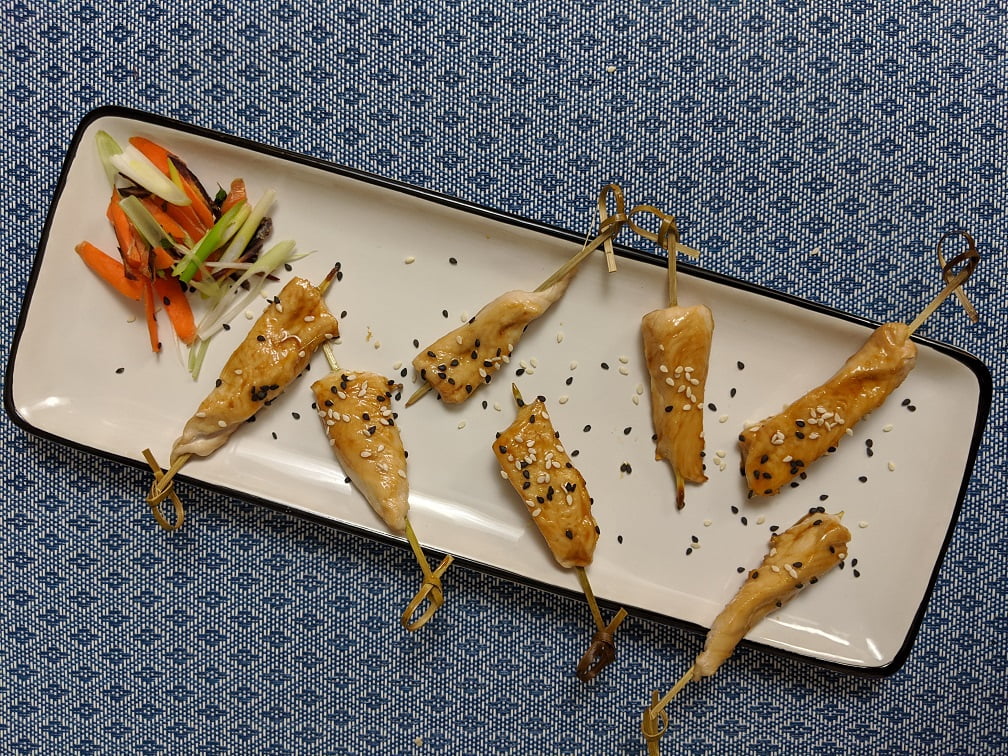
The holidays are almost upon us and we all know what that means; potlucks, parties, and entertaining. For one final time this year I have partnered up with ThinkTurkey.ca and Turkey Farmers of Canada to create not one, not two, not even three, but five delicious Turkey hors d’oeuvres to help you get through this Holiday Season.
So, what did I come up with? To start, Mini Moroccan Spiced Turkey Meatballs, and Turkey and Brie Sliders, then on to Oven-Baked Turkey Tenders with Cranberry Sweet and Sour Sauce, Teriyaki Turkey Skewers, and finally, Southern Braised Turkey on Corn Bread Muffins. Drooling yet?
Let’s take a look!
Mini Moroccan Spiced Turkey Meatballs
With Moroccan spices and apricot, these turkey meatballs are flavourful and have a little pop of sweetness. These could easily be made ahead, frozen and reheated so there ready when you are. One pound of ground turkey makes about two dozen mini meatballs, of course, you can make larger ones and just have them for dinner too.
To make these Mini Turkey Meatballs, combine all the ingredients listed in the recipe below, mix and form into 24 balls. Heat a frying pan over medium heat, add a touch of oil and sauté until cooked through. Easy peasy.
Mini Moroccan Spiced Turkey Meatballs
Delicious little meatballs made with Moroccan Spices and apricot.
The second item I made was Turkey and Brie Sliders with Homemade Green Apple Relish. The turkey patties I made for this could easily be made a bit bigger and used as a great turkey sausage breakfast patty. Seriously, try it.
To make the sliders I mixed some ground turkey with the spices listed below and formed it into small patties. I fried these and then topped them with a slice of brie. I put mine on a gluten-free baguette with a bit of mayo, you can use any kind of bread you’d like.
For the relish, I combined vinegar, sugar, water, salt, and spices in a small pot, brought it to a boil then added in 1 green apple cut into match sticks and half an onion thinly sliced. I cooked this all together for a minute or two, then it was ready to top the sliders.
Turkey and Brie Sliders
Delicious turkey sliders with brie and homemade green apple relish.
Oven-Baked Turkey Tenders with Cranberry Sweet and Sour Sauce
If I had to choose my number one favourite item from this list, this would be it. The turkey was tender, the breading was crisp, and the sauce was out of this world. I will definitely be adding this into the meal rotation and putting it on my hors d’oeuvre menu.
To make these Turkey Tenders I seasoned some flour (I used gluten-free flour and bread crumbs) with the spices listed below. I breaded the turkey using the standard breading procedure of flour, egg, breadcrumbs. Then I baked the turkey on a greased baking sheet on 400°F for a total of about 25 minutes.
For the sauce, I combined sugar, vinegar, cranberry juice, and dried cranberries in a pot and brought it to a boil. I then added a mixture of cornstarch and water to thicken it.
I cannot stress enough how much you need to make these. You will be so, so happy that you did.
Oven-Baked Turkey Tenders
These Turkey Tenders will not only become an entertaining staple but you will want to eat them every day of the week. Pair them with the cranberry sweet and sour sauce and you have a real winner.
Little pieces of turkey breast put on a skewer and baked with a simple homemade teriyaki sauce, who isn’t going to love that?
These are about as straightforward as it comes. Thinly slice the turkey, put it on skewers, baste with the sauce and bake.
The sauce is a mixture of soy sauce (I used gluten-free tamari), sugar, rice vinegar, and water. That’s it. Boil this until it’s thick and you are good to go.
Teriyaki Turkey Skewers
Simple and delicious Turkey Skewers with homemade Teriyaki Sauce
Southern Braised Turkey Breast on Cornbread Muffins
There really isn’t too much I can say about these except, “OH MY GOD!” These are my second favourite on this list and for good reason. They taste amazing. The turkey is braised in a southern style BBQ sauce made with ketchup, vinegar, liquid smoke (can be found at most grocery stores), brown sugar, garlic, onion, and a touch of chili. Once the turkey was cooked I pulled it apart with two forks pulled pork style and served it on the best cornbread muffins I have ever had. (Find the cornbread recipe here)
While I was making these Southern Braised Turkey Cornbread Muffins, I debated adding cheese, or jalapeno, or any number of other things, but at the end of the day, nothing was needed. These were so good on their own that I left them alone and let the simplicity of them speak for itself.
I can’t really express how much fun I had creating these recipes and making this post. Not only did I get to push my creativity a little but I got to eat some really, really good food. I can not be more serious when I say that you need to try at least a couple of the apps on this list. You, your family, your friends, and your guests will be so happy that you did.
Remember to think turkey all year round not just at the holidays, it can be so many delicious things. And for even more great turkey recipes go to ThinkTurkey.ca
Thanksgiving is only a few short days away and I feel like I am pretty much obligated to write posts about it at this point. Today, with that in mind, we are going to look at 10 Overlooked Thanksgiving Side Dishes. There are some items on this list that you may feel aren’t overlooked at all, potatoes for example. For those more common items, we are going to look at a few easy ways we can make them more interesting and tastier.
From greens to squash, corn on the cob to carrots, and sweet potatoes to salad, this is…
10 – Greens
Greens like beet greens, collards, and swiss chard make a great yet rarely seen Thanksgiving side dish. What’s more is that they are very good for you, fairly easy to prepare, and delicious when prepared correctly.
The way I like to prepare greens like these is to slice them very thin and fry them with onion and a little garlic, for about 5 minutes. Then add in some stock or water. For one bunch of swiss chard or collards, I would say about 1 cup of liquid. Cook the greens for about 10 minutes or until they are tender. Season with salt and pepper, and finish with a squeeze of lemon juice and a tablespoon of butter.
9 – Corn on the cob
Yes, I know that it is a little late in the year for corn on the cob. But, luckily Canadian Thanksgiving, (aka Thanksgiving) is early enough in October that you can still generally find it. If it was good enough for the natives and the settlers it’s good enough for me.
Try husking the corn, drizzling it with olive oil, salt, and pepper and roasting it in a 400°f oven for 20 – 25 minutes.
8 – Squash
I think we should all be eating more squash. It’s so delicious! There loads of ways that you can prepare squash but the easiest and most appealing visually is to cut it in half, scoop out the seeds then cut it into slices, skin on. Then, drizzle it with olive oil, salt, and pepper, and maybe some thyme then roast it for around 45 minutes or until it is tender.
What I love about the technique is that it will work for just about any type of squash and it looks really cool.
7 – Brussels Sprouts
Boiled Brussels Sprouts should be a thing of the past. When Brussels Sprouts are boiled they get mushy, are often way overcooked, and they lose so much flavour.
I have two favourite ways to cook Brussels Sprouts. The first, which is probably starting to sound familiar is to cut them in half, drizzle them with olive oil, salt and pepper then roast them on 400°f for 35-45 minutes.
The second way I like to cook Brussels Sprouts is to pan roast them. Essentially, I cut them in half, heat up a heavy skillet, add a bit of oil (bacon fat works well), then cook them over medium heat. Start with the cut side down and cook until they get a deep dark brown colour. Then flip them, add in 1/4 – 1/2 cup of water or stock, put a lid on the pan and cook them until tender. Sometimes I don’t even steam them. These are really great with bacon. To finish them, I squeeze a little bit of lemon juice over them.
6 – Carrots
You probably serve carrots as a Thanksgiving side dish, but I’m guessing they are probably just boiled. Now, even though carrots are delicious roasted and I suggest you try roasting them I am actually going to suggest a different way to cook them.
Start with your carrots sliced or however you like to cut them (it is best to cut them a little thick for this). Put them in a pot and put water in the pot so they are just covered. It’s very important that you don’t add too much water here. As soon as the carrots are covered with water, stop. Now, add in 2-3 sprigs of thyme, 1-2 tbsp of honey, 1-2 tbsp cider vinegar, 1-2 tbsp butter, and salt and pepper. Bring the water to a boil, don’t cover the pot, then turn the heat down to medium. Cook the carrots until they are tender, but also until the liquid has pretty much all evaporated. The idea is that that all the water is being cooked off as the carrots cook and what is left at the end are delicious glazed carrots.
5 – Dressing
Let’s just start off by saying that the difference between stuffing and dressing is very simple. Stuffing is dressing that has been cooked inside a turkey. That is all.
I’ve never been a big fan of dressing but I can appreciate well made one. There are a lot of ways that dressing can be improved upon. Use fresh herbs rather than dried. Use butter, bacon fat, or turkey drippings to lubricate the dressing rather than oil. Use a good quality sourdough or brioche bread. Cook onions and garlic before adding them to the rest of the dressing mixture. Adding dried fruit like dried cranberries, or chopped dried apricots will add a nice pop of sweetness into the dressing.
The point I’m trying to make here is that dressing is pretty straight forward and we don’t have to complicate it to make it even better than it is. Changing a few ingredients, adding in a few and a good dressing becomes the star of the show.
4 – Green Beans
Green beans are delicious but often are just boiled to death like Brussels Sprouts. If you are going to boil them, only do so for 4-5 minutes. Just until they are tender. The green beans should still be green when served. If they turn a gross olive colour they are overcooked.
Though they can be boiled. and that’s okay, I prefer to toss them with olive oil, salt and pepper, and a little paprika (smoked or sweet), then I roast them on 400°f for about 20 minutes. Once they come out of the oven I finish them with a little lemon juice.
You may be starting to see a pattern here with roasting vegetables. There are two reasons for this. Roasting vegetables makes them really delicious. It enhances there natural sweetness and they get so good. Also, your oven is on anyway and you’ve likely only got four burners on your stove. How much stuff do you really want to try to cook on four burners?
3 – Salad
Think about how often you see a salad on the table at Thanksgiving. My guess is probably never. Salads are a great way a get a few extra vegetables into the meal and they are versatile enough that they can be made to match the rest of the meal.
My favourite way to make a salad is to take lettuce, toss it with olive oil, salt and pepper and roast it on 400°F for 20 minutes. Just joking! I wanted to see if you were still paying attention.
2 – Sweet Potatoes
Sweet potatoes can be roasted, boiled, baked, or made into a casserole. For me, if I’m serving mashed potatoes, I generally don’t want another mashed or mushy item. So, I find roasted sweet potatoes, a great addition to the Thanksgiving table.
Cut the sweet potatoes into wedges, toss them with…you guessed it, olive oil, salt and pepper (you can add paprika or fresh herbs) then roast the sweet potatoes on 400°f until tender inside and crisp on the outside.
1 – Potatoes
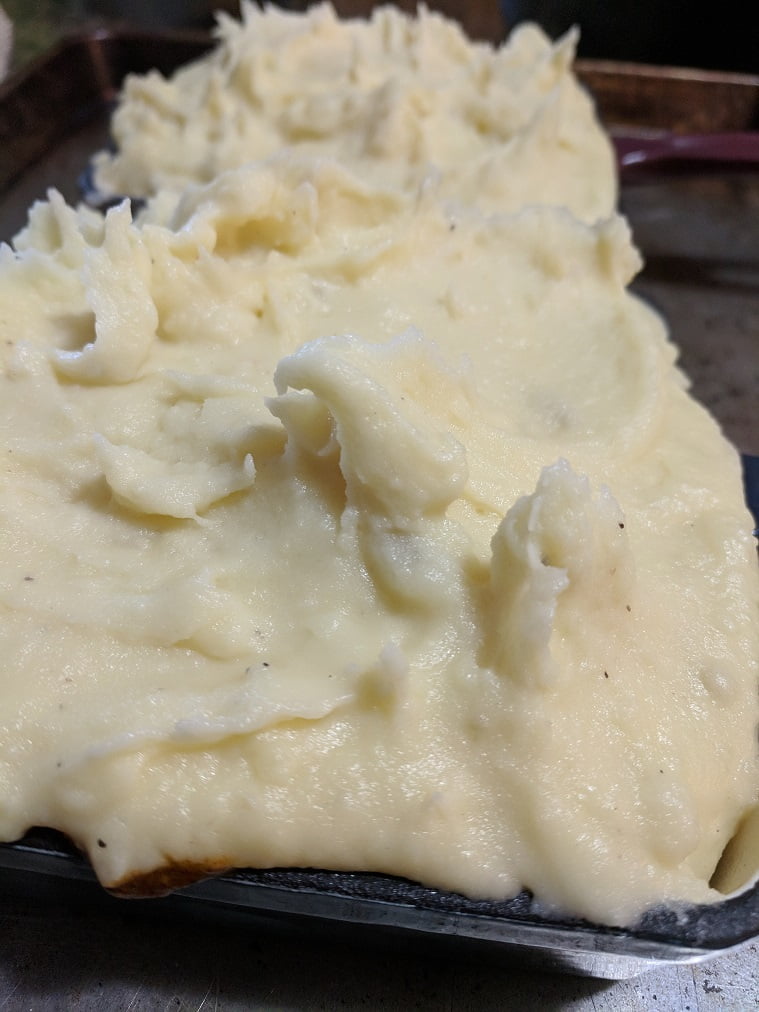
You are probably going to have mashed potatoes as a Thanksgiving side dish and why wouldn’t you? They are delicious and everyone loves them. But maybe it’s time to rethink the same old potatoes that have been on the table year after year.
First of all, heat up butter and milk before adding it into the potatoes. This will keep the potatoes hot for longer. Speaking of dairy, sub the regular milk for cream for richer mashed potatoes. Buttermilk or sour cream will give the potatoes a nice fresh flavour, especially when combined with fresh parsley or chives. Whole garlic cloves can be added to the potatoes while cooking mashed with the potatoes to give them a mild garlic flavour.
Regular russet potatoes can be substituted for red potatoes or baby potatoes. Mash them with the skin on for more texture and colour.
The point is that there are a lot of ways that mashed potatoes can be way better than just mashed potatoes.
Conclusion
All I really hope you take from this is the idea that the same side dishes we serve every Thanksgiving can be updated with a few minor tweaks. This allows the person cooking dinner a little creative freedom while still delivering the meal that everyone is expecting.
If you are looking for a cool turkey idea to match with your new side dishes check this out.
On a personal note
On a personal note, most of you know that my wife and I are expecting our first child. We found out yesterday that the doctors are going to induce my wife today. So, because of this big change happening in our life I’m going to be taking a little time off of the blog. Probably for about two weeks. This means that this is the last past until probably around the 28th of October.
I hope that you all have a great Thanksgiving and that I see you all back here in a few weeks. Thanks everyone!
We use cookies on our website to give you the most relevant experience by remembering your preferences and repeat visits. By clicking “Accept”, you consent to the use of ALL the cookies.
This website uses cookies to improve your experience while you navigate through the website. Out of these, the cookies that are categorized as necessary are stored on your browser as they are essential for the working of basic functionalities of the website. We also use third-party cookies that help us analyze and understand how you use this website. These cookies will be stored in your browser only with your consent. You also have the option to opt-out of these cookies. But opting out of some of these cookies may affect your browsing experience.
Necessary cookies are absolutely essential for the website to function properly. This category only includes cookies that ensures basic functionalities and security features of the website. These cookies do not store any personal information.
Any cookies that may not be particularly necessary for the website to function and is used specifically to collect user personal data via analytics, ads, other embedded contents are termed as non-necessary cookies. It is mandatory to procure user consent prior to running these cookies on your website.