Barbecue Pork Banh Mi. Right now, you may be thinking, “Mmm, that sounds good! But Ben, what is a “banh mi”?” That is a great question. What if I told you that a Banh Mi was the most delicious sandwich in the whole wide world? What if I told you that every bite of a Banh Mi is like a tickle on the tongue for a thousand little angel wings? More than that, what if I told you that a Banh Mi was a Vietnamese Sandwich made from the remnants of French colonization using local ingredients? Well, that’s what it is, and it is, in my humblest of opinions, one of the world’s best combinations of two cultures.
Today I am going to show you how to make my version of this sandwich that isn’t strictly classical but is damn delicious none the less. We are going to look at a recipe for barbecue pork tenderloin along with our trusty stand by, sriracha mayo, and quick homemade pickles. Let’s get to it.
The Barbecue Sauce
This sauce is not anywhere near close to authentic Vietnamese, or authentic anything for that matter. But, it is really tasty and worked perfectly on the pork tenderloin. It is a combination of classic barbecue sauce ingredients like ketchup, vinegar, and molasses, but with the addition of elements from South East Asia like fish sauce, Sambal, soy sauce, and Chinese 5 Spice. See the full recipe below.
Barbecue Sauce For Pork Tenderloin
This Barbecue sauce is pack with flavour from ingredients from South East Asia. It is the perfect sauce to marinade your pork tenderloin for your Banh Mi.
When using pork tenderloin, it is always best to take a minute or two to remove the long strip of silverskin that runs about 2/3 of the length of the tenderloin. You can see this silverskin very clearly on the second pork tenderloin in the first picture below. Use a small sharp knife to make an incision directly under the silver skin as close to the surface of the pork as possible. With the blade of your knife tilted slightly upwards, run your knife the length of the silver skin until it breaks free. Go back and clean up any other bits you see. Removing the silverskin from the tenderloin may seem like a waste, but it isn’t going to breakdown during cooking, which will give the pork a chewy texture. A chewy texture is the last thing anyone wants from something with the word “tender” right in its name.
Once the tenderloin is clean, go back over it with your knife and make a few shallow crisscross slashes on the top and bottom. This pattern will help the barbecue sauce more deeply penetrate the meat during the marination and will help the tenderloin to cook more evenly. Put the pork in a ziplock bag and pour half of the barbecue sauce over it. Seal it, and put it in the fridge for at least 2 hours.
Cooking the pork
Preheat your grill, then cook the pork over medium heat for about 15-20 minutes or until a thermometer takes an internal temperature reading of 160°f. Brush the pork with the remaining barbecue sauce as it is cooking.
A Banh Mi is typically a cold sandwich, so I put one of my pork tenerdloins in the fridge for the night to have in a Banh Mi the next day. The other pork tenderloin became dinner with some grilled vegetables.
Pickled Vegetables and Sriracha Mayo
Sriracha Mayo
For this Banh Mi, I recommend making a batch of Sriracha mayo. It’s my condiment of choice, and it is easy to make. I’ve made this a few times on the blog now, so rather than showing how to make it again, I’m going to share a link to my Ginger Beef Lettuce Rolls – 30 Minutes or Less Post which has the Sriracha Mayo Recipe.
Quick Pickles
Pickled vegetables are a common ingredient on a traditional Banh Mi. The acidity and the crunch from the pickles is one of the things that makes this sandwich truly special. The pickles can be made in only a few minutes and will last in your fridge for a few weeks. A lot of people that I’ve shared this recipe with in the past have told me that they always have a batch of these quick pickles in their fridge becasue they love them so much. Maybe you’ll love them that much too.
Typically, on a Banh Mi, the pickles are made of carrot and daikon radish. I didn’t have any daikon, so opted for something a little different. The vegetables I used to make these pickles are carrot, red onion, jalapeno, and cucumber, but you can use any vegetables you’d like. See the full recipe below.
Quick Pickles
This is a quick pickle recipe that can be made in just a few minutes. These pickles are fantastic on a Banh Mi sandwich, or just as a snack.
The traditional bread for a Banh Mi sandwich is a Vietnamese version of a French Baguette. If you live in Canada, Superstore, or Loblaws sells small baguettes (Demi Baguettes) that are perfect for this. However, you have been following this blog for any amount of time (I hope you have been) you know that I can’t eat gluten at all. So, I had to go for a gluten-free alternative to the classic baguette. I used Udi’s gluten-free baguettes. I’m going to be completely honest here, Udi’s baguettes are good for what they are, but I think they are meant more like a dinner bread, something you dip in a sauce with your meal, rather than a sandwich bread. The crust is too crunchy and crumbly, and the baguette itself is just too big. It really took away from the sandwich. Having said that, it was better than nothing. In the future, I will probably use a gluten-free hotdog bun or something like that.
Putting The Banh Mi Together
Putting the Banh Mi together once all the components are ready is pretty straight forward. Slice the pork nice and thin, cut up some fresh cucumbers and put it all together.
Conclusion
If you are thinking that this sandwich seems a bit out of your comfort zone, good! Try it anyway! What I always say is that trying new things, as scary as they may seem, is the quickest (and only) way to find new things that you love. Life is short. Don’t deny yourself the oportunity to enjoy something that I honestly think will knock your socks off.
Thanks for reading, share this post, and rememeber to subscribe to the blog to get Chef’s Notes in your inbox.
As I said in the intro, this Banh Mi isn’t strictly classical. However, if you would like to learn more about what a traditional Banh Mi is, along with its history, you can check out this article from Saveur Magazine.
You may think that making sausage patties at home is complicated. What if it isn’t? What if you could make delicious homemade sausage patties in less time than it takes you to watch an episode of your favourite network sitcom? Imagine having a sausage patty and knowing everything that’s in it. Imagine that it isn’t super greasy. I know that I’m building this up, but the fact is that if you can make a burger, you can make a sausage patty. After all, a sausage patty is essentially just a thin burger made of anything but beef.
Today, we are going to make breakfast sausage patties that are fantastic on breakfast sandwiches, as a side to fried eggs and toast, or with pancakes. What’s more is that they freeze very well, and as they are pre-cooked, they can be taken out of the freezer and heated in the microwave in just a few minutes.
So, if you love sausage but hate the grease, prefer to know what you are eating, and love/need breakfast on the go, you’ve come to the right place. This is how to make…
Simple Homemade Sausage Patties
What is a sausage patty?
First of all, I want to acknowledge that Friday is usually dedicate to Barbecue Posts. However, this week I decided to change it up a bit and share something that I have had a severe craving for and love dearly. I hope you enjoy it.
As I said in the intro to this post, a sausage patty is a thin well-seasoned burger made of anything but beef. The recipe that we are focusing on today is pork-based. However, we could easily substitute the pork with ground chicken or turkey for a lighter option. The key to this is the seasoning that we will be using, which is a combination of herbs, spices, and garlic. Our goal is to create lots of flavours, without overpowering the character of the meat, without using too much salt, and with perfect balance. That is easier said than done, but we will do our best. Let’s take a look.
Getting Started
Generally, when making sausage, the meat is ground fresh. However, as I assume you do not have a meat grinder at home, I think buying ground pork from the grocery store or butcher is an excellent option. (If we were making sausage links, I would not advocate for pre-ground pork for a myriad of reasons.) In total, I used 1 lb or 454 g of ground pork. This amount of pork made six decently sized sausage patties.
To the ground pork, I added Kosher Salt, paprika, black pepper, white pepper, ground sage, cayenne pepper, ground clove, onion powder, fresh garlic, sugar, and cold water. (For measurements, see the recipe at the end of this post.) Other optional ingredients include 1/2 tsp of ground ginger, a 1/8 tsp ground cinnamon or more cayenne if you prefer a bit more heat. I didn’t add ginger or cinnamon simply because they didn’t come to mind until I was eating.
Mixing and Cooking
Once I had added all of the ingredients to the meat, I mixed it and formed six evenly sized balls. I pressed the meatballs into thin patties on a parchment-lined baking sheet. With all of the patties made, I put them into a 350°F oven for 12 minutes. After that, the patties are fully cooked and can be cooled, wrapped and frozen, or eaten.
Making Breakfast Sandwiches
Although the sausage patties are fully cooked and ready to eat when they come out of the oven, I prefer to brown them in a hot pan before serving them. I find that this helps to develop a little more depth to their flavour. I seared two patties while cooking a couple of eggs, added a bit of cheddar cheese then put them on a gluten-free English Miffun with lettuce and mayo. What a great way to start the day!
Conclusion
Although I’m kind of billing these as breakfast sausage patties, they would be great broken up in a pasta sauce, or as a ravioli filling. You could mix them with cheese and use them to stuff a chicken breast or as an alternative to regular hamburgers. The point is that these sausage patties are versatile, cheap, easy to make, and delicious. How could you go wrong?
Thank you for reading and remember to subscribe to the blog and share this post because it will help us grow and create better content. Have a geat Friday Everyone!
Simple Breakfast Sausage Patties
If you love sausage patties, or quick breakfast sandwiches this is the recipe that you've been looking for. These simple sausage patties are the perfect thing to make, throw in your freezer, and grab and go for a breakfast on a run.
Pork belly, you’ve probably heard of it and you’ve absolutely eaten it whether you know it or not. It is surprising how many people are turned off by the idea of pork belly when it is called “pork belly” but have no problem with it when it is called “bacon”. That’s right, bacon is pork belly that has been cured and smoked. So, if you like bacon, you are probably going to like pork belly. If you like pork, you are probably going to like pork belly too.
Pork belly can be cooked and prepared in a variety of ways, however, because it can be fairly tough I prefer it to be braised or slow roast. If it is braised, I find it is best, and it is common to fry it afterwards. The braised pork belly is cut into pieces then pan-fried or deep-fried. The result of this double cook, is pork that is very crispy on the outside but tender and soft in the middle. In my opinion, and I mean this whole heartily, a piece of pork belly that is well prepared is likely to be one of the best bites of food you will ever taste. There is nothing that compares to it. As a side note, pork belly and scallops paired together with an element that is slightly sweet and slightly acidic is pure culinary magic.
Today we are going to look at a version of pork belly that I love, which is heavily influenced by Chinese-Style pork belly, though I would not call this authentic Chinese by any stretch. Of course, authentic Chinese or not, it is delicious. Let’s take a look.
This is how to make…
Crispy Chinese-Style Pork Belly
Getting Started
To get started we have to make a marinade for the pork belly. It starts with a bit of sliced onion, chopped garlic, and grated ginger. Next up, Chinese 5 Spice, honey, tamari (gluten-free Soy Sauce), rice vinegar, crushed red pepper flakes, and Thai fish sauce. All these ingredients get mixed, then the sliced pork belly gets added in. Cover the bowl with plastic and put it in the fridge for 2 hours.
I find it’s best not to let this marinate overnight unless you are using one large piece of pork belly. It may just be me, but I find that pork that has been marinated in soy sauce for more than a few hours often takes on an unpleasant flavour. To avoid this off-taste, limit the marinating time.
Braising the pork belly
After the pork has marinated in the fridge for two hours, it goes into a pot along with the marinade and 1 cup of water or chicken stock. The pot goes on a high burner until it starts to boil at which point the heat is turned down to low and a lid is put on the pot. At this point, the pork is left to simmer for about 35 minutes or until it is tender. To be clear, the pork should not be “falling apart” tender. It should be just tender enough to easily push a fork through it.
Once the pork is tender it gets removed from the braising liquid and set aside to dry and rest. The temperature of the marinade is turned back up to high and brought back to a boil. Boil the marinade until there is only about 1/4 cup left in the pot. Once the liquid has reduced remove it from the heat and set it aside.
Finishing the pork
The final step in preparing the pork is to heat a large skillet over medium-high heat, add in a teaspoon or two of oil (canola, peanut, corn, or vegetable) add in the pork belly and cook it until it is crispy on the bottom, then flip it and cook it until it gets crispy on the top side. This should take 4-5 minutes per side depending on the heat.
Once the pork is crispy on both sides drain off the excess oil then add the reduced braising liquid into the pan. Toss the pork belly in the liquid until it gets sticky then serve it.
Serving the pork belly
I like to serve this dish with steamed sticky rice, steamed or stir-fried vegetables, and garnished with sesame seeds.
Conclusion
This pork belly recipe works just as well with large cubes of pork belly, as it does with strips. You can also skewer and grill the pork belly after it has been braised. If you were to grill the pork belly, you would do so over medium heat for about 4 minutes per side, then brush the sauce on and cook for 1-2 more minutes per side. In this case, the pork would make a great appetizer as well as a great meal when paired with rice and vegetables.
Where can you find pork belly?
I should say really quickly that most grocery stores now carry cut strips of pork belly. I think the main reason for this is that it is cheap compared to most other cuts of meat. The thing is that you have to know what to do with it which you now do. Look for it with the other fresh pork at the butcher counter.
Thanks for reading and remember to like and share this post! See you Wednesday when we will take a look at how to make Lemon Mousse Cups. See you then!
Crispy Chinese-Style Pork Belly
Crispy, sweet, salty, and a little spicy. You'll love this delicious pork belly recipe.
Good morning everyone! It’s Friday and that means it is barbecue time here on the blog! Today, we are going to look at a few different things including how to make delicious and tender ribs on the smoker or grill, and a really great all-purpose rub, and barbecue sauce. Let’s get to it!
This is how to make…
Delicious & Tender Barbecue Ribs
The Rub
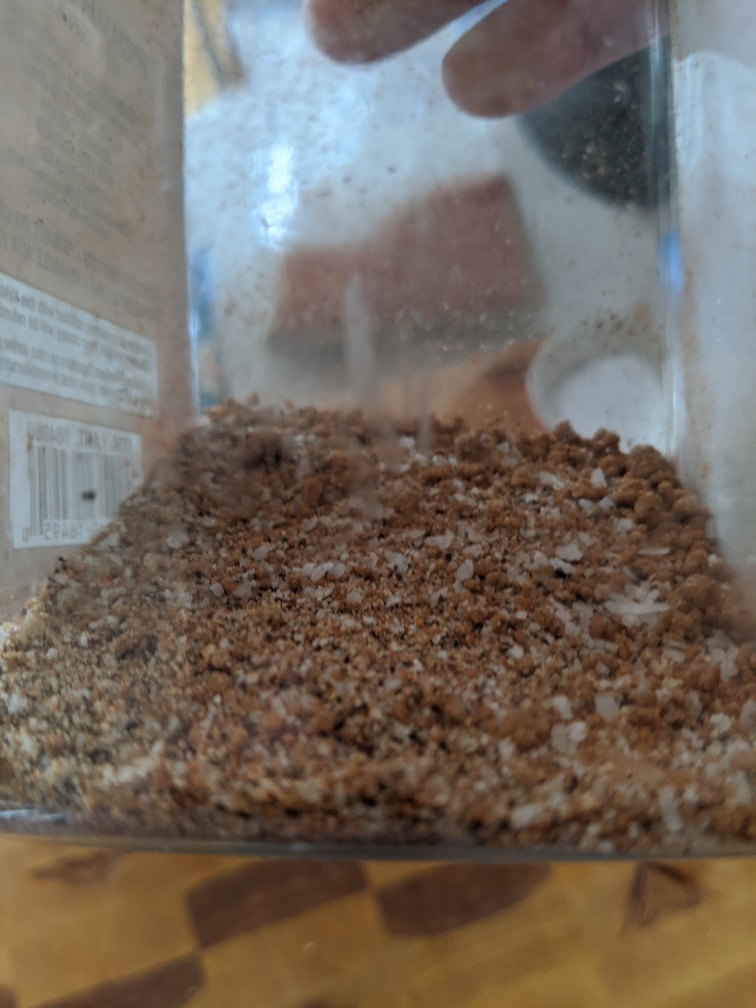
The first step in making delicious ribs is to make a delicious rub. Simply put, the rub is the seasoning on the meat. We could just go with salt and pepper, often I do, but today we are going to use a few more ingredients to add in a little extra flavour.
For the rub, I used equal parts of salt and brown sugar. To that, I added black pepper, garlic and onion powder, cayenne, cumin and paprika. This all got mixed together then I put it in an empty spice bottle that could be used as a shaker. Using a shaker rather than just sprinkling the seasoning on by hand, will create a much more even coating on the meat. This isn’t strictly necessary, but it does help a lot.
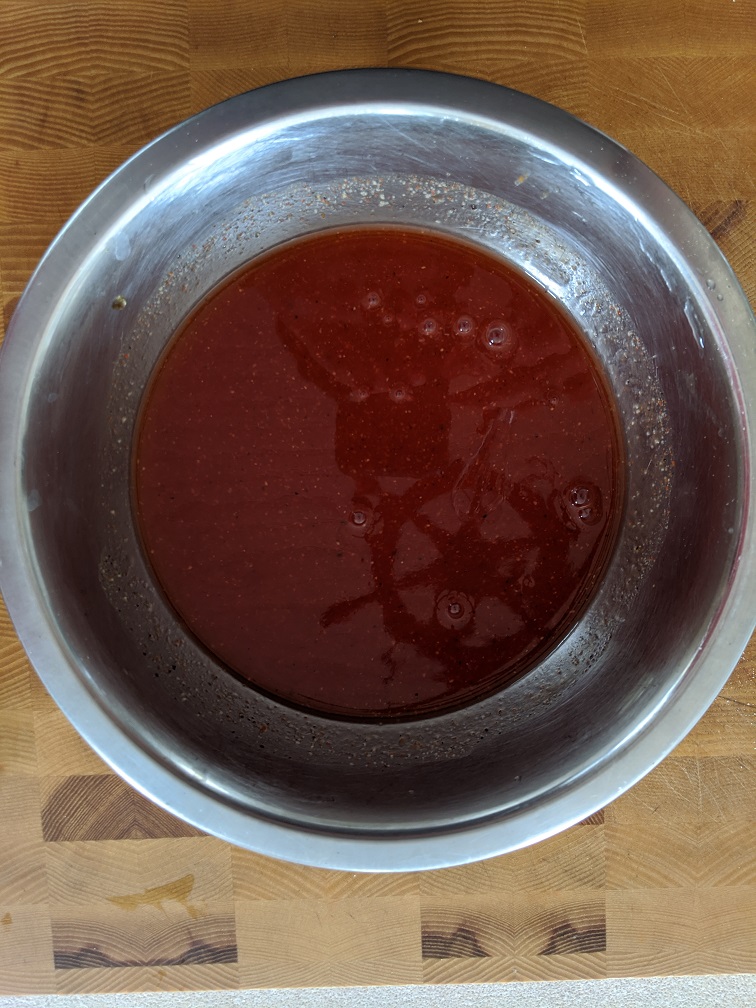
After the rub was made and ready to go I made a quick barbecue sauce. The sauce I’m using for the ribs may not be what you would expect to use for ribs. Typically, where I’m from, we put thick, really sweet barbecue sauce on ribs, or most things actually. Today’s sauce, however, is only slightly sweet, leaning more on the acidic side of things. It is also much thinner than you may expect.
The consistency of the sauce is actually really important for the method we are going to look at for making the ribs. If you use a store-bought sauce you are going to want to thin it out with a bit of water to the point that it is more a heavy cream consistency than a ketchup consistency.
For the sauce, I used equal parts ketchup, cider vinegar, and maple syrup. This mixture was then flavoured with garlic and onion powder, cayenne, a few drops of fish sauce (or Worchestershire Sauce), salt and pepper. The final ingredient in the sauce is a little water to thin it out. I mixed all the ingredients together then put the sauce in a squeeze bottle.
All Purpose Barbecue Sauce for Ribs
A delicious Barbecue Sauce for ribs, pork or whatever.
For the ribs, I followed what is known as the Franklin Method. This method comes from Franklin Barbecue in Austin Texas. The owner and chef there is named Aaron Franklin and is considered by most to be the best pitmaster in the world. Franklin Barbecue is considered the best barbecue in the world. So, if you are going to use a method for making ribs, his method is probably the one you want to use.
I should say that everything Aaron cooks is cooked over an indirect wood fire. This gives the food a smoky flavour but also prevents flare-ups and burns. Having said that, this technique can easily be adapted to a gas or charcoal grill, or a smoker. I used a charcoal smoker to make my ribs.
Making the ribs with the Franklin Method
To make the ribs I first laid them flat on my cutting board, used the tip of my knife against the end rib bone to lift the membrane, then used a paper towel to pull it off. This membrane doesn’t break down during cooking so I always prefer to take it off. It should only take a second or two to do. Once the membrane was removed from the ribs I went back and removed any excess fat with my knife. You don’t really have to do this, I just wanted a clean looking rib.
I should say that I am using back ribs rather than side ribs. You can read about the difference in this post I did all about ribs.
Applying the rub
Once the ribs were cleaned I used my shaker to apply the rub in an even layer. One thing that Aaron recommends and that I have noticed works well, is to keep the shaker moving the whole time you are applying the rub. This prevents the heavier ingredients, namely the salt, from settling to the bottom of the shaker.
I applied the rub on the underside of the ribs, patted it on, flipped the ribs and applied to the rub to the other side. Even though it’s called a rub you really don’t “rub” it. I just kind of pat it down to make sure it stays on the meat. Once the rub was applied, I cut my ribs in half so they would fit on my smoker. You can skip this step if the ribs will fit on your smoker or grill. At this point, I set everything aside and went to get my smoker going.
Readying the smoker
To get the smoker ready I lit some lump charcoal in a chimney starter and let it burn until all the coals were ashed over. While the coals were burning down I filled up the water pan at the bottom of the smoker. Even if you are using a gas grill to cook your ribs I suggest using a water pan. It will help prevent the ribs from drying out. Just get a metal bowl or pot with a metal handle and put it on the back of your grill out of the way.
Once the coals were ready, I added about 1 cup of hickory wood chips that had been soaking in water for 30 minutes. I let the initial steam burn off for a few minutes until I could smell the hickory smoke. At this point, I assembled my smoker, put the ribs on and got to cooking.
For the ribs, my goal was a consistent temperature of around 275°f – 300°f. Any hotter than that and the ribs will cook to fast and risk drying out. Any lower and the ribs will take much longer to cook than they need to. My goal for the cooking time was about three hours. For the first hour and forty-five minutes, I didn’t do anything to the ribs. The only thing I concerned myself with was the fire, smoke and maintaining the temperature.
After the initial cook
After the first hour and forty-five minutes, I generously sauced the ribs than let them cook for another fifteen minutes. Once that had happened, the ribs had been cooking for two solid hours and it was time to wrap them. I laid out some foil, gave it a good squirt of the sauce, put the ribs meaty side down, and added another splash of sauce. At this point, I wrapped the ribs tightly and put them back on the grill meaty side up. The ribs cooked for another hour to finish.
This wrapping does a few things. It helps to speed up the cooking process by holding in the heat. It also helps to prevent moisture loss at a critical point in the cooking process. Finally, it helps it to add flavour by steaming the meat in the sauce.
We talked earlier in this post about the consistency of the sauce. This is where that is very important. If the sauce is very thick, like a typical barbecue sauce, it will just kind of burn at this step. We need that extra moisture to prevent that and to help finish cooking the ribs.
Finishing the ribs
Once the full three hour cook time had gone by I gave the ribs a little poke with my finger to see how tender they were. They felt done to me because the meat had some give to it. Now, contrary to popular belief you do not want the rib meat to be falling off the bone. We aren’t trying to make pulled pork. The meat should easily come away from the bone, but it should never fall off.
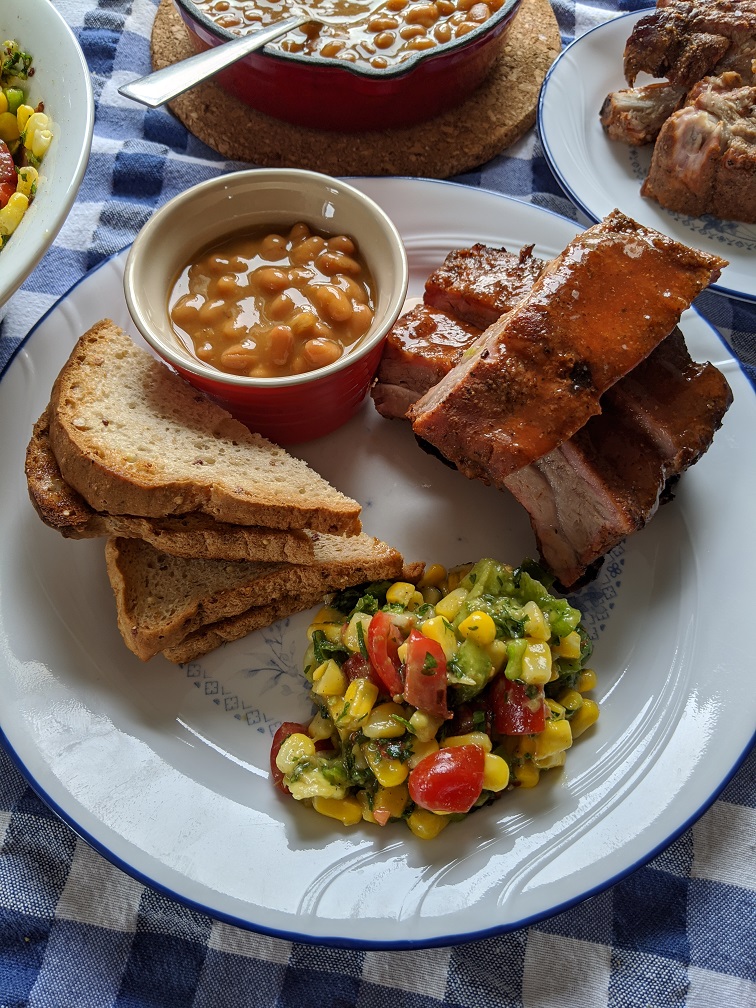
I served the ribs with the remaining sauce on the side, some baked beans which I will talk about in a second, some toast (mostly for the beans) and a corn and avocado salad which we will talk about on Monday. If you are wondering, yes, it tasted as good as it looked.
Adapting to a gas grill
If you are going to follow this technique on a gas grill you really don’t have to change anything. What I would recommend is either cooking the ribs on the warming rack or only turning on half the barbecue and cooking the ribs on the other half so that they never come in direct contact with the flames. A lot of fat and juices are going to render out of the ribs and the last thing you are going to want is to have a flare-up burn them after putting in all this time.
The beans
Years ago I was flipping through this Weber Barbecue Cook Book I have (I am 90% sure it was that book) and there was a recipe for barbecued baked beans. I got excited until I saw that the recipe said to open a can of baked beans, pour them into a pot, and heat them on the grill. Now, I don’t know about you but to me, that seemed like a ridiculous thing to have in a cookbook, especially the one about grilling put out by a grill company.
As I was making the ribs I got a craving for some beans but I didn’t have time to make them from scratch. That’s when this random “recipe” I had seen years ago popped into my mind. I thought I would try it if for no other reason to validate my disappointment. I opened a can of Heinz baked beans, poured them into a little skillet and heated them on the smoker for about forty-five minutes. To my surprise, the beans actually took on a lot of the smoke flavour and were way better than they normally are. Of course, they weren’t as good as homemade barbecue baked bean (which we will make) but they were still pretty good. Despite this, I still think it was a stupid thing to have a recipe for in a cookbook.
Conclusion
This is only the second time that I have used this technique to make ribs but it is by far my favourite way that I’ve tried. I cannot recommend this method enough, I really can’t. These ribs come out tender, juicy, and really flavourful. Give it a shot and let me know what you think.
Also, remember to come back Monday for the Corn and Avocado Salad Recipe. See you then and have a great weekend!
Oh, and as always, remember to sign up to the blog so you never miss a post again!
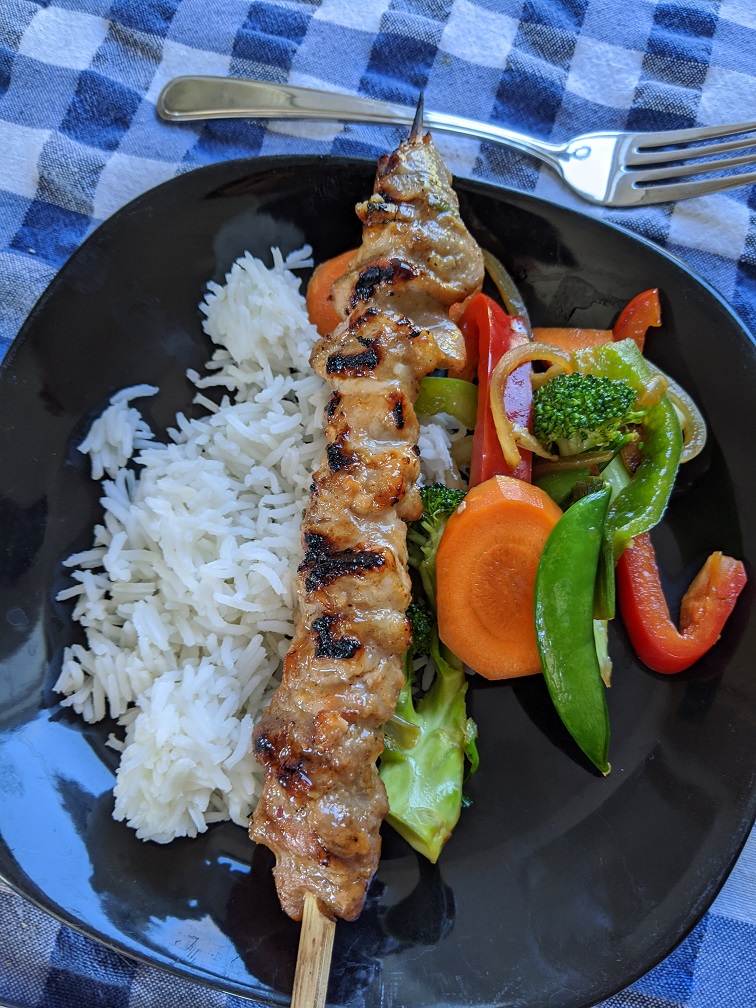
Today on the blog we are going to take a look at how to make my version of Pork Satay Skewers. The marinade we are going to use on the pork can also be used with chicken, beef, lamb, shrimp, scallops, or even fish. So, it’s very versatile. We are also going to take a look at what I consider to be a proper meat skewering technique. We have a lot to cover, so let’s get to it.
This is how to make…
Pork Satay Skewers
What is Satay?
Before we get into this we should first answer the question What is Satay? At its core, Satay is just seasoned and skewered meat, generally served with a sauce, cooked over an open flame. Most of the time some sort of peanut-based sauce or marinade is used. Satay originates in Indonesia and is their national dish, however, it is popular all around Southeast Asia.
The Marinade
Typically, Satay is served with a peanut sauce, however, I wanted to do something a little different with my version. For mine, I put the peanut in the marinade. The only real reason for this is because I didn’t want to make a sauce. I wanted all the flavour to come from the meat itself.
For whatever reason I didn’t take the normal walkthrough photos that I generally do for the marinade. So all I have for that part of the process is the written recipe below.
There are three main ways to skewer meat. The first skewer technique is that you cut the meat into evenly sized cubes then skewer them. The second skewer technique is to cut the meat into thin strips and skewer the meat on as one long piece. The third, and my personal preference is to cut the meat into thin strips but then thread the meat onto the skewer.
As you can see in the pictures below the meat is placed on the skewer like a folded ribbon with the bamboo skewer going straight up the middle. I prefer this technique for a few different reasons. First of all, I find that with this technique as opposed to the two other techniques the meat stays on the skewer much better when cooking. The second reason I prefer this technique is that the meat cooks more evenly. If you find that you prefer one of the other techniques I mentioned or one I didn’t use that. I just find that this technique works best for me.
The Skewers
I just wanted to touch really quickly on the skewers that I used for this. They are a paddle style bamboo skewer meaning they have an offset handle at the end. They are ten or twelve inches long and are square shaped rather than round. I find that the square shape of the square really helps to keep the meat in place as opposed to round skewers. However, you can use whatever skewer you have or can find. Just make sure to soak them in water for at least an hour prior to skewering the meat and grilling. This will help to prevent the skewers from catching on fire.
Cooking the Skewers
To cook the skewers I first preheated my grill on medium-high for about ten minutes. This makes sure that the grates are hot enough to sear the meat which helps prevent them from sticking. I do not oil my grill, ever. As long as the grates are giving enough time to get hot, there should never be an issue with sticking.
The heat on my grill is not even, to make sure the skewers are getting even heat, I put the skewers on the grill, let them sit for about two minutes, then took the one from the back of the grill, moved it to the front of the grill, and push the rest back. I did this about every two minutes. After about five minutes of total cooking, I flipped the skewers and then continued with the skewer rotation for another five minutes or until the skewer were cooked through.
Conclusion
I served the skewers with steamed rice and stir-fried vegetables to make this a meal. However, these Pork Satay Skewers are great as a snack or as party food.
As I said in the intro the marinade I used on these skewers is great with chicken, beef, scallops, shrimp, or fish. Give it a try and I promise that this will be in your regular summer barbecue rotation.
Thank you as always for reading and remember to subscribe to the blog so you never miss a post again! If you enjoyed this post please share it with someone who you think will enjoy it.
Good morning everyone. First and foremost I want to thank you all for being so understanding and supportive over the last few weeks. I had been feeling pretty drained in part because of everything going on with covid-19, but also because we moved in the middle of all of this. I’ve been back and forth between where I live now and where I used to live about seven times in the last month and a half. It’s a three-hour drive each way which is fine once in a while but not once or twice a week. Luckily, that is completely done now. Then, of course, there was the horrible shooting two weeks ago which in all honesty hit me pretty hard. I was in the exact area where that began only a few hours before the first shots were fired. I think on top of everything else it was just a little more than I could take and still find the energy and drive to be creative and do everything I have to do to keep the blog and everything going. So again, thank you all. I feel much better now and I am eager to get going.
With that, let’s get back to business as usual.
Today we are going to look at the Thai Coconut Red Curry Pork recipe I was originally going to post about two weeks ago. To make this I used a product (Thai Kitchen Red Curry Paste) which you should all be starting to get a little familiar with as I have used it to make a few different things. You can check those out here and here. This is a pretty straightforward recipe that gives you one more delicious way to use pork. Of course, you can use chicken, fish or tofu for this too.
Let’s take a look. This is…
Thai Coconut Red Curry Pork
Getting Started
To get started I mixed the pork with the curry paste and a bit of salt and let it sit for a few minutes while my oven was heating up. My pork was already cubed up (about 1 lb), but you can just cut up some pork chops. I used about 2 tbsp of the curry paste (which is gluten-free) plus a good pinch of salt which was probably about a 1/4 tsp. I mixed this all together, turned the oven on to 425°f and let it sit until the oven was hot and ready.
Ginger and Garlic
While I was waiting for the oven to heat up I combined 2 small onions with 4 cloves of garlic and a 2-inch piece of ginger in the bowl of a food processor and blitzed it. You can make extra of this and freeze it in icecube trays than use it whenever you want to make a curry.
Get Cooking
Once the oven was hot I lightly oiled a sheet pan with olive oil spread the pork out so that none of the pieces were touching and placed it in the center of the oven. Then, I let a large skillet heat up over medium-high heat before adding in 2 tbsp of olive oil along with the ginger, garlic and onion mixutre and one minced celery stalk. I cooked this mixture for about 5 minutes, stirring a few times a minute.
Curry Paste
Once the onion mixture started to brown slightly I add in the remaining curry paste and cooked it for about 3 minutes until it had darkened slightly and became very aromatic. At this point, I add in a 1/2 cup of water.
Vegetables
While I was waiting for the oven to heat up I cut up half of a large head of cauliflower. If you have a small cauliflower use the whole thing. Once I added the water into the curry I add the cauliflower along with 1 cup of green beans. I mixed this all up then added in 1 400 ml can of full-fat coconut milk. I brought this all to a boil, turned the heat down to low, put a lid on the pan and let it simmer until the pork was ready.
Pork
After about 20 minutes of being in the oven, the pork was dark around the edges and cooked through. I removed it from the oven, added it into the curry broth and simmered it for another 5 minutes.
Thai Coconut Red Curry Pork
After the final 5 minute simmer, I seasoned the pork with salt, pepper, and lime juice to taste and served it with basmati rice and a lime wedge. Just like that dinner was ready.
Conclusion
I am not usually a fan of most bottled sauces, I think you all know that. Having said that I do think that when it comes to certain things it is just better to buy it. In my heart of hearts, I know that I could make a better red curry paste than the Thai Kitchen one that I am using. Having said that the amount of time, effort, and money it would take to get all of the ingredients and make it just isn’t worth it to me when there is a pretty decent option. Having said that, if you do want to make it yourself you can check out this recipe from Epicurious.
Thank you all for reading. I hope that you have enjoyed this post. If you did please remember to share it. It is so good to be back. I’ll see you all soon.
Thai Coconut Red Curry Pork
When you have pork and you want something a little different Thai Coconut Red Curry Pork
Keyword: Coconut Curry, Curry Pork, Quick Meals, Red Curry
Servings: 4servings
Ingredients
1jarThai Kitchen Red Curry Paste
1canCoconut Milk
4clovesGarlic
2smOnionsAbout 1 cup
2inchPiece of Ginger
1/2headCauliflower
1stalkCelery, thinly sliced
1cupGreen Beans
1lbsCubed Pork
1Lime Juiced
Salt and Pepper to taste
3-4tbspOlive Oil
1/2cupWater
Instructions
Preheat the oven to 425°f
Combine the pork with 2 heaping tablespoons of the curry paste and a pinch of salt. Mix well and let sit for a few minutes.
Oil a sheet pan with 1-2 tbsp of olive oil. Spread the pork out onto the sheet pan leaving spaces between the pieces. Roast on 425°F for about 20 minutes or until the pork is cooked through and browned on the edges.
While the pork is cooking peel and rougly chop the onions and place in the bowl of a food processor along with the garlic and ginger. Blitz until the finely chopped.
Heat a large frying pan over medium-high heat. Add the remaining olive oil into the pan along with the onion, garlic, and ginger mixture and cook for about 2 minutes.
Add the celery into the pan and cook for an additional 3-4 minutes.
Once the celery has softened slightly add in the remaining curry paste along with the water and cook for 4-5 minutes.
Add in the coconut milk, cauliflower and green beans. Bring the mixture to a boil, reduce the heat to low, and put a lid on the pan and simmer until the pork is ready.
Once the pork is cooked add it into the coconut broth. Return the lid and simmer for an additional 5 minutes. Finish to taste with salt, pepper, and lime juice. Serve with rice.
Good morning everyone! I hope self-isolation is treating you well and that you aren’t going too stir crazy. Today on the blog we are going to make something very special, DIY Shake and Bake Pork Chops! That’s right, we are going to make our own version of shake n’ bake, coat some pork chops in it, cook them up, and serve them with cauliflower mash and roasted asparagus.
If you are sitting at home, looking at a package of pork chops and wondering what to do with them, I’ve got you covered. So let’s get right too it.
This is…
DIY “SHAKE AND BAKE” PORK CHOPS
Getting Started
First things first I popped the oven on to 400°f. While the oven was pre-heating I measured my bread crumbs (I used gluten-free) into a large zip lock bag. To the bread crumbs, I added onion powder, garlic powder, kosher salt, black pepper, dried sage, and paprika. Cut out the measurements in the recipe at the bottom of this post.
Once all the seasonings were measured into the bag, I sealed it, gave it a good shake to mix it all up and set it aside.
6:38 pm – Bread the pork
In order to get a nice even coating of our DIY Shake and Bake we have to first wet the pork chops. To do this you could use a beaten egg or two, or you can use milk which is what I did. I went with milk because it gives you a thinner, crisper coating.
I poured some milk into a bowl, dipped my pork chops in it, put them in the zip lock bag, and shook with all my might. More cooking should involve vigorous shaking. It’s a great way to release some of that isolation stress.
Bake the chops
Once the pork chops are breaded, generously oil a sheet pan with olive oil. Put the pork chops on the sheet pan, making sure to leave space between each one. Put the pan in the lower third of the oven and cook.
Prep the Cauliflower
Now that the pork is in the oven it is time to move on to the cauliflower. First up clean the cauliflower by cutting out the root, pulling the leaves off and cutting into florets. The easiest way to do this is to push the tip of your knife into the base of the cauliflower at a 45° angle. Then spin the cauliflower 360°. The stem and leaves should mostly come right off. Then just cut away any bits that didn’t come off the first time.
Once the cauliflower is cleaned and cut into florets put it in a pot, cover with hot water, add salt, put a lid on it and bring it to a boil. Cook until the cauliflower is tender.
Asparagus
We also have to clean the asparagus. To do this garb it by the top and bottom and bend it. Where the stem breaks is where it goes from being woody to being tender. Discard the bottom woody bits and spread the rest out on a sheet pan. Drizzle the cleaned asparagus with olive oil and season with salt and pepper. Set aside until ready to cook.
The asparagus is only going to take about 12-15 minutes to cook so we want to wait to put in the oven until the pork chops only have about that much time left.
Sauce
With our DIY Shake and Bake pork chops, we are going to need some kind of sauce. When it comes to breaded meats there is one sauce that I love above all else, which is sweet chilli gastrique. You’ve seen me use this before but I don’t care. It’s delicious and I wanted to use it again. To make it combine honey, vinegar, chilli flakes, salt and pepper and a clove of garlic in a small pot and bring it to a boil. Once it’s boiling turn the heat and simmer for 8-10 minutes. Finish the sauce by whisking in a bit of butter.
Again check the recipe below for the measurements of the full ingredients.
Flip the pork chops
After about 12 minutes in the oven, the pork chops should be ready to flip. They are ready when they’re golden brown. Flip the pork chops and return them to the oven. At this point, the asparagus can go in the oven as well.
Asparagus in the oven
After about 12 minutes in the oven take the asparagus out and set it aside. Feel free to drizzle with lemon juice and sprinkle with parmesan cheese.
Flip again
You may not have to do this part but I flipped my pork chops and put them in the oven one more time. They just weren’t exactly golden enough. I put them in for another 3-4 minutes while I mashed my cauliflower.
Mash the cauliflower
Once the cauliflower is very tender, drain it, season it with salt and pepper, and add 1-2 tbsp of butter. Grate in a bit of parmesan cheese and mash it up really well using a potato masher.
Finish it up.
With everything ready to go all that is left is to plate dinner. First up, put a big scoop of the cauliflower mash down, then th asparagus topped by a top chop and finished with the sauce.
Delicious!
Conclusion
This meal is deceiving. You look at it and think “oh, this looks good.” but then when you eat it, it kind of blows your mind a little. All the flavours work very well together and the pork chops come out juicy and tender. Definitely give this a try!
As I said in the intro, I hope you are all doing well. I know that these are very strange times, and who knows when things will get back to normal or even what or new normal will be. All I can really say is that as lonely as it may feel, none of us are alone. To that point, if you have any questions about food or cooking, feel free to ask me either in the comments on this blog, on Facebook, Twitter, or on Instagram. I will answer as quickly as I can. In all honesty, if you just want to say hello and have a chat I’m down for that too.
DIY “Shake and Bake” Pork Chops
A quick and delicious DIY Shake and Bake Recipe with Pepper honey glaze, roasted asparagus, and mashed cauliflower.
This week on 30 minutes or less we are going to take a look at Scallop and Bacon Chowder. If you are wondering, yes, we have done a chowder here before. We did Corn Chowder in 30 Minutes or Less way back in April of last year. Since that was almost a full year ago I thought it was safe to do another one.
The chowder today is composed of bacon, onion, celery, and scallops with cream and clam juice thickened with a roux making up the base. It was absolutely delicious and I recommend it to anyone who wants to feel a bit of comfort and a bit of normalcy right now. Let’s get to it.
This is…
Scallop and Bacon Chowder in 30 Minutes or Less
12:15 pm – Getting Started
I started cooking at 12:15 pm. The first thing I did was turn a pot on over medium-high heat. Next up, I patted the scallops dry with a paper towel to ensure a nice even sear. With the scallops dried I pulled the adductor muscle discarded it. I put the scallop on a dry piece of paper towel just to make sure their surface was really dry.
12:17 pm – Scallops In the Pan
With the scallops dry, and adductor muscles removed, it was time to cook. I seasoned the scallops with salt and pepper, added a bit of oil into my pot and added in the scallops leaving them alone for about two minutes.
12:20 – Bacon
In the two minutes that the scallops were cooking on the first side, I cut two pieces of bacon into finger-width pieces. I flipped the scallops and cooked them for one more minute.
12:21 – Cook the Bacon
Once the scallops had seared on both sides I removed them from the pan and added in the bacon. While the bacon was cooking, I minced a celery stalk and half an onion.
12:24 pm – Vegetables In
After a few minutes, the bacon was mostly cooked so I added in the celery and onion. Then, I moved on to peeling and dicing two potatoes.
12:26 – Roux
I cooked the celery and onion for about two minutes before adding in two tablespoons each of butter, and flour. The better went in first was left to melt, and then I stirred in the flour. This made a roux which thickens the chowder.
12:28 pm – Clam Juice
With the flour and butter combined it was time to add in some liquid. I chose to use clam juice to give the chowder a more seafood forward flavour. You can use water or even chicken stock if you would prefer. I added the clam juice in and gave everything a stir and let the mixture come to a boil.
12:30 pm – Potatoes In
Once the clam juice started to boil, I added in the diced potato, brought the liquid back to the boil, then turned the heat down to a simmer. I let the chowder base cook for about ten minutes or until the vegetables were tender.
12:31 pm – Parsley
While the chowder was cooking I took the opportunity to cut some fresh parsley.
12:34 pm – Cut Scallops
I also cut my scallops into quarters to stretch them a little bit further in the chowder.
12:40 pm – Cream in
After the chowder base had been cooking for about ten minutes and the vegetables were cooked through I added in the cream and brought it back to a boil tasted it and adjusted the seasoning with salt and pepper.
12:42 pm – Finish the chowder
Once the cream was boiling and the seasoning was where I wanted it, I added in the scallops and the parsley, took the pot off the heat, and served.
Conclusion
The world is obviously a little crazy at the moment. We are social distancing, and self-isolating, and preparing for the worst while hoping for the best. It can be a bit scary, and it can feel a bit lonely. A dish like this isn’t going to cure anything, but it will for at least a few minutes make you feel like everything is okay.
Good luck everyone and stay safe.
Scallop and Bacon Chowder in 30 Minutes or Less
Scallops, bacon, and vegetables in a delicious chowder made in under 30 minutes.
Good morning everyone! Today we are going to do something a little different. Just before Christmas, I bought myself some new tools for work and one of the things I got was a sous vide circulator. If you don’t know what that is, it’s okay. We’re going to get into it in a second. What’s important is that today, we are going to look at how to use it to make sous vide honey garlic spare ribs. Delicious! And yes, you can make these without the sous vide circulator.
Sous vide. What is it?
First and foremost what is sous vide? Literally, sous vide means “under vacuum” in French. However, the term has come to refer to a low heat cooking technique where food is vacuum-sealed, then submerged heated in water.
Sous vide circulator
The sous vide circulator is a tool for precisely controlling the temperature of the cooking water. The circulator is made up of two main parts. It has a heating element to control the temperature. And, it has a small water pump. The pump keeps the water moving very gently to make sure the temperature is consistent the whole way through.
Benefits of sous vide cooking
To be clear, food is vacuum-sealed in bags. Those bags are then submerged into very precisely heated water. They are then left to cook over a period of time. Essentially, it is a very modern and precise slow cooker.
There are a few benefits to this cooking technique. Number one, you have very precise control over the temperature. Imagine for a second that you are cooking a steak and you want it to be a perfect mid-rare (135°f). You set the temperature of the water to the exact temperature you want (130°F). Next, you vacuum seal the steak with thyme and garlic and put it in the water. That steak will never go above the temperature you set. You could leave it in there a week it won’t ever be well done.
As the steak cooks the connective tissue breaks down and the fat renders out. Essentially, the steak cooks in its own juices. After a few hours, the steak comes out of the water and taken out of the bag. It gets patted dry and seared in a very hot pan to get a nice brown crust on the outside. This searing is done very quickly so the temperature of the steak doesn’t rise too much. Then, you have a perfectly cooked, very flavourful, and tender steak.
The benefits are that none of the flavours of your food escape. Your food is never overcooked, it won’t dry out. And, you just kind set it and forget it.
Foods that can be cooked sous vide.
You can cook anything in this style. I mean anything. From stew to fruit and vegetables, to ribs, or pork shoulder (if you have a big enough bag), even fish and seafood.
Sous Vide Honey Garlic Spare Ribs
Now that we are all on the same page about what sous vide cooking is, let’s take a look at how to make sous vide honey garlic spare ribs. First up, the marinade.
Marinade
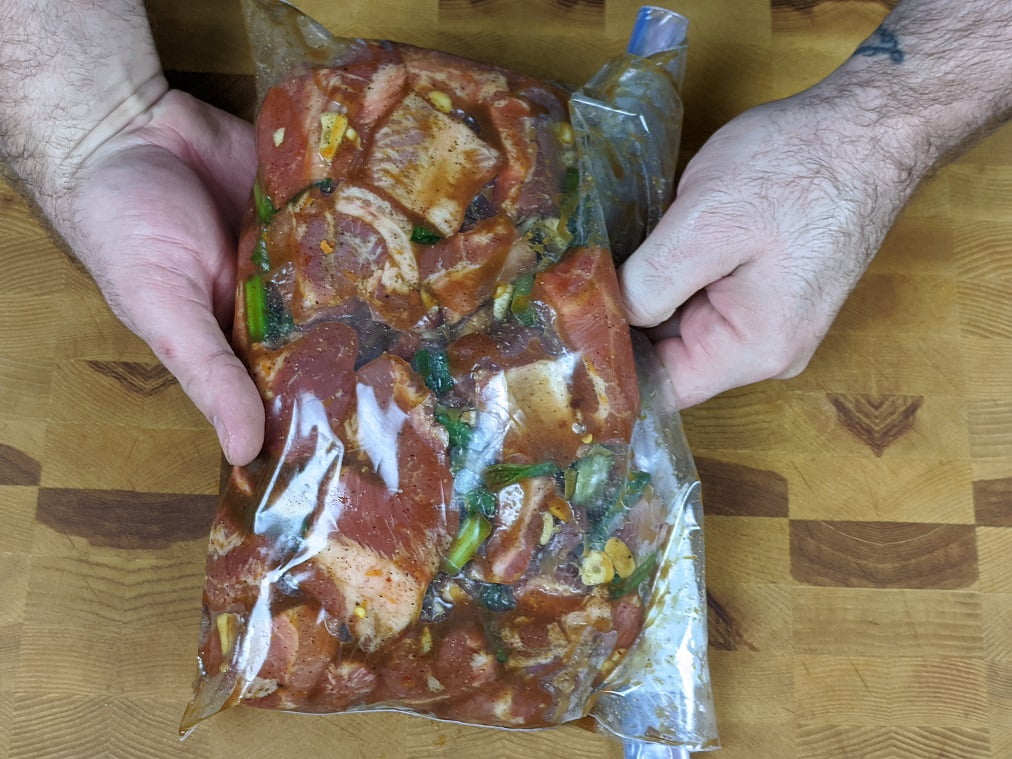
To make the marinade for the ribs I combined 1/4 cup soy sauce (gluten-free tamari), 1/4 cup honey, 2 tbsp rice vinegar (you can use white vinegar), 2 tbsp sesame oil, the juice and zest from one navel orange, 4 chopped green onions, 8 chopped cloves of garlic, 1 tbsp Chinese 5 Spice, 1/4 tsp chilli flakes, 1/2 tsp black pepper, and 1 tsp kosher salt.
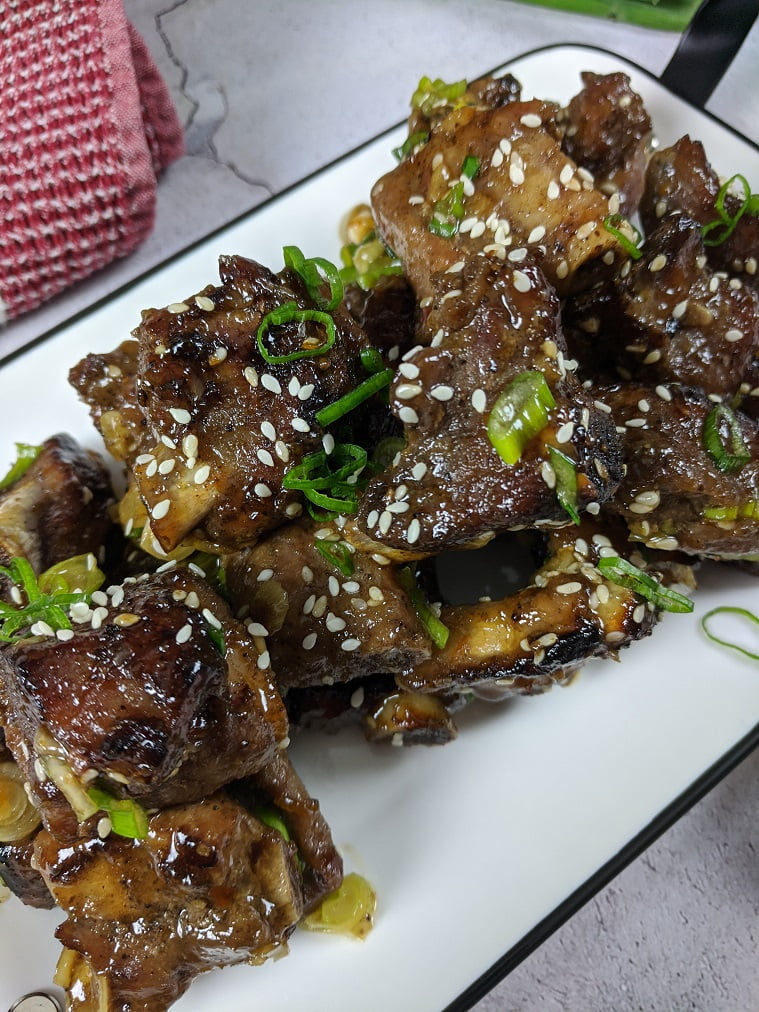
Ribs
The ribs I used are the really small cut spare ribs but you can use whatever you want. To prepare the ribs, I used a paper towel to pull the membrane off the underside. Then cut I cut the ribs between the bones to give myself a lot of little riblets. It was about 1.1 kg (2.5 lbs) in total.
Marinading the ribs
I added the ribs to the marinade, put them in a ziplock bag and let them sit in the fridge for two days. One day would have been fine but I got busy and didn’t have a chance to cook them one the first day.
Cooking the ribs
When it came time to cook the ribs, I took them out of the marinade, put them in a vacuum-sealed bag, sealed them and put them in the water heated to 167°F for 4 hours. I could have done this for a longer period of time on a lower heat, but I was hungry.
I also could have sealed the ribs with the marinade into the vacuum bag, but it could have gotten a bit messy. So, I opted to take them out of the marinade. They were very flavourful so I don’t feel like I lost anything.
Finishing the ribs
After 4 hours the ribs were just about done. They were tender and everything, one thing sous vide can’t do is brown, or add colour to foods. So, I heated the broiler on my oven, spread the ribs out on a sheet pan and broiled them for about eight minutes in total. This gave them a nice colour and a more complex flavour.
While the ribs were finishing in the oven I made a quick honey garlic sauce. I sauteed 4 cloves of garlic in 2 tsp of sesame oil. Next, I added in 2 tbsp of honey, 2 tbsp soy sauce, 2 tsp rice vinegar, and 1 tsp of corn starch mixed with 1 tbsp of water. I boiled this for about 2 minutes then poured it over the ribs. Finally, I added sesame seeds and green onions as garnish.
Conclusion
I am still very new to sous vide cooking. Prior to the last few weeks, I’ve only used the technique once or twice. This despite it having been around for the last decade. I’m really looking forward to playing around some more and seeing what I can come up with.
If you don’t have a sous vide circulator you can still make these ribs. Put the ribs, marinade, and 1-2 cups of water in a pot bring to a boil. Turn the heat down, and simmer the ribs until they are tender (about 1-2 hours). Take the ribs out of the cooking liquid and broil as described above.
Thank you for reading everyone and if you have any thoughts, questions, or comments I’d love to see them. Leave them in the comments section below.
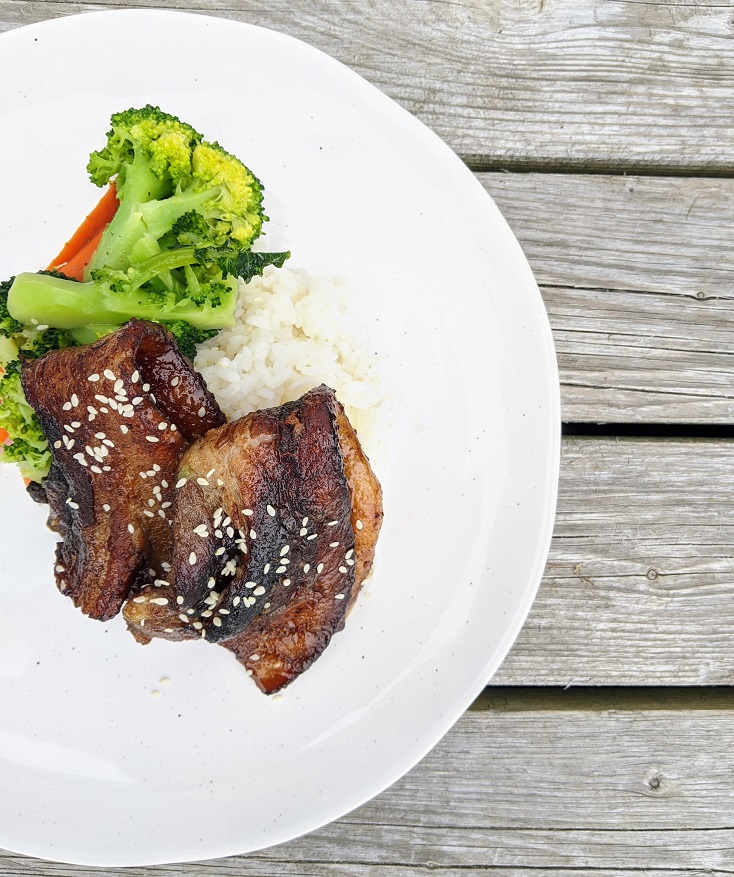
It was the year 2000, I was 15 years old and working for the summer in a mall Chinese Food place in Southern Ontario. Every day of the week there was a different special at the restaurant. It was my first Thursday working and so it was also the first time I was seeing the Thursday special. When I arrived at work the steam table was already set up and as my eyes scanned the all familiar pre-lunch mounds of fried rice, lo mein, sweet and sour pork, and beef and broccoli, something caught my eye. There, in the tray where the daily special always went, was a pile of bright red pieces of pork. I’d never seen anything like it. I asked what it was and the manager told me, “Chinese BBQ Pork”.
It wouldn’t be until years later that I’d realize what I was serving that day and subsequently had for lunch every Thursday that summer was Char Siu, aka Chinese BBQ Pork. A sweet, and incredibly flavourful pork dish that to this day is one of my strongest memories from that period of my life.
The recipe I’m going to share with you today isn’t the recipe from all those years ago in the mall Chinese Food place, and I’d be hard-pressed to call it authentic. But, it is delicious. And if you are looking for something different to do with a big chunk of pork, something that will keep you up at night with cravings, then this is it.
A note about the red colour.
The red colour of char siu generally comes from either red bean curd or red food colouring. The colour of mine comes from Korean Chili Powder. It is likely that char siu was originally cooked slowly over an open fire leading to a red smoke ring around the meat. It’s also possible that the red bean curd was added to mimic that natural red line. As nice as the red colour is, if you can’t find red bean curd or Korean Chili powder, I recommend just leaving it. It’s always best not to die your food with red food colouring if you can avoid it.
Char Siu Flavours
The main flavours of Char Siu are typically Chinese 5 spice, honey, soy sauce, rice wine, hoisin sauce, and red bean curd. To accommodate my issues with gluten and to use ingredients I already had on hand I changed the basic recipe a little bit, but we will get into that later.
The recipe I created is based on one I found online which seemed pretty good. You can check out the original here.
Okay, let’s take a look at what I did.
The Marinade
The secret to the incredible flavour of Char Siu is in the marinade which doubles as a basting liquid and even plays a thrid roll as a sauce later (once it has been boiled). Making the marinade is as easy as putting ingredients in a bowl and stirring them.
One of the main ingredients in Char Siu is typically Hoisin sauce. I have yet to find a good quality gluten-free version of this so I left it out of the recipe. If you are unfamiliar with Hoisin Sauce it is a sweet fermented soybean sauce with a base of flavours similar to Chinese 5 Spice. To make up for the lack of Hoisin I added miso paste (also made of fermented soybeans and also replacing the red bean curd which I didn’t have), extra soy sauce (made of fermented soybeans too), extra honey, and extra Chinese 5 Spice. The combination of all of these ingredients worked really well to replace the Hoisin Sauce to the point where I didn’t even notice it was missing.
I also didn’t have any rice wine so I used brandy instead. If you have white wine or sherry, those will work too.
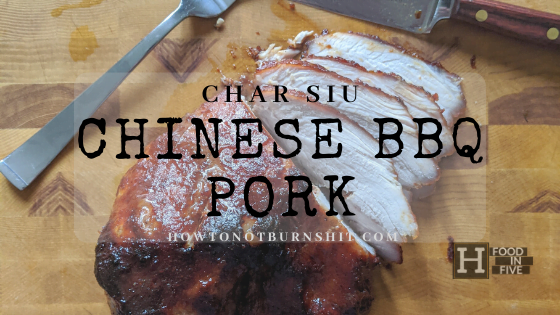
Char Siu Pork (Chinese BBQ Pork) Gluten-Free
A Gluten-Free Char Siu Pork or Chinese BBQ Pork Recipe That Will Leave You Wanting More.
Char Siu can be served sliced thin with rice and bok choy as I did, it can be served with noodles either stir-fried or in a soup, it can be used in fried rice, or eaten in steamed buns. Of course, you can do anything you want with your Char Siu. Pick it up with your hands and take a big bite out of it caveman style…okay I did this too.
The point here is that this delicious pork has a lot of uses, so go make it. Seriously, go make it. Your taste buds will thank you.
We use cookies on our website to give you the most relevant experience by remembering your preferences and repeat visits. By clicking “Accept”, you consent to the use of ALL the cookies.
This website uses cookies to improve your experience while you navigate through the website. Out of these, the cookies that are categorized as necessary are stored on your browser as they are essential for the working of basic functionalities of the website. We also use third-party cookies that help us analyze and understand how you use this website. These cookies will be stored in your browser only with your consent. You also have the option to opt-out of these cookies. But opting out of some of these cookies may affect your browsing experience.
Necessary cookies are absolutely essential for the website to function properly. This category only includes cookies that ensures basic functionalities and security features of the website. These cookies do not store any personal information.
Any cookies that may not be particularly necessary for the website to function and is used specifically to collect user personal data via analytics, ads, other embedded contents are termed as non-necessary cookies. It is mandatory to procure user consent prior to running these cookies on your website.